5 Figure Editor


The figure editor is where you design animated characters to put into Anim8or's scenes. The main difference between a figure and an ordinary object is that a figure contains a bone structure, or skeleton, that you use to bend and shape it in different poses. By setting the pose of a character in a few key frames of an animation, you can bring it to life. Anim8or will smoothly fill in all the in-between poses by bending the joints of the skeleton just the right amount. You can enter the figure editor at any time by selecting Mode->Figure in the menu.
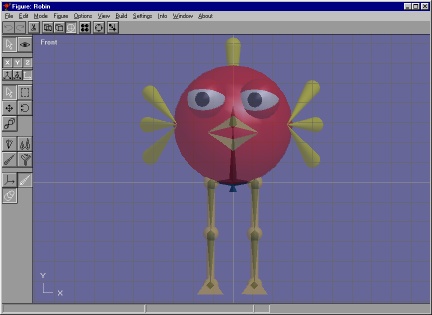
The basic screen is similar to the Object Editor and is shown below. You can also view multiple viewpoints simultaneously, as with the other editors.

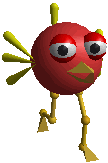
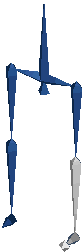
Notice the bones that are faintly visible inside of the character's body and legs. You can control the visibility of bones, your character's body parts, and other aspects to help with the design. This character doesn't have any particularly interesting bones in his body, but does have animatable legs and feet.

The figure editor has two modes: edit and viewpoint. You click on one of the icons to switch between these two modes.

Figure/Edit mode button. This is the initial mode that the figure editor starts in. You use it to do all of your character design.

Figure/Viewpoint mode allows you to pan, scale, rotate, and size-to-fit any or all of your views of your workspace.

Figure Basics

There are two different parts of that you make when building a figure: the body, which is all of the visible parts of your character that will appear in the final images, and the bones or skeleton which you use to pose and animate your character.
You will usually design all of your character's body parts in the Object Editor as different objects. When you add them to your character, you are only making a reference to the original object. This way you can add an object several times without increasing the size of your working files, and you can make changes to all the instances by editing a single object.

There are also a couple of "built in" shapes in the figure editor to help with preliminary design and motion tests. The "ball and stick" legs shown here are made from build in cylinders and balls.


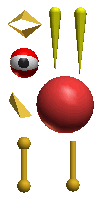
Once you have made your character's parts, you switch into the Figure Editor and build a skeleton. Starting at the initial root bone, you add bones one at a time to make the movable structure of your character. For example, if you want human like legs, you need to add a bone for each of the thigh, lower leg, and foot. You can give each joint it's own range of motion which makes animation a lot easier.
Once the skeleton is designed you can add the character's visible parts. You link each part to a specific bone, and when that bone moves, so does the body part. You can also move, scale and rotate each part individually within the coordinate space of its bone.


Figure/Edit Operations

You use the first group of buttons to select various parts of your character, and to place the visible parts on the bones in a similar manner to the same ones in the Object Editor.

You use this mode to select both your character's bones and body parts. As usual, you can use the right mouse to select additional things while keeping the original ones selected.

This button sets drag-select mode. You drag a rectangle on the screen and select all objects that fall within the final area. Again, using the right mouse button adds selections without deselecting any.

The next three buttons apply to the objects that you have attached to the skeleton, not to the bones themselves. You use this one to move an object around relative to the bone that it's attached to.

You can rotate objects with this button, and

scale objects with this one. You have to select an object before you can modify it.

You use the next set of buttons to edit the bones of your character's skeleton once it has been built.

This mode allows you to rotate your characters joints into their nominal position. This position defines the zero value for all rotations that this joint can perform. It is not the same as the default position of the joint, which is where the joint is when it's "relaxed", but is used to define the bone's coordinate system.

You use this button to change the length of a bone. When it is pushed, you can click on the end of a selected bone and stretch or shorten it with the mouse. You have to be sure that you click directly on the end of the bone or it will not change. You can also double click on a bone and set the length directly with a dialog box.

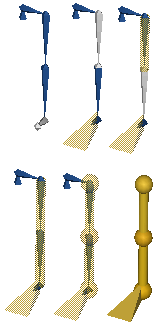
You use this mode to add new bones to a skeleton. To add a new connecting bone, you click on the end of a bone and drag to set the bone's length. It will always align in the same direction of its parent. So if you want it oriented in another direction, you must use the rotate button shown above.

Note: You have to click on the tip of the bone or nothing will happen. If you want to attach a new bone to the end of an unselected bone, click on the tip and it will become selected. Then click a second time on the tip, and drag until your new bone is the right length. You can also double click on a bone to bring up it's parameter dialog and set the length manually.

This button allows you to skin part or all of a skeleton with a single Object. Then when the joints of a bone bend the object deforms and bends seamlessly along with the skeleton. There is more detail on how to use this skinning tool later on.

You use the final group of buttons to control what is visible in the edit window. You may find it easier to manipulate your character's skeleton without its body getting in the way, or want to see the final, solid look without the bones showing. These controls will do just that.


You use these two buttons to toggle the visibility of bones and body parts. If both of them are enabled then your character's body will be shown in a sort of transparent view with the bones visible inside. You will find this indispensable when arranging your character's parts. If only one is enabled, the corresponding items are shown as solid objects.


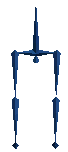
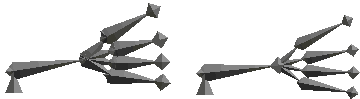
This shows a character with a simple skeleton. Only the legs have bones, so you could only animate the legs. The face would be frozen in that silly look unless you added additional bones to animate the eyes, wings, beak, etc.
 
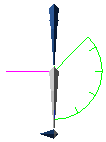
This button toggles a visible axis for any selected bones. It also shows you the range of movement for their joints.

Building a Skeleton

Each figure's skeleton starts with a root  bone. By adding child bones the root, and then to successive bones, you construct a skeleton one bone at a time. Each bone is owned by its parent, and any movement that the parent makes also moves all of its children.
When you add a bone it is aligned in the same direction as its parent. So you will normally have to rotate it to its proper orientation.
If you want to delete a bone, first select it and then choose Edit->Cut from the menu bar. This will delete the bone and all objects attached to it. Any lower bones will be moved up and attached to the deleted bone's parent.
If you want to insert a bone into your figure as well.  First select a bone and then use the Build->InsertBone command.  You can insert the new bone either as the parent or as the child of the selected bone.
This is a simple skeleton. It is made out of 9 bones plus the root. This skeleton is built with two symmetrical hips and legs. The lower two bones in the right leg are selected and shown is white.

The foot has an extra diamond visible on the end. This gives you an easier target to grab onto when you are manipulating the bone. The lower leg has one as well, but it is hidden inside the foot bone and isn't visible.


Flexible Joints

In Anim8or you decide which joints are flexible and which ones are frozen in a fixed position. By default they are all fixed. You add flexibility in the bone editor dialog that appears when you double click on a bone.

You control the rotation of a joint around each axis independently. Clicking on the "free" check box for an axis allows it to rotate around that axis. You can set the minimum, default, and maximum allowable angles as well.


Angle values are limited to values between -359 and 359 degrees with a maximum difference of 359 degrees.

 
You use the X and Z-axes to control the bending of a joint, and the Y-axis to twist around. Clicking the single "Locked" check box will prevent any changes to a bone's length or position in the basic skeleton. It's a good idea to lock your bones once you've got things set up. This prevents their accidental alteration. You can still change all the joint parameters, but since this is done in a dialog instead of with the mouse, it is less likely that you will do something accidentally. The "Lckd" check box for each axis is used when you are animating a character and doesn't apply to the figure editor.
If you check the "No Limits" box then you will be able to rotate the bone freely in that axis. This kind of joint is called a free or unconstrained joint because there are no restrictions on its position.
Working with a lot of small bones, such as in a hand, can create a confusing jumble of overlapping bones.  You can change the diameter use to show each bone in the Bone Editor by changing the value in the Dia. field to help clear up the view.


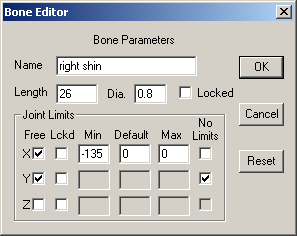
This is a side view of a skeleton. The show axis  button is set so you can see the joint rotation limits of any selected bones. The x-axis is shown in green the y-axis in blue and the z-axis in violet.
       
The bone selected here is the lower part of the right leg and forms the right knee. It can only bend in the x-axis and like a human knee can only bend backwards in this case a maximum of 135 degrees backwards.


Adding Body Parts

Once you have built a skeleton, you need to add the visible body parts that will appear in your final images. Each body part is an object that you add to a specific bone's local coordinate system. First select the bone that you want to add your object to, then use the Build->AddObject menu command to add it. Your object then behaves like that bone. When the bone rotates, so does the object.
 
You can also add simple cylinders and spheres. They aren't very sophisticated, they just look like sticks and balls, but they do allow you to do quick tests to see how your skeleton behaves. You add them using the Build->AddCylinder and Build->AddSphere menus.

You can change a few of the properties for these simple shapes as well. Double click on one to bring up it's property dialog, and use the Settings->Component->Material menu entry to set their color. These basic shapes are not as flexible as Objects that you build yourself. They have some fairly restrictive limits and aren't meant for any kind of final rendering. For finer control than this you need to build things in the Object Editor.


Skinning

In the previous section you've learned how to add an Object as the offspring of a specific bone. It follows all of its parent bone's movements, but remains a rigid, inflexible Object. This is what you want when making a robot. It's not exactly what a living human or animal does. You want them to be flexible, to change shape and bend along with their skeleton. This is exactly what Skinning does.
Once you've built an Object and a skeleton, you can attach your object to several bones at the same time with the Skinning tool. In this mode each bone has an area of influence that is strongest close to the bone and diminishes further away. Each point in an Object moves with each nearby bone proportionally to the strength of that bone's influence on it.

The bones two at the right show their ranges if influence. The inner yellow area is where the bone exerts maximum control. This does not mean that other bones can't also control points that fall within this region, just that the bone is a strong influence. The outer orange area is the limit of the bone's control. That bone does not affect points that lie beyond this boundary at all. The only exception is that if a point lies outside all bones' area of influence, it is simply controlled by its base bone, the one that it is initially attached to.


To skin an object you first attach it to a bone called its base bone. You should pick it carefully since only the base bone's descendants will be able to bend your object. Then enter Skinning mode by pressing the skinning button on the toolbar . Now select your object by clicking on it. This will enable skinning for your object and add it's base bone to its influence set those bones which can alter its shape. To add other bones simply click on them and confirm that you want to add them in the dialog that appears.
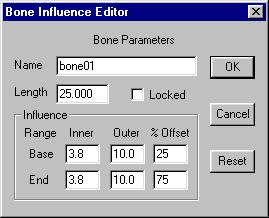
You can adjust the size of a bone's influence in two ways. You can double click on it and enter numeric values, or you can edit the influence regions directly on the screen.

You can set the size if the inner and outer range for each end of the bone. You can also set the position along the bone where they start and end as a percentage of the bone's length.

Changing sizes directly on the screen is often more effective but it can sometimes be tricky to do because things are often cluttered with several overlapping regions.


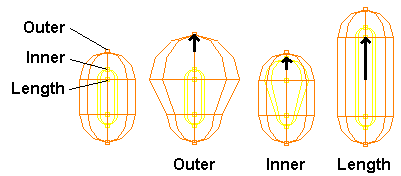
There are six control points on each bone, three at each end. If you turn off the visibility of both bones and objects by clicking on the buttons at the bottom of the toolbar you will get a clearer picture of what's there. You use the one at the tip of the orange area adjust the size of the outer region, and the one at the tip of the yellow area for the inner one. The inner yellow point adjusts the offset.

One final note: Don't attempt to adjust your bone's positions in the Figure Editor and expect to see your mesh bend! It doesn't work that way. You will only be adjusting the bone's position, and area of influence, relative to your object. You must go to the Sequence editor to start animating your character.

Now you're ready to go to the Sequence Editor to make some animated sequences. Then on to the Scene Editor for your final movie!


This page was last updated on August 9, 2003
Copyright 2003 R. Steven Glanville