3D Cursor - To be able to work in three dimensions it must be possible to specify a point in space where your tools do their work and the actions take effect. A two dimensional computer screen is one dimension short therefore in addition to the normal mouse pointer a second "Cursor" is provided. This cursor can be placed anywhere in 3D space by dragging it (with the mouse pointer) in one, two or three of the Working-Volume view windows.
Actor - An Actor is the term used for each directable element in the Animator. An Actor is given a costume, the costume is implied by the type of Actor and costumes can change from frame to frame. An Actor on the other hand is constant throughout the animation. There are 12 types of Actors. The most important of which is the "Model". A Model Actor uses models from the Designer module as its costumes. Models are stored in files with the name extension .MFX.
Actor's track - The track of an Actor is an implied path that the Actor will follow throughout the whole animation. A track will only be visible if the Actor has at least two contiguous movement timelines.
Active Window - The Active Window is the Working-Volume view window with input focus. It is highlighted by being surrounded with a focus rectangle. When the multi-views are visible pressing the Tab key activates the the next window in a cycle. Clicking the mouse in any view window activates it.
Center Point - Each Model has a point which is used in the Animator to "hold" the model. For example if a model of an aircraft is following a path then the point in the model that is exactly on the path is the Center Point. For an aircraft it should be the center of gravity.
Timeline - To direct the activity of an Actor during an animation requires the use of four timelines, one each for costume, movement, rotation, and scale. A timelinel spans a number of frames and has a Keyframe associated with it. The Keyframe is the frame in which the action of the Actor is exactly exactly specified, other frames spanned by the timeline have the action of the Actor determined by interpolation.
The Keyframe is always the last frame in the timeline. A timeline therefore is a range of frames where an action of the Actor is determined from the details specified in the Keyframe at the end of that timeline.
TImeline Span - A Timeline spans the current frame if the first frame in the timeline is less than or equal to the current frame and if the last frame in the timeline is greater than or equal to the current frame.
Costume - To be visible in an animation an Actor must wear a costume. The type of Actor dictates what sort of costume an Actor can wear, but Actors may change their costume during an animation.
Current Frame - The current frame is the frame in the animation that is displayed in the view windows and in which any changes take effect.
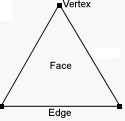
Curve - A set of vertices connected together by edges without forming any faces. Curves may be open or closed.
Edge - A line segment connecting two vertices (the plural of vertex).
| Face - A triangular surface area composed of three edges joining exactly three vertices. |  |
Follow Point - A location (specified in the Designer module) in a model which other Actors can follow.
Example: The tail rotor of a helicopter can be simulated by making models of the fuselage and rotor, setting the fuselage follow point at the axis of the tail rotor and then instructing the tail rotor to follow the fuselage.
Frame - Like a conventional cinematic film an animation is build up from a large number of still pictures (images) shown for approximately 1/24th sec. Each of these pictures is called a frame.
Gourand Shading - A rendering algorithm that shades models smoothly by blending and blurring adjacent surfaces together. Gourand shading is the rendering method used by the OpenGL Shaded Camera View.
Image Map - An Image Map is a picture in a GIF or TGA file that is painted on to faces in the model to add decals or other surface detail.
Indicate - To choose one particular vertex, edge, face, or connected part of a model to be affected by an operation by placing the 3D Cursor on or very near it (within one or two pixels). If more than one vertex, edge, face, or part of model is indicated in the current Working-Volume view window, then the one closest to the 3D Cursor in the other Views will be used.
Keyframe - A Keyframe is a frame in which some information is specified about the activity of an Actor. It always occurs at the end of a timeline. The action of the Actor in other frames spanned by the timeline is determined by interpolation.
Model - A model is the main unit of structure. A model is made up of faces and each face is bounded by three edges. The size, position and orientation of a face is determined by the vertices that define it.
Modifier Keys - The Shift, Ctrl and Alt keys are used to modify the action of the Designer tools. If one or other is held down as the tool is used then the action of the tool is modified in some manner.
Morphing - Enables one model to gradually change shape into another model.
Node - A node is a point on a path or robot that can be manipulated. Represented by a small square on the path or the robot.
Origin - The default origin is coordinate values of (0, 0, 0).
Path - A Curve that used in the animator as templates for Path Actors (.PTH) and may be used in the Designer as paths for the Extrude along function.
Phong Shading - A rendering algorithm that shades models smoothly and accurately depicts surfaces, textures, and reflective properties (such as specularity) and can simulate mirror reflections. The Renderer uses Phong rendering by default unless ray tracing is enabled.
Phong Smoothing - This is a procedure that helps to remove the faceted appearance from the curved surfaces of models.
Ray Tracing - A complex rendering method that accurately renders mirror effects, transparency, shadows, and refraction (bending of light through clear surfaces). Ray tracing is the most realistic rendering available but is also the most time consuming.
Selection Status - Each vertex in a model can be in one of three states, Selected, Deselected or Hidden. Selected vertices are manipulated with Tools and Actions. Deselected Vertices are not affected by tools or actions even if connected to selected vertices. Hidden vertices are never drawn but remain as part of the model until revealed.
Texture - A texture is an algorithmic procedure that can add fine detail to the appearance of surfaces in the model. Examples are Wood and Marble finishes.
Skeleton - The Skeleton and the Names Hierarchy are one and the same thing. The Skeleton in addition to facilitating a hierarchical naming system for set of vertices provides a way of deforming parts of the model.
Skeleton Joint - The Skeleton is made up from a number of Joints, each Joint has a "long bone" associated to it and a "node" at one end. Each bone is attached to one other Joint at it's node or the "Root node".
Specular Highlight - Shininess is simulated by what is known as a specular highlight. Basically, the more shiny a surface the smaller the specular highlight. For example, plastic material has a less shiny appearance than tin, so a plastic bottle will have a larger specular highlight than a tin can.
Vertex - A distinct point in 3D space represented by a yellow dot if selected or a purple dot if deselected.
Working-Volume - The Working-Volume is a cubic volume of space which is used as the working environment for building models and setting up animations. It can be moved around and changed in size so that details on a model can be constructed without having the screen cluttered up by every vertex and edge in the whole model in view at all times. The three right angle view windows are views into the Working-Volume, normally they are a Top view which looks down, a Side view and a view from the front or rear.