Backing up files, like checking for computer viruses is something that every personal computer owner should routinely perform, but often neglect until it is too late. Every computer should have an automated backup system that is easy to use…and yet they do not. Windows ships with the Microsoft backup program. It has a nice interface, but is not widely used for one primary reason: it cannot be scheduled nor can command line parameters be passed in from a scheduling agent.
TaskZip is a system agent that will automatically archive specified files and folders into a single zip file (pkzip compatible format). You can backup across a network, from computer to computer, or even to a zip or jaz drive (note that disk spanning not supported at this time). You can create and schedule an unlimited number of backup jobs, each containing as many folders or files as you want. TaskZip has a simple, step-by-step wizard to guide you through selecting files/folders, backup locations, and backup scheduling. The program's scheduler can run backups at any time, and you can set recurring schedules for running daily, weekly, or monthly backups. For each backup job, you can even maintain up to 99 older (grandfather) backup copies of each zip archive file.
You can password protect the zip file archives. When data loss occurs, you can highlight a backup job and with the click of a button, bring up your default windows zip shell (Winzip, Enzip, Freezip, etc.) to restore the corrupt files. You can also forego compression and just backup files and folders directly.
This help file is arranged in an easy to follow layout that follows the application’s features. To minimize the download size, screenshot gifs are used sparingly and where appropriate.
TaskZip requires the following items:
• Windows 95/98 (Windows NT4 or later should also work)
• Should have at least 16MB of RAM, but can get by with less
• Should have a Pentium or better, but a 486 will work
• For restoring parts of a backed up zip file, you should have one of the following zip shells:
|
(1) Winzip |
|
|
(2) EnZip |
|
|
(3) Freezip |
|
|
(4) Easyzip |
http://freehosting2.at.webjump.com/1be87d53c/ea/easyzip-webjump/ |
|
(5) Zip Central |
INSTALLING AND RUNNING THE APPLICATION
INSTALLATION
This application uses a common setup engine to install the following files:
• TaskZip.exe
• Zip.exe
• TaskZip_Help.htm
• Several Image.jpg files.
The setup utility will build a program group off of your Start button, and place a shortcut in your startup group so that every time your system is re-booted, TaskZip is set to automatically run and maintain backups. The setup utility will build an uninstall program as a physical file (unwise.exe) in the target application directory (or you can use the control panel Add/Remove Programs dialog). Kudos to the freeware Zip.exe file by the Info-Zip group (simpler sibling engine to the dll that Winzip and Dynazip use -- http://www.cdrom.com/pub/infozip/).
RUNNING APPLICATION
TaskZip will automatically setup a shortcut in your startup folder so that every time you reboot, TaskZip will be automatically run. A reboot is forced once installation is complete, so TaskZip will automatically run. If you have shutdown TaskZip, you can always go to the Start|Programs|TaskZip folder to select and run TaskZip manually.
USING TASKZIP
INITIAL RUN SETUP
When you run TaskZip, it will silently popup in the system tray near the system clock at the lower right corner of your screen:
![]()
Figure 1 – System Tray Icon for TaskZip
SCHEDULED BACKUP JOBS
When you first run TaskZip, it has no backup jobs defined. You will need to define backup jobs to execute. By clicking the TaskZip icon in the system tray (Figure 1 above), a popup menu will appear. You can either select "Exit TaskZip" to shut it down, or "Schedule Backup Jobs" to bring up the Scheduled Backup Jobs dialog box. Select the latter:
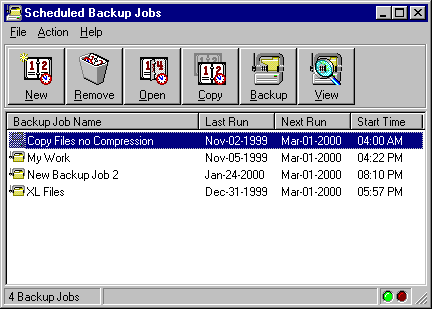
Figure 2 – Scheduled Backup Jobs Dialog
During the initial run, the table is empty because no jobs have been created. The toolbar buttons have the following functionality:
• New: Add a new backup job for TaskZip to process. The number of backup jobs you can add is limited only by the size of your harddrive (how many .tzp files you can store).
• Remove: Will remove the currently highlighted backup jobs. You will be prompted to confirm the deletion you are about to make.
• Open: Will open an existing backup job whose properties you can alter.
• Copy: Will copy the highlighted backup job to a new backup job prefixed with "Copy Of ". It will then open up the new "Copy Of " backup job for editing.
• Backup: Will execute the backup job that is currently highlighted. Will not alter the date of last run, or date of next run field values.
• View: Will load the currently highlighted backup job into your default windows zip compression utility (e.g.: WinZip). If you do not have a zip utility installed, try the freeware product "FreeZip" located at the url listed in the Requirements section; or if you can spend a little money use the best of the best – Winzip.
The File menu bar has the following functions:
• Close: Will close the Scheduled Backup Jobs Dialog, leaving the tray icon running. Note: to close the tray icon, right click it, and select Exit TaskZip from the popup menu.
The Action menu bar has all the functions available in the toolbar above, plus the following functions:
• View Transaction Log File: Will load the transaction log into Notepad.exe. The transaction log lists every folder or file that is copied (can be multiple folders or files inside every backup job). Any failures encountered during the archival process will be noted directly after the file or folder that failed in this log.
• View Error Log File: Will load the error log into Notepad.exe. The error log differs from the transaction log in that it contains only errors, and it includes very detailed error diagnostics including the error number and description, the module and function in which the error occurred, etc.
The Help menu bar contains several functions to assist users:
• Contents: Will load this HTML help file for you to peruse.
• License Agreement: Will popup a message box indicating that this product is freeware and can be freely distributed.
• TaskZip Homepage: Will load your default browser and set the url to TaskZip’s homepage. You can download TaskZip, download other freeware/shareware, look at the download/VB/Access links, etc. from this website.
• About: Will popup the About dialog box indicating version and build number, copyright information, license information, etc.
The list view box at the lower half of the screen lists every backup job you have built. (Note that these backup jobs are each saved as an .tzp file in the "BackupJobs" subdirectory off of your TaskZip application directory.) The fields in the list view are as follows:
• Backup Job Type Icon: The first element on the far left of the list view is an icon. There are two possible icons that can be displayed (as shown above in figure 2). One icon represents a backup job using zip compression to squeeze all of the selected files and folders down into a single zip file. The other icon represents a backup job using no compression, just performing a straight file copy of the files and folders selected.
• ID: This is the automatically assigned backup job ID number.
• Backup Job Name: This is the name of the backup job you assigned when you built the job (step 1).
• Last Run Date: This is the date in which the backup job was last run (if never, then defaults to today).
• Next Run Date: This is the date that the backup job is next scheduled to run based upon the days of week, frequency, day of month, etc.
• Time: This is the time of day that the backup job is scheduled to run.
BACKUP JOB DEFINITION WIZARD
When you first popup the Scheduled Backup Jobs Dialog (figure 2 above), it contains no backup jobs. The first thing you should do is create a new backup job by clicking the New button. That will bring up step 1 of a 4 step Wizard shown below. Step 1 prompts you for a backup job name. You can use any alpha or numeric characters for the backup job name.
Be forewarned that the output zip filename is derived from a condensed (spaces removed) and scrubbed (symbols removed) version of the name you enter here. Therefore, it is not suggested, but you can use hyphens, tildes, and other symbols in the name. You can also exceed 8 characters for a name. However, if TaskZip is having any problems saving or opening .tzp files, then I would urge you to try the following naming convention modifications:
1) Limit to 8 characters if using Novell.
2) Remove the following (and similar) characters: `~!@#$%^&*()_+=-:;’"/?.>,<.
3) Be sure that the name is unique from other backup jobs (esp. after strip and scrub).
4) Be sure not to start backup job names with a number.
Also note that when zip files store the source path information, they do not save the drive name. This is important when you go to restore archived files en masse after a hard drive crash, and you have hundreds of paths. If you can not easily distinguish which folders go on which drive, then you are better off creating separate backup jobs for the separate drives.
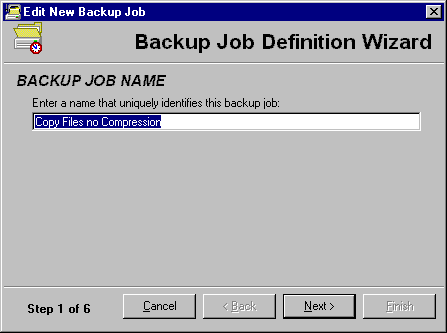
Figure 3 – Backup Job Definition Wizard, Step 1
Once you have entered a name, click the Next button to proceed to step 2. This step will prompt you for scheduling information. The fields are as follows:
• Start Time: This is the time of day that you want the backup job to occur on. The proper entry format is "hour : minute" and then "AM" or "PM". You can enter other variations of date too such as military time "14:00", or use only an "A" or a "P" or use lower case "a", etc.
• Frequency: This is the rate at which the backup job will be repeated: daily, weekly, or monthly. Daily and weekly are identical in that the days you check below are repeated every week. Monthly will produce a drop-down box containing the 1st – 28th day of the month on which backup jobs can be repeated.
• Monday-Sunday: These checkboxes represent what day(s) of the week you want the backup job to recur on. For a frequency of daily, the default values are all days of the week except Sunday checked. For a frequency of weekly, the default value is only Sunday checked. Note that these checkboxes are not visible if a frequency of "monthly" is selected.
• Day of Month: If the frequency is set to monthly, then this drop down box will be visible. It prompts you for the one day of the month on which you want the backup job to occur. You are limited to days 1 –28 (I took the coding shortcut to prevent special code for handling the variations in month length—28 for February, and 30 or 31 for other months).
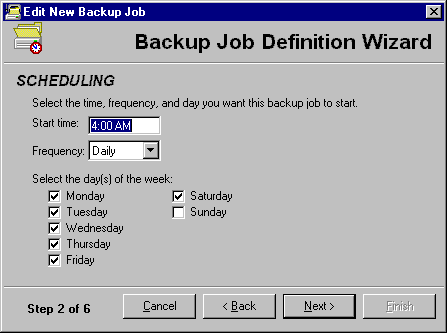
Figure 4 – Backup Job Definition Wizard, Step 2
Once you are satisfied with the schedule, click the Next button to proceed on to step 3 where you select the source files and folders (input).
• File Specifications: This list box contains all of the files and wildcard specs that you select for backup. Each file or wildcard spec is given a single line in the list box.
• Add: This button will popup a dialog box in which you can select multiple files or build a wildcard spec to backup. The wildcard spec can be one of two options: *.* for all files, or *.ext where you specify the extension name.
• Remove: This button will delete the currently highlighted files/wildcard specs in the File Specifications listbox.
• Include Subdirectories: When checked, this checkbox forces all subdirectories below the selected directory to also be backed up. This is a very important item.
• Drag-n-Drop: Click this button to popup Windows Explorer. Drag and drop mutliple files and folders from Explorer directly into the Source Files / Folders listbox to speed up your file selection process.
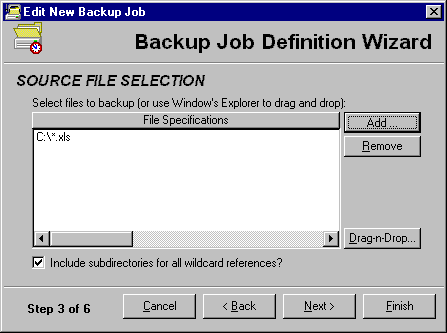
Figure 5 – Backup Job Definition Wizard, Step 3
When you click the Add button, the dialog box below will popup. You can use this dialog to select multiple files and add them to the backup job as shown in Figure 6.
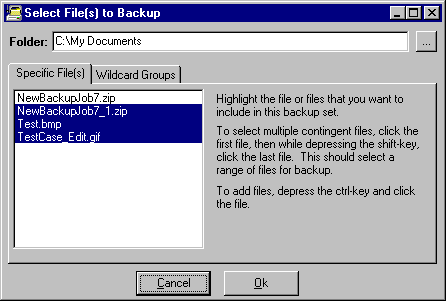
Figure 6 – Backup Job Specific File Selection
You can also specify a wildcard list to backup from a directory (and its subdirectory). Click the "Wildcard Groups" tab on the Select File(s) to Backup tab. Note (in Figure 7) that you can select all files (*.*), select a specific extension from the common extensions drop down box, or type in an extension into the text box (other extension).
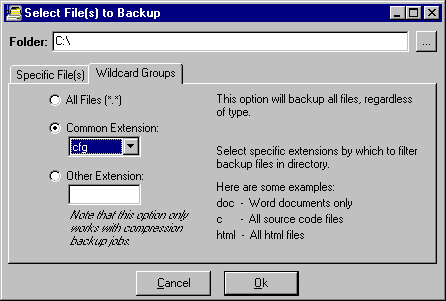
Figure 7 – Backup Job Wildcard Specification File Selection
Once you have selected all of the source files and folders, you can click Next to proceed to the fourth step where you will find the target directory for the zip file (output).
• Target Directory: This text box and accompanying browse button are used to specify the target directory into which the recurring zip file backup will be placed. If compression (step 4) is not selected, then this is the target directory into which all of the source files will be copied. The name of the zip file placed into this directory will be a scrubbed (of symbols) and stripped (of spaces) version of the backup job name entered in step 1 above.
• Browse: This button will load up the browse dialog box for you to select the target location for either the archive zip file, or the archive multiple files/folders copied directly.
• Explorer: This button will fire up the Windows Explorer, pointing either to the target directory if one is entered, or to the application directory. You can use this button to easily conduct file operations such as adding new directories, deleting files/directories, etc.
Note that there are web vendors on the internet (such as http://www.xdrive.com) that provide free hard drive space accessible through the web (ftp). As long as you can go into Windows Explorer (not IE) and map a drive to that ftp location (typically using downloaded client-side software from the web vendor), then you can assign the target directory to that remote drive, and save your files offsite. Now, I have not done this, however, it is theoretically possible. It is also the work-around until I get a chance to "wire-in" some ftp functionality.

Figure 8 – Backup Job Definition Wizard, Step 4
After you have selected all files to backup, you can click Next to proceed to the fifth step. This step permits you to select the type of backup job this will be: Full Backup or Incremental Backup. A Full Backup will archive every file in the backup set. An Incremental Backup will only backup files whose date/time has changed since the date of last backup.
Typically, you should just use the default Full Backup option. However, numerous users requested that we add an Incremental Backup feature to reduce network traffic and storage requirements on really large backup sets; so we built the feature. However, if you need to use an Incremental Backup, here are the steps to do so:
Note that there are a few limitations of the incremental backup. One is that you must set the time of the Incremental Backup schedule to very late in the day (zip.exe only checks dates, not times). Another limitation of Incremental Backups is that they only work with compression. The final limitation is that files you copy or move into a directory that retain an older file date/time stamp WILL NOT be recognized as recent modifications; and thus will not be incrementally backed up.
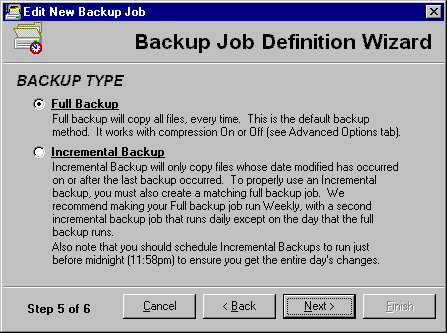
Figure 9 – Backup Job Definition Wizard, Step 5
Once you have selected a backup type, you can click Next to jump to the final step. This step contains advanced options for your backup:
• No Compression: When checked, all source files and folders are copied directly (mirrored) to the target directory as is (no compression). There are reasons why you may not want to compress: copy files directly to be picked up by some polling agent, copy zip files from one archive to a second tier archive, etc.
• Zip Compression: Zip Compression is the default selected. When checked, all source files and folders are compressed into a single .zip file and stored in the target directory under the name of the backup job. Typically users will want to compress the backup output to save space, keep archives organized, etc.
• Number Previous Copies: This option is only available if the Compress Data checkbox is checked. It allows for between 1 to 12 copies of previous zip file backups to be retained and stamped with the prefix "_n" before the ".zip" where n is the number 1 to 12. These copies give you additional safety in cases where you are unaware of a files corruption and you need to restore it after several "bad" backups have been made (just go back several versions and restore from an old backup).
• Password Protect: This option is only available if the Compress Data checkbox is checked. It enables a zip archive to have all files password protected. Users can still open the zip file in their favorite zip shell (e.g. Winzip); however, they must enter the correct password (that you entered here in TaskZip Backup Job Definition Wizard, Step 4) to access the files.
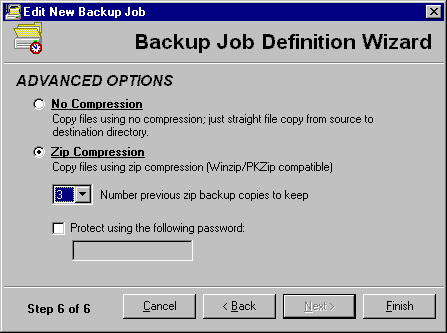
Figure 10 – Backup Job Definition Wizard, Step 6
TaskZip has the ability to store a user’s preferences. These preferences are saved into a file called ‘TaskZip.txt’ and is stored in the application directory. Currently there are two preference settings that are saved:
• Maximum # Backup Copies: You can select a numeric value from 1-99 from this drop-down box. The value you select will be the default range automatically placed into the Backup Job Definition Wizard’s ‘Number Backup Copies’ drop down.
• Stop Auto Backups On Error: Occasionally, users will encounter situations where backup errors occur (user’s machine is turned off for the night accidentally, machine name changed, etc.). When these errors occur, you have one of two options: silently log the error and proceed on, or log the error and popup a message box, halting further processing until an operator confirms the error message (clicks Ok). Selecting ‘No’ at this drop-down on the dialog below will silently log the error; whereas selecting ‘Yes’ will halt other backup jobs until you confirm.
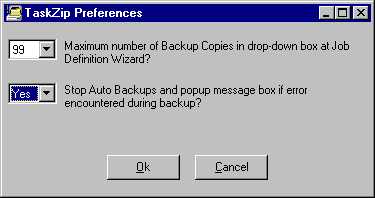
Figure 11 – TaskZip Preferences Dialog
SUGGESTIONS AND BUGS
If you encounter bugs or just have good suggestions, please email them to me. I value all input as it will improve the product in future releases.
My email address is:
taskzip@pb-sys.com
My website containing additional tools is located at:
http://www.pb-sys.com/
SOURCE CODE
You can download the source code by clicking the Download Source Code button on the Help | About dialog.
There are a few stipulations that I will request in exchange for the source code:
1) Leave the application name the same.
2) Leave PBSystems as the author’s website (although you can add your name and website to the About box and help file).
3) Do not charge a fee for the modified application, distribute it for free (unless there are reasonable costs associated with distributing it).
TZP FILES
TaskZip stores backup job schedule information in .tzp files in a subfolder titled "BackupJobs" off of the main TaskZip folder. These files can be opened with Notepad or any other text editor. Every field is stored on a separate line. The field values are as follows (row by row): Backup Job Name, Last Date Run, Scheduled Time, Frequency (1-Daily, 2-Weekly, 3-Monthly), Day of Week (2^n OR’d where n=1/2/3/4/5/6/7 for day of week), Day of Month (1-28), Use Compression (True/False), Number Copies Compressed Files to Keep, Password (blank for not use), Include Subdirectoris (True/False), Incremental Backup (True/False), Zip File Directory, and all subsequent files and folders are the source files/folders to be backed up.
In the near future, these will be re-written as ini file format (although they will retain the .tzp extension). This modification will make it easier to add or change properties than using a sequentially built file.
INFO-ZIP COMPRESSION ENGINE
The zip compression engine is the zip.exe file taken from the Info-Zip Group’s webpage (http://www.cdrom.com/pub/infozip/). These guys did a wonderful job of building a zip engine—as well as unzip engine and other components. I could not use their zip.dll because at this time it is only callable from C++ (not VB which TaskZip is written in). Thus, I had to resort to silently shelling out to run the zip engine. If you want to see the license agreement, just popup a DOS command shell window, goto the TaskZip directory, and run zip.exe with –L parameter (for show license). Using this freeware engine saved me from having to purchase a copy of Dynazip (or other VB-Addin); and you may find it handy too. A gentlemen emailed me with additional free zip utilities that I will be reviewing in the near future. These utilities come in the form of a dll callable by Visual Basic rather than an executable that must be shelled to (e.g.: zip.exe). Using one of these dll’s may overcome some of TaskZip’s current shortcomings such as lack of support for full wildcards (?, *, file spec fragments, etc.).
LICENSE
TASKZIP END USER LICENSE AGREEMENT
Use of TaskZip (hereinafter 'SOFTWARE') is contingent on your agreement to the following terms:
1. GRANT OF LICENSE
Pierce Business Systems (hereinafter PBSys) grants you a limited non-exclusive license to use the SOFTWARE free of charge.
If you are using the SOFTWARE free of charge under the terms of this Agreement, you are not entitled to any support whatsoever; however, you can try and email us…I will most likely respond unless am too busy, or the answer is in the FAQ on the website.
2. DISCLAIMER OF WARRANTY
THE SOFTWARE IS PROVIDED AS IS WITHOUT WARRANTY OF ANY KIND. TO THE MAXIMUM EXTENT PERMITTED BY APPLICABLE LAW, PBSYS FURTHER DISCLAIMS ALL WARRANTIES, INCLUDING WITHOUT LIMITATION ANY IMPLIED WARRANTIES OF MERCHANTABILITY, FITNESS FOR A PARTICULAR PURPOSE, AND NONINFRINGEMENT. THE ENTIRE RISK ARISING OUT OF THE USE OR PERFORMANCE OF THE PRODUCT AND DOCUMENTATION REMAINS WITH RECIPIENT. TO THE MAXIMUM EXTENT PERMITTED BY APPLICABLE LAW, IN NO EVENT SHALL PBSYS BE LIABLE FOR ANY CONSEQUENTIAL, INCIDENTAL, DIRECT, INDIRECT, SPECIAL, PUNITIVE, OR OTHER DAMAGES WHATSOEVER (INCLUDING, WITHOUT LIMITATION, DAMAGES FOR LOSS OF BUSINESS PROFITS, BUSINESS INTERRUPTION, LOSS OF BUSINESS INFORMATION, OR OTHER PECUNIARY LOSS) ARISING OUT OF THIS AGREEMENT OR THE USE OF OR INABILITY TO USE THE PRODUCT, EVEN IF PBSYS HAS BEEN ADVISED OF THE POSSIBILITY OF SUCH DAMAGES.
3. SCOPE OF GRANT
You may not reverse engineer, de-compile or disassemble the SOFTWARE. PBSys shall retain title and all ownership rights to the SOFTWARE.
For that software which includes the source code, this paragraph applies: you may modify the source code for yourself, your organization, or other users who would benefit by your modifications. However, you are not permitted to distribute the modified software for profit. The intent of this clause is to permit you to make any modifications you need to use the software; but to also preclude unethical people from slightly altering the code and then re-distributing the application as their own.
4. COPYRIGHT
This SOFTWARE is protected by copyright laws and international copyright treaties, as well as other intellectual property laws and treaties.
5. MAINTENANCE
PBSys is not obligated to provide maintenance or updates for the SOFTWARE. However, any maintenance or updates provided by PBSys shall be covered by this Agreement.
6. DISTRIBUTION
The SOFTWARE may be freely distributed provided that the PBSys website links and support mail addresses remain unchanged inside the application, and provided that no fee is charged (except for any reasonable fees necessary to cover costs of distribution media). The only exception is listed in item 3 above, or via email consent of the author (which he will grant for reasons such as localization to non-english languages, etc.)
THIS SOFTWARE AND THE ACCOMPANYING FILES ARE PROVIDED "AS IS" AND WITHOUT WARRANTIES OF ANY KIND WHETHER EXPRESSED OR IMPLIED.
In no event shall the author be held liable for any damages whatsoever, including without limitation, damages for loss of business profits, business interruption, loss of business information, or any other loss arising from the use or inability to use the software.