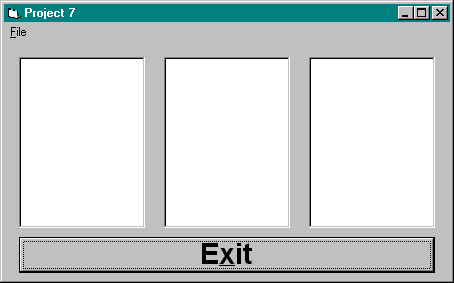
For your eighth Visual Basic project, you will create a program that displays 3 Textboxes and an Exit Button. To prevent the user from typing in the Textboxes, the Enabled property of each Textbox will be set to False. A Menu with the following structure will allow the user to choose the background color of each Textbox. A check mark will appear on the Menu next to the color that has been selected, and the corresponding Textbox’s background color will change to that color. Suggested Names (use them!) for the menu items follow the Caption names.
| Level 1 Caption |
Level 2 Caption |
Level 3 Caption |
Suggested Name |
| &File | mnuFile | ||
| Box &1 | mnuBox1 | ||
| &White | mnuB1White | ||
| &Red | mnuB1Red | ||
| &Blue | mnuB1Blue | ||
| &Purple | mnuB1Purple | ||
| Box &2 | mnuBox2 | ||
| &White | mnuB2White | ||
| &Red | mnuB2Red | ||
| &Blue | mnuB2Blue | ||
| &Purple | mnuB2Purple | ||
| Box &3 | mnuBox3 | ||
| &White | mnuB3White | ||
| &Red | mnuB3Red | ||
| &Blue | mnuB3Blue | ||
| &Purple | mnuB3Purple | ||
| — | mnuBrk (a single hyphen) | ||
| E&xit | mnuExit |
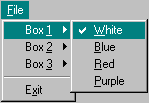
When completed, the menu should resemble the illustration above.
Each Box menu item (Box 1, Box 2, Box 3) will have a sub-menu, with four color choices. A check mark next to the color choice indicates which color is currently in effect.
Begin with a blank form (Choose New Project under the File menu. Make the project type: Standard) and press the F4 key to view the form’s properties—if they are not already displayed.
- Change the form’s Caption property to Project 8
- Change the default Name of the form (form1) to frmProj8
Select Project1 Properties on the Project dropdown menu. Make sure the General tab is selected and set the options described in the next bullet.
In the Startup Object combobox make sure frmProj8 is selected (it should be by default). In the Project Name textbox type Project8. In the Project Description textbox type the following: Using a menu tree to change the backcolor of 3 different Textboxes. Leave all other settings at their defaults and click the OK button.
- Pull down the File menu and choose Save Project. Save the form as: frmProj8.frm. Save the project as project8.vbp.
Use this illustration as a guide and add the 3 Textboxes and an Exit Button as shown:
No Properties/Procedures Table is provided for this project. Please use the Naming Conventions for your Controls and Variables that we have followed so far in this class. I suggest txtBox1, txtBox2, and txtBox3 for the 3 Textboxes.
Use the Menu Editor (On the Tools dropdown menu, or the Menu Editor button on the toolbar). Note: to use the Menu Editor, you must be in Object View and the Form must be selected. Once you get into the Menu Editor window:
- Use the structure illustrated on the first page to guide you.
- For the Name property, use the names I suggested (in the last column following the Caption names).
- The Caption property is the name that will appear on the menu. The addition of an ampersand (&) in front of a character in a Caption underlines that character and makes it a hot key (i.e. Pressing Alt+F selects the File menu, then just by typing 1, 2, or 3 you can select Box 1, Box 2, or Box 3, etc.)
- Set the checked property of the White menu items in each of Box sub-menus to on by default (click the checked check box in the menu editor).
- Leave the other menu setting options at their defaults. You can experiment. Remember, you can fix it if it doesn’t come out right the first time.
Here’s how you do it
To set the BackColor property of the Textboxes, use the QBColor function (get Visual Basic help on this function). QBColor requires only one parameter—a numeric color code. These numbers represent these colors:
WHITE = 15
BLUE = 9
RED = 12
PURPLE = 13An example of the QBColor command would look like this:
txtBox1.BackColor = QBColor(9)
The 9 being passed to the QBColor function means Blue. But if you didn’t know that 9 stands for Blue this could be an ambiguous command. It would be clearer if the command looked like this instead:
txtBox1.BackColor = QBColor(BLUE)
Using the descriptive name BLUE is the way to go. Here the constant BLUE must be assigned the value 9 which is the numeric code for the color blue. To define a set of constants for the four colors that you are going to use, add the following lines to the General Declarations section of the Form (declaring a variable as a Const means that its value cannot be changed—it has a constant value as assigned in its declaration). Constants are traditionally designated with upper case (Capital) letters, so that it is easy to spot them in your code, please adhere to that convention in your coding:
‘Add these lines to the General Declarations section
Const WHITE = 15
Const BLUE = 9
Const RED = 12
Const PURPLE = 13Now whenever you want to specify the color red, instead of using the number 12, you can use the constant RED instead. The same goes for white, blue, and purple; specify WHITE, BLUE, and PURPLE respectively instead of 15, 9, and 13.
Scope (again)
The declarations for these constants were placed in the General Declarations section so that they can be usable throughout the entire program (within every event procedure). Once declared in the General Declarations section of a form, these constants have Public (or global) Scope. A variable’s Scope determines its range of visibility:
- Variables dimensioned within an event procedure are only visible within that event procedure. Their Scope is said to be local.
- Variables dimensioned in the General Declarations section of a form are visible to all the event procedures of that Form. Their scope is said to be Public or Global. In order to make a variable visible to all the Forms of a multi-form project, you can declare variables as Public within a Module—which is a type of form you can add to a project. A Module should only contain code which you want to have Public scope.
As an example of the code which should appear in the Click event procedure for each sub-menu item—White, Blue, Red, and Purple—here is the code from the mnuB1Blue_Click event procedure. The mnuB1Blue_Click event procedure is executed whenever the User selects the Blue menu item under the Box 1 sub menu. Each line is described below:
If mnuB1Blue.Checked <> True Then
mnuB1White.Checked = False
mnuB1Blue.Checked = True
mnuB1Red.Checked = False
mnuB1Purple.Checked = False
txtBox1.BackColor = QBColor(BLUE)
End If
- The first line of code above examines the Checked property of mnuB1Blue. If it’s value is True then it’s already checked and there’s nothing left to do (<> means not equal to).
- The second line sets the Checked property of the mnuB1White menu item to False. Why? Because the User just selected the mnuB1Blue menu item; if the mnuB1White menu item was checked before, setting its Checked property to False un-checks it.
- The third line sets the Checked property of the mnuB1Blue menu item to True.
- The fourth line sets the Checked property of the mnuB1Red menu item to False, for the same reason mentioned in 2 above.
- The fifth line sets the Checked property of the mnuB1Purple menu item to False, for the same reason mentioned in 2 above.
- The sixth line uses the QBColor function to set the BackColor property of txtBox1 to the color blue.
- This code structure is virtually identical for all the Click event procedures of all the other menu items. Good luck.
Save and test your program thoroughly. That completes this project.