For your Sixth Visual Basic project, you will create a program that displays a window with 6 Check Boxes inside a Frame whose caption will be Hide. The window will also contain a Textbox, and a Listbox. There will be 4 Command Buttons one each for Add, Delete, Clear, and Exit. You will do this project in 2 parts.
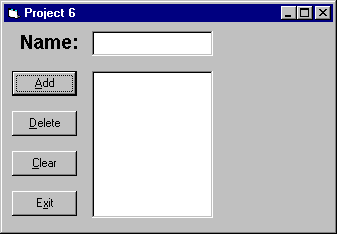
Here’s what Part A requires (See the first illustration below):
The user can type a name in the Textbox and click the Add Button (or press Enter) to copy the name from the Textbox to the ListBox. In the event the user clicks the Add Button and the Textbox is blank, a MsgBox should display an error message.
As the user Adds more names, the entries in the Listbox will grow.
To delete an entry from the Listbox, the user clicks on the entry they want to remove and than clicks the Delete Button. In the event the Delete Button is clicked and no name within the Listbox is selected, a MsgBox should display an error message.
Clicking the Clear Button erases all the entries in the ListBox.
If the user clicks the Clear button when the ListBox is already empty, a MsgBox should display an error message.
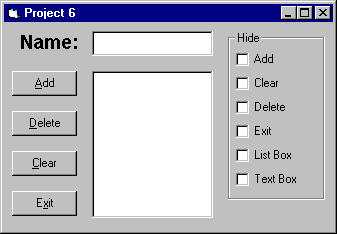
Here’s what Part B requires (See the last illustration below):
To hide a control, check the Checkbox of the item you wish to hide.
To unhide a control, uncheck the Checkbox of the item you wish to unhide.
Begin with a blank form (Choose New Project under the File menu (make the project type: Standard) and press the F4 key to view the form’s properties—if the Properties Window is not already showing.
- Change the Caption property of the form to Project 6
- Change the default Name of the form (form1) to frmProj6
Select Project1 Properties from the Project dropdown menu. Make sure the General tab is selected and set the options described in the next bullet.
- In the Startup Object combobox make sure frmProj6 is selected (it should be by default). In the Project Name textbox type Project6. In the Project Description textbox type the following: Copying names from a Textbox to a Listbox. Deleting and clearing names from the Listbox, and hiding controls. Leave all other settings at their defaults and click the OK button.
Pull down the File menu and choose Save Project. Save the form as: frmProj6.frm. Save the project as project6.vbp.
Part A. Use the illustration below as a guide. Place the Textbox (top) and Listbox (below the Textbox) as shown. Add the 4 Command Buttons, and the Name: Label for the Textbox. Add code to fulfill the requirements for Part A as stated above (hints follow).
No Properties/Procedures Table is provided for this project. Be sure to name each control as you place it on the Form. Please use the Naming Conventions for your Controls and Variables that we have followed so far in this class.
To add items typed into the Textbox to the Listbox, use Visual Basic Help and look up the Listbox control’s AddItem method. To Delete items in the ListBox get Help on the Listbox control's RemoveItem method. To clear the contents of the Listbox, get help on the Listbox control's Clear method.
When the user clicks in the Textbox to type a name, the Textbox gets the focus (Only 1 control can have the focus as a time). Then when they click the Add Button, the Add Button gets the focus. Before the user can start typing another name in the Textbox they will have to use the mouse to click on it and give it the focus again. That’s not very user friendly. To solve this problem, you can call the Textbox’s SetFocus method from within the Add Button’s Click event procedure to automatically set the focus back on the Textbox for the user:
txtName.SetFocus ‘Set the Focus back on the Name textbox
Below is an example of the code required to display a message box (MsgBox). You don’t need to include the 4 comment lines when you type this code:
Dim iStyle As Integer
'This Message box displays an OK button (vbOKOnly), an 'exclamation point icon (vbCritical), and is a modal dialog 'box—must be closed before the user can do anything else '(vbApplicationModal)
iStyle = vbOKOnly + vbCritical + vbApplicationModal
MsgBox "The Name Box is Blank!", iStyle, "Illegal Entry"A Listbox comes with a method that Clears all the items from the Listbox, use Visual Basic Help to learn about it (get help on the Listbox control and examine it’s Method list).
Save and test your program, making sure that all of the Part A requirements have been met before going onto part B.
Part B. Use the following illustration as a guide. It is important that you first place the Frame control as shown. Then create the Checkbox controls inside the frame (Checkboxes have a Caption, be sure to stretch them wide enough so that you can see it). Write the code to fulfill the requirements for Part B as stated on the first page (hints follow).
To determine whether a Checkbox is checked or not examine its Value property like so:
If chkAdd.Value = vbChecked Then ‘vbChecked is a Visual Basic Constant
cmdAdd.Visible = False
Else
cmdAdd.Visible = True
End IfAs you can see in the example code above, you can hide and unhide a Control by setting its Visible property to True and False respectively.

