For your Sixth Visual Basic project, you will create a program that allows the user to type names into a TextBox and add those names to a ListBox (with an Add button). The user will be able to select names in the ListBox and remove them one at a time (with a Delete button), or clear the ListBox completely (with a Clear button). They will also be able to hide individual controls with a set of CheckBoxes that are inside a GroupBox with the caption Hide. You will do this project in 2 parts.
Here’s what Part A requires (See the first illustration in Part A below):
- The user can type a name in the Textbox and click the Add Button (or press Enter) to copy the name from the Textbox to the ListBox. In the event the user clicks the Add Button and the Textbox is blank, a MessageBox should display an error message.
- As the user Adds more names, the entries in the ListBox will grow.
- To delete an entry from the ListBox, the user clicks on the entry they want to remove and than clicks the Delete Button. In the event the Delete Button is clicked and no name within the ListBox is selected, a MessageBox should display an error message.
- Clicking the Clear Button erases all the entries in the ListBox.
- If the user clicks the Clear button when the ListBox is already empty, a MessageBox should display an error message.
Here’s what Part B requires (See the first illustration in Part B below):
- To hide a control, checkmark the Checkbox of the item you wish to hide.
- To unhide a control, uncheck the Checkbox of the item you wish to unhide.
Removing your old project and creating a new one
Run Visual Basic .NET and open your Solution (<your name>.sln).
Right-click on the Project5 project in the Solution Explorer window and select Remove from the context menu. Click the OK button when warned that Project5 will be removed from the Solution. Drop down the File menu. Under the Add Project menu item, select New Project. When the Add New Project dialog appears, be sure that the Visual Basic Projects folder is open in the Project Types pane, and that the Windows Application template is selected in the Templates pane. Type Project6 in the Name textbox. Then click the OK button. This creates a new folder inside the \Visual Studio Projects\<Your Name> folder named Project6:
...My Documents\Visual Studio Projects\<Your Name>\Project6.
Note: When class is over, be sure to follow the instructions at the end of this project that tell you how to copy your project to your floppy diskette so you can take it home with you.
Rename the Form file and change it's Name and Text properties
With the form file (Form1.vb) selected in the Solution Explorer window, so that it's File properties are displayed in the Properties window, change the File Name property to frmProj6.vb (don't forget to include the .vb extension).
Now click on the form in the Designer window to display it's properties:
- Change the Name property to frmProj6 (Remember: No spaces are allowed in the form’s Name property, or the name property of any control).
- Change the Text property to Project 6
Setting the Startup Object
Right-click on the Project6 project in your Solution Explorer window, click on the Properties item at the bottom of the context-menu. In the Project6 Property Pages dialog drop down the Startup object list and choose frmProj6 and click the OK button.
Before going on, click on the Save All button on the toolbar to save your project:
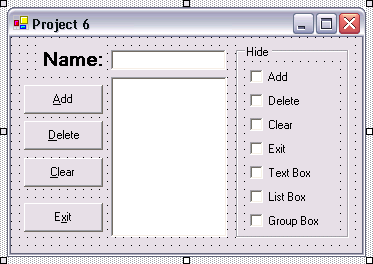
Part A
Use the illustration below as a guide. Place the Textbox (top) and ListBox (below the Textbox) as shown. Add 4 Buttons, and a Label (Name:) for the Textbox:
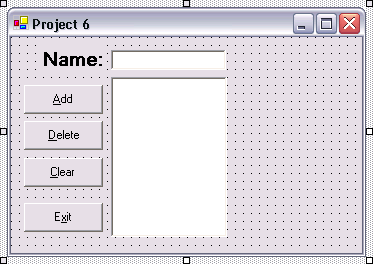
Note: No Properties/Procedures Table is provided for this project. Be sure to name each control as you place it on the Form. Please use the Naming Conventions for your Controls and Variables that we have followed so far in this class.
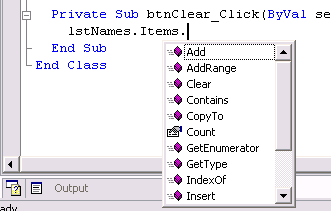
Adding items to a ListBox - The Add button
To add items typed into the Textbox (txtName) to the ListBox (lstNames), use the Add method of the Items collection of the ListBox. The Items collection gives us access to all the entries in a ListBox. The single parameter required by the Add method is the object to be added to the collection. The following line of code adds the value in the Text property of the txtName TextBox to the ListBox:
'Use the Add method of the listbox's Items collection to add the value
' in txtName.Text to the lstNames listbox.
lstNames.Items.Add(txtName.Text)
Add the above line of code to the btnAdd_Click event procedure.
Testing the program so far
Click on the Save All button on the toolbar to save your project. Now click the start button to run the project. Type your name in the txtName textbox and click on the Add button. Did the name get added to the lstNames listbox? Type another name in the txtName textbox, and click the Add button again. Did the new name get added to the lstNames listbox below the first name you added? Clear any text from the txtName textbox and click the Add button once. Now type a new name in the txtName textbox and click the Add button. Do you see a blank entry between the last name and the second name you added to the listbox?
To prevent the user from adding blank entries to the listbox, we need to make sure that the Text property of the txtName textbox isn't empty before adding the value it contains to the listbox. Modify the above code (the highlighted line below) in the btnAdd_Click event procedure to include this additional code:
'Be sure that txtName.Text is not equal to (<>) empty ("") before adding
' it's contents to the lstNames listbox.
If txtName.Text <> "" Then
'Use the Add method of the listbox's Items collection to add the value
' in txtName.Text to the lstNames listbox.
lstNames.Items.Add(txtName.Text)
End If
The above code tests the contents of the Text property of the txtName textbox. If txtName.Text is not equal to (<>) an empty string ("") then we add it's contents to the lstNames listbox. This is also where we can use a MessageBox to instruct the user on how to use the Add button, by modifying the above code to include an Else section, like this:
'Be sure that txtName.Text is not equal to (<>) empty ("") before adding
' it's contents to the lstNames listbox.
If txtName.Text <> "" Then
'Use the Add method of the listbox's Items collection to add the value
' in txtName.Text to the lstNames listbox.
lstNames.Items.Add(txtName.Text)
Else
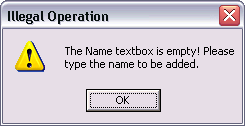
'Display an instructive MessageBox
MessageBox.Show("The Name textbox is empty! Please" & _
vbCrLf & "type the name to be added.", _
"Illegal Operation", _
MessageBoxButtons.OK, _
MessageBoxIcon.Exclamation)
End If
The four parameters being passed to the Show method of the MessageBox class, in the above code, have been broken onto multiple lines for readability. Note: You can break a single long line of code onto multiple lines by adding a space and underline character at the end of each line. Also note that in the message line above we have inserted vbCrLf, which is a visual basic constant for a carriage return and linefeed, so that the message is broken onto two lines as shown in the illustration below
With the above code, if the user tries to click the Add button without typing a name in the txtName textbox, we display a message box that looks like this:
A call to the Show method of the MessageBox class requires 4 parameters, which are:
- The message string. This is the message that is displayed in middle of the message box.
- The caption string. This is the string that appears in the caption bar of the message box.
- The MessageBoxButtons specification. This determines which buttons are displayed on the message box. Several button combinations are available. This message box only requires an OK button to close it (MessageBoxButtons.OK).
- The MessageBoxIcon specification. This determines which, if any, icon is displayed on the message box. Several eye catching icons are available to help get the user's attention when the message box is displayed.
Testing the program so far
Click on the Save All button on the toolbar to save your project. Now click the start button to run the project. Type your name in the txtName textbox and click on the Add button. Now clear the txtName textbox and click the Add button. Is the message box displayed?
Making the Add button more user friendly
As it is now, after clicking on the Add button the user must click in the txtName textbox to give it the focus and manually erase the previous name they had typed before they can type a new name. To make adding names more user friendly, we can move the focus and clear the txtName textbox for the user in our code. Add the following two lines of code after the End If statement at the bottom of the btnAdd_Click event procedure:
'Clear the name that was added from the txtName textbox
txtName.Text = ""
'Move the focus to the txtName textbox
txtName.Focus()
Testing the program so far
Run the project and add a few names to the listbox. Is the program easier to use now?
Removing items from a ListBox - The Delete button
There are at least a couple of ways of removing items from a ListBox. We could use the Remove method of the Items collection, with a line of code that looks like this (do not type this code):
lstNames.Items.Remove("Jerry")
This code would remove the first Jerry entry from the lstNames listbox. This method won't work for us because we want to remove an entry that the user has clicked on in the listbox. The RemoveAt method of the Items property let's us remove an entry from a listbox by specifying it's location (Index) in the list. All the entries in a listbox can be referenced by and Index value which is their location in the list. The first entry (at the top) in a listbox is in the 0 (zero) location. The second entry is at 1, the third is at 2, etc. The following code example will remove the third entry in the lstNames listbox with the RemoveAt method (do not type this code):
'Remove the third entry (0,1,2) from the lstNames listbox
lstNames.Items.RemoveAt(2)
What we need to determine is the index value of the item in the listbox that the user has selected, and remove that item. Fortunately, listboxes come with a SelectedIndex property, which is always equal to the index value of the selected entry in the listbox. So the line of code above can be modified to include lstNames.SelectedIndex to remove the entry in the listbox that the user has selected, like this:
'Remove the selected item (SelectedIndex) from the lstNames listbox
lstNames.Items.RemoveAt(lstNames.SelectedIndex)
Add the above line of code to the btnDelete_Click event procedure.
Testing the program so far
Click on the Save All button on the toolbar to save your project. Now click the start button to run the project. Run the project and add a few names to the listbox. Click on one of the entries in the listbox and click on the Delete button. Was it deleted? Now click on the Delete button again while no entry in the listbox is selected. You should see the following error message box:
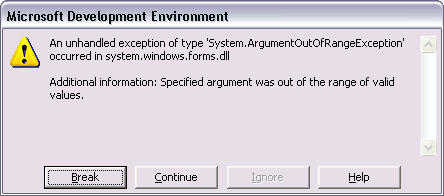
Click on the Break button to close the error message box and go to the line of code in the program that caused the error (which is highlighted green). If you hold your mouse pointer over SelectedIndex to see what value it has, a popup message should match the following illustration (SelectedIndex is equal to negative one!):

This shows us that the SelectedIndex property, which would normally be equal to the index value of the selected entry in the listbox--which will always be a number 0 or higher--is equal to negative one (-1) when no entry in the listbox is selected. Negative one is NOT a legal index value, so the RemoveAt method generates a critical error when trying to process it. To make sure that the user doesn't crash the program by clicking on the Delete button without selecting an entry in the listbox first, we need to test the value of SelectedIndex, like this (Note: Make sure you stop the program before you enter the code below):
'Make sure an entry in the lstNames listbox is selected
If lstNames.SelectedIndex <> -1 Then
'Remove the selected item (SelectedIndex) from the lstNames listbox
lstNames.Items.RemoveAt(lstNames.SelectedIndex)
End If
Use what we did in the btnAdd_Click event procedure to display a message box here when the user clicks the Delete button without selecting an entry in the listbox first.
Clearing all items from a ListBox - The Clear button
Take a look through the methods of the Items collection of the lstNames listbox. Is there a method that clears all the entries from a listbox?
Making the Delete and Clear buttons user friendly
Are the Delete and Clear buttons easy to use? When you click on the Delete button does it keep the focus? Should it? Test the project so far and make sure it's as easy to use as possible.
Part B
Use the following illustration as a guide. It is important that you first place the GroupBox control as shown. Then create the Checkbox controls inside the frame (Checkboxes have a Text property, be sure to stretch them wide enough so that you can see it):
To determine whether a Checkbox is checked or not examine its Checked property like so:
'Is the chkAdd checkbox checked?
If chkAdd.Checked = True Then
'Hide the btnAdd button
btnAdd.Visible = False
Else
'Unhide the btnAdd button
btnAdd.Visible = True
End If
As you can see in the example code above, you can hide and unhide a Control by setting it's Visible property to True and False respectively.