Beginning Visual Basic (Visual Studio 2008) - Project 5

The Cash Register Program

Project 5

Close your last project and creating a new one

If you still have the Project3-4 project open, select the Close Project item on the file menu to close it.

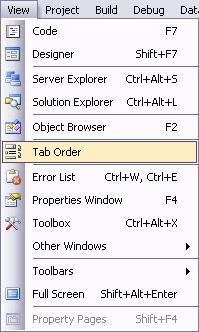
With no open projects, click on the Project... option next to Create: on the Start Page, or pick New Project item on the File drop-down menu. 

The Add New Project dialog appears.  With the Windows Application template selected, type Project5 for the name and click the OK button.  Now click the Save All button on the toolbar to save the project.  Be sure to uncheck the Create directory for solution option on the Save Project dialog box.  Do not change the default Location path and click the Save button. 

This creates a new folder inside the My Documents\Visual Studio 2008\Projects\  folder named Project5:

        My Documents\Visual Studio 2008\Projects\Project5

Rename the Form file and the Form

With the form file (Form1.vb) selected in the Solution Explorer window, the Properties window directly below it displays it's File properties.  Click on the File Name property and type frmProj5.vb (don't forget to include the .vb extension).  To display the properties of the form in the Properties window, click once on the blank Form, which should be displayed on the left side of the screen in the Design window.  Make sure the Name property—which is in parentheses (Name) at the top of the property list so that it's easy to find—is frmProj5.  Then scroll the properties windows down and change the Text property to Project 5.

Before going on, click on the Save All button on the toolbar to save your project.


Creating a custom Cash Register

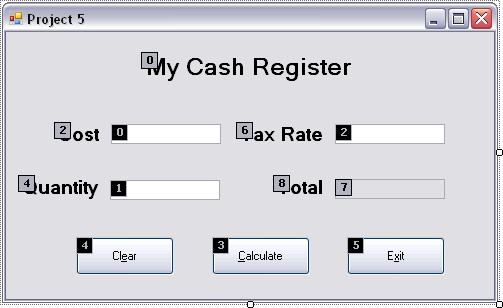
Here’s your chance to use what you have learned. This program will simulate a simple Cash Register. On a blank form you will place 4 Textboxes: One each for Cost, Quantity, Tax Rate, and Total Price. Each Textbox will be labeled with a Label control. Labels are one of the simplest Controls of all. Labels come with Event Procedures like other controls, but it’s rare that you’ll ever use them. All you’re going to use Labels for in this program is to label your Textboxes. Besides the 4 Textboxes, and 4 Labels, you’re also going to add 3 Buttons. One Button each for Clear (to clear the contents of the Textboxes), Calculate (to calculate the Total price from the Cost, Quantity, and Tax Rate), and Exit. Oh, and don’t forget to add one more Label as a title. Below is an example of the program, but you do not need to copy this layout exactly. Besides containing the essential Controls shown, you can make it look any way you like:

Following are 3 sections which provide 3 levels of help designated: Hacker, User, and Nubie.

  1. The Hacker level is the hardest, with the least amount of instruction—you’re pretty much on your own. For those of you who like to figure it out for themselves, try the Hacker help section first.
  2. The User help section is for those who like to figure things out for themselves, but need a little extra information.
  3. The Nubie help section (which is computer slang for beginner) is more instructive than Hacker or User and might give you that one hint that gets you moving when you get stuck.

Please try to figure out as much as you can on your own. Begin with the Hacker help section and only refer to the User and Nubie help sections when you get stuck. When you finish with the basic project, don’t forget to try and complete the Required Enhancements at the end.


Hacker Help Section

I have only a few important suggestions:


User Help Section

First read the instructions in the Hacker help section above.

Here are the commands to calculate the Total as they should appear in the btnCalc_Click event procedure:

‘Dimension a Double variable to hold the
'    calculated Total.
Dim dTotal As Double
‘Calculate the total amount
dTotal = Val(txtCost.Text) * Val(txtQuantity.Text)
‘Calculate the Tax and add it to the total
dTotal = dTotal + (dTotal * Val(txtTaxRate.Text))
‘Format the total as currency and copy it
'    to the txtTotal textbox.
txtTotal.Text = Format(dTotal, "Currency")

Get Help on the Val and Format functions to understand what they do.

Here’s a hint for the Clear button. Textboxes have a Clear method, like so:

txtCost.Clear()

This command erases any previous value in the Text property of the txtCost textbox control.

The font I used in the illustration above for the Labels was:

Font - Microsoft Sans Serif
Size - 14 point
Attribute - Bold

You can set these with the Font property of the labels.  Feel free to pick different fonts and different font sizes to your taste.


Nubie Help Section

Use the illustration at the beginning of this assignment as a guide and place the 4 Textboxes on the form as shown. Place 4 Labels—one to the left of each Textbox. Place another Label control near the top center of the form for the title. Now add 3 Command Buttons where shown. Use the following Properties/Procedures Table to set the designated property values:

Properties

Object Property Setting
Form Name frmProj5
  Text Project 5
Button Name btnClear
  Text Cl&ear
Button Name btnCalc
  Text &Calculate
Button Name btnExit
  Text E&xit
Text Box Name txtCost
  Text blank
Text Box Name txtQuantity
  Text blank
Text Box Name txtTaxRate
  Text blank
Text Box Name txtTotal
  Text blank
  ReadOnly True
Label Name default name
  Text Cost:
  Font Arial (16 pt. Bold)
Label Name default name
  Text Quantity:
  Font Arial (16 pt. Bold)
Label Name default name
  Text Tax Rate:
  Font Arial (16 pt. Bold)
Label Name default name
  Text Total Amount:
  Font Arial (16 pt. Bold)
Label Name default name
  Text My Cash Register
  Font Arial (16 pt. Bold)

Setting the Tab Order to control how the focus moves between controls

After adding the controls in the above table to your form, you can set what order the focus moves between the controls when the user presses the Tab key.  This is called setting the Tab Order.  In design view (with the Form selected) choose the Tab Order menu item from the View drop-down menu (as shown below):

Notice the numbered boxes that appear next to every control on your form (shown in the illustration below).  By default, the tab order is set to correspond to the order that you placed the controls on the form (0 for the first control you placed, 1 for the second, etc.).  The numbers actually indicate the value of each control's TabIndex property.  The control with the TabIndex of 0 (zero) is the control that starts off with the focus when the program is first launched.  The control with the TabIndex of 1 will receive the focus next when the user presses the Tab key.  Change the Tab Order to match the following illustration, by clicking on the Cost textbox first (0), the Quantity textbox second (1), the Tax Rate textbox third (2), etc., until the numbers in the black boxes match those in the illustration below.  Note: Ignore the Tab Order numbers of Label controls, as they cannot get the focus anyway.  Label controls only have a TabIndex property because they inherit it from the Base Class (the mother of all classes) from which all controls are derived:

With the above tab order, the focus moves from Cost to Quantity textbox, then to Tax Rate textbox and the Calculate button.  Then from Calculate to Clear button.  After the Clear button, the focus should move back to the Cost textbox so that the user can continue entering values, but the way we have the tab order set the Exit button gets the focus after cost, and then the Total text box after that—and the user is never going to type into the Total textbox.  To prevent the Exit button and Total textbox from getting the focus set their TabStop properties to False.  Select the Tab Order item on the View drop-down menu to turn off the Tab Order display, and set the TabStop properties of the btnExit and txtTotal controls to False.

You can also set the Tab Order by manually changing the TabIndex property of the controls in the Properties window, one control at a time.  But using the Tab Order option on the View menu, makes the process much easier.

Event Procedures

Object Procedure Code
btnExit btnExit_Click() Me.Close()
btnClear btnClear_Click() txtCost.Clear()
txtQuantity.Clear()
txtTaxRate.Clear()
txtTotal.Clear()
btnCalc btnCalc_Click() Dim dTotal As Double
dTotal = Val(txtCost.Text) * Val(txtQuantity.Text)
dTotal = dTotal + (dTotal * Val(txtTaxRate.Text))
txtTotal.Text = Format(dTotal, "Currency")

The btnClear_Click event procedure should clear all the values in the Text properties of the 4 Textboxes.  Use the Clear method of the textboxes.

Dimension a variable as a Double named dTotal in the btnCalc_Click event procedure. Double precision numbers can contain real numbers with decimal values (which is what you need when dealing with currency). The Val function turns a string into a number. The Format function puts a number into one of several formats. Get Visual Basic help on the Val and Format functions to find out how they work (also get help on CInt, CDbl, and CDec).


Required Enhancements

‘Test if the key the user typed (e.KeyChar) was
'    the return key (Keys.Return).
If e.KeyChar = Chr(Keys.Return) Then
    ‘Move the focus to the txtQuantity textbox
    txtQuantity.Focus()
End If

The e parameter of the KeyPress event procedure is a KeyPressEventArgs type which has a KeyChar data member that contains the character that the user typed.  Above we compare e.KeyChar with the Keys.Return enumerated data type—which is the ASCII value of the Return key (the Enter key on modern keyboards).  By converting Keys.Return to a character with the Chr function, we can compare it to e.KeyChar to determine if the user pressed the Enter key.  Visual Studio enumerated data types are available for all the keys on the keyboard (i.e. Keys.A for capital ‘A’, Keys.End for the End key, etc.).

What will adding the following line of code to the txtCost_Leave event procedure do? Try it and see:

txtCost.Text = Format(txtCost.Text, "Currency")

Note: The Val conversion function can’t convert a string that is in Currency format ($#,##.##) to a number. Use the CDec conversion function for that.  Adding the above code to the txtCost_Leave event procedure means you need to change Val(txtCost.Text) to CDec(txtCost.Text) in the btnCalc_Click event procedure.


To copy a Project folder from your Projects folder on the Hard Drive to a floppy diskette or pen-drive follow these steps:

  1. Exit Visual Studio 2008 and insert the floppy diskette or pen-drive, that you want to copy the Project5 folder to:
  2. Select the My Documents item on the Start Menu to open the My Documents folder.
  3. In the My Documents folder, double-click the Visual Studio 2008 folder to open it.
  4. Double-click on your Projects folder to open it.
  5. Open the Project5 folder by double-clicking on it.  Inside the Project5 folder, delete the Obj and Bin folders—these folders are created automatically when you open a project.  You do not need to copy them, or their contents, to your floppy diskette or pen-drive.  Important: Be sure not to delete the My Project folder or Resources folder.
  6. Once you have deleted the Obj and Bin folders, hit the Backspace key once—or click the Back button on the toolbar.  This moves you from inside the Project5 folder to back inside your Projects folder.
  7. Right-click on the Project5 folder and selected: 31/2" Floppy A: or your pen-drive on the Send To fly-out menu.  This copies the Project5 folder to your floppy diskette or pen-drive.