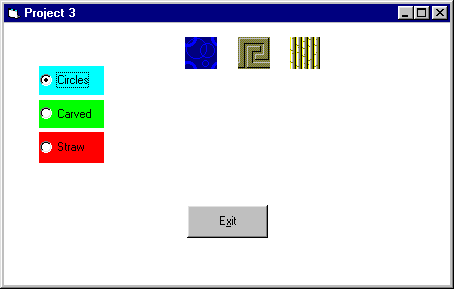
For your third Visual Basic project, you will create a program that displays a window with 3 Option Buttons, 3 Images, and an Exit Button. When the program runs, you will be able to point the mouse anywhere on the form and click to move one of the Images to that spot. Which Image moves depends upon which Option Button is selected.
Begin with a blank form (Choose New Project under the File menu. Make the project type: Standard) and press the F4 key to view the form’s properties—if the Properties Window is not already showing.
- Change the Caption property to Project 3
- Change the default Name of the form (form1) to frmProj3
Select Project1 Properties on the Project dropdown menu. Make sure the General tab is selected and set these options:
In the Startup Object combobox make sure frmProj3 is selected (it should be by default). In the Project Name textbox type Project3. In the Project Description textbox type the following: Option buttons let you choose an Image you can move around the form by clicking. Leave all other settings at their defaults and click the OK button.
Pull down the File menu and choose Save Project. Save the form as: frmProj3.frm. Save the project as project3.vbp.
Use the illustration below as a guide and place 3 Option Buttons (on the left), 3 Images (top middle), and Exit Command Button as shown:
Use the Project 3 - Properties/Procedures Table (last page) to set the designated property values of the Form, Option Buttons, Images, and Command Button (don’t add any of the Code from the Event Procedures section yet).
You can refer to the Event Procedures section of the Properties/Procedures Table (last page) while following these steps:
- All the code you need will be inserted into the Form_MouseDown event procedure. There are 4 parameters that are automatically passed into Form_MouseDown by the MouseDown Event (which occurs if the mouse was clicked on the form somewhere—anywhere except upon another control). These parameters contain information regarding the state of the mouse at the moment the mouse button was pushed down:
Button As Integer The value of this parameter indicates whether the left, right, or middle mouse button was pushed. (You’re just ignoring this parameter, since you don’t care which button was pushed).
Shift As Integer The value of Shift indicates whether the mouse button was pushed while the Shift, Ctrl, or Alt keys were being pressed. (The value of Shift is also ignored by you).
X As Single
Y As Single These variables contain the coordinates of the mouse location at the time the mouse button was pushed. A Single precision variable is a floating point number (which can have decimal value) that is 4 bytes long, an integer is just 2 bytes long (the size in bytes determines how big a number can fit in the variable—the more bytes the bigger the number can be).You can use the values of X and Y to move the Image indicated by the selected Option Button to where the user clicked on the form. By checking the value of the Value property of each Option Button you can determine which Option Button (optCircles, optCarved, or optStraw) is selected. An important quality of Option Buttons is that only one of them my be selected at a time. If you select one, and another one is already selected, it is automatically deselected. Here’s the code that goes in the Form_MouseDown event procedure that checks which Option button is selected, and moves the corresponding Image to its new location.
If optCircles.Value = True Then ‘Handles Circles option button
imgCircles.Move X, Y
ElseIf optCarved.Value = True Then ‘Handles Carved option button
imgCarved.Move X, Y
Else ‘Handles Straw option button
imgStraw.Move X, Y
End IfThe first line of code above tests If the optCircles option button is selected. If it is selected, its Value property will be True (True is a reserved word in Visual Basic. So is False which is the opposite of True). Then the Move method of the imgCircles control is used to change the location of imgCircles (like a Property and an Event Procedure; a Method is a function that comes built into a Control. Every Control type comes with several Methods).
The ElseIf test on the third line (Else and If stuck together) is only executed if the first If test is False. If the ElseIf test is also False then the code after the last Else statement on the fifth line is executed. Why not test of the Value of the optStraw control? Because if either of the first two Option Buttons—optCircles or optCarved—are not On (True), then the last one, for optStraw, must be on. Note: Like I mentioned before, an important quality of Option Buttons is that one of them—and only one—must be On (True) at all times—you can’t turn them all Off (False).
Save your program and run it. Click on any of the 3 option buttons (Circles, Carved, or Straw). Now click anywhere on the form and watch the corresponding image jump to that spot. Now select another option button and click in the window again to see what happens.
Note: If your optCircles Option button is not on by default when your program starts, go to the Properties window and set its TabIndex property to 0 (zero). You can use the TabIndex properties of the controls on your form to set the order which the controls get the focus when the user presses the Tab key while the program is running. The control that has its TabIndex property set to zero begins with the focus when the program starts.
