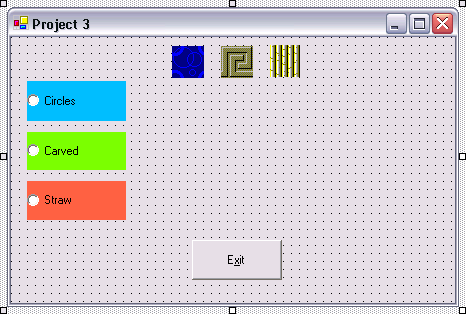
For your third Visual Basic project, you will create a program that displays a window with 3 RadioButtons, 3 PictureBoxes, and an Exit Button. When the program runs, you will be able to point the mouse anywhere on the form and click to move one of the PictureBoxes to that spot. Which PictureBox moves depends upon which Radio Button is selected.
Removing your old project and creating a new one
Run Visual Basis .NET and open your Solution (<your name>.sln).
Right-click on the Project2 project in the Solution Explorer window and select Remove from the context menu. Click the OK button when warned that Project2 will be removed from the Solution. Drop down the File menu and select New Project under the Add Project menu item. When the Add New Project dialog appears, be sure that the Visual Basic Projects folder is open in the Project Types pane, and that the Windows Application template is selected in the Templates pane. Type Project3 in the Name textbox. Then click the OK button. This creates a new folder inside the \Visual Studio Projects\<Your Name> folder named Project3:
...My Documents\Visual Studio Projects\<Your Name>\Project3.
Note: When class is over, be sure to follow the instructions at the end of this project that tell you how to copy your project to your floppy diskette so you can take it home with you.
Rename the Form file and change it's Name and Text properties
With the form file (Form1.vb) selected in the Solution Explorer window, so that it's File properties are displayed in the Properties window, change the File Name property to frmProj3.vb (don't forget to include the .vb extension).
Now click on the form in the Designer window to display it's properties:
- Change the Name property to frmProj3 (Remember: No spaces are allowed in the form’s Name property, or the name property of any control).
- Change the Text property to Project 3
Setting the Startup Object
Right-click on the Project3 project in your Solution Explorer window, click on the Properties item at the bottom of the context-menu. In the Project3 Property Pages dialog drop down the Startup object list and choose frmProj3 and click the OK button.
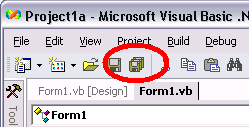
Before going on, click on the Save All button on the toolbar to save your project:
Adding three RadioButtons, PictureBoxes, and a Button to the form
Use the illustration below as a guide and place 3 RadioButtons (on the left), 3 PictureBoxes (top middle), and an Exit Button as shown:
Use the following table and assigned these values to the listed properties (you will find the bitmap files for setting the Image properties of the PictureBoxes in the in \Shared folder on either drive C: or D:, you may also download the required bitmap files by clicking on this Link.):
Control Property Value RadioButton1 Name rdoCircles Text Circles BackColor DeepSkyBlue (from Web tab) Checked True RadioButton2 Name rdoCarved Text Carved BackColor LawnGreen (from Web tab) Checked False RadioButton3 Name rdoStraw Text Straw BackColor Tomato (from Web tab) Checked False PictureBox1 Name picCircles SizeMode AutoSize Image Circles.bmp PictureBox2 Name picCarved SizeMode AutoSize Image Carved Stone.bmp PictureBox3 Name picStraw SizeMode AutoSize Image Straw Mat.bmp Button1 Name btnExit Text E&xit
The sender and e Event Procedure Parameters
Let's take a look at the structure of the form's Click event procedure:
frmProj3_Click(ByVal
sender
As Object,
_
ByVal e
As
System.EventArgs)
I've removed the Handles MyBase.Click statement at the end of the above line so that we can focus on the sender and e parameters that are passed to the event procedure by the operating system (more on the Handles statement later). I've also broken the line onto two lines for readability. Leave it to Microsoft to invent such imaginative names for these two parameters: sender and e. I especially like e...can we come up with a more ambiguous name? Here is what they are:
- sender is a reference to the actual object (control) that triggered the event. In the case of the frmProj3_Click event procedure, sender would actually be a reference to the form itself, since it generated the event when the user clicked on it.
- e actually varies from one event procedure to another, hence the non-descriptive name: e. In the Click event procedure, e is actually empty, because the operating system doesn't pass anything (except the sender) to the Click event procedure of any control.
If you put your cursor inside the frmProj3_Click event procedure and type e. (e dot) you will see this list of choices:
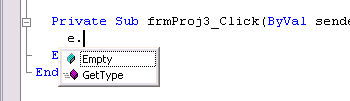
See how e is actually Empty in the Click event procedure.
Determining where the user clicked on the form
When the user clicks on the surface of the form, we want to move the PictureBox that corresponds to the selected RadioButton to that location. Our first assumption would be that we can put the code to move the PictureBox inside the Form's Click event procedure. But we just discovered that the e parameter of the Click event procedure is empty, there is no way we can tell where on the form they clicked from the Click event procedure. Let's take a look at the MouseDown event procedure of the form instead:
frmProj3_MouseDown(ByVal
sender
As
Object,
_
ByVal
e
As
System.Windows.Forms.MouseEventArgs)
In the case of the MouseDown event procedure, the e parameter actually contains information about where on the form the mouse pointer was when it was clicked. In fact, if you put your cursor inside the frmProj3_MouseDown event procedure and type e. you will see this list of choices:
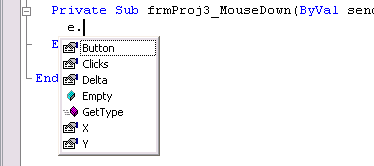
The e.X and e.Y values are exactly what we are looking for. e.X specifies the horizontal location (from the left edge of the form), and e.Y specifies the vertical location (from the top of the form), of the mouse pointer when the user clicked down the mouse button. Notice the Button item in the above list? You can use e.Button to determine which mouse button the user actually clicked down on to trigger the event. (i.e. If e.Button = MouseButtons.Left Then).
Adding code to the frmProj3_MouseDown event procedure to move the PictureBoxes
Add the following code to the frmProj3_MouseDown event procedure:
If rdoCircles.Checked = True Then 'Is the rdoCircles radio button on?
picCircles.Left = e.X
picCircles.Top = e.Y
ElseIf rdoCarved.Checked = True Then 'Is the rdoCarved radio button on?
picCarved.Left = e.X
picCarved.Top = e.Y
Else 'If the other radio buttons are off then the rdoStraw radio button must be on
picStraw.Left = e.X
picStraw.Top = e.Y
End If
The first line of code above tests If the rdoCircles Radio Button is checked. If it is checked, its Checked property will be True (True is a reserved word in Visual Basic. So is False which is the opposite of True). Then the following two lines under the If line move the the picCircles picturebox control to the location on the form where the user clicked by setting the Left and and Top properties of picCircles to the e.X and e.Y values respectively.
The ElseIf test on the fourth line (Else and If stuck together) is only executed if the first If test is False. If the ElseIf test is also False then the code after the last Else statement on the seventh line is executed. Why not test the Checked property of the picStraw control with another ElseIf test on line 7 above? Because if either of the first two Radio Buttons—rdoCircles or rdoCarved—are not checked, then the last one (rdoStraw) must be. Note: Like I mentioned before, an important quality of Radio Buttons is that one of them—and only one—must be On (True) at all times—you can’t turn them all Off (False).
Save your program and run it. Click on any of the 3 Radio Buttons (rdoCircles, rdoCarved, or rdoStraw). Now click anywhere on the form and watch the corresponding image jump to that spot. Now select another Radio Button and click in the form again to see what happens.