Close your last project
and creating a new one
If you still have
the Project1 project open,
select the Close Project item on the
file menu to close it.
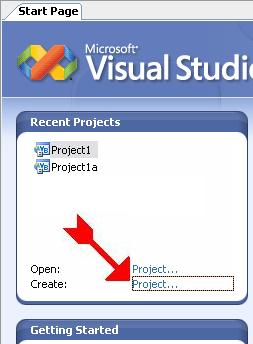
With no open projects, click on the Project... option next to
Create: on the Start Page, as shown in the following illustration (Arrow).
Note: You could also create a new
project by selecting the New Project
item on the File drop-down menu:
The Add New Project
dialog appears:

Be sure the Windows Forms Application template is selected
in the Templates pane on the right
side, then type
Project2 in the
Name textbox (as shown above).
Now click the OK button. Once the new project is opened—this
might take a few seconds—right-click on the Start Page tab and select the
Close item on the context menu to close it. Now save the project by clicking on the
Save All button on the standard
toolbar to display the Save Project
dialog box, as shown:
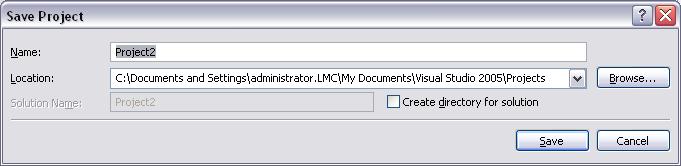
Do not change the
default Location path—Note:
The illustration above is from version 2005. Be sure to uncheck the
Create directory for solution
option, as show above, before clicking on the
Save button.
This creates a new folder inside the
My Documents\Visual Studio 2010\Projects\ folder named
Project2:
My
Documents\Visual Studio 2010\Projects\Project2
Note: When class
is over, be sure to follow the instructions at the end of each project that
tell you how to copy your project to your floppy diskette or pen-drive so you can take it
home with you.
Rename the
Form
file
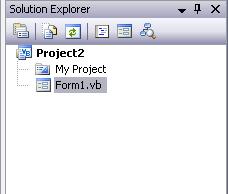
With the form file (Form1.vb)
selected in the Solution Explorer window (as
shown above), the Properties
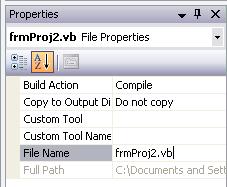
window directly below it displays it's File properties. Click on
the File Name property and type
frmProj2.vb (don't forget to
include the .vb extension, as shown
in the illustration below):
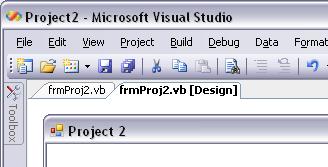
Change the
Name
and
Text
properties of the Form
To display the
properties of the form in the Properties
window, click once on the blank
Form, which should be displayed on
the left side of the screen in the
Design window.
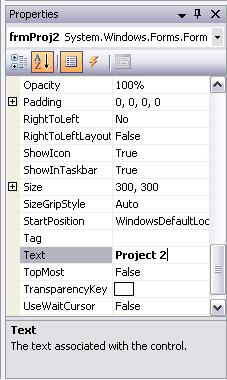
Make sure the Name property—which is in
parentheses (Name) at the top of the
property list so that it's easy to find—is
frmProj2. It should have been
set to that automatically when we named the form file. Then scroll the
properties windows down—the properties are listed alphabetically—and change the Text
property to Project 2
as shown below:
Before going on, click on the Save All
button on the toolbar to save your project.
Adding a
TextBox,
HScrollBar,
and Button
to the form
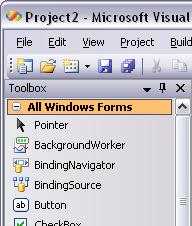
The HScrollBar
(Horizontal Scrollbar) control is not included in the
Common Controls section of the
Control Toolbox. To find
it, expand the
All Windows Forms section at the top of
the Control Toolbox by clicking
the + in front of the All Windows Forms
item. Once expanded, the + changes to a - as shown
below:
With all the windows form controls to choose from, use the following illustration as a guide and place a TextBox,
HScrollBar,
and Button control as shown:

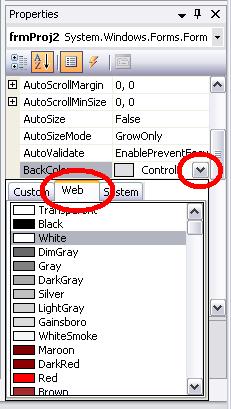
Set the BackColor property of the
form (frmProj2) to white. When setting the
BackColor or
ForeColor properties of a control, be sure to click the
Web tab on the color
options popup to have access to a wider variety of colors, as shown in the
following illustration:
Use the following table and set the properties of the listed
controls to these values:
|
Control |
Property |
Value |
| TextBox1 |
Name |
txtColor |
| |
TextAlign |
Center |
| |
Text |
255 Color Value |
| HScrollBar1 |
Name |
hsbColor |
| |
Minimum |
0 |
| |
Maximum |
255 |
| |
Value |
255 |
| Button1 |
Name |
btnExit |
| |
Text |
Exit |
The hsbColor
scroll bar control has 3 parts:
 |
The
Left scroll arrow button |
 |
The
Right scroll arrow button |
 |
The
Thumb button |
The user can move the
Thumb
button back and forth by clicking on either the
Left or Right scroll
arrow buttons, or by clicking on and dragging the
Thumb button itself. The
position of the Thumb button determines the
number value of the hsbColor.Value
property. With the Thumb
button at the extreme right, the value of
hsbColor.Value
is 255; At the extreme Left, the value of hsbColor.Value is 0 (these are the
Maximum and
Minimum properties of the
hsbColor control which you set
above).
Adding code to the
Scroll
event procedure of
hsbColor
Double-Click on the hsbColor
scroll bar to go to it's Scroll
event procedure in the Code view window:

Now type the following
code in the hsbColor_Scroll event
procedure:
'This is a comment.
Comments begin with a
single quote
' character. We use comments to describe our code.
'
'Create an Integer variable to store
the number in the
' Value property of hsbColor.
Dim
iColor As Integer
'Assign the number in the
Value property of hsbColor
' to iColor.
iColor =
hsbColor.Value
'Concatenate the string
" Color Value" to the number
' stored in iColor, and assign that joined string to the
' Text
property of txtColor.
txtColor.Text =
iColor.ToString
&
" Color Value"
'Use the FromArgb method of the
Color class to
change
' the BackColor property of frmProj2 (referred to in
' code as
Me).
Me.BackColor =
_
Color.FromArgb(iColor,
iColor,
iColor)
The first line of code above dimensions an Integer variable (iColor)
that we use—in the second line of code—to store the number in the
Value property of the horizontal scroll
bar (hsbColor). The number in hsbColor.Value is set by moving the
Thumb button of the horizontal scroll bar back and forth
along the length of the scroll bar. Because we set the
Minimum property of hsbColor to 0
and the Maximum property of hsbColor to 255, the number in
hsbColor.Value
will always be a number greater than or equal to 0 and less then or equal
to 255.
Take a look at this line of code from above:
txtColor.Text =
iColor.ToString
&
" Color Value"
If iColor is equal to 146, then the
purpose of the line of code above is to have the txtColor textbox display this string:
The statement: iColor.ToString & " Color Value"
joins together—concatenates—the number in iColor with the literal string
"
Color Value".
This is then assigned to the Text
property of the txtColor textbox.
We may only join (concatenate) two strings together, so we use the
ToString method of the
iColor integer variable to
convert it to a string.
The line of code from above that actually changes the back ground color
of the form is this one:
Me.BackColor =
_
Color.FromArgb(iColor,
iColor,
iColor)
Whenever you want to refer to the form (frmProj2 in this case) in
code, you must use the generic term Me.
To change the BackColor property
of the form, we used the FromArgb
method of the Color
class. The FromArgb
method takes three number parameters which specify the luminosity values
for the three computer primary colors: Red,
Green, and
Blue. These number values must
range between 0 and 255—hence our choice of 0 for the
Minimum property and 255
for the Maximum property of hsbColor.
FromArgb
combines these three luminosity values and generates a color that is assigned
to the BackColor property of the
form. By combining different luminosity values for
Red, Green,
and Blue, the
FromArgb
method can generate up to 16,581,375 unique colors—255 x 255 x 255.
Before going on, click on the Save All
button on the toolbar to save your project.
Testing the program so far
Let's test run the program and see what happens.
Click on the Start Debugging button on the
toolbar. Once the program runs, try changing the position of the Thumb
button on the hsbColor control. Does the back color of the form
change? Why does the color change from white to darker and darker shades
of gray and finally to black? By assigning the same value to the
luminosity settings of Red,
Green, and
Blue (by passing iColor in all three parameters), white,
black and shades of gray are the only colors possible. We'll take care
of this issue in the enhancements for this project.
Stop the program by
clicking on the close button in the upper right corner of the form:

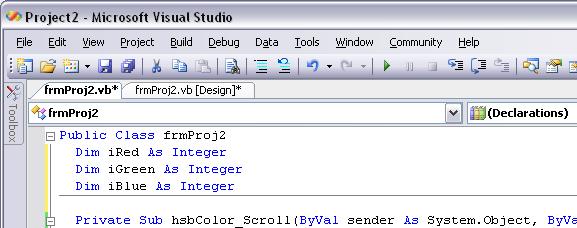
Add these three lines of code to the Declarations
section. The Declarations section is at the the top of the
View Code window. Add the
follow three lines immediately below the
Public Class frmProj2
declaration line at the top of the code window. You may also add the comments
above each line (Comments
begin with a single quote):
'Variable
to store the Red color luminosity value
Dim
iRed
As Integer
'Variable to
store the Green color luminosity value
Dim
iGreen As Integer
'Variable
to store the Blue color luminosity value
Dim
iBlue As Integer
After adding the above three dimensions statements, your Declarations
section should look like this:
Change to design view by clicking on the [Design] tab at the top
of your code window, as shown below:
Select the txtColor
textbox so that it's properties are displayed in the
Properties window. Modify these
properties:
|
Property |
Value |
| Name |
txtRed |
| BackColor |
Red |
| ForeColor |
White |
| Text |
255 Red Value |
Now select the hsbColor
horizontal scroll bar to view it's properties and change it's
Name property to
hsbRed.
After making the above modifications return to the View Code window by
clicking on the frmProj2.vb tab to the
left of the [Design] tab (shown in the previous illustration).
How event procedures
Handle
an event
At the end of every event procedure declaration is a
Handles statement where the
control name and
event name that raises the event procedure are
specified in this format:
control.event. Normally, the event procedure name matches the name of the
control that handles it, like this:
Private Sub
hsbColor_Scroll(...)
Handles hsbColor.Scroll
In the above event procedure declaration
hsbColor_Scroll handles the
hsbColor.Scroll event procedure. The above declaration is what the
hsbColor_Scroll event procedure
declaration looked like before we changed the name of the
hsbColor scrollbar to hsbRed.
However, after changing the name of the hsbColor
scrollbar to hsbRed the only thing that
changes in the original hsbColor_Scroll
event procedure declaration is the Handles
statement at the end of the line, like this:
Private Sub
hsbColor_Scroll(...)
Handles hsbRed.Scroll
The name of the event procedure is still
hsbColor_Scroll, but the Handles
statement says that it handles the hsbRed.Scroll
event procedure. This means your code will still work after
renaming a control, but it has the down side of making your code harder to
read when the names of the event procedures don't match the names of the
controls that raise them. You can fix this by editing
the declaration name. Change hsbColor:
Private Sub
hsbColor_Scroll(...
to hsbRed:
Private Sub
hsbRed_Scroll(...
Note: Always be very careful when
editing an event procedure declaration. Just one small typo will
completely screw it up.
Now
modify the code in the newly named hsbRed_Scroll event
procedure so that it looks like this:
Dim
iColor
as Integer ▀ Delete this
line of code!
iRed = hsbRed.Value
txtRed.Text
= iRed.ToString
&
"
Red Value"
Me.BackColor
= _
Color.FromArgb(iRed,
iGreen,
iBlue)
Save and run the program, and see what happens
when you move the Thumb button on the
hsbRed scroll bar.
Continue this enhancement by adding 2 more HScrollbar controls and name them
hsbGreen
and hsbBlue. Use
the following table to set these properties:
|
Control |
Property |
Value |
| hsbGreen |
Minimum |
0 |
| |
Maximum |
255 |
| |
Value |
255 |
|
hsbBlue |
Minimum |
0 |
| |
Maximum |
255 |
| |
Value |
255 |
Now add 2 more Textbox
controls and name them txtGreen and
txtBlue. Position them next to their
corresponding scrollbars. Use the following table to set these properties:
|
Control |
Property |
Value |
| txtGreen |
TextAlign |
Center |
| |
BackColor |
Green |
| |
ForeColor |
White |
| |
Text |
255 Green Value |
|
txtBlue |
TextAlign |
Center |
| |
BackColor |
Blue |
| |
ForeColor |
White |
| |
Text |
255 Blue Value |
Copy
the code from the hsbRed_Scroll event
procedure to the hsbGreen_Scroll and hsbBlue_Scroll event procedures, and modify
the code so that it looks like this:
‘for the
hsbGreen_Scroll event
procedure
iGreen =
hsbGreen.Value
txtGreen.Text =
iGreen.ToString &
"
Green Value"
Me.BackColor
= _
Color.FromArgb(iRed,
iGreen,
iBlue)
‘for the
hsbBlue_Scroll event
procedure
iBlue =
hsbBlue.Value
txtBlue.Text =
iBlue.ToString &
"
Blue Value"
Me.BackColor
= _
Color.FromArgb(iRed,
iGreen,
iBlue)
Adding code to the Form's
Load event procedure
In Visual Basic when a number variable (Integer,
Double, etc.) is Dimensioned
it is automatically initialized to a value of 0 (zero). Since all three
of our Scroll bars start off with their Value properties set to 255, you must be
sure to manually set the values of the iRed,
iGreen, and iBlue variables to 255 (So that
the very first time the
FromArgb
method is called zeros don't end up getting passed as two of the color
intensity parameters). A good place to initialize variables when the program
starts is the form's Load
event procedure. Drop down the
Class Name list at the top left side of the code window and
choose (frmProj2 Events). Then
select the Load event procedure
from the Method Name drop down list at
the top right of the code window. Then type the following code into
the frmProj2_Load event
procedure:
'Initialize
iRed, iGreen, and iRed to 255
iRed = 255
iGreen = 255
iBlue = 255
The frmProj2_Load
event procedure should look like this:

Now save the program and run it.
Scope
It is very important that the declarations for iRed,
iGreen, and iBlue
are placed in the Declarations
section. This allows these variables to retain any values that they are assigned
throughout the entire program (within every event procedure and across
event procedure boundaries). Once declared in the Declarations section of a form, a
variable has Global Scope (also called Public scope). A variable’s Scope
determines its range of visibility:
- Local scope—Variables dimensioned within an event procedure are only visible
within that event procedure. Their Scope is
said to be local. Any value that they
are assigned within the event procedure where they are dimensioned is lost and the
variable itself ceases to exist when the procedure exits.
- Public scope—Variables dimensioned in the
Declarations section of a form are visible to all
the event procedures of that Form.
Their scope is said to be public (or
global). When a value is assigned to
a public variable its value is retained throughout the execution of the program, and within
all event procedures.
Don't forget to get the Exit
button to work. You can exit a program by closing it's main form.
Trying adding Me.Close
to the btnExit_Click
event procedure.
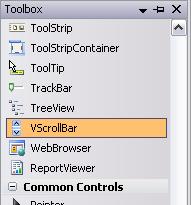
Additional Required
Enhancement
Adding a vertical scrollbar to control brightness. Add a vertical
scrollbar control (VScrollbar)
to the form:
Position it on the right side of the form, to the right of the other
controls. Name it vsbBrightness
and use the following table to set these properties:
|
Control |
Property |
Value |
| vsbBrightness |
Minimum |
-255 |
| |
Maximum |
255 |
| |
Value |
0 |
When the user moves the vertical scrollbar up and down, it needs to move
the three horizontal scroll bars in unison so that the color brightness is
affected. Double-click on the
vsbBrightness scrollbar to get to the
vsbBrightness_Scroll
event procedure and type the following code:
'Add the difference
between the old and new
' values of the
vsbBrightness scrollbar to
' hsbRed.Value.
hsbRed.Value
+= e.OldValue
- e.NewValue
'Add the
difference between the old and new
' values of the vsbBrightness scrollbar to
' hsbGreen.Value.
hsbGreen.Value
+= e.OldValue
- e.NewValue
'Add the
difference between the old and new
' values of the vsbBrightness scrollbar to
' hsbBlue.Value.
hsbBlue.Value
+= e.OldValue
- e.NewValue
'Manually
call the Scroll event procedures of
' hsbRed, hsbGreen, and hsbBlue so that
' the code in them is executed
and the
' BackColor of the form is updated.
hsbRed_Scroll(Nothing,
Nothing)
hsbGreen_Scroll(Nothing,
Nothing)
hsbBlue_Scroll(Nothing,
Nothing)
The vsbBrightness_Scroll
event procedure should look like this:

The += operator is used to add value to an existing value in a variable,
as apposed to overwriting it, which = by itself would do. That
means this code:
hsbRed.Value
+= e.OldValue
- e.NewValue
will add the difference between
e.OldValue
and
e.NewValue
to whatever value is already in the
Value property of
hsbRed, thus incrementing it—or
decrementing it if the number we are adding is negative.
Save the program and run it. Before touching the
Brightness scroll bar,
adjust the other three horizontal scrollbars to these values by moving their
thumb buttons:
- Set the Red scrollbar to 200
- Set the Green scrollbar to 75
- Set the Blue scrollbar to 125
That gives us a pretty rose color to begin with. Now click on the
down arrow button of the vsbBrightness
scrollbar to move it's thumb button down. Notice that all the
horizontal scrollbars move to the left together, and the
BackColor should darken. Stop
before any of the horizontal scrollbars reach zero. Now use the thumb
button on the brightness scrollbar and move it up to make the
BackColor brighter. Keep moving it
up until red horizontal scrollbar exceeds 255. Your program should
crash, and the following dialog should appear:
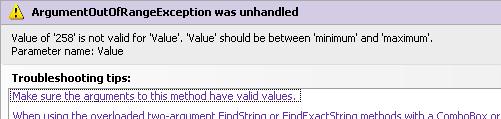
Attempting to set the Value property
of a scrollbar greater than the Maximum
property value or smaller than the Minimum
property value will raise an error and crash your program. The cause
of the program crash is this line of code from the
vsbBrightness_Scroll
event procedure:
hsbRed.Value
+= e.OldValue
- e.NewValue
The above code adds the difference between
e.OldValue
and
e.NewValue
to the Value property of
hsbRed unconditionally.
Changing
hsbRed.Value
to a number less than 0 or greater than 255 will violate the limits set by
the Minimum and
Maximum properties. To avoid this problem, we need to
change the above code so that we can't accidentally change
hsbRed.Value
to a value
outside its allowed limits with an If-Then
test, like this:
'For readability,
create an iDiff variable to store
' e.OldValue - e.NewValue
Dim
iDiff
As Integer
= e.OldValue
- e.NewValue
If hsbRed.Value
+
iDiff
>=
0
And
_
hsbRed.Value
+
iDiff <=
255
Then
hsbRed.Value
+= iDiff
End If
In the above code we are combining two test conditions in one
If-Then test with the
And operator. The
And operator requires that both
tests result in True. The
first test confirms that adding the difference between
e.OldValue
and e.NewValue
to the Value property of
hsbRed will be greater
than or equal to 0 (>=
0):
hsbRed.Value
+
iDiff
>=
0
The second test confirms that we won't try changing
hsbRed.Value
to a number greater than 255 (<=
255):
hsbRed.Value
+ iDiff
<=
255
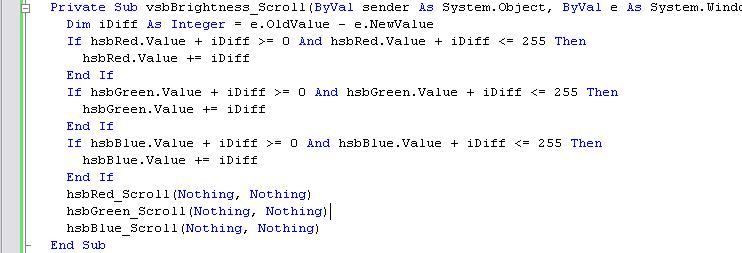
Modify the first three lines of code in the
vsbBrightness_Scroll
event procedure to include this If-Then
test, like this:
'For readability, create
an iDiff variable to store
' e.OldValue - e.NewValue
Dim
iDiff
As Integer
= e.OldValue
- e.NewValue
If hsbRed.Value
+ iDiff
>=
0
And
_
hsbRed.Value
+
iDiff
<=
255
Then
hsbRed.Value
+= iDiff
End If
If
hsbGreen.Value
+ iDiff
>=
0
And
_
hsbGreen.Value
+
iDiff
<=
255
Then
hsbGreen.Value
+= iDiff
End If
If
hsbBlue.Value
+ iDiff
>=
0
And
_
hsbBlue.Value
+
iDiff
<=
255
Then
hsbBlue.Value
+= iDiff
End If
The vsbBrightness_Scroll
event procedure should look like this, now:
Now save and run the program to test it. Does our code prevent the
crash that our previous code caused? It should have. However,
there are other issues, what are they? What else can we do to improve
this code?