Beginning Visual Basic - Project 12
Control Arrays & Variable
Arrays
The 12th Project
In this project you will be using an array of Image Controls and
an array of Variables to create the game of Concentration. An Array
is a group of things (commonly called the Elements of the array) that have the same
name but are distinguished from one another by an index value. This is an example of how
you can Dimension an Array of 16 integers:
Dim iTile(16) As Integer
This dimension statement actually Dimensions 16 different
variables, all of which are integers (the elements of an array must always be of the
same data type). This is how you would assign the value 5 to the first element of
the array, and 8 to the fourth element of the array:
iTile(0) = 5
iTile(3) = 8
Notice that the first element of the array has an index value of 0,
which makes the fourth element 3—(0, 1, 2, 3). This seems a bit confusing at
first, and you may ask "Why are arrays important?". Arrays are really powerful
when you use them in loops. Look how easy it is to set all the elements of the iTile array,
dimensioned above, to the value 10:
For i = 0 to 15
iTile(i)
= 10
Next i
Normally, assigning values to 16 variables would take 16
lines of code. The following code shows how easy it is to set the Visible property
of an array of 10 Command Buttons to False:
For i = 0 to 9
cmdButt(i).Visible
= False
Next i
Not only does it save code to use arrays, but you’ll discover
that many applications are practically impossible to create without them. This project is
a prime example. In this project you will be using arrays of variables and arrays
of controls to make your program more efficient and powerful. As a matter of
fact, to do this project without arrays the code would need to be at least 10 times longer
than it will be.
Begin with a new project (Choose New Project under the File menu, and choose Standard from the New
Project dialog) and press the F4 key to view the form’s properties.
- Change the Caption property to Concentration
International
- Change the default Name of the form (form1) to frmProj12
- Open the Properties dialog by selecting Project1 Properties
under the Project drop-down menu. Make sure the General tab on the Properties dialog is selected. In the Startup Object
combobox make sure frmProj12 is selected (it should be by default). In the Project Name textbox type Project12. In the Project Description
textbox type the following: Concentration:
Using Control and Variable Arrays. Leave all other settings
at their defaults and click the OK button.
- Pull down the File menu and choose Save Project. Save the form as frmProj12.frm. Save the project as proj12.vbp.
Adding an Array of Images to the frmProj12 form (follow
these instructions exactly):
- Click once on your blank Form to make it active.
- Add 1 Image control to the form by double clicking on
the Image control icon in the Control Toolbox (the new image control appears
in the center of the blank form).
- Press the F4 key to view the new Image control’s
properties.
- Set the Name property of the Image control to imgTile.
- Set the Picture property to earth.ico by clicking the ellipses button (…). Find the earth.ico icon file at this
location on your computer in the Moorpark College CIS computer lab: c:\shared\icons\elements\earth.ico,
and double click on it (At Home or
Work: if you installed the graphic files that came with
VB you should have a graphic folder inside: VB5: c:\Program Files\DevStudio\vb, VB6: c:\Program Files\Microsoft Visual Studio\Common. The icon folder is inside the graphic folder). You can also download a self-extracting archive containing just
the icon files you need to do this exercise by clicking on this
link.
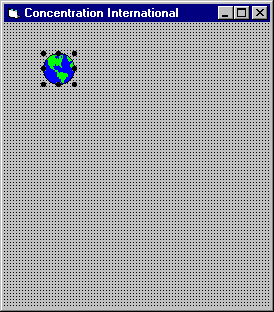
After setting the Picture property to earth.ico, the imgTile Image control should match the one on the example
below.
Use the mouse to drag the Image control and position it on
the form like this:
Point the mouse at the imgTile Image control (on the
form) and click the right mouse button. Select Copy from the context menu.
Right click on a blank place on the form (not on the imgTile
Image) and choose Paste from the context menu. The Array Conformation dialog, similar to
this, should appear.
Click the Yes button. A copy of the Image will appear In the very upper
left corner of the form. This new Image control is actually the second element of
an Array of Image controls. Press the F4 key to view the new Image
control’s properties. Notice that its Name property (in the upper
dropdown Listbox on the properties window) is imgTile(1) (1 is
the second element of an array because 0 is the first element). Click once on
your original Image control and view its properties by pressing F4. Notice
that its Name property (in the upper dropdown Listbox on the properties window)
has changed to imgTile(0).
Use the mouse to drag the new Image control from the upper
left corner of the form, and place it to the right of the first one.
Right click on a blank place on the form (not on either Image
control) and choose Paste from the context menu. This time the Array
Conformation dialog box does not appear and another element in your growing Array of Images appears
in the upper left corner of the form. Use the mouse to drag it to its new position to the
right of the last one.
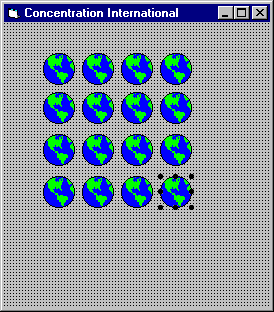
Repeat the bullet above until you have created an Array of 16
Image controls that are arranged like this on your form:
Save the project now. Now you are going to add a new Form to
the project.
- Select Add Form from the Project dropdown menu. Choose Form from the Add Form dialog box and click the Open
button.
- Press F4 to view the new Form’s properties.
- Make the Name property frmStore.
- Make the Caption property Storage Form.
- Select Save frmStore As from the File dropdown menu. Save the new Form in the same place as the rest of
your project files as frmStore.frm.
Right about now you should be asking yourself, "Why do I need
this new form?". Let me explain: The object of the game of concentration is to match
up pairs of different pictures hidden on a grid. The User can only view 2
of the pictures at a time, so they need to concentrate to remember where the
different pictures were in order to select them and match them up. Eight pairs of
pictures are required to fill a 4 by 4 grid (your Array of Images on the
first form). These Eight pictures must be stored somewhere so that you can copy
them to the different Images of the grid as they are needed. You could use the LoadPicture
command and read the picture files directly from the disk whenever they are
needed, but that would mean that everywhere your program went, the pictures files would
have to go as well. A better option would be to add 8 more Images to a
hidden form (frmStore), and store the pictures there. Then whenever they are needed
you can copy them from the images on the hidden form to the images of the grid on your
main form.
Following these steps exactly:
- Click on your new frmStore form to make it the active form.
I reiterate: Before doing the next step, be sure that the frmStore form is the
active form (Its Caption bar reads Storage Form).
- Add 1 new Image control to the frmStore form by double
clicking on the Image control icon in the Control Toolbox.
- Press the F4 key to view the new Image control’s
properties.
- Set the Name property of the Image control to imgFlag.
- Set the Picture property to flgfin.ico by clicking the ellipses button (…). Find the flgfin.ico icon
file. If your in the Moorpark College CIS lab the files is located here: c:\shared\icons\flags\flgfin.ico,
and double click on it (at home you’ll find the flags folder inside your icons
folder in VB5: c:\Program
Files\DevStudio\vb, VB6: c:\Program Files\Microsoft Visual Studio\Common.
You are about to create another Array of images. Unlike the
imgTile array on the first form where all the elements of the array shared the same
Picture property,
each imgFlag array element will have a different Picture property value.
- Point the mouse at the imgFlag Image control and click
the right mouse button. Select Copy from the context menu.
- Right click on a blank space on the frmStore form (not on imgFlag)
and choose Paste from
the context menu. Click the Yes button on the Array Conformation dialog. Drag the newly pasted Image
from the upper left corner of the form and place it to the right of the first one.
- Press the F4 key and change the Picture property of the new Image
to flgden.ico (click
the ellipses button again and find the flgden.ico icon file at this location: VB5: c:\Program Files\DevStudio\vb\graphics\icons\flags\flgden.ico, VB6: c:\Program
Files\Microsoft Visual Studio\Common\graphics\icons\flags\flgden.ico.
- Repeat steps 2
and 3 above to place 6 more Image controls
onto the frmStore form (for a total of 8). Set their Picture
properties to:
(find all these icons in c:\shared\icons\flags folder if your in the
CIS computer lab, or your graphics\icons\flag folder at home)
flggerm.ico, flgcan.ico, flgjapan.ico, flgmex.ico,
flgusa02.ico, flguk.ico
Add one more new Image control (not another imgFlag array element) to the frmStore form, by
double clicking the image control button on the Control Toolbox. Set its Name property to imgEarth. Set its Picture property to:
earth.ico (found in
d:\shared\icons\elements in the CIS computer lab, or your graphics\icons\elements folder
at home)
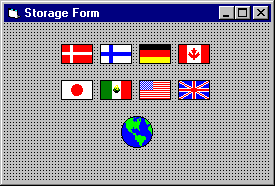
When finished, the frmStore form should look something like
this:
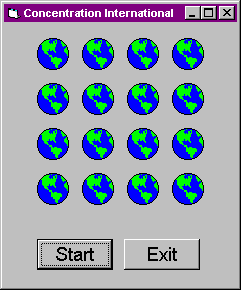
Now you’re going to add Start and Exit buttons to the frmPrj12 form (not frmStore).
Before doing the next step, activate the frmPrj12 Form by double-clicking on
it in the Project Explorer window (Make sure you make the following
changes to the frmPrj12 form not frmStore).
- Place 2 Command Buttons onto the frmPrj12 form.
- Make their Name properties cmdStart and cmdExit.
- Make their Caption properties Start and Exit.
Game Play
The User clicks the Start button to initiate game play. The User then clicks on one of the Earth pictures displayed on the
4 by 4 game grid. The Earth is replaced by a picture of a Flag. The User can then click on another Earth to reveal its Flag picture. With 2 Flags showing, when the User
tries to "turn over" a third Flag, one of two things will happen:
If the first 2 Flags are identical, they remain exposed.
If the first 2 Flags are different, they are flipped back over and replaced by pictures of Earth.
The point of the game is for the User to flip over all
matching pairs of flags as quickly as possible, until they are all exposed.
The following code will goes in the frmPrj12 form code
window. Starting at the top of the next page is the
code for the General Declarations section, the Form_Load event procedure, the cmdStart_Click event procedure, and the imgTile_Click event procedure. Enter this
code as shown and experiment with it by running the program and seeing what it does. In
class (and in our online discussions area) we will discuss using the Debugger to step through the
program, and I will provide a more detailed analysis at that time (do your best to figure
it out on your own initially).
Note:
Be sure to enter this code into frmPrj12’s code window, not the
code window of frmStore.
Here is the code for the General Declarations section:
Option Explicit
Const BLANK = -1
Const FOUND = -1
Dim bDone As Boolean
Dim iTile(16) As Integer
Dim iLastFlipped As Integer
Dim iNumFlipped As Integer
Here is the code for the Form_Load
event procedure:
Private Sub Form_Load()
Randomize
bDone = True
End Sub
Here is the code for the cmdStart_Click
event procedure:
Private Sub cmdStart_Click()
Dim i As Integer, iPos As Integer
Dim iFlag As Integer
Dim bLooking As Boolean
For i = 0 To 15
iTile(i)
= BLANK
imgTile(i).Picture
= frmStore.imgEarth.Picture
Next i
iLastFlipped = BLANK
iNumFlipped = 0
bDone = False
For iFlag = 0 To 7
bLooking
= True
While
bLooking
iPos = Int(Rnd * 16)
If iTile(iPos) = BLANK Then
iTile(iPos) = iFlag
bLooking = False
End If
Wend
bLooking
= True
While
bLooking
iPos = Int(Rnd * 16)
If iTile(iPos) = BLANK Then
iTile(iPos) = iFlag
bLooking = False
End If
Wend
Next iFlag
End Sub
Here is the code for the imgTile_Click event procedure:
Private Sub imgTile_Click(Index As Integer)
Dim i As Integer
If bDone or Index = iLastFlipped Then Exit Sub
imgTile(Index).Picture = _
frmStore.imgFlag(iTile(Index)).Picture
iNumFlipped = iNumFlipped + 1
Select Case iNumFlipped
Case 1
iLastFlipped = Index
Case 2
If iTile(Index) = iTile(iLastFlipped) Then
iTile(Index) = FOUND
iTile(iLastFlipped) = FOUND
iLastFlipped = BLANK
End If
Case 3
iNumFlipped = 1
iLastFlipped = Index
For i = 0 To 15
If iTile(i) <> FOUND And i <> Index Then
imgTile(i).Picture = _
frmStore.imgEarth.Picture
End If
Next i
End
Select
End Sub
Enhancements to the program (Not required, but hey, you do want to pass don’t
you?):
Not so hard
- Fix any anomalies or bugs in the original code (they exist).
- Tell the User when they have won.
- Add a Timer control to count off the seconds (set the Timer’s
Interval property to 1000). Remember, the fastest time wins.
- Add any other features you can think of.
Hard
- Make the game harder by adding another row/column of images to the
playing grid (and more flags to go with them).
- Enable different levels of difficulty.
A Better Way
Let's take a look in the cmdStart_Click
event procedure and examine the code we use to randomize the locations of the
flags when we start a new game. This code is fine, and fast, if we are
using an array of Images with only 16 elements in it. However, if we
increase the number to 100 images, this code will become almost unbearably
slow. The reason this code works efficiently with 16 elements and
unacceptably with 100 or more elements has to do with this part of the code:
While
bLooking
α
iPos = Int(Rnd * 16)
If iTile(iPos) = BLANK Then
iTile(iPos) = iFlag
bLooking = False
End If
Wend
The arrowed line of code above is where our
problems with this code begin. Our method of randomly picking an
unused iTile() element out of an array of
16 iTile()'s depends upon the random
numbers that we generate (on the arrowed line) to eventually include all of
the numbers between 0 and 15.
The While loop above will keep
going until an iTile() array element has
been found that has not already been assigned a flag index. This is easy
the first few times this loop is executed because all of the iTile()
array elements are blank to begin with. Early on, the random numbers that
are generated are more likely to represent an unused iTile()
than one that has already been assigned a flag index. But what happens
at the end of this process, when there are only a couple of iTile()
array elements remaining that are blank? Since we are still generating
random numbers between 0 and 15,
the odds go way down that we will randomly generate the index value of an
unused iTile(). With a range of only
0 to 15, our random numbers do eventually pop up for those last
remaining unused iTile() array
elements. Even in the most unusual situations, the last couple of random
numbers we need will pop up within a couple of tenths of a second. But
what if we increased the number of images to 100, and the range of
random numbers from 0 to 99?
Instead of causing a delay of just a couple tenths of a second, the delay
might be several seconds long. What do you thing would happen if we
change the range of random numbers to from 0
to 999, or 0 to
9999? While our While
loop goes around and around, we would be generating a random number each time
between 0 and 9999
hoping that it will hit the index value of the last remaining
iTile() array element that has not yet been assigned a flag index,
minutes or even hours could go by!
Okay, so the code above is fine for a limited number of
images--a concentration game with a difficultly level that uses a hundred
tiles is ridiculous (I've seen it!). But how should be change our code
to handle a similar
situation with over 1000 array elements?
Private Sub cmdStart_Click()
Dim i As Integer, iPos As Integer
Dim iFlag As Integer
Dim bLooking As Boolean
Dim iIndex(16) As Integer, iIndexLimit As Integer
For i = 0 To 15
iTile(i)
= BLANK
imgTile(i).Picture
= frmStore.imgEarth.Picture
iIndex(i) = i
Next i
iLastFlipped = BLANK
iNumFlipped = 0
bDone = False
iIndexLimit = 16
For iFlag = 0 To 7
'Pick
a random location for iFlag and use it
iPos = Int(Rnd * iIndexLimit)
iTile(iIndex(iPos)) = iFlag
'Delete
the value in the used iIndex(iPos) element and shrink the array
For
i = iPos To iIndexLimit - 2
'Make every element of iIndex() equal to the
value of the next element
'
starting from iIndex(iPos), this deletes the value in iIndex(iPos)
'
and leaves behind only unused index values
iIndex(i)
= iIndex(i + 1)
Next
i
'Reduce
the maximum number of available index values by 1
iIndexLimit = iIndexLimit - 1
'Pick
another random location for iFlag from the iIndex() elements that remain
iPos = Int(Rnd * iIndexLimit)
iTile(iIndex(iPos)) = iFlag
'Delete
the value in the used iIndex(iPos) element and shrink the array
For
i = iPos To iIndexLimit - 2
'Make every element of iIndex() equal to the
value of the next element
'
starting from iIndex(iPos), this deletes the value in iIndex(iPos)
'
and leaves behind only unused index values
iIndex(i)
= iIndex(i + 1)
Next i
'Reduce
the maximum number of available index values by 1
iIndexLimit = iIndexLimit - 1
Next iFlag
End Sub
The above code is far superior to our original
code. But it is more complicated, so I hesitated to use this version of
the code in our original version of this project. By adding a locally
dimensioned array of integers (iIndex)--that
will store the index values of our iTile()
array elements--and a single integer (iIndexLimit)--to
store the number of image indexes that are still unused (BLANK)--we can
restrict our generation of random numbers to just those numbers that represent
the index values of unused iTile() array
elements. We start off by initialize all the elements of the iIndex()
array to the same number value as its position in the array:
For i = 0 To 15
iTile(i)
= BLANK
imgTile(i).Picture
= frmStore.imgEarth.Picture
α iIndex(i)
= i
Next i
So now the values of the iIndex()
array elements look like this:
iIndex(0) =
0
iIndex(1) =
1
iIndex(2) =
2
etc.
Now we generate a random
number with iIndexLimit as
our limit. Then instead of using iPos
as the index value for iTile(), we us iIndex(iPos),
like this:
iPos = Int(Rnd * iIndexLimit)
iTile(iIndex(iPos)) = iFlag
To make sure we do not use the value stored in iIndex(iPos)
again, we use a For-Next loop to remove it from our iIndex()
array, like this:
For
i = iPos To iIndexLimit - 2
'Make every element of iIndex() equal to the
value of the next element
'
starting from iIndex(iPos), this deletes the value in iIndex(iPos)
'
and leaves behind only unused index values
iIndex(i)
= iIndex(i + 1)
Next i
And then we reduce the range of random numbers we can
generate by decrementing iIndexLimit,
like this:
iIndexLimit = iIndexLimit - 1
The next time we generate a random number, it's maximum
value will be 1 less than the previous maximum. We don't have to worry
about generating the index of an iTile()
array element that has been used before, because the used index value in iIndex(iPos)
has been removed from the iIndex()
array.
Take some time to study this code. No matter how
big the range of numbers is, this code is fast! We may still generate
the same random number several times--as in our previous version of this code,
it is inevitable--but because we remove the number stored at that location in
the iIndex()
array each time, we can never generate the same index value for
iTile() twice.


