Beginning Visual Basic (Visual Studio 2008) - Project 11

Counting Key Strokes and Custom Procedures

Project 11

Creating Project 11 from Project 10

Open Project10-11 by selecting it on the start page, as shown:

You may also open it by selected Open Project on the File drop-down menu.

Rename the Form file by changing its File Name property 

Select the frmProj10.vb form file in the Solution Explorer window, as shown:

Change the File Name property from frmProj10.vb to frmProj11.vb:

Renaming the form file should have automatically rename the form as well.  In design view click once on the form to select it and display its properties in the Properties Window.  Be sure that the Name property of the form is now frmProj11 and change the Text property of the form to Project 11, as shown:

Before going on, click on the Save All button on the toolbar to save your project.


Modifying the Form

You will add counters under both the txtEnter and txtView Textboxes. The counters will keep track of the Number of Characters, the Number of Words, and the Number of Sentences. The final result will look something like this:

The labels for the counters, and the counters themselves are Label controls.  Use the above illustration to guide you and add 6 labels under the Enter Text textbox on the left side, use this table to set their properties.  Note: Don't forget that you can make fine adjustments to the positions of controls by selecting them and using the arrow keys on the keyboard:

Under the Enter Text textbox
Label Label
Property Value Property Value
Name (default name) Name lblChars1
AutoSize False AutoSize False
BackColor (Anything but Gray) BackColor (Anything but Gray)
Text Number of Characters: Text 0
TextAlign MiddleRight TextAlign MiddleLeft
Label Label
Property Value Property Value
Name (default name) Name lblWords1
AutoSize False AutoSize False
BackColor (Anything but Gray) BackColor (Anything but Gray)
Text Number of Words: Text 0
TextAlign MiddleRight TextAlign MiddleLeft
Label Label
Property Value Property Value
Name (default name) Name lblSents1
AutoSize False AutoSize False
BackColor (Anything but Gray) BackColor (Anything but Gray)
Text Number of Sentences: Text 0
TextAlign MiddleRight TextAlign MiddleLeft


Now add 6 more labels under the View Text textbox on the right side, use this table to set their properties:

Under the View Text textbox
Label Label
Property Value Property Value
Name (default name) Name lblChars2
AutoSize False AutoSize False
BackColor (Anything but Gray) BackColor (Anything but Gray)
Text Number of Characters: Text 0
TextAlign MiddleRight TextAlign MiddleLeft
Label Label
Property Value Property Value
Name (default name) Name lblWords2
AutoSize False AutoSize False
BackColor (Anything but Gray) BackColor (Anything but Gray)
Text Number of Words: Text 0
TextAlign MiddleRight TextAlign MiddleLeft
Label Label
Property Value Property Value
Name (default name) Name lblSents2
AutoSize False AutoSize False
BackColor (Anything but Gray) BackColor (Anything but Gray)
Text Number of Sentences: Text 0
TextAlign MiddleRight TextAlign MiddleLeft


Using the KeyPress event procedure

To keep track of the number of Characters, Words, and Sentences that are typed into the txtEnter textbox, you must examine each key press. As you know, Textboxes come with a KeyPress event procedure. Type the following code into the txtEnter_KeyPress event procedure:

'If the user did not type the Backspace key,
'    increment the Character counter.  If
'    they did, decrement it.
If e.KeyChar <> Chr(Keys.Back) Then
   
lblChars1.Text = CInt(lblChars1.Text) + 1
Else
   
lblChars1.Text = CInt(lblChars1.Text) - 1
End If
'If the user typed the Spacebar key,
'       increment the Word counter.
If e.KeyChar = Chr(Keys.Space) Then
   
lblWords1.Text = CInt(lblWords1.Text) + 1
End If
'If the user typed the Period key, increment
'       the Word and Sentence counters.
If e.KeyChar = Chr(46) Then
   
lblWords1.Text = CInt(lblWords1.Text) + 1
   
lblSents1.Text = CInt(lblSents1.Text) + 1
End If

The first If-Then-Else test above increments the Character counter unless the user typed the Backspace key.  If they type the Backspace key, we assume they deleted a character so we decrement the Character counter.  But what about the Delete key?  We cannot test for the Delete key in the KeyPress event procedure. 

Using the KeyDown event procedure

Textboxes actually have two event procedures that process keystrokes.  So far we have only used the KeyPress event procedure.  There is also a KeyDown event procedure.  The difference between the two event procedures requires a little explanation of how the keyboard sends keystroke codes to the operating system.  When you type a key on the keyboard it transmits two numbers to the operating system.  The first number is processed by the KeyPress event procedure, the second number is processed by the KeyDown event procedure.  The majority of keys on the keyboard send the number code that represents the key stroke in the first number, and so we use the KeyPress event procedure to process most keystrokes.  But there are also a set of keys that send the number code that represents the keystroke in the second number.  These keys include the Function Keys, Page Up and Page Down keys, Insert, Home, End, and Delete keys.  In order to detect when the user types the Delete key, we need to add the following code to the txtEnter_KeyDown event procedure:

'If the user typed the Delete key, decrement
'       the Character counter.
If e.KeyValue = Keys.Delete Then
   
lblChars1.Text = CInt(lblChars1.Text) - 1
End If

Creating the CWS_Counter procedure

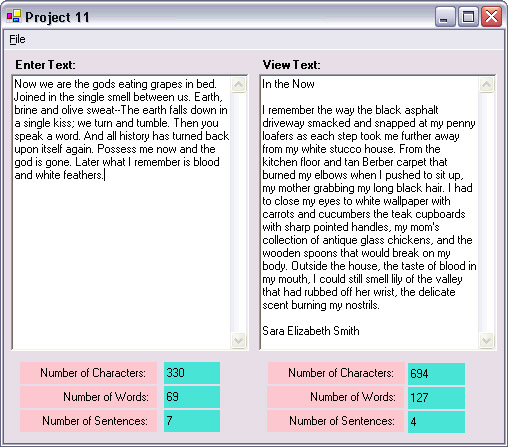
The above code takes care of counting Characters, Words, and Sentences in the Enter Text textbox (txtEnter) while the user is typing. To count the same elements of a text file that we read and display in the View Text textbox (txtView), we will create our own custom procedure. One big difference between a procedure you create and an event procedure that comes built into a Control, is that your created procedure must be called manually.  The Event Procedures of a control are executed when the user raises an event by interacting with the control, by clicking on it, passing the mouse over it, etc. We will create a custom procedure to count the Characters, Words, and Sentences in the View Text textbox. To create your custom procedure do the following:

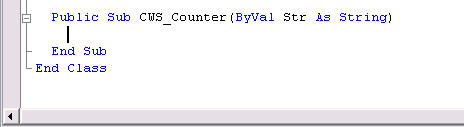
Insert a blank line above the End Class statement at the bottom of the code window, type the following line and press the Enter key:

Public Sub CWS_Counter(ByVal Str As String)

The End Sub statement should appear automatically below your cursor after you press enter (as shown in the illustration below): 


Our CWS_Counter procedure will count the Characters, Words, and Sentences of a string (Str) that is passed to it.  We will use a For-Next loop and scan through the string one character at a time.  Let's begin by dimensioning three variables to keep track of the Characters, Words, and Sentences.  Add these three dimension statements at the top of the CWS_Counter procedure:

'Use these variables to count the number of
'     Characters, Words, and Sentences in Str
Dim iChars As Integer
Dim
iWords As Integer
Dim
iSents As Integer

Using a For-Next loop

This is the format of a For-Next loop (do not type this code):

For <Counter variable> = <Start value> To <Limit value>  Step <Step value>
    ...
    <loop code goes here>
    ...
Next

The <Counter variable> is initialized to a starting value, and then compared to the <Limit value>.  If the <Counter variable> is less than or equal to the <Limit value> the code between For and Next is executed.  Then the <Counter variable> is incremented by the <Step value> and the <Counter variable> is compared to the <Limit value> again.  The process continues until the <Counter variable> exceeds the <Limit value>, and the loop exits.  The Step part of the code above is optional. The step is +1 by default.

We will use the iChars variable as our loop counter.  Type the following line of code into the CWS_Counter procedure (below the three dimension statements):

'Start at character position 1 and go
'    to the Length of Str minus 1.
For iChars = 1 To Str.Length - 1

String variables have a Length property that is equal to the number of characters in the string, so we are using Str.Length as the limit for our For-Next loop.  We are actually using Str.Length - 1 as the limit because the first character of the string is at index position 0. This means that Str.Length would be equal to 50 for a string that was 50 characters long; But that the last character in the string would be at index position 49. 

Using the SubString method of a String to examine single characters inside it

String variables also have a SubString method that lets you examine or extract pieces of a string.  We will use the SubString method of Str to look at individual characters in the string.  This is the format of the SubString method:

Str.Substring(<Start Char Position>, <Number of Characters>)

Add the following code inside the For-Next loop:

'Check if the char at position iChars is a Space
If Str.Substring(iChars, 1) = " " Then
   
iWords += 1
'Check if the char at position iChars is a Period
ElseIf Str.Substring(iChars, 1) = "." Then
  
 iWords += 1
   
iSents += 1
End If

Note: Because iChars is our loop counter variable, it starts out equal 1 and grows one larger each time the loop is executed.  We are using iChars in the SubString method to designate the character position in Str that we want to examine.  By the time the loop is finished—with iChars incrementing with each iteration—we will have examined every character in the string. 

Notice how in the code above, we are using the += operator to increment the iWords and iSents variables, instead of the older method of making them equal to themselves plus one, like this: iWords = iWords + 1.  Take a look at this code comparison (do not type this code):

This:
    iWords += 1
does the same as this:
    iWords = iWords + 1

Note: There are also several other operators of this type, for example: -= (the variable is equal to itself minus some value), *= (the variable is equal to itself multiplied by some value) and &= (the string variable is equal to itself and joined to another string).

Once the loop is finished, we can assign the values in iChars, iWords, and iSents to the counter labels.  Add the following code below the Next statement in the CWS_Counter procedure:

'Assign the final values to the
'    View Text counter labels.
lblChars2.Text = iChars
lblWords2.Text = iWords
lblSents2.Text = iSents

This is a summary of the code in the CWS_Counter procedure:

'Use these variables to count the number of
'     Characters, Words, and Sentences in Str
Dim iChars As Integer
Dim
iWords As Integer
Dim
iSents As Integer
'Start at character position 1 and go to
'    the Length of Str minus 1.
For iChars = 1 To Str.Length - 1
     'Check if the char at position iChars is a Space
    If Str.Substring(iChars, 1) = " " Then
       
iWords += 1
     'Check if the char at position iChars is a Period
    ElseIf Str.Substring(iChars, 1) = "." Then
  
     iWords += 1
   
    iSents += 1
    End If
Next

'Assign the final values to the View Text counter labels
lblChars2.Text = iChars
lblWords2.Text = iWords
lblSents2.Text = iSents

Make sure your code matches the above code before going on.

Calling the CWS_Counter procedure from mnuOpen_Click

To use the CWS_Counter procedure we need to call it and pass it the contents of the View Text textbox (txtView).  The best place to do this is immediately after filling the View Text textbox.  Look inside the mnuOpen_Click event procedure.  Insert the call to CWS_Counter (in large italicized font below), where shown below.  This single line of code is being inserted into the existing code of mnuOpen_Click:

If iResult <> Windows.Forms.DialogResult.Cancel And _
        OpenFileDialog1.
FileName <> "" Then
    Dim
FStream As New _
        
IO.FileStream(OpenFileDialog1.FileName_
         IO.
FileMode.Open)
    Dim
SReader As New IO.StreamReader(FStream)
  
 txtView.Text = SReader.ReadToEnd()
   
SReader.Close()
   
FStream.Close()
   
SReader = Nothing
   
FStream = Nothing
   
CWS_Counter(txtView.Text)
End If

With the addition of the call to CWS_Counter above, we are updating the values in the counter labels right after opening a new file.

Save and test your program thoroughly.

Required Enhancements

Get the code in txtEnter_KeyPress and txtEnter_KeyDown event procedures to work properly. By that I mean to test it thoroughly. Try using the Backspace and Delete keys and see what your counters do. Are their values accurate?  Your goal is to modify the code in the txtEnter_KeyPress and txtEnter_KeyDown event procedures until it works.


Hint: Please don't read this hint section until you've struggled for awhile on your own with this problem.

The Best way to get the real-time Character, Word, and Sentence counting to work in the Enter Text textbox is not to place any code in the txtEnter_KeyPress or txtEnter_KeyDown event procedures at all. But instead to take a totally different approach to the problem. Start by completely deleting your txtEnter_KeyPress and or txtEnter_KeyDown event procedures.

Instead of trying to count in real-time, character by character, we need to count everything with each keystroke.  We've already created a procedure that counts the Characters, Words, and Sentences in a string.  What if we were to pass the contents of the Enter Text textbox (txtEnter) to the CWS_Counter procedure, every time the contents of the Enter Text textbox changes?  We could use a call like this (do not type this code yet):

CWS_Counter(txtEnter.Text)

The only problem with the above code is that the CWS_Counter procedure updates the counter labels for the View Text textbox, and we want to update the counter labels for Enter Text.

Modifying the CWS_Counter procedure so it can count for both textboxes

If we modify the CWS_Counter procedure so that a call to it includes an extra parameter that indicates which counter labels need to be updated, we can use it to count the Characters, Words, and Sentences of both the Enter Text and View Text textboxes.  Begin by adding these constant declarations to the Declaration section at the top of the code window:

Const ENTER_TEXT = 1
Const VIEW_TEXT = 2

Now change the CWS_Counter procedure declaration from this:

Public Sub CWS_Counter(ByVal Str As String)

To this:

Public Sub CWS_Counter(ByVal Str As String, _
                                  ByVal
WhichLabels As Integer)

By adding a new parameter: WhichLabels, we can tell the CWS_Counter procedure which counter labels need to be updated.  Now make this addition to the existing code (shaded and non-Italicized below) at the end of the CWS_Counter procedure (in large italicized font below):

        iSents += 1
    End If
Next
If
WhichLabels = ENTER_TEXT Then

     'Assign the final values to the Enter Text counter labels
    lblChars1.Text = iChars
    lblWords1.Text = iWords
    lblSents1.
Text = iSents
Else
     'Assign the final values to the View Text counter labels
    lblChars2.Text = iChars
    lblWords2.Text = iWords
    lblSents2.Text =
iSents
End If

So depending upon the value of the WhichLabels argument, either the Enter Text or View Text counter labels get updated.  The last two things we need to do are change the line of code that calls the CWS_Counter procedure in the mnuOpen_Click event procedure so that it includes the new second parameter that specifies which labels are to be updated:

CWS_Counter(txtView.Text, VIEW_TEXT)

And add the following new line of code to the txtEnter_TextChanged event procedure.  Note: Notice that because you've modified the procedure declaration for CWS_Counter to include a new WhichLabel parameter, the smart tip that appears when you're typing the line below tells you that a WhichLabel parameter is required:

CWS_Counter(txtEnter.Text, ENTER_TEXT)

Before testing these modifications to your program, make sure you have completely deleted the txtEnter_KeyPress and txtEnter_KeyDown event procedures.  The code they contained is no longer required.


To copy a Project folder from your Projects folder on the Hard Drive to a floppy diskette or pen-drive follow these steps:

  1. Exit Visual Studio 2008 and insert the floppy diskette or pen-drive, that you want to copy the Project10-11 folder to:
  2. Select the My Documents item on the Start Menu to open the My Documents folder.
  3. In the My Documents folder, double-click the Visual Studio 2008 folder to open it.
  4. Double-click on your Projects folder to open it.
  5. Open the Project10-11 folder by double-clicking on it.  Inside the Project10-11 folder, delete the Obj and Bin folders—these folders are created automatically when you open a project.  You do not need to copy them, or their contents, to your floppy diskette or pen-drive.  Important: Be sure not to delete the My Project folder or Resources folder, if it exists.
  6. Once you have deleted the Obj and Bin folders, hit the Backspace key once—or click the Back button on the toolbar.  This moves you from inside the Project10-11 folder to back inside your Projects folder.
  7. Right-click on the Project10-11 folder and selected: 31/2" Floppy A: or your pen-drive on the Send To fly-out menu.  This copies the Project10-11 folder to your floppy diskette or pen-drive.