What’s so important about Class Libraries and OLE Server applications
Class or Code Libraries, in the form of DLL (Dynamic Link Libraries) files, form the foundation of the Windows Operating System—dynamic link library files have a .dll extension. The classes and functions that a Class Library contains are exposed so that other applications can access them. For example, the code that generates the Windows GUI (Graphic User Interface) exists in DLL files which are part of the operating system. These files are shared and can be used by almost every application. By putting commonly used classes and functions into Class Libraries programs don't need to contain the code of those classes and functions, so they are smaller and easier to maintain. A Class Library is usually in the form of a DLL file, which cannot run as a stand-alone application. An OLE Server application on the other hand, is a stand-alone program (the program file has an .exe extension), which also has exposed functionality. For example, Microsoft Word and Excel are Ole Server applications. We discovered that in projects 5 and 6 where we were able to run instances of Word and Excel directly from within our own applications.
Creating a custom CompInfo class library
In this project, we will create a Class Library that contains four custom classes (objects). Each class will have several Properties or Methods that provide useful information about the computer. Here is a list of the classes we will create:
| Class Library | ||
| Class | Property/Method | |
| pCPU | Count | Number of CPU's in the computer |
| Architecture | CPU architecture, i.e. x86 | |
| Version | Version number of the CPU | |
| Level | Level number of the version | |
| Identifier | A summary of the above information | |
| pOS | Platform | The name of the operating system |
| Version | The version of the operating system | |
| pDisk | Size | Size of the specified disk drive |
| FreeSpace | Free space on the specified disk drive | |
| UsedSpace | Used space on the specified disk drive | |
| pMemory | FreePhys | Free physical memory |
| FreeVirt | Free Virtual memory | |
All of the above classes will be combined into a single Class Library named CompInfo.dll. We will then be able to create instances of these classes from within other applications by setting a reference to the CompInfo.dll class library.
Launch Microsoft Visual Studio 2010. Drop down the File menu and select New Project...
Be sure the Class Library template in the New Project dialog is selected in the Templates pane on the right side, then type CompInfo in the Name textbox (as shown below):

Now click the OK button.
Save the project by clicking on the Save All button on the standard toolbar. This displays the Save Project dialog box, as shown:
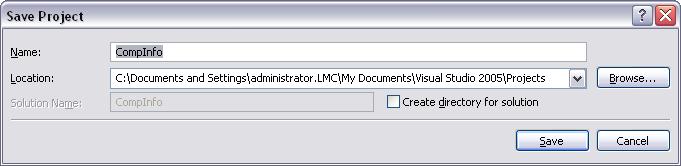
Do not change the default Location path. Be sure to uncheck the Create directory for solution option, as show above, before clicking on the Save button.
This creates a new folder inside the My Documents\Visual Studio 2010\Projects\ folder named CompInfo:
My Documents\Visual Studio 2010\Projects\CompInfo
Rename the Class file
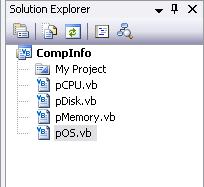
When you create a new Class Library a single class module is added automatically—like a Windows Application adds a form automatically. Make sure the class file is selected in the Solution Explorer window:
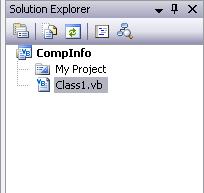
With the class file (Class1.vb) selected in the Solution Explorer window (as shown above), the Properties window directly below it displays it's File properties. Click on the File Name property and type pCPU.vb and press the enter key (don't forget to include the .vb extension, as shown in the illustration below):

Adding three more Class modules to the project
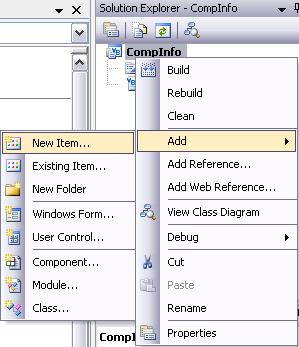
Right-click on the CompInfo project in the Solution Explorer window (as shown below) and select New Item... under the Add menu item on the context menu:
On the Add New Item dialog, be sure the Class template is selected in the Templates pane (see illustration below). Type pOS.vb in the Name textbox and click the Add button:
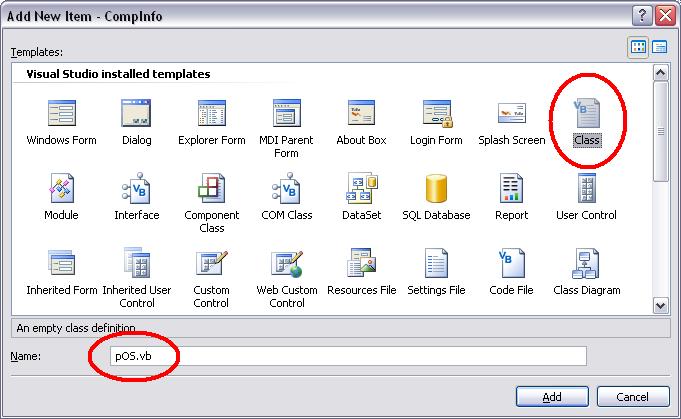
This adds the pOS class module file to the project. Now use the Add New Item option two more times to add two more class modules to the project and name them pDisk.vb and pMemory.vb. Be sure to name each class module as you add it by typing it's name in the Name textbox of the Add New Item dialog. Your solution explorer window should look like this when you are finished adding all four Class modules:
Adding five Properties to the pCPU class
The basic format of a Property declaration looks like this (do not type this code):
'Internal storage for the property's value.
Private MonthNum As Integer = 1
'The Month property declaration
Property Month() As Integer
'The Get section returns the value
' of the property.
Get
Return MonthNum
End Get
'The Set section applies a value
' to the property.
Set(ByVal Value As Integer)
If Value < 1 Or Value > 12 Then
'Error processing for invalid value.
Else
MonthNum = Value
End If
End Set
End Property
This Month Property—of some unknown class, hereafter called <ClassName>—is an example of the basic layout of a Property declaration. Notice the Get and Set parts of the declaration. The Get part is executed when the value of the property is examined, with code like this for example:
If <ClassName>.Month = 6 Then
The Set part of the property declaration is executed when the programmer assigns a new value to the Property, like this:
<ClassName>.Month = 11
This kind of Property has both Get and Set parts. But Properties can be created that have only a Get section. Properties with only a Get section are called ReadOnly properties, since their values cannot be set by the programmer. The properties that we will be creating for the pCPU class will be ReadOnly. A ReadOnly property declaration looks like this (don't type this code yet):
'Returns the number of CPU's in the computer
ReadOnly Property Count() As String
Get
Return GetEnvironmentVariable( _
"NUMBER_OF_PROCESSORS").ToString
End Get
End Property
Notice how we use the ReadOnly keyword when we declare the property. This prevents us from even adding a Set section in the declaration. This means that a programmer can see the value of this property, but they cannot assign a value to it. Note: A common example of a ReadOnly property is the Count property of a collection. When examined, the Count property returns the number of items in the collection, but you cannot assign a value to Count because it is ReadOnly.
Accessing information about the Environment with System.Environment
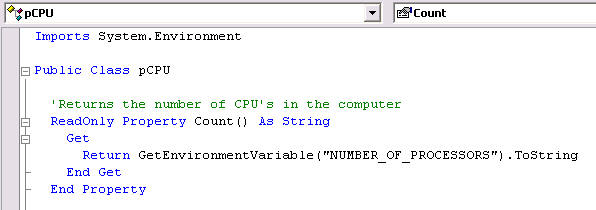
Be sure that the code window of the pCPU class is displayed. Add the following Imports statement at the top of the pCPU class code window (above the Public Class pCPU line):
Imports System.Environment
This gives us access to the GetEnvironmentVariable method of the System.Environment class. By passing an environment variable name as a string to the GetEnvironmentVariable method, it returns the value of that environment variable. Note: Environment variables are stored in the registry, the GetEnvironmentVariable method looks in the registry to find their values. Now add the following code below the Public Class pCPU line to create a Count property for the pCPU class:
'Returns the number of CPU's in the computer
ReadOnly Property Count() As String
Get
Return GetEnvironmentVariable( _
"NUMBER_OF_PROCESSORS").ToString
End Get
End Property
Your pCPU code window should look like this now:
Now continue adding the following code to create four more properties for pCPU (below the End Property line of the Count property):
'Returns the Processor Architecture
ReadOnly Property Architecture() As String
Get
Return GetEnvironmentVariable( _
"PROCESSOR_ARCHITECTURE").ToString
End Get
End Property'Returns the Processor Level
ReadOnly Property Level() As String
Get
Return GetEnvironmentVariable( _
"PROCESSOR_LEVEL").ToString
End Get
End Property'Returns the Processor Version
ReadOnly Property Version() As String
Get
Return GetEnvironmentVariable( _
"PROCESSOR_REVISION").ToString
End Get
End Property'Returns the Processor description
ReadOnly Property Identifier() As String
Get
Return GetEnvironmentVariable( _
"PROCESSOR_IDENTIFIER").ToString
End Get
End Property
Adding a Module so that we can Test the new Properties of the pCPU class
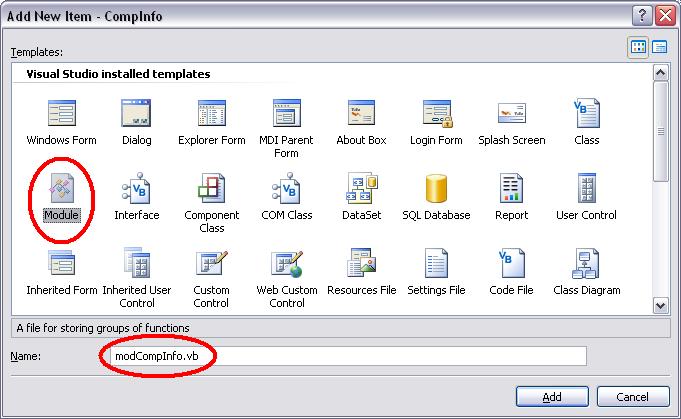
In order to test the five new properties we've added to the pCPU class, we need to add a Module to the project. Think of a Module as the code window part of a Form without the actual Form. Right-click on the CompInfo project in the Solution Explorer window and select New Item... under the Add menu item on the context menu. On the Add New Item dialog, be sure the Module item in the Templates pane is selected (as shown below), and type modCompInfo.vb in the Name text box and click the Add button:
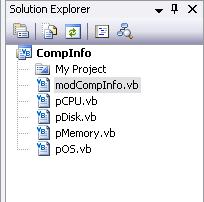
Your solution explorer window should look like this when you are finished adding the modCompInfo.vb Module:
Adding a Sub Main procedure to the Module
Open the code window for the modCompInfo.vb module file. Below the Module modCompInfo line, type the following line of code and press enter:
Sub Main
This creates a Sub Main procedure. Add the following line of code to the Sub Main procedure to construct a pCPU object:
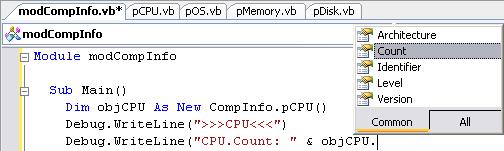
Dim objCPU As New CompInfo.pCPU()
Now that we have created a pCPU object, we can access it's properties to see if the values they contain are valid. Add the following lines of code to the Sub Main procedure:
Debug.WriteLine(">>>CPU<<<")
Debug.WriteLine("CPU.Count: " & objCPU.Count)
Debug.WriteLine("CPU.Arch: " & objCPU.Architecture)
Debug.WriteLine("CPU.Version: " & objCPU.Version)
Debug.WriteLine("CPU.Level: " & objCPU.Level)
Debug.WriteLine("CPU.Ident: " & objCPU.Identifier)
Notice that when you typed objCPU. a pop up list of the properties we added to the pCPU class are displayed:
Important: Because this project has no form, we should add a message box to let us know when the program finishes, and so that we can see the output in the Immediate window. Add the following line of code immediately above the End Sub line at the bottom of Sub Main to display a message box when the program finishes:
'Because there is no form, display a message
' box when the program finishes.
System.Windows.Forms.MessageBox.Show( _
"Program Finished! Check the OutPut Window.")
So what's with the squiggle blue underline on this MessageBox line of code? Remember, this is a Class Library project. A reference to the System.Windows.Forms class library—which is where the MessageBox class is declared—was not set for us by default, like it is when we create a Windows Application project. This isn't going to be a problem for long. In order to have the Sub Main code executed when we run this program, we need to temporarily change it's Application Type from a Class Library to a Windows Application. Double-click on the My Project item in the solution explorer window to display the project properties window. With the Application tab selected, your project property window should look like this:
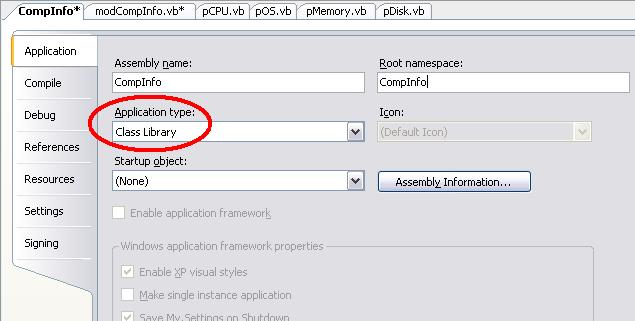
Notice that the Application type is set to Class Library (Note: This window looks slightly different in Visual Studio 2010 from the illustrations above and below which are from Visual Studio 2010) Change the Application type to Windows Application (In Visual Studio 2010 select Windows Forms Application) then drop down the Startup object list and choose, Sub Main, as shown in the following illustration:
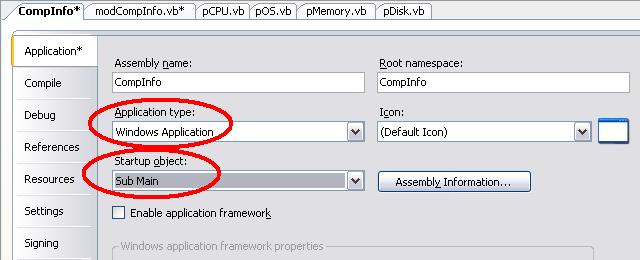
After making these changes, click on the Save All button to save the project. You can then right-click on the project property tab (CompInfo) and close it. You should notice that the squiggle blue underline on the MessageBox line of code in the Sub Main procedure is gone. Changing the project type from Class Library to Windows Application included several class library references automatically, including the System.Windows.Forms class library—of which the MessageBox class is a member.
Testing the program so far
Run the program. When the messagebox tells you the program is finished, don't close it yet and take a look at the Immediate window. It should look something like this (Note: The Immediate window is only displayed at run-time. You can scroll it up and down, or resize it to see its contents):
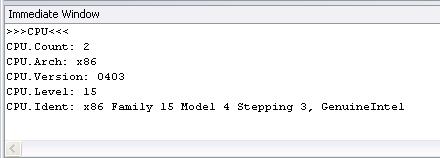
Notice the five lines under the >>>CPU<<< header line. These are the Debug.WriteLine statements for the five properties of the pCPU class from Sub Main. Your values will differ from the above values, depending upon the type of computer you are using.
Adding Two Properties to the pOS class
Be sure that the code window of the pOS class is displayed. We will use the OSVersion class of System.Environment to provide the values for the Platform and Version properties we will now add to the pOS class. So add the following Imports statement at the top of the pOS class code window (above the Public Class pOS line):
Imports System.Environment
This gives us access to the of the OSVersion class, which conveniently has Platform and Version properties. Add the following code below the Public Class pOS line to create the Platform and Version properties for the pOS class:
'Returns the Operating System Name
ReadOnly Property Platform() As String
Get
Return OSVersion.Platform.ToString
End Get
End Property'Returns the Operating System Version
ReadOnly Property Version() As String
Get
Return OSVersion.Version.ToString
End Get
End Property
Using Sub Main to test the new pOS properties
Save the project now. Add the following line of code at the beginning of the Sub Main procedure in the modCompInfo.vb module code window to construct a pOS object:
Dim objOS As New CompInfo.pOS()
Now add the following three lines of code to the Sub Main procedure (above the Message Box line of code) in the modCompInfo.vb module code window:
Debug.WriteLine(">>>OS<<<")
Debug.WriteLine("OS.Platform: " & objOS.Platform)
Debug.WriteLine("OS.Version: " & objOS.Version)
Testing the program so far
Save the project now. Run the program. When the message box tells you the program is finished, take a look at the Immediate window. Do you see the pOS Platform and Version information under the >>>OS<<< header line?
Adding three Methods to the pDisk class
Instead of Properties, we will add three Methods (Size, FreeSpace, and UsedSpace) to the pDisk class. Unlike Properties, Methods are functions that can be passed parameters. In this case, Size, FreeSpace, and UsedSpace need to be passed the drive letter that they will provide information about, i.e. objDisk.Size("c:").
Adding a Reference to the System.Management class library
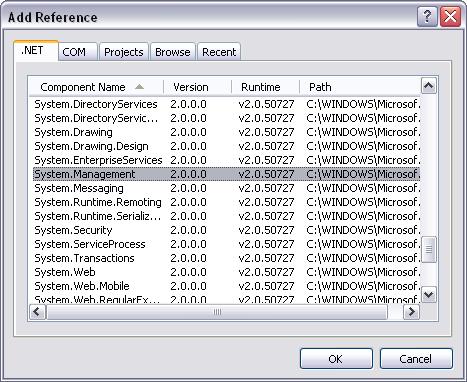
To access information about the disk drives on the computer, we will need to use a ManagementObject. ManagementObject's are available through the System.Management class library. The System.Management class library is not available by default, so we will need to set a Reference to it. Right-click on the CompInfo project in the solution explorer window and select the Add Reference menu item, as shown below:
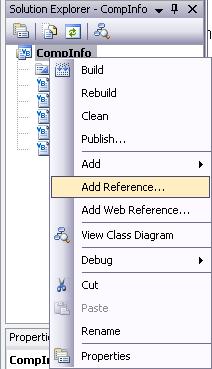
With the .NET tab selected, scroll down and select the System.Management class library (as shown below). Then click the OK button:
Now with the pDisk class code window open, add the following Imports statement at the top (above the Public Class pDisk line):
Imports System.Management
This gives us access to the of the ManagementObject class, which can be passed a win32_logicaldisk.deviceid=<drive> parameter to get information about specific disk drives on the computer. Adding methods to a Class is as simple as adding custom functions to the code window of a form. Add the following code below the Public Class pDisk line:
'Returns the physical size of Drive
Function Size(ByVal Drive As String) As String
Try
Dim Disk As New _
ManagementObject( _
"win32_logicaldisk.deviceid=" & _
"""" & Drive & """")
Disk.Get()
'Convert the number to Gigabytes
Return Disk("Size").ToString _
/ 1024 / 1024 / 1024
Catch
Return "Drive " & Drive & " not found!"
End Try
End Function
In the above code we construct a ManagementObject called Disk. By using it's Get method we populate a collection it contains with information about the disk drive (Drive) that we passed along with the win32_logicaldisk.deviceid= parameter to the ManagementObject constructor call. Different members of the Disk collection can be accessed by providing an index string, i.e. Disk("Size"). Also notice the Try-Catch error trapping in the above code. This is always a good idea when creating Methods for your classes which rely upon some, potentially erroneous, values being passed to them by a programmer (we know how stupid they can be). Now add the following code to add two more methods to the pDisk class:
'Returns the amount of Free Space on Drive
Function FreeSpace( _
ByVal Drive As String) As String
Try
Dim Disk As New _
ManagementObject( _
"win32_logicaldisk.deviceid=" & _
"""" & Drive & """")
Disk.Get()
'Convert the number to Gigabytes
Return Disk("FreeSpace").ToString _
/ 1024 / 1024 / 1024
Catch
Return "Drive " & Drive & " not found!"
End Try
End Function'Returns the amount of Used Space on Drive
Function UsedSpace( _
ByVal Drive As String) As String
Try
Dim Space As Long
Dim Disk As New _
ManagementObject( _
"win32_logicaldisk.deviceid=" & _
"""" & Drive & """")
Disk.Get()
'Calculate the Used space
Space = Disk("Size").ToString - _
Disk("FreeSpace").ToString
'Convert the number to Gigabytes
Return Space.ToString / 1024 / 1024 / 1024
Catch
Return "Drive " & Drive & " not found!"
End Try
End Function
Using Sub Main to test the new pDisk methods
Add the following line of code at the beginning of the Sub Main procedure in the modCompInfo.vb module code window to construct a pDisk object:
Dim objDisk As New CompInfo.pDisk()
Now add the following four lines of code to the Sub Main procedure (above the MessageBox line of code) in the modCompInfo.vb module code window:
Debug.WriteLine(">>>Disk<<<")
Debug.WriteLine("Disk.Size: " & _
objDisk.Size("c:"))
Debug.WriteLine("Disk.FreeSpace: " & _
objDisk.FreeSpace("c:"))
Debug.WriteLine("Disk.UsedSpace: " & _
objDisk.UsedSpace("c:"))
Testing the program so far
Save the project now. Run the program. When the message box tells you the program is finished, take a look at the immediate window. Do you see the result of pDisk's Size, FreeSpace, and UsedSpace method calls under the >>>Disk<<< header line?
Adding two Properties to the pMemory class
To access information about the computer's memory, we will use the ManagementObjectSearcher class of the System.Management class library. The ManagementObjectSearcher class returns a collection of WMI objects based upon a specified query. Here is Microsoft's description of WMI: Windows Management Instrumentation (WMI) is a scalable system management infrastructure that uses a single consistent, standards-based, extensible, object-oriented interface. WMI provides us with a standard way to interact with system management information and the underlying WMI APIs. WMI is used primarily by system management application developers and administrators to access and manipulate system management information.
Basically, what this means is, we can access a lot of information about the computer if we construct a ManagementObjectSearcher object. Here is the code we will use to construct a ManagementObjectSearcher object (don't type this code yet):
Dim sQuery As String
sQuery = "SELECT * FROM Win32_OperatingSystem"
Dim WMIData As New ManagementObjectSearcher(sQuery)
Win32_OperatingSystem is a WMI class that represents an operating system installed on a Win32 computer system. Any operating system that can be installed on a Win32 system is a descendent (or member) of this class. If the computer has multiple operating systems installed, this class returns only an instance for the currently active operating system. By using Win32_OperatingSystem in the query string that we pass to the ManagementObjectSearcher object constructor we create a WMI object that has access to more than fifty different properties that the Win32_OperatingSystem class contains. We can then extract specific information about system memory with code like this (don't type this code yet):
Dim mo As ManagementObject
For Each mo In WMIData.Get()
'Return the amount of free Physical Memory
Return mo("FreePhysicalMemory").ToString
Next mo
Or this:
Dim mo As ManagementObject
For Each mo In WMIData.Get()
'Return the amount of free Virtual Memory
Return mo("FreeVirtualMemory").ToString
Next mo
By creating a ManagementObject reference variable (mo) in the above code, we can look through the WMIData collection with a For-Each loop and return only the information we are interested in, to provide the values for our properties.
With the pMemory class code window open, type the following Imports statement at the top (above the Public Class pMemory line):
Imports System.Management
This gives us access to the ManagementObjectSearcher and ManagementObject classes. Now add that following code below the Public Class pMemory line to create the FreePhys and FreeVirt properties of the pMemory class:
'Return the amount of free Physical Memory
ReadOnly Property FreePhys() As String
Get
Try
Dim sQuery As String
sQuery = _
"SELECT * FROM Win32_OperatingSystem"
Dim WMIData As New _
ManagementObjectSearcher(sQuery)
Dim mo As ManagementObject
For Each mo In WMIData.Get()
Return mo("FreePhysicalMemory").ToString
Next mo
Catch
Return "(Unknown)"
End Try
End Get
End Property
'Return the amount of free Virtual Memory
ReadOnly Property FreeVirt() As String
Get
Try
Dim sQuery As String
sQuery = _
"SELECT * FROM Win32_OperatingSystem"
Dim WMIData As New _
ManagementObjectSearcher(sQuery)
Dim mo As ManagementObject
For Each mo In WMIData.Get()
Return mo("FreeVirtualMemory").ToString
Next mo
Catch
Return "(Unknown)"
End Try
End Get
End Property
A little Try-Catch error trapping doesn't hurt here either. Note: The green squiggles under the End Get lines that appear after you type in the code above are just a warning. Since both our Return statements are conditional—one is inside the Try section, the other is inside the Catch section—the compiler thinks it's possible they might be skipped. We know this won't happen, but the compiler isn't as smart as we are so it's warning us about a possible problem that won't occur. So we can ignore the green warning squiggles in the code above.
Using Sub Main to test the new pMemory properties
Add the following line of code at the beginning of the Sub Main the procedure in the modCompInfo.vb module code window to construct a pMemory object:
Dim objMemory As New CompInfo.pMemory()
Now add the following three lines of code to the Sub Main procedure (above the Message Box line of code) in the modCompInfo.vb module code window:
Debug.WriteLine(">>>Memory<<<")
Debug.WriteLine("Memory.FreePhys: " _
& objMemory.FreePhys)
Debug.WriteLine("Memory.FreeVirt: " _
& objMemory.FreeVirt)
Testing the program so far
Save the project now. Run the program. When the message box tells you the program is finished, take a look at the immediate window. Do you see pMemory's FreePhys and FreeVirt property information under the >>>Memory<<< header line?
Making the changes necessary to compile CompInfo as a Class Library file
In order to test the classes we've added to the CompInfo project, we changed Application Type to a Windows Forms Application. This results in a program that compiles to a stand-alone executable file that has an EXE extension. This allowed us to use the Sub Main of a module to build and run the program each step of the way, so that we could test the properties and methods of our four classes as we created them. In it's final form though, CompInfo must be compiled as a Class Library, which will produce a dynamic link library, a DLL file which will have a .dll extension. It will not be a stand-alone application.
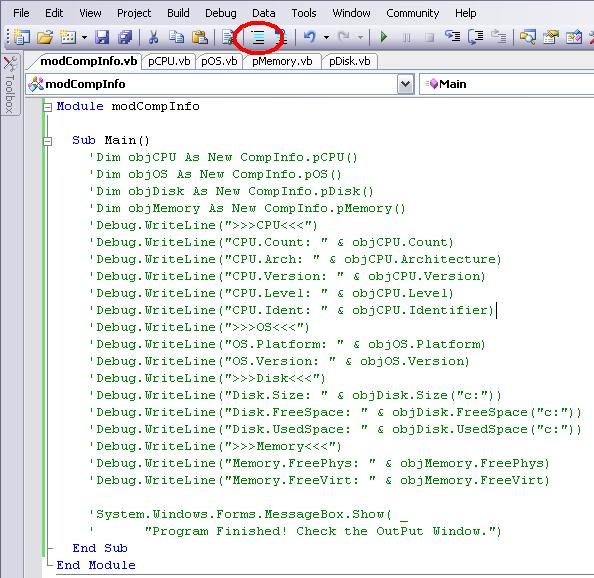
You must begin by commenting out all the code in the Sub Main of our modCompInfo.vb file. This code is no longer required for an application that cannot run stand-alone. Click and drag to select all the Sub Main code, then use the Comment Block button on the standard toolbar (circled below) to comment out all the code. Your Sub Main should then look like this:
Double-click on the My Project item in the solution explorer window to display the project properties window. With the Application tab selected, change the Application type back to a Class Library. Now save the project.
Adding the Solutions Configurations selection combo box to the toolbar
When you test run a project it is compiled to an exe or dll file inside a Debug folder which is in the bin folder of your project folder. This compiled version of your program contains extra code that lets you suspend your program, step through it line by line, and examine the value of variables in real time. When an error occurs in a program compiled in Debug mode the development environment can stop and highlight the line that caused the error so that you can easily debug it. When we are ready to compile a program for distribution we need to remove the extra debugging code that a Debug compiled version contains—which streamlines the program and can speed up its performance significating—we need compile it in Release mode. Changing back and forth from Debug to Release mode isn't possible until we add the Solutions Configurations selection combo box to the toolbar.
The illustration above includes a toolbar with the Solutions Configurations selection combo box. It makes switching a build from Debug to Release mode easy. Unfortunately it is not normally included on the toolbar by default. So here is how we add it to the toolbar—in the classroom this should already be on your toolbar:
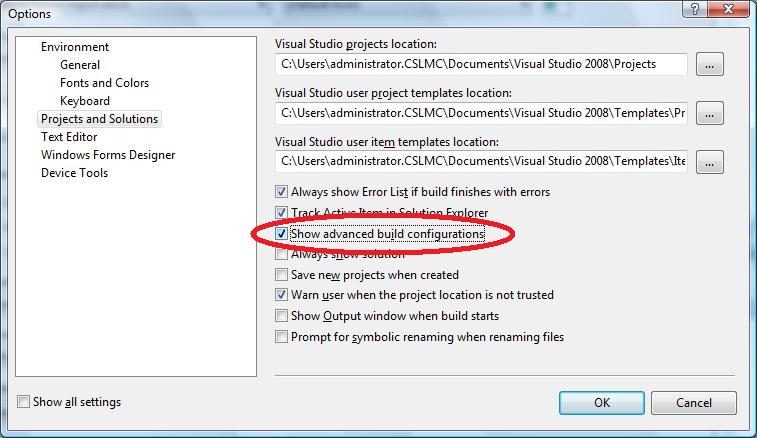
1) Drop down the Tools menu and select Options... to display the Options dialog. Checkmark the Show advanced build configurations item, as shown and click the OK button:
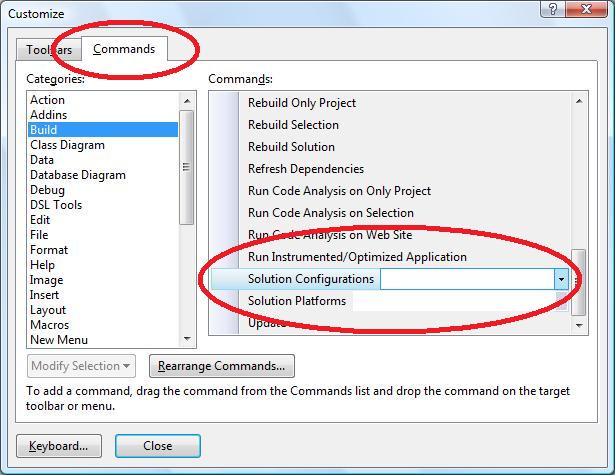
2) Drop down the Tools menu again and select Customize... to display the Customize dialog. Click on the Command tab and select the Build item in the Categories listbox. Scroll the Commands listbox all the way to the bottom to find the Solution Configurations combo box, as shown:
3) Use the left mouse button to click and drag the Solutions Configurations combo box to your toolbar and drop it there—I suggest placing it near your Start Debugging button, like this:
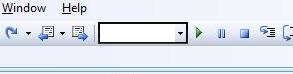
Click the Close button to close the Customize dialog. Now you will be able to easily change the compile method from Debug to Release whenever you need to.
Compiling your Project to create a Class Library file (DLL)
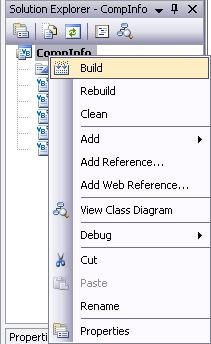
Set the Solutions Configurations combo box on the toolbar to Release. Now right-click on the CompInfo project in the solution explorer window and select the Build menu item, as shown:
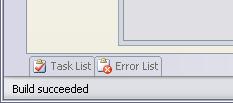
Once the compilation is complete (after just a few seconds), you should see this Build succeeded message in the lower left corner of the window:
Taking a look at the finished CompInfo.dll file
Exit Visual Studio 2010 and open the My Documents folder, then open the Visual Studio 2010 folder. Locate your CompInfo project folder inside the Projects folder. Open it to see your CompInfo project files. Open the bin folder:
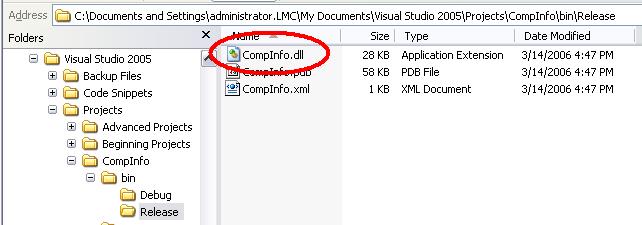
You should see your compiled class library file, CompInfo.dll, inside the Release folder.
In project 8 we will write an application that uses the CompInfo Class Library file (CompInfo.dll). We will also learn how to convert a Class Library into a Component Library.