Removing your old project and creating a new one
Run Visual Basis .NET and open your Solution (<your name>.sln).
Right-click on the MyEditor project in the Solution Explorer window and select Remove from the context menu. Click the OK button when warned that MyEditor will be removed from the Solution. Drop down the File menu and select New Project under the Add Project menu item. When the Add New Project dialog appears, be sure that the Visual Basic Projects folder is open in the Project Types pane, and that the Windows Application template is selected in the Templates pane. Type LoanCalc in the Name textbox. Then click the OK button. This creates a new folder inside the \Visual Studio Projects\<Your Name> folder named LoanCalc:
...My Documents\Visual Studio Projects\<Your Name>\LoanCalc.
Note: When class is over, be sure to follow the instructions at the end of this project that tell you how to copy your project to your floppy diskette so you can take it home with you.
Rename the Form file and change it's Name and Text properties
With the form file (Form1.vb) selected in the Solution Explorer window, so that it's File properties are displayed in the Properties window, change the File Name property to frmLoanCalc.vb (don't forget to include the .vb extension).
Now click on the form in the Designer window to display it's properties:
- Change the Name property to frmLoanCalc
- Change the Text property to Loan Calculator
Setting the Startup Object
Right-click on the LoanCalc project in your Solution Explorer window, click on the Properties item at the bottom of the context-menu. In the LoanCalc Property Pages dialog drop down the Startup object list and choose frmLoanCalc and click the OK button.
Using Microsoft« Excel within your program
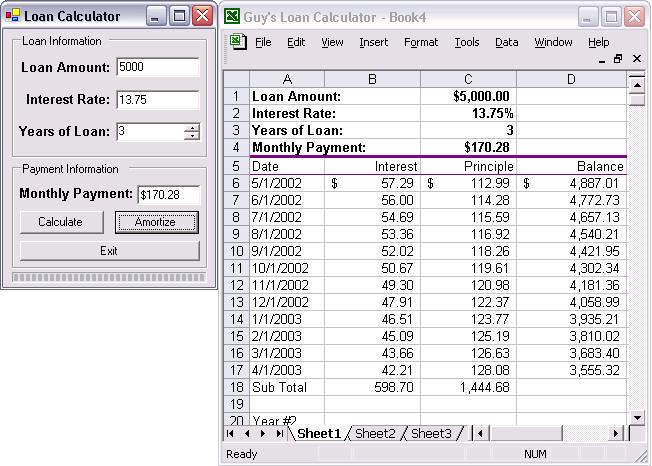
In this project we will create a Loan Calculator that displays a loan amortization chart in a Microsoft Excel spreadsheet.
Like Microsoft Word, Excel was also created to support OLE automation, so most of it's functionality is exposed for our use.
Starting with a simple Loan Payment Calculator
Let's begin by creating a simple loan payment calculator:

Important: Before you add any controls to the form, set these properties of the form, and do not resize the form later:
| Form | |
| Property | Value |
| Height | 273 |
| Width | 218 |
| FormBorderStyle | FixedSingle |
Use the above illustration and add a GroupBox to the form as shown. Set it's Text property to Loan Information. Fill the GroupBox with three Labels, two Textboxes, and one NumericUpDown control, and set their properties like this:
| Label | Textbox | ||
| Property | Value | Property | Value |
| Text | Loan Amount: | Name | txtLoan |
| Text | blank | ||
| Label | Textbox | ||
| Property | Value | Property | Value |
| Text | Interest Rate: | Name | txtRate |
| Text | blank | ||
| Label | NumericUpDown | ||
| Property | Value | Property | Value |
| Text | Years of Loan: | Name | nudYears |
| Minimum | 1 | ||
| Maximum | 30 | ||
If you think the name of the NumericUpDown button is funny (nudYears), just imagine what the name would be if we had used a DomainUpDown control instead (dudYears).

Use the illustration above and add another GroupBox below the first one. Set it's Text property to Payment Information. Fill it with one Label, one Textbox, and two Buttons, and set their properties like this:
| Label | Textbox | ||
| Property | Value | Property | Value |
| Text | Monthly Payment: | Name | txtPayment |
| Text | blank | ||
| Button | Button | ||
| Property | Value | Property | Value |
| Name | btnCalculate | Name | btnExit |
| Text | &Calculate | Text | E&xit |
Calculating a Monthly Payment
We will begin by adding code to the btnCalculate_Click event procedure. In its most basic form, the code to calculate a monthly payment when we provide a valid loan amount, interest rate, and years of the loan would look like this:
'The following code goes in the Declarations section
'Dimension the variables for Loan amount, Interest Rate,
' and Monthly Payment variable in
' the Declarations section.
Dim dLoan, dRate, dPayment As Double
Dim iYears As Integer
'The following code goes in the btnCalculate_Click event procedure
'Convert the Loan amount to a double and store it in dLoan
dLoan = CDbl(txtLoan.Text.Trim)
'Convert the Interest Rate to a double and store it in dRate
dRate = CDbl(txtRate.Text.Trim)
'Convert dRate to a percent value (required by the Pmt function)
If dRate > 1 Then dRate = dRate / 100
'Convert the Years of Loan to an Integer and store it in iYears
iYears = CInt(nudYears.Text.Trim)
'Use the Pmt function to calculate the Monthly Payment
dPayment = Pmt(dRate / 12, iYears * 12, -1 * dLoan)
'Display the Monthly Payment in the txtPayment textbox
txtPayment.Text = Format(dPayment, "$#,##0.00")
'Display the Payment amount before the Amortization process starts
txtPayment.Refresh()
Add the above code to the btnCalculate_Click event procedure. Be sure to dimension dLoan, dRate, dPayment and iYears in the Declarations section (as shown above) so that they have public (global) scope.
Testing the program so far
Save the project now. Run the program and enter values for Loan Amount, Interest Rate, and Years of Loan. When you click on the Calculate button does it work?
Error Trapping in VB.NET (Try and Catch)
The main problem with the above code is that there is no error trapping whatsoever. The CDbl, CInt, and Pmt functions will all generate a critical (program stopping) error it they are not passed the correct values. The CDbl function, for example, will crash the program if the value typed into the txtLoan textbox is not a number value. To prevent your program from crashing if the user makes invalid entries we must do some error trapping.
Here is the code that will trap an illegal entry in the txtLoan textbox:
Try
'Try to convert the value in txtLoan to a double
dLoan =
CDbl(txtLoan.Text.Trim)
Catch
'If a conversion error occurs, this code is executed
MessageBox.Show("Loan
Amount Invalid!",
"Invalid Loan Amount", _
MessageBoxButtons.OK,
MessageBoxIcon.Exclamation)
'Set the focus back on the txtLoan textbox
txtLoan.Focus()
'Exit the sub, so the user can correct their error and try again
Exit Sub
End Try
If the code inside the Try section above generates a critical error the code in the Catch section is executed. In the above example, if CDbl's attempt to convert the value in txtLoan fails, we display a message box that tells the user they made an invalid Loan entry, set the focus back on the Loan textbox, and then exit the btnCalculate_Click event procedure to let them fix it.
Using the above code as an example of the error trapping Try-Catch format, we would need to modify the code in the btnCalculate_Click event procedure so that every line of code that uses CDbl, CInt, and Pmt is in an error trap. The finished the code in your btnCalculate_Click event procedure would look like this (do not type this code yet!):
'Convert the Loan amount to a double and store it in dLoan
Try
'Try to convert the value in txtLoan to a double
dLoan = CDbl(txtLoan.Text.Trim)
Catch
'If a conversion error occurs, this code is executed
MessageBox.Show("Loan Amount Invalid!", "Invalid Loan Amount", _
MessageBoxButtons.OK, MessageBoxIcon.Exclamation)
'Set the focus back on the txtLoan textbox
txtLoan.Focus()
'Exit the sub, so the user can correct their error and try again
Exit Sub
End Try'Convert the Interest Rate to a double and store it in dRate
Try
'Try to convert the value in txtRate to a double
dRate = CDbl(txtRate.Text.Trim)
'Convert dRate to a percent value (required by the Pmt function)
If dRate > 1 Then dRate = dRate / 100
Catch
'If a conversion error occurs, this code is executed
MessageBox.Show("Interest Rate Invalid!", "Invalid Interest Rate", _
MessageBoxButtons.OK, MessageBoxIcon.Exclamation)
'Set the focus back on the txtRate textbox
txtRate.Focus()
'Exit the sub, so the user can correct their error and try again
Exit Sub
End Try'Convert the Years of Loan to an Integer and store it in iYears
Try
'Try to convert the value in nudYears to a double
iYears = CInt(nudYears.Text.Trim)
Catch
'If a conversion error occurs, this code is executed
MessageBox.Show("Years of Loan Invalid!", "Invalid Years of Loan", _
MessageBoxButtons.OK, MessageBoxIcon.Exclamation)
'Set the focus back on the nudYears control
nudYears.Focus()
'Exit the sub, so the user can correct their error and try again
Exit Sub
End Try'Convert the Years of Loan to an Integer and store it in iYears
Try
'Use the Pmt function to calculate the Monthly Payment
dPayment = Pmt(dRate / 12, iYears * 12, -1 * dLoan)
Catch
'If an error occurs, this code is executed
MessageBox.Show("Payment cannot be calculated! Check entries!", _
"Payment Calculation Error", _
MessageBoxButtons.OK, MessageBoxIcon.Exclamation)
'Set the focus back on the txtLoan control
txtLoan.Focus()
'Exit the sub, so the user can correct their error and try again
Exit Sub
End Try
'Display the Monthly Payment in the txtPayment textbox
txtPayment.Text = Format(dPayment, "$#,##0.00")
'Display the Payment amount before the Amortization process starts
txtPayment.Refresh()
The above code would protect our program from input errors. But look at all the extra code this requires! There has to be a way we can reduce the amount of code that adding Try-Catch error trapping requires. How about if we combine all the original code into a single Try-Catch statement. Then we can keep track of which conversion causes the error by incrementing a variable (iError) before each conversion. A Select Case iError statement in the Catch section lets us tell the user where the error occurred:
'Dimension an iError flag to keep track of which conversion causes the error.
Dim iError As Integer
'Dimension a generic object reference variable so we can reference the
' control that contains the illegal entry and set the focus there.
Dim errControl As Control
Dim sMessage As String
'Convert the values entered into the txtLoan, txtRate, nudYears
' controls to number values. Then calculate the Monthly Payment.
Try
'Increment the iError flag before each conversion so that we can examine
' iError in the Catch section to determine which conversion caused the error.
iError = 0
dLoan = CDbl(txtLoan.Text.Trim)
iError = 1
dRate = CDbl(txtRate.Text.Trim)
If dRate > 1 Then dRate = dRate / 100
iError = 2
iYears = CInt(nudYears.Text.Trim)
iError = 3
dPayment = Pmt(dRate / 12, iYears * 12, -1 * dLoan)
txtPayment.Text = Format(dPayment, "$#,##0.00")
'Display the Payment amount before the Amortization process starts
txtPayment.Refresh()
Catch
'If a conversion error occurs, this code is executed. The value of
' iError tells us which conversion generated the error.
Select Case iError
Case 0
sMessage = "Loan Amount Invalid!"
'Reference the textbox containing the illegal entry.
errControl = txtLoan
Case 1
sMessage = "Interest Rate Invalid!"
errControl = txtRate
Case 2
sMessage = "Years of Loan Invalid!"
errControl = nudYears
Case 3
sMessage = "Payment Calculation Error!"
'Not sure where the error occurred, so set the focus on txtLoan.
errControl = txtLoan
End Select
MessageBox.Show(sMessage, "Invalid Entry!", _
MessageBoxButtons.OK, MessageBoxIcon.Exclamation)
'Set the focus back on the control that contains the illegal entry
errControl.Focus()
'Exit the sub, so the user can correct their error and try again
Exit Sub
End Try
Replace all the code in the btnCalculate_Click event procedure with the above code.
Testing the program so far
Save the project now. Run the program and enter some illegal values for Loan Amount, Interest Rate, and Years of Loan (i.e. type your name in the Loan amount textbox) . When you click on the Calculate button are the errors trapped correctly? Is the focus set back to the control where the illegal entries were made?
Adding the Amortize Button

Use the illustration above and add another Button next to the calculate button. Set its properties like this:
| Button | |
| Property | Value |
| Name | btnAmortize |
| Text | &Amortize |
Using Microsoft Excel to display an amortized list of loan payments
For the next page or so, a lot of these instructions will remind you of project 5, because Microsoft Excel, like Word, is also an ActiveX (OLE server) application. This means that it was written and compiled so that most, if not all, of its functionality is exposed. You can write applications that launch Excel, open and modify worksheets, all from within your own applications. In order to access the exposed functionality of Microsoft Excel, we must set a reference to the Microsoft Excel 10.0 Object Library. This object library contains declarations and definitions for all of the exposed classes that Microsoft Excel contains. Note: Use the Microsoft Excel 9.0 Object Library if you are using Microsoft Office 2000.
Setting a Reference to the Microsoft Excel 10.0 Object Library
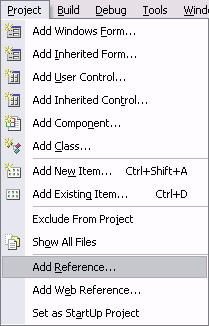
Drop down the Project menu and select the Add Reference... item:
On the Add Reference dialog box, click on the COM (Component Object Model) tab to display all the COM libraries. Note: The Component Object Model (COM) and its related COM-based technologies of DCOM, COM+, MTS and ActiveX« comprise the most widely-used component software model in the world. For more information on COM, I suggest you visit http://www.microsoft.com/com/about.asp.
Scroll down the Component Name list and select the Microsoft Excel 10.0 Object Library item and click the Select button to add it to the Selected Components listbox at the bottom of the dialog. Note: Use the Microsoft Excel 9.0 Object Library if you are using Microsoft Office 2000. Now click the OK button to close the Add Reference dialog.
Creating a Excel Object Reference variable
We will use an object constructor at load-time to access the exposed functionality of Microsoft Excel. Add the following dimension statement to the Declarations section at the top of the code window:
'Dimension an Excel.ApplicationClass reference variable
' and construct an instance of Excel
Dim ExcelObj As Excel.ApplicationClass = _
New Excel.ApplicationClass()
By actually constructing the Excel.ApplicationClass here, Excel is being launched in the background at the same time our application is run. So instead of launching Excel every time the user clicks on the Amortize button, we are launching it only once at program startup. If you recall from project 5, we launched Word and disposed of it within the same procedure, the code from project 5 looked like this (do not type this code):
'Make sure that WordObj is not already referencing an
' instance of Microsoft Word.
If WordObj Is Nothing Then
'Use the Word.ApplicationClass object constructor to
' create an instance of Microsoft Word.
WordObj = New Word.ApplicationClass()
End If
...
... Code to do the spell checking is here
...
'Close the document we created above without saving any changes to it.
WordObj.Documents.Close(Word.wdSaveOptions.wdDoNotSaveChanges)
'Quit Microsoft Word
WordObj.Quit()
'Set the WordObj reference variable to Nothing so that our
' instance of Word can terminate.
WordObj = Nothing
The second line of code above constructs an instance of Word which launches the application. The last three lines of code above dispose of Word and remove it from memory. By constructing an instance of an application and disposing of it within the same procedure we can be sure it won't be left in memory after our program terminates. In our current project, since we are constructing Excel at program launch, we must be sure to dispose if it before the program terminates.
Using the form's Closing event procedure to dispose of objects
The ideal place to dispose of an object prior to program termination is in the form's Closing event procedure. Add the following code to the frmLoanCalc_Closing event procedure:
'Disable Alerts so Excel doesn't prompt us to
' save any workbooks we create.
ExcelObj.DisplayAlerts = False
'Close any workbook we created.
ExcelObj.Workbooks.Close()
'Quit Microsoft Excel
ExcelObj.Quit()
'Set the ExcelObj reference variable to Nothing so that our
' instance of Excel can terminate.
ExcelObj = Nothing
The form's Closing event procedure is automatically raised when the user terminates a program with the Close button in the upper right corner of the window, or when they press Alt-F4. Important: The form's Closing event procedure is not executed when the program is terminated with the command Me.Dispose. To make sure the Closing event procedure is executed the code in the btnExit_Click event procedure should be Me.Close, instead of Me.Dispose. Add the following line of code to the btnExit_Click event procedure:
'Exit the program and trigger the Closing event procedure
Me.Close()
The big difference between Me.Close and Me.Dispose is that Me.Dispose exits the program immediately, without triggering the form's Closing event procedure. Note: Visual Basic 6 programmers like to compare the Me.Dispose command to VB6's End command, and the Me.Close command to VB6's Unload Me command.
Creating a Worksheet Object Reference variable
The spreadsheets in Excel are called Worksheets. They are contained inside a Workbook. We need to create a Worksheet reference variable. Once assigned to a worksheet in our Excel application, we can us it to populate the cells on the worksheet with values and formulas. Add the following dimension statement to the Declarations section at the top of the code window:
'Dimension a Excel.Worksheet reference variable
Dim SheetObj As Excel.Worksheet
We can't actually construct a reference a Worksheet here, because a Workbook (which contains all the worksheets) hasn't been created yet. We also need to be sure and delete any reference that SheetObj has been assigned before closing our instance of Excel. So add the following line of code to the beginning (top) of the frmLoanCalc_Closing event procedure:
'De-reference SheetObj before exiting Excel
SheetObj = Nothing
Creating a Workbook at program launch
To create a new Workbook at program launch, add the following line of code to the frmLoanCalc_Load event procedure:
'Add a new Workbook to our ExcelObj application
ExcelObj.Workbooks.Add()
This creates a new Workbook, which come with three new Worksheets automatically.
Coding the btnAmortize_Click event procedure
The first thing we will do in the Click event procedure of the Amortize button is dimension some variables we will need, and set a reference to the first Worksheet in the Workbook we created with the ExcelObj.Workbooks.Add() method call in the frmLoanCalc_Load event procedure. Add the following code to the btnAmortize_Click event procedure:
'iRow is the number of the output row. iMonth and iYear are
' loop counters. iPayment is the payment number.
Dim iRow, iMonth, iYear, iPayment As Integer
'iStartRow and iEndRow are used to specify the beginning
' and ending row values for our =Sum() function.
Dim iStartRow, iEndRow As Integer
'dTotInterest and dTotPrinciple accumulate the Grand
' total values for Interest paid and Principle paid.
Dim dTotInterest, dTotPrinciple As Double
'Make sure SheetObj is not already referencing a Worksheet
' before referencing the first worksheet in the workbook.
If SheetObj Is Nothing Then
SheetObj = ExcelObj.Workbooks(1).Worksheets(1)
End If
In the last three lines of the above code we make sure the SheetObj is unassigned before referencing the first Worksheet of our new Workbook.
Populating the Worksheet with our Amortization data
We will need the monthly payment amount (dPayment), interest rate (dRate), loan amount (dLoan), and the total years of the lone (iYears) to do our amortization calculations. In case the user has not already calculated the monthly payment, where these variables are assigned value, we need to call the btnCalculate_Click event procedure ourselves. Add this line of code to the btnAmortize_Click event procedure:
'Call the Calculation Payment event to assign values
' to dPayment, dRate, dLoan, and iYears.
btnCalculate.PerformClick()
In case the worksheet is already visible, we will hide it and clear it of any previous data. Add this code to the btnAmortize_Click event procedure as well:
'Hide the spreadsheet while we fill it with data
ExcelObj.Visible = False
'Clear any previous Amortization values
SheetObj.Range("A1:D500").ClearContents()
In the last line of code above, we are using the ClearContents method of the Range class to clear columns A through D all the way down to row 500. A1:D500 is how you specify this range of cells in Excel. The colon (:) between the two cell addresses means through, as in A1 through D500. Note: Our range is a box of cells where A1 is the cell in the upper left corner, and D500 is the cell in the lower right corner. All the cells in-between are included. This range will cover the display of data for the amortization of a 30 year loan with a few rows to spare.
Inserting the Loan Summary Info at the top of the Worksheet
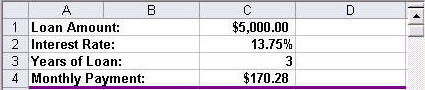
At the top of the worksheet we will insert the loan summary information in the first 4 rows (as shown in the above illustration). Add this code to the btnAmortize_Click event procedure:
'Insert Loan Summary Information, begin with the Loan Amount
SheetObj.Cells(1, 1).Value = "Loan Amount:"
SheetObj.Cells(1, 3).Value = Format(dLoan, "$#,###.00")
'Interest Rate
SheetObj.Cells(2, 1).Value = "Interest Rate:"
SheetObj.Cells(2, 3).Value = Format(dRate, "Percent")
'Years of Loan
SheetObj.Cells(3, 1).Value = "Years of Loan:"
SheetObj.Cells(3, 3).Value = iYears
'and finally, the Monthly Payment amount
SheetObj.Cells(4, 1).Value = "Monthly Payment:"
SheetObj.Cells(4, 3).Value = Format(dPayment, "$#,###.00")
'Change the font for the summary information to Bold
SheetObj.Range("A1:C4").Font.Bold = True
When specifying cell locations for the Cells class, we use row and column numbers: Cells(row,column). Note: In Excel the column headers are assigned letter values: Column letter A is column 1, B is 2, etc. As you can see from the above code, setting the Value property of the Cells class is the way to assign values to individual cells. The last line of code above, sets the Bold property of the Font class to True to make the text in a Range of cells (A1:C4) bold.
Setting the Column Width and changing the Format of cells in a Worksheet
We can use the ColumnWidth method of the Range class to specify the widths of individual columns in our worksheet. Add this code to the btnAmortize_Click event procedure:
'Set the Column Width of the Date column
SheetObj.Range("A1:A500").ColumnWidth() = 10
'Set the Column Width of the Interest column
SheetObj.Range("B1:B500").ColumnWidth() = 13
'Set the Column Width of the Principle column
SheetObj.Range("C1:C500").ColumnWidth() = 13
'Set the Column Width of the Balance column
SheetObj.Range("D1:D500").ColumnWidth() = 15
'AutoFormat the Cells. This line should not be broken on 2 lines.
SheetObj.Range("A5:D500"). _
AutoFormat(Excel.XlRangeAutoFormat.xlRangeAutoFormatAccounting2)
In the last line of code above, we use the AutoFormat method of the Range class to allow excel to automatically format the Amortization data for us. There are several AutoFormat options available. Through a little trial and error, I found that the xlRangeAutoFormatAccounting2 option does the best job for our Amortization data, which is primarily date and currency values.
Inserting the Column Headings for the Amortization output
Before we begin displaying the amortization data, we need to insert column heading for the payment Date, Interest, Principle, and Loan Balance values. Add this code to the btnAmortize_Click event procedure:
'Insert the Column headings in row 5, in columns 1 through 4
iRow = 5
SheetObj.Cells(iRow, 1).Value = "Date"
SheetObj.Cells(iRow, 2).Value = "Interest"
SheetObj.Cells(iRow, 3).Value = "Principle"
SheetObj.Cells(iRow, 4).Value = "Balance"
Generating and displaying the Amortization output
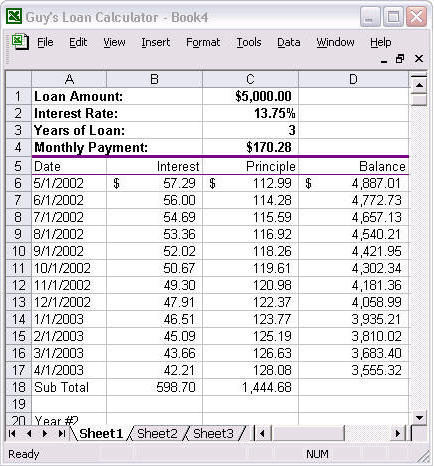
We will begin by displaying the monthly payments for the first year of the loan followed by a sub total of the Interest and Principle amounts for that year (as shown in the above illustration). The output will continue down the worksheet and include every year of the loan, followed by a grand total of the Interest and Principle amounts. The total number of payments is the number of years of the loan (iYears) multiplied by 12. We will use two For-Next loops, one for the years and one for the months. The For-Next loop for months will be nested inside the For-Next loop for the years. Add this code to the btnAmortize_Click event procedure:
For iYear = 1 To iYears
'Skip a row to make a blank row between each year of output.
iRow = iRow + 1
'Store the first row of the year in iStartRow so we
' can use the value later in a =Sum() function
iStartRow = iRow
For iMonth = 1 To 12
'Display the Month and Year in column 1. The DateSerial function
' uses this format DateSerial(Year, Month, Day) and returns a
' date in this format mm/dd/yy.
SheetObj.Cells(iRow, 1).Value = DateSerial(Year(Now), _
Month(Now) + iPayment, 1)
'Calculate and display the Interest amount in column 2
SheetObj.Cells(iRow, 2).Value = dLoan * (dRate / 12)
'Calc and display the Principle amount in column 3. Subtract the Interest
' value we calculated in cell (iRow, 2) to determine the Principle.
SheetObj.Cells(iRow, 3).Value = dPayment - _
SheetObj.Cells.Item(iRow, 2).Value
'Calc the new Current Balance and display it in column 4
dLoan = dLoan - SheetObj.Cells.Item(iRow, 3).Value
SheetObj.Cells(iRow, 4).Value = dLoan
'Move to the next row
iRow = iRow + 1
'Increment the Payment counter
iPayment = iPayment + 1
Next iMonth
'Store the last row of the year in iEndRow so we
' can use the value in a =Sum() function
iEndRow = iRow - 1
'Display Sub Total on the row after a year of data
SheetObj.Cells(iRow, 1).Value = "Sub Total"
'Insert two =Sum() functions to let Excel calculate the sub totals for us.
' The format of the =Sum() function is =Sum(StartRange:EndRange)
SheetObj.Cells(iRow, 2).Value = _
"=SUM(B" & iStartRow & ":B" & iEndRow & ")"
SheetObj.Cells(iRow, 3).Value = _
"=SUM(C" & iStartRow & ":C" & iEndRow & ")"
'Accumulate the Grand Total Interest paid and Principle paid amounts
dTotInterest = dTotInterest + SheetObj.Cells.Item(iRow, 2).Value
dTotPrinciple = dTotPrinciple + SheetObj.Cells.Item(iRow, 3).Value
'Add a blank row after each year of output.
iRow = iRow + 1
Next iYear
Excel's =Sum() function and using the Values in Cells to do calculations
Instead of adding up the monthly Interest and Principle payments for each year ourselves, we are inserting a =Sum() function at the end of each year so that Excel will do it for us. The =Sum() function requires a Range as a parameter. In this example: =Sum(A5:A17), the values in cells A5 through A17 are added together and displayed in the cell where the =Sum() function is inserted.
Take a look at the following line of code from the above code:
dLoan = dLoan - SheetObj.Cells.Item(iRow, 3).Value
Notice how we are using the Value property of the Item collection, to access the number in a cell to do a calculation. The following code would work the same way, by using the Value property of the Cells collection instead:
dLoan = dLoan - SheetObj.Cells(iRow, 3).Value
Both ways work the same.
After calculating the values for each year we are accumulating the total Interest paid and total Principle paid in dTotInterest and dTotPrinciple. To display the Grand Total Interest and Principle at the very bottom, add the following code to the btnAmortize_Click event procedure below the Next iYear line:
'Display Grand totals for Interest paid and Principle paid
SheetObj.Cells(iRow, 1).Value = "Grand Total"
'Notice how we don't need to format these values as currency
' because we are letting Excel auto format these cells.
SheetObj.Cells(iRow, 2).Value = dTotInterest
SheetObj.Cells(iRow, 3).Value = dTotPrinciple
Formatting the Worksheet some more before displaying it
Up until now the Excel Worksheet has been hidden, recall the ExcelObj.Visible = False command above. Before displaying the Worksheet we need to configure Excel a little bit more. For example, we want to hide the Standard and Formatting toolbars, and the Formula Bar. Then set the Caption to customize the look of Excel to go with our program. Add the following code to the end of btnAmortize_Click event procedure to hide the Standard and Formatting toolbars and the Formula Bar:
'Hide the Formatting and Standard toolbars and the Formula Bar
ExcelObj.CommandBars("Formatting").Visible = False
ExcelObj.CommandBars("Standard").Visible = False
ExcelObj.DisplayFormulaBar = False
By default, the Standard and Formatting toolbars are displayed when you open Excel. So is the Formula Bar. Since we are using Excel just to display our amortization data, the availability of these toolbars would just confuse the user, so we are hiding them. Add the following code to the end of btnAmortize_Click event procedure to customize the text on Excel's caption bar:
'Customize the text on the Excel Caption bar
ExcelObj.Caption = "Guy's Loan Calculator"
User your name instead of mine!
Changing the size and position of the Excel window
To adjust the size and position of the Excel window so that it will appear next to our form when it is displayed, we can set the WindowState, Width, Height, Left, and Top properties, like this (add the following code below the line of code above, in the btnAmortize_Click event procedure):
'By setting WindowState to xlNormal, it can be resized
ExcelObj.WindowState = Excel.XlWindowState.xlNormal
'Adjust the size of the Excel window and position it on the screen
ExcelObj.Width = 325
ExcelObj.Height = 350
ExcelObj.Left = Me.Left + 140
ExcelObj.Top = Me.Top - 24
To make sure the Excel window opens next to the window of our program, add these two lines of code to the frmLoanCalc_Load event procedure so our project window opens in the correct location (Note: Add this code to frmLoanCalc_Load event procedure):
Me.Left = 100
Me.Top = 100
Now we are ready to display Excel. Add this final line of code to the btnAmortize_Click event procedure to display Excel:
ExcelObj.Visible = True
Testing the program so far
Save the project now. Run the program and enter values for Loan Amount, Interest Rate, and Years of Loan. Then click the Amortize button and wait. Does the Excel Worksheet that appears look ok? Try entering the Loan Amount (5000), Interest Rate (13.75), and Years of Loan (3) values from the illustration example above. Do your results match?
Adding a ProgressBar to the form

Because the calculations for a loan of 30 years can take some time, the addition of a ProgressBar on the bottom of the form will provide useful feedback to the user during a long calculation process when it looks like the program is frozen. Use the illustration above and add a progress at the bottom of the form. Leave it's default property values unchanged, it's name will be ProgressBar1.
Setting the Maximum property of ProgressBar1 at run-time
The Maximum property of the ProgressBar determines the number of ticks it takes to fill the bar. Because the number of years of a loan can vary, we need to dynamically set the ProgressBar's Maximum property, like this (do not type this code yet):
'Initialize the ProgressBar's Maximum property
ProgressBar1.Maximum = iYears * 12
This sets the Maximum property to the total number of payments, so every time we calculate and write the payment information for a month to the worksheet, we need to increment the progress bar. But we must always be sure we don't try to set the Value property of a ProgressBar to greater than the Maximum value (do not type this code yet):
'Increment the ProgressBar
If ProgressBar1.Value + 1 < ProgressBar1.Maximum Then
ProgressBar1.Value = ProgressBar1.Value + 1
End If
Below is a summary of the code in the btnAmortize_Click event procedure that includes the ProgressBar code. Modify the code in your btnAmortize_Click event procedure to include the ProgressBar code where shown (The six Shaded lines):
Dim
iRow,
iMonth,
iYear,
iPayment
As Integer
Dim
iStartRow,
iEndRow
As Integer
Dim
dTotInterest,
dTotPrinciple
As Double
If
SheetObj Is
Nothing
Then
SheetObj = ExcelObj.Workbooks(1).Worksheets(1)
End If
btnCalculate_Click(sender, e)
'Initialize the
ProgressBar's Maximum property
' and increment it 2 ticks as the process starts.
ProgressBar1.Maximum
=
iYears
*
12
ProgressBar1.Value
=
2
ExcelObj.Visible
=
False
SheetObj.Range("A1:D500").ClearContents()
SheetObj.Cells(1,
1).Value
= "Loan Amount:"
SheetObj.Cells(1,
3).Value
=
Format(dLoan,
"$#,###.00")
SheetObj.Cells(2,
1).Value
= "Interest Rate:"
SheetObj.Cells(2,
3).Value
=
Format(dRate,
"Percent")
SheetObj.Cells(3,
1).Value
= "Years of Loan:"
SheetObj.Cells(3,
3).Value
= iYears
SheetObj.Cells(4,
1).Value
= "Monthly Payment:"
SheetObj.Cells(4,
3).Value
=
Format(dPayment,
"$#,###.00")
SheetObj.Range("A1:C4").Font.Bold
= True
iRow =
5
SheetObj.Cells(iRow,
1).Value
= "Date"
SheetObj.Cells(iRow,
2).Value
= "Interest"
SheetObj.Cells(iRow,
3).Value
= "Principle"
SheetObj.Cells(iRow,
4).Value
= "Balance"
For
iYear = 1 To
iYears
iRow
=
iRow
+ 1
iStartRow
=
iRow
For
iMonth = 1
To
12
SheetObj.Cells(iRow, 1).Value
=
DateSerial(Year(Now),
_
Month(Now)
+ iPayment, 1)
SheetObj.Cells(iRow,
2).Value
=
dLoan
* (dRate / 12)
SheetObj.Cells(iRow, 3).Value
=
dPayment - _
SheetObj.Cells.Item(iRow,
2).Value
dLoan
=
dLoan - SheetObj.Cells.Item(iRow, 3).Value
SheetObj.Cells(iRow, 4).Value
=
dLoan
iRow
=
iRow
+ 1
iPayment
=
iPayment
+ 1
'Increment the ProgressBar
If
ProgressBar1.Value
+
1 <
ProgressBar1.Maximum
Then
ProgressBar1.Value
=
ProgressBar1.Value
+
1
End If
Next
iMonth
iEndRow
=
iRow
- 1
SheetObj.Cells(iRow,
1).Value
= "Sub Total"
SheetObj.Cells(iRow,
2).Value
= _
"=SUM(B" &
iStartRow
& ":B"
&
iEndRow
& ")"
SheetObj.Cells(iRow,
3).Value
= _
"=SUM(C" &
iStartRow
& ":C"
&
iEndRow
& ")"
dTotInterest
=
dTotInterest
+
SheetObj.Cells.Item(iRow,
2).Value
dTotPrinciple
=
dTotPrinciple
+
SheetObj.Cells.Item(iRow,
3).Value
iRow
=
iRow
+ 1
Next
iYear
SheetObj.Cells(iRow,
1).Value
=
"Grand Total"
SheetObj.Cells(iRow,
2).Value
=
dTotInterest
SheetObj.Cells(iRow,
3).Value
=
dTotPrinciple
ExcelObj.CommandBars("Formatting").Visible
=
False
ExcelObj.CommandBars("Standard").Visible
=
False
ExcelObj.DisplayFormulaBar
=
False
ExcelObj.Caption
=
"Guy's Loan Calculator"
ExcelObj.WindowState =
Excel.XlWindowState.xlNormal
ExcelObj.Width =
325
ExcelObj.Height =
350
ExcelObj.Left =
Me.Left
+ 140
ExcelObj.Top =
Me.Top
- 24
'Fill the ProgressBar
now that the process is complete
ProgressBar1.Value
= ProgressBar1.Maximum
ExcelObj.Visible = True
Testing the program
Save the project now. Run the program. Test it thoroughly. Fix any bugs. Take a nap.
Required Enhancements
- Display the Year number
Display the Year number above every year of amortization data on the worksheet.
- Display the Total number of Payments in the Summary
Add a fifth row to loan summary info at the top of the spreadsheet that displays the total number of payments
- Turn the mouse pointer into an hourglass during
the calculation
Hint: Cursor.Current = Cursors.WaitCursor