This project will be an enhancement of the last project.
- Begin by launching Visual Basic.
- Open your snooper.vbp project.
Context Sensitive Help means the User can point the mouse at a Control in your application and click on it to find out what it does. How does a Context Sensitive Help system work? Context Sensitive Help is implemented differently in Windows 95/98/NT 4.0 and Windows 3.1 (mentioned here for historical purposes only).
Windows 3.1
To access Context Sensitive Help for a control in Windows 3.1, the user must select the control (give the control the focus) then press the F1 key.
Windows 95/98/NT/2000
To access Context Sensitive Help for a control in Windows 95, 98, or NT, the user clicks the What's This button in the upper-right corner of the window (if available), then chooses the control they want information about by clicking on it. Or the user right-clicks on the control and selects the What’s This item on a context menu that appears.
In this exercise you’ll be using the Windows 95 method (You can’t create 16-bit applications with Visual Basic versions 5 and up anyway, so Windows 3.1 apps are out of the question). Note: Most controls in VB 5 and up now have a new property called ToolTipText that allows you to specify a descriptive phrase (keep it short) that will display in a Tool tip that pops open next to the control if you hold your mouse over it for more than 1 second. This is not Context Sensitive Help, which displays in a similar way, but tends to provide much more detailed help (up to several paragraphs).
The following list (1 through 5) is a summary of the Steps you will be taking in this project to enable the Windows 95 style of Context Sensitive Help in the Database Snooper application (Read though these steps now, don’t do them yet):
- Assign unique numbers to the WhatsThisHelpID and HelpContextID properties of the controls in Database Snooper that you want to be supported by Context Sensitive Help.
- Change the frmSnooper form’s BorderStyle property to 3 - Fixed Dialog, and set its WhatsThisButton and What’sThisHelp properties to True.
- Use Help Workshop to add a MAP section to your Help Project File (Snooper.hpj).
- Add new help text to your Help Text File (Snooper.rtf)—One new page of help text for each control that will support Context Sensitive Help.
- Use the Help Workshop to compile your help project to recreate your Help File (Snooper.hlp).
Do each of these Steps in order, please don’t jump ahead.
1) Assign unique numbers to the WhatsThisHelpID and HelpContextID properties of the controls in Database Snooper that you want to support Context Sensitive Help.
Use this table to set the WhatsThisHelpID and HelpContextID properties of these Controls to the values shown:
Control Property Value cmdOpen WhatsThisHelpID 1
HelpContextID 1cmdExit WhatsThisHelpID 2
HelpContextID 2Note: Click on the first Textbox in the txtField array and then hold down the shift key and select every Textbox of the txtField array by clicking once on each of them. Once they are all selected, you can set these properties on all of them at once.
Control Property Value txtField
(every element of the array)WhatsThisHelpID 3
HelpContextID 3Note: Click on the first Label in the lblField array and then hold down the shift key and select every Label of the lblField array, so that you can set this property on all of them at once. Labels don't have a HelpContextID property.
Control Property Value lblField
(every element of the array)WhatsThisHelpID 4
lblOLEField WhatsThisHelpID 4
lstTables WhatsThisHelpID 5
HelpContextID 5OLEField WhatsThisHelpID 6
HelpContextID 6daoSnooper WhatsThisHelpID 7
2) Change the frmSnooper form’s BorderStyle property to 3 - Fixed Dialog, and set its WhatsThisButton and What’sThisHelp properties to True.
Setting the BorderStyle property of the frmSnooper form to 3-Fixed Dialog and changing it’s WhatsThisButton and What’sThisHelp properties to True, adds the What’s This help button to the upper right corner of the window (the button with the ?). Save the project now. That completes the changes you need to make to your project.
3) Use Help Workshop to add a MAP section to your Help Project File (Snooper.hpj).
In Project 4 you used the Help Workshop to create a Help Project File that had 3 sections: OPTIONS, FILES, and WINDOWS. To create a regular Help File these 3 sections are all that a Help Project File needs. A MAP section must be added to enable the Context Sensitive Help feature. The MAP section is where you designate the Tags (for the footnotes in your Help Text File) that link to the corresponding WhatsThisHelpID values you assigned to the controls of your application.
Run Help Workshop and open your Snooper.hpj help project file. To add a MAP section to the project click on the MAP button to display this Map dialog.
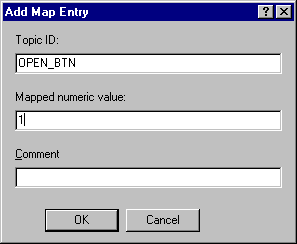
Now click the Add button of the Map dialog to display this Add Map Entry dialog:
For the Topic ID type OPEN_BTN. Press the Tab key and enter 1 for the Mapped numeric value. Now click the OK button. OPEN_BTN stands for Open Button, which refers to your cmdOpen control, remember you set it’s WhatsThisHelpID property to 1.
Press the Add button on the Map dialog again and repeat the process above until you’ve entered all of these values:
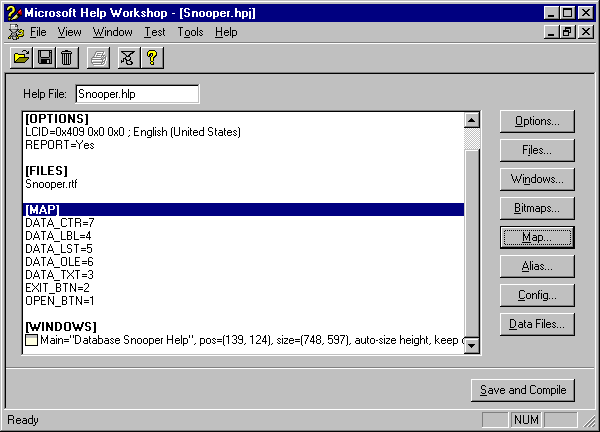
Topic ID Mapped numeric value EXIT_BTN 2 DATA_TXT 3 DATA_LBL 4 DATA_LST 5 DATA_OLE 6 DATA_CTR 7 DATA_LST refers to your lstTables control, DATA_OLE is the Tag for the OLE control, and so on. I came up with these names; you could make up your own (stick with these for this exercise). When you’re finished entering all these values click the OK button on the Map dialog box. Your Help Workshop main window should be similar this example:
Pull down the File menu and Save the help project file. Minimize the Help Workshop application (don’t close it), you’ll need it after step 4.
Note: A completed version of the snooper.rtf help text file has been included with this project (snooper3.rtf), download a self-extracting archive of it by clicking on this link. Don’t try to open this file with a normal Text file editor like Notepad! While creating a Help text file is easy once you know how; unless I’m looking over your shoulder as you create or modify this file for the first time, far too many small things can go wrong that will prevent it from compiling. The following instructions (Step 4), show you how to make modifications to your Help text file with Microsoft Word. If you have Microsoft Word and would like to try following these instructions to make these additions to the file, you may do so. However, you are also free to go straight to step 5 and use the completed Help text file (snooper3.rtf) that I’ve included with this project.

4) Add new help text to your Help Text File (Snooper.rtf). One new page of help text for each control that will support Context Sensitive Help.
Now you’re going to make some additions to your Help Text File (snooper.rtf). Load your snooper.rtf file into Microsoft Word and add the following pages (below the pages you created in the previous exercise). Remember to add a Footnote at the start of each page. Use # for the Custom mark and add the appropriate Tag as the footnote value—from the list of corresponding Footnotes at the bottom of the page. Notice that the footnote values correspond to the Topic ID tags we added to the MAP section of the Help Project file.
When finished, save your snooper.rtf file and exit Word before going on to step 5.