Launch Microsoft Visual Studio 2010. Drop down the File menu and select New Project...
Be sure the Windows Forms Application template in the New Project dialog is selected in the Templates pane on the right side, then type MyEditor in the Name textbox (as shown below):
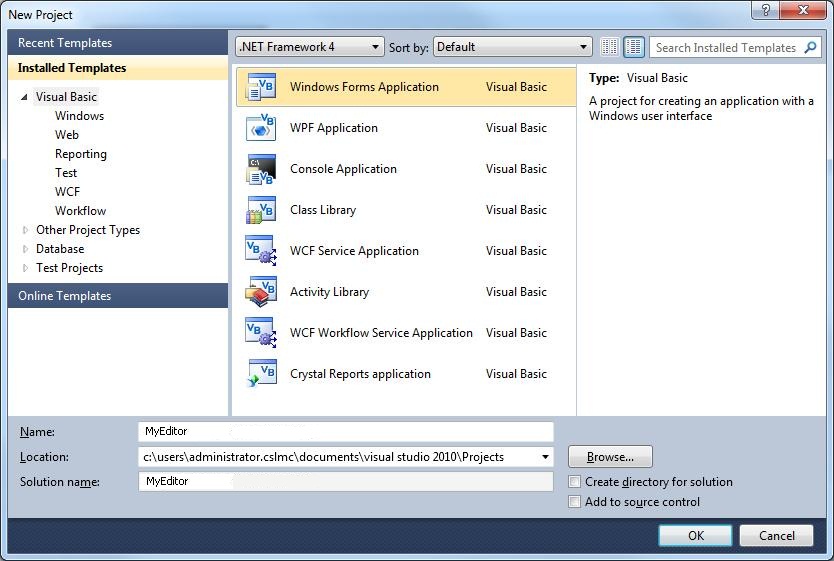
Now click the OK button.
Save the project by clicking on the Save All button on the standard toolbar. This displays the Save Project dialog box, as shown:
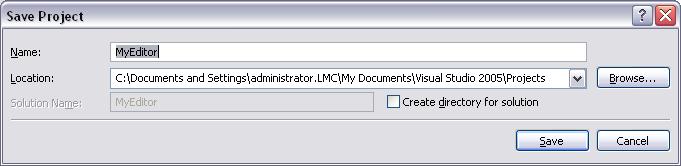
Do not change the default Location path. Be sure to uncheck the Create directory for solution option, as show above, before clicking on the Save button.
This creates a new folder inside the My Documents\Visual Studio 2010\Projects\ folder named MyEditor:
My Documents\Visual Studio 2010\Projects\MyEditor
Rename the Form file
Make sure the form file is selected in the Solution Explorer window:
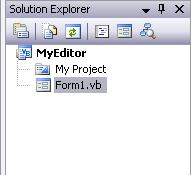
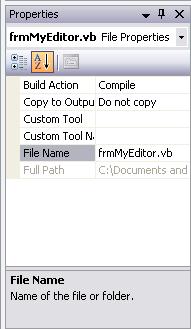
With the form file (Form1.vb) selected in the Solution Explorer window (as shown above), the Properties window directly below it displays it's File properties. Click on the File Name property and type frmMyEditor.vb and press the enter key (don't forget to include the .vb extension, as shown in the illustration below):
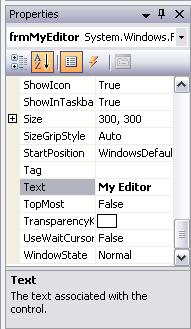
Change the Name and Text properties of the Form
To display the properties of the form in the Properties window, click once on the blank Form, which should be displayed on the left side of the screen in the Design window. Make sure the Name property—which is in parentheses (Name) at the top of the property list so that it's easy to find—is frmMyEditor. It should have been set to that automatically when we named the form file. Then scroll the properties windows down—the properties are listed alphabetically—and change the Text property to My Editor as shown below:
Creating a Simple Editor that uses the Microsoft« Word spell checker
In this project we will create a simple word processor. It will include a StatusStrip and the option to do spell checking. But instead of creating our own spell checker, we will use the same spell checker that Microsoft Word uses by using OLE automation. OLE is an acronym that stands for Object Linking and Embedding. We will embed the functionality of the Microsoft Word spell checker into our application. Here is an example illustration of the finished My Editor application:
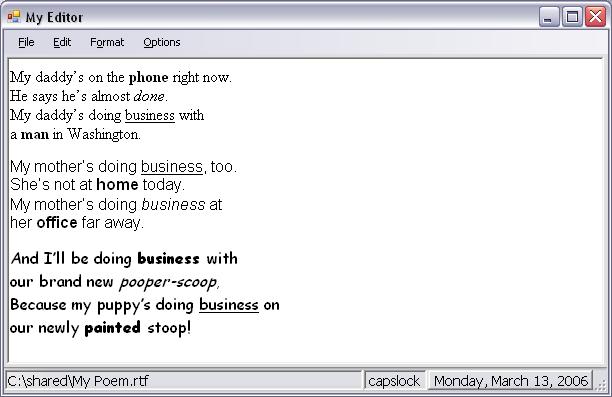
Adding a StatusStrip to the form
Notice the StatusStrip at the bottom of the illustration above. It has three ToolStripStatusLabels. Starting from the left end they are:
- A sunken panel that displays the path and name of the open file.
- A sunken panel that displays the status of the Capslock key.
- A raised panel that displays the Date, including the day of the week.
Instead of adding our StatusStrip by pulling it from the Control Toolbox, we will use code only to create and configure our StatusStrip. To create a StatusStrip with three ToolStripStatusLabels with code only, we will use object constructors.
Creating a StatusStrip and three ToolStripStatusLabels
Add this code to the Declarations section—at the top of the code window—of the form:
'Declare a StatusStrip reference variable
Private StatusStrip1 As StatusStrip
'Declare three ToolStripStatusLabel reference variables
Private StatusLabel1 As ToolStripStatusLabel
Private StatusLabel2 As ToolStripStatusLabel
Private StatusLabel3 As ToolStripStatusLabel
The above code creates the reference variables for a StatusStrip (StatusStrip1) and three ToolStripStatusLabels (StatusLabel1, StatusLabel2, and StatusLabel3). We will now make a custom CreateMyStatusStrip procedure to hold the code that will create, configure, and display the StatusStrip. At the bottom of the Code window, make a blank line above the End Class statement. Then type the following line of code and press enter to create a custom CreateMyStatusStrip procedure:
Private Sub CreateMyStatusStrip()
Now we can use the object constructor (New) to create StatusStrip1 and StatusLabel1, StatusLabel2, and StatusLabel3. Type the following code into your new CreateMyStatusStrip procedure:
'Create the StatusStrip and three ToolStripStatusLabels
StatusStrip1 = New StatusStrip()
StatusLabel1 = New ToolStripStatusLabel()
StatusLabel2 = New ToolStripStatusLabel()
StatusLabel3 = New ToolStripStatusLabel()
The above code creates the objects, now we can configure the ToolStripStatusLabels and add them to StatusStrip1. Add the following code to the CreateMyStatusStrip procedure, below the object constructor code above:
'Configuring StatusLabel1
'Set the DisplayStyle to Text
StatusLabel1.DisplayStyle = _
ToolStripItemDisplayStyle.Text
'Set the BorderStyle to Sunken
StatusLabel1.BorderStyle = Border3DStyle.Sunken
'Display a Border on All sides
StatusLabel1.BorderSides = _
ToolStripStatusLabelBorderSides.All
'Align the contents of StatusLabel1 to the MiddleLeft
StatusLabel1.TextAlign = _
ContentAlignment.MiddleLeft
'Initialize the text of StatusLabel1. We begin with
' a New File.
StatusLabel1.Text = "New File"
'Set the Spring property to True so that StatusLabel1
' automatically stretches to fill any space the other
' two StatusLabels don't use.
StatusLabel1.Spring = True
'Configuring StatusLabel2
'Set the DisplayStyle to Text
StatusLabel2.DisplayStyle = _
ToolStripItemDisplayStyle.Text
'Set the BorderStyle to Sunken
StatusLabel2.BorderStyle = Border3DStyle.Sunken
'Display a Border on All sides
StatusLabel2.BorderSides = _
ToolStripStatusLabelBorderSides.All
'Align the contents of StatusLabel2 to the MiddleCenter
StatusLabel2.TextAlign = _
ContentAlignment.MiddleCenter
'Use the Keyboard.CapsLock property of My.Computer
' to determine the status of the Caps Lock key.
If My.Computer.Keyboard.CapsLock = True Then
StatusLabel2.Text = "CAPSLOCK"
Else
StatusLabel2.Text = "capslock"
End If
'Configuring StatusLabel3
'Set the DisplayStyle to Text
StatusLabel3.DisplayStyle = _
ToolStripItemDisplayStyle.Text
'Set the BorderStyle to Raised
StatusLabel3.BorderStyle = Border3DStyle.Raised
'Display a Border on All sides
StatusLabel3.BorderSides = _
ToolStripStatusLabelBorderSides.All
'Align the contents of StatusLabel3 to the MiddleRight
StatusLabel3.TextAlign = _
ContentAlignment.MiddleRight
'Set the text of the StatusLabel3 to the current
' day and date.
StatusLabel3.Text = _
System.DateTime.Today.ToLongDateString()
Putting the parts together and displaying the StatusStrip
We are now ready to put all the pieces together and display the StatusStrip on the form. Add the following code at the end of the CreateMyStatusStrip procedure:
'Add the three StatusLabels to the Items collection
' of StatusStrip1.
StatusStrip1.Items.Add(StatusLabel1)
StatusStrip1.Items.Add(StatusLabel2)
StatusStrip1.Items.Add(StatusLabel3)
'The default font size is a bit small, so let's bump it
' up to 10 pt.
StatusStrip1.Font = _
New Font("Tahoma", 10, FontStyle.Regular)
'Add StatusStrip1 to the Controls collection of the form.
Me.Controls.Add(StatusStrip1)
Last but not least add a call to the CreateMyStatusStrip procedure to the frmMyEditor_Load event procedure so that the StatusStrip is created and displayed when the program starts:
'Create the StatusStrip when the program starts.
CreateMyStatusStrip()
Testing the program so far
Save the project now. Run the program. Is your StatusStrip displayed? Fix any issues before going on.
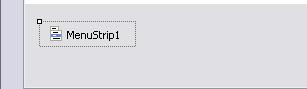
Adding a MenuStrip control to the form
Double-click on the MenuStrip item in the Menus & Toolbars section of the Control Toolbox to add a MenuStrip control (MenuStrip1) to the Component Tray. Once added to your project, the MenuStrip control appears in the Component Tray at the bottom of the design window, like this:
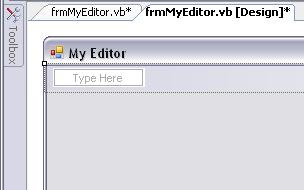
To have your form use this menu, be sure the the MainMenuStrip property of frmMyEditor is set to MenuStrip1—which it should have been set to automatically when you added the MenuStrip control. Click once on the MenuStrip1 control in the Component Tray to selected it. The new blank menu should appear in the upper left corner of the form, like this:
Create the menu structure outlined below. Note: To insert a Separator (the line between menu items), right-click on the menu item where the separator is to go and choose Separator from the Insert submenu off the context menu.
| Menu Table | ||
|
Level 1 Text |
Level 2 Text |
Name |
|
&File |
(default name) | |
| &New | mnuNew | |
| &Open | mnuOpen | |
| &Save | mnuSave | |
| (Insert Separator) | ||
| E&xit | mnuExit | |
| &Edit | (default name) | |
| &Undo | mnuUndo | |
| (Insert Separator) | ||
| Cu&t | mnuCut | |
| &Copy | mnuCopy | |
| &Paste | mnuPaste | |
| &Delete | mnuDelete | |
| F&ormat | (default name) | |
| &Font... | mnuFont | |
| (Insert Separator) | ||
| &Bold | mnuBold | |
| &Italics | mnuItalic | |
| &Underline | mnuUnderline | |
| &Options | (default name) | |
| &Spell Check | mnuSpell | |
Adding a RichTextBox control and ContextMenuStrip
Rich Text Format or RTF files are a universal format for text files that support multiple fonts and formatted text (i.e. bold, underline, Italics, etc.). Whereas normal text files have a TXT extension and support only a single font for the entire document with no special formatting. Since we are using a RichTextBox control I've decided we will use RTF files instead of normal TXT file for this project. To that end, we are also added Edit and Format menus to let the user choose different fonts and apply special formatting to the document.
A ContextMenuStrip lets us add a Context Menu to the RichTextBox which is displayed when the user right-clicks on it. This context menu will allow the user to right-click on selected text to copy it, cut it, change it to bold text, etc. Double-click on the ContextMenuStrip item in the Menus section of the control toolbox to add one to the component tray, like this:
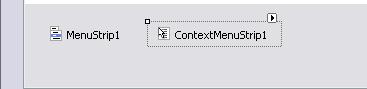
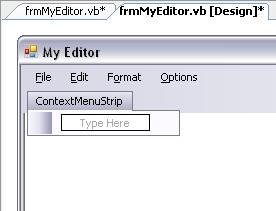
When ContextMenuStrip1 is selected—as in the above illustration—you will have the option to add ToolStripMenuItems to it. This is how the ContextMenuStrip is displayed at design-time so that we can configure it, as shown below:
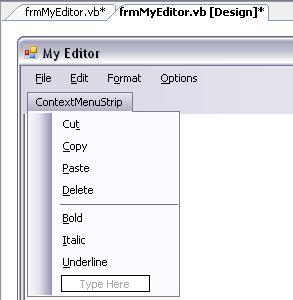
Create the menu structure outlined below (Note: A ContextMenuStrip has no level 1 items):
| Context Menu Table | ||
|
Level 1 Text |
Level 2 Text |
Name |
|
NA |
||
| Cu&t | cmnuCut | |
| &Copy | cmnuCopy | |
| &Paste | cmnuPaste | |
| &Delete | cmnuDelete | |
| (Insert Separator) | ||
| &Bold | cmnuBold | |
| &Italic | cmnuItalic | |
| &Underline | cmnuUnderline | |
When you are finished, the ContextMenuStrip should look like the following illustration:
Now add a RichTextBox control to the form—Stretch it to cover the form, from the bottom of the MenuStrip to the bottom edge of the form. Set it's properties, like this:
| RichTextBox | |
| Property | Value |
| Name | txtEditor |
| ContextMenuStrip | ContextMenuStrip1 |
| MultiLine | True |
| Text | (blank) |
To make sure that the RichTextBox (txtEditor) is resized when the form is resized, add the following code to the frmMyEditor_Resize event procedure:
'Add 3 to Left and Top to shift the edge of
' the txtEditor textbox 3 pixels away from
' the edge of the form. Add an extra 24 to
' the Top for the height of the MenuStrip.
txtEditor.Left = 3
txtEditor.Top = 3 + 24
'The Border of the form is 6 pixels wide, add
' to that the 3 pixels from the edge and we
' get 6 * 2 + 3 = 15
txtEditor.Width = Me.Width - 15
'The Caption bar of the form is 47 pixels high
' and the StatusStrip is 40 pixels high so we
' get 47 + 40 + 3 = 90
txtEditor.Height = Me.Height - 90
Testing the program so far
Save the project now. Run the program. Try resizing the form (Note: There is a resize-grabber handle on the right end of the StatusStrip). How does it look? Does the txtEditor textbox stretch to fit the form? Can you see the StatusStrip at the bottom? Does the menu look good?
Adding OpenFileDialog, SaveFileDialog and FontDialog controls
Double-click once on the OpenFileDialog, SaveFileDialog and FontDialog controls in the Dialogs section of control toolbox to add one each to the Component Tray. Your Component Tray should look like this:

Using a SaveFileDialog to help you save files
Why do the Open file and Save file dialogs that most applications use look very similar to each other (see the illustration below)? The idea of a Common User Interface is an important driving force behind the development of windows applications. In theory, if all applications work in a similar way, a user will be more productive and take less time learning how to use new applications. To that end, the Save and Open file dialog boxes look and behave the same way between different applications. In fact, the code that generates these dialog boxes exists inside a Dynamic Link Library (DLL) file that is part of the operating system. So the Save file and Open file dialog boxes don't just look the same between different applications; they are the same!
When we use a SaveFileDialog dialog box, we are actually displaying the same Save dialog that most other applications will display. This is how the SaveFileDialog dialog looks. This should look familiar to you:

Here is the code that uses the SaveFileDialog control to create the above Save dialog box (Note: The comments are for you. You don't need to include these extensive comments when you type this code):
'Dimension an iResult variable to capture the DialogResult
' returned by the SaveFileDialog so we can determine if
' the user pressed the Cancel or Save button to close it.
Dim iResult As DialogResult
'Assign the dialog’s Title property (this is displayed in the
' caption bar of the Save dialog).
SaveFileDialog1.Title = "Specify a Name for the File"
'The Filter property lets you specify which file types will
' be listed in the Save dialog. The text to the left of the |
' (vertical bar) is the text displayed in the Save As Type
' dropdown listbox (shown above). The last part: *.rtf is
' the actual filter specification, which means only files
' with a RTF extension will be displayed.
SaveFileDialog1.Filter = "Rich Text Format (*.rtf) | *.rtf"
'The AddExtension property makes sure that the .rtf extension
' is automatically added to any file name the user specifies.
SaveFileDialog1.AddExtension = True
'By setting the OverwritePrompt property to true, a warning
' dialog will appear if the user attempts to save over an
' existing file.
SaveFileDialog1.OverwritePrompt = True
'The InitialDirectory property lets you specify the start up
' directory that is displayed when the Save dialog first opens.
SaveFileDialog1.InitialDirectory = "C:\"
'Clear the FileName property of SaveFileDialog1 prior
' to displaying it.
SaveFileDialog1.FileName = ""
'The ShowDialog method displays the Save dialog. Any
' code that follows this line of code will not be executed
' until the Save dialog is closed.
iResult = SaveFileDialog1.ShowDialog()
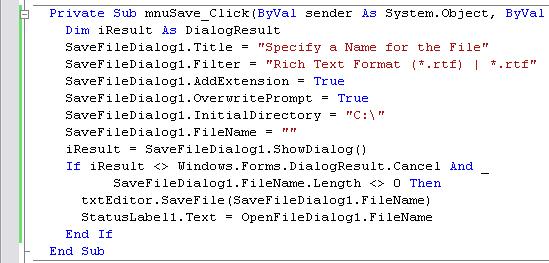
Type the above code into the mnuSave_Click event procedure. The code above does not actually save a file. All it does is use the SaveFileDialog to display the Save dialog where the user specifies the name of the file to be saved—or they can browse and select an existing file to overwrite it. It is still up to us to write the code that will save the contents of the txtEditor textbox to the file that the user specifies.
Using the RichTextBox's SaveFile method to write to a file
In projects 10 and 11 from the beginning class, we used a FileStream with a StreamWriter to save the contents of a textbox to TXT files. One very nice feature of RichTextBoxes is the built-in SaveFile method. So instead of doing this to save a file—from beginning projects 10 and 11, (don't type this code):
'Make sure the user did not click the Cancel button And
' specified a file name for the file to be created.
If iResult <> Windows.Forms.DialogResult.Cancel And _
SaveFileDialog1.FileName.Length <> 0 Then
'Create a FileStream object that connects to the file
' and opens it in create mode.
Dim FStream As New _
IO.FileStream(SaveFileDialog1.FileName, _
IO.FileMode.Create)
'Create a StreamWriter object for the FileStream to
' make writing to the file easy.
Dim SWriter As New IO.StreamWriter(FStream)
‘Write the contents of the txtEditor textbox to the file.
SWriter.Write(txtEditor.Text)
‘Close the StreamWriter and FileStream.
SWriter.Close()
FStream.Close()
‘Destroy the StreamWriter and FileStream objects.
SWriter = Nothing
FStream = Nothing
End If
With a RichTextBox we don't need to use a FileStream and a StreamWriter. The powerful SaveFile method built into our RichTextBox (txtEditor) control is all we need. So all that code above is replaced with this code:
'Make sure the user did not click the Cancel button And
' specified a file name for the file to be created.
If iResult <> Windows.Forms.DialogResult.Cancel And _
SaveFileDialog1.FileName.Length <> 0 Then
'Save the file. Wow, that was hard.
txtEditor.SaveFile(SaveFileDialog1.FileName)
'Display the path and filename in StatusLabel1
StatusLabel1.Text = SaveFileDialog1.FileName
End If
The SaveFile method supports a second, optional parameter that lets us specify the file format we would like to use. If we don't include that parameter, the default format is RTF. Type the above code at the end of the mnuSave_Click event procedure. When you are finished the code in your mnuSave_Click event procedure should look like this:
Using an OpenFileDialog control to help you read from a file
The only significant difference between the OpenFileDialog and SaveFileDialog controls is that the text on the button of the OpenFileDialog says Open and the text on the button of the SaveFileDialog says Save. Add the following code to the mnuOpen_Click event procedure to display an OpenFileDialog:
Dim iResult As DialogResult
'Assign the dialog’s Title property
OpenFileDialog1.Title = "Choose a File to Open"
'List files with a .rtf extension only.
OpenFileDialog1.Filter = "Rich Text Format (*.rtf) | *.rtf"
'Clear the FileName property of OpenFileDialog1
OpenFileDialog1.FileName = ""
'The ShowDialog method displays the Open dialog. Any
' code that follows this line of code will not be executed
' until the Open dialog is closed.
iResult = OpenFileDialog1.ShowDialog()
The OpenFileDialog has no OverwritePrompt property since the user is picking a file to be opened, not saved.
Using the RichTextBox's LoadFile method to read a file
We could read a file with a FileStream and StreamReader, that require about as much code as the FileStream and StreamWriter methods described above. But the RichTextBox's built-in LoadFile method makes it so much easier. Add the following code to the end of the mnuOpen_Click event procedure, below the code you've already added to it:
'Make sure the user did not click the Cancel button And
' specified a file name for the file to be created.
If iResult <> Windows.Forms.DialogResult.Cancel And _
OpenFileDialog1.FileName.Length <> 0 Then
'Read the file into the txtEditor RichTextBox.
txtEditor.LoadFile(OpenFileDialog1.FileName)
'Display the path and filename in StatusLabel1
StatusLabel1.Text = OpenFileDialog1.FileName
End If
Testing the program so far
Before testing the project, click on the Save All button on the toolbar to save it. Now run the program and type something into the txtEditor textbox, and save it to a file with the Save menu item. Then use the Open menu item and open the file. Does it work?
Updating the Caps Lock statuslabel on the StatusStrip
The Caps Lock key statuslabel on the StatusStrip needs to be updated when the user toggles on or off the Caps Lock key. We added the following code to our CreateMyStatusStrip procedure to update the Caps Lock key statuslabel when the StatusStrip is first displayed:
'Use the Keyboard.CapsLock property of My.Computer
' to determine the status of the Caps Lock key.
If My.Computer.Keyboard.CapsLock = True Then
StatusLabel2.Text = "CAPSLOCK"
Else
StatusLabel2.Text = "capslock"
End If
All we need to do is add the above code to an event procedure that is triggered whenever the Caps Lock key is pressed. The first event procedure that comes to mind is the KeyPress event procedure of the txtEditor textbox. But remember that the KeyPress event procedure actually happens before the key that was typed sends it's code to the operating system for processing. So examining My.Computer.Keyboard.CapsLock—which gets it's information directly from the operating system—would happen too soon if we put the above code into the KeyPress event procedure of txtEditor. How about the KeyUp event procedure? The KeyUp event procedure happens after the operating system has processed the key stroke, so it should be ideal. Add the following code to the txtEditor_KeyUp event procedure:
'Make sure they pressed the Caps Lock key.
If e.KeyValue = Keys.CapsLock Then
'Use the Keyboard.CapsLock property of My.Computer
' to determine the status of the Caps Lock key.
If My.Computer.Keyboard.CapsLock = True Then
StatusLabel2.Text = "CAPSLOCK"
Else
StatusLabel2.Text = "capslock"
End If
End If
Save and run the program. Does pressing the Capslock key toggle the "capslock" font in the StatusStrip from upper to lower case?
Enabling the Edit menu features
Let's get the Undo, Cut, Copy, Paste, and Delete features on the Edit menu to work. We'll tackle them one-by-one.
How Undo works
The Undo method of a RichTextBox (regular Textboxes also have this method) is a useful feature that lets us allow the user to undo a mistake. Before we call the Undo method it is a good idea to examine the CanUndo property to see if an Undo is possible. Add the following code to the mnuUndo_Click event procedure:
'Can we Undo the last action?
If txtEditor.CanUndo = True Then
'Undo the last thing the user did.
txtEditor.Undo()
'Clear the undo buffer to make sure that
' clicking Undo again doesn't redo the
' last thing undone.
txtEditor.ClearUndo()
End If
How Cut, Copy, and Paste work
The user clicks and drags over some text to select it, then pulls down the Edit menu and chooses Cut or Copy. Both options copy the selected text to the clipboard. Cut also removes the selected text from the document. Then the user places the cursor somewhere else in their document, pulls down the Edit menu and chooses Paste. This inserts the previously cut or copied text at that location in the document. Add the following code to the mnuCut_Click event procedure:
'Is any text selected to cut?
If txtEditor.SelectionLength > 0 Then
'Cut the selected text to the clipboard
txtEditor.Cut()
End If
Add the following code to the mnuCopy_Click event procedure:
'Is any text selected to copy?
If txtEditor.SelectionLength > 0 Then
'Copy the selected text to the clipboard
txtEditor.Copy()
End If
Now add this code to the mnuPaste_Click event procedure:
'Make sure there is text on the clipboard to be pasted
If Clipboard.GetDataObject().GetDataPresent( _
DataFormats.Rtf) = True Then
'Is any text selected?
If txtEditor.SelectionLength > 0 Then
'Ask the user if they want to paste over currently
' selected text.
If MessageBox.Show( _
"Paste over current selection?", _
"Replace Selected Text?", _
MessageBoxButtons.YesNo) = _
Windows.Forms.DialogResult.No Then
'If No, move selection to the point after
' the current selection.
txtEditor.SelectionStart = _
txtEditor.SelectionStart + _
txtEditor.SelectionLength
End If
End If
'Paste the text on the Clipboard into the
' txtEditor. Replacing any selected text.
txtEditor.Paste()
End If
By default, the Paste method will replace any selected text, so we are including a messagebox in the above code to prompt the user for permission to paste if any text is selected. If they choose No, we move the cursor to the end of the selected text and paste it there.
How Delete works
As you might guess, the Delete feature just deletes any selected text. Add this code to the mnuDelete_Click event procedure:
'Is any text selected to delete?
If txtEditor.SelectionLength > 0 Then
'Delete the selected text
txtEditor.SelectedText = ""
End If
Enabling the Edit features on the Context menu
The Context menu (ContextMenuStrip1) includes Cut, Copy, Paste, and Delete features like the Edit menu does. They need to work exactly the same way. Instead of repeating the code above, let's just add the context menu equivalents of these features to the Handles statement of the Edit menu versions. For example, edit the Handles statement for the mnuCopy_Click event procedure to include the context menu cmnuCopy.Click event, like this:
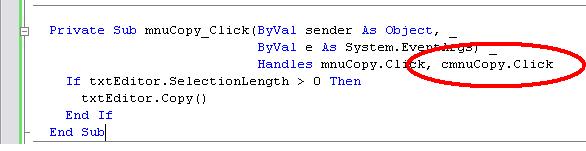
Now when the Click event procedure of cmnuCopy is raised, the code in the mnuCopy_Click event procedure will be executed. Make similar modifications to the Handles statement of the Click event procedures of the Edit menu's Cut, Paste, and Delete features so that they will also support the cmnuCut.Click, cmnuPaste.Click, and cmnuDelete.Click event procedures.
Enabling the Format menu features
Let's get the Font..., Bold, Italic, and Underline features on the Format menu to work. We'll tackle them one-by-one.
How the Font item works
Allowing the user to change the font of the entire document or include multiple fonts within the same document, is a significant benefit of using a RichTextBox over a normal Textbox. Earlier, we added a FontDialog (FontDialog1) control to the component tray. We can use It to let the user select any font they prefer. The first thing we want to do in the mnuFont_Click event procedure is make sure that the FontDialog is displayed showing the font at the current cursor position in the document—remember, the document may contain multiple fonts. Type the following code into the mnuFont_Click event procedure:
'Make sure the default font displayed in the
' FontDialog matches the font at the location
' of the cursor.
FontDialog1.Font = txtEditor.SelectionFont
If FontDialog1.ShowDialog <> _
Windows.Forms.DialogResult.Cancel Then
'This sets the selected text to the font the
' user chose, or if no text is selected, sets
' the font for all new text that is typed.
txtEditor.SelectionFont = FontDialog1.Font
End If
How the Bold, Italic, and Underline features work
All of these features are toggles. That is, they are turned on (check marked on the menu) or tuned off (unchecked). While on, any text that is typed will be affected. When text is selected, turning these formatting features on and off will affect the selected text. Let's start with the Bold feature. Add this code to the mnuBold_Click event procedure:
'Toggle the Checked property: If it's True this
' code makes it False, and visa versa.
mnuBold.Checked = mnuBold.Checked = False
'The Bold property of SelectionFont is ReadOnly.
' To change it, we must create a new Font, set
' it's FontStyle to Bold or Regular, then apply
' the font to SelectionFont.
Dim currentFont As _
System.Drawing.Font = txtEditor.SelectionFont
Dim newFontStyle As System.Drawing.FontStyle
'If SelectionFont was already Bold, unbold it,
' and visa versa.
If txtEditor.SelectionFont.Bold = True Then
newFontStyle = FontStyle.Regular
Else
newFontStyle = FontStyle.Bold
End If
txtEditor.SelectionFont = New Font( _
currentFont.FontFamily, _
currentFont.Size, _
newFontStyle)
The Bold, Italic, and Underline properties of the SelectionFont are ReadOnly. To change them we need to create a new font that is a copy of the current font in SelectionFont. Then replace the font of SelectionFont with it, adjusting it's FontStyle accordingly. Use the code above as an example and add identical code to the mnuItalic_Click and mnuUnderline_Click event procedures. Be sure to modify the code where needed for Italic and Underline, respectively.
Enabling the Format features on the Context menu
The Context menu (ContextMenuStrip1) includes the Bold, Italic, and Underline features of the Format menu. They need to work exactly the same way. Instead of repeating the code above, let's just add the context menu equivalents of these features to the Handles statement of the Format menu versions. Edit the Handles statement for the mnuBold_Click event procedure so that it includes the cmnuBold.Click event. We must also add a line to toggle the Checked property of cmnuBold (highlighted line in the following illustration). Modify your mnuBold_Click event procedure so that it matches this example:
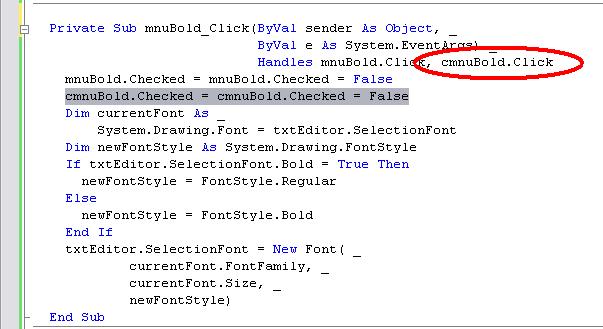
Now when the Click event procedure of cmnuBold is raised, the code in the mnuBold_Click event procedure will be executed. Make similar modifications to the Handles statement of the Click event procedures of the Format menu's Italic and Underline features so that they will also support the cmnuItalic.Click and cmnuUnderline.Click event procedures. Don't forget to add the new line of code to each event procedure that toggles the Checked property of cmnuItalic and cmnuUnderline, as we did above (the highlighted line).
One final consideration. Whenever the user moves the cursor to a new location in the text, we want the Checked property of the Bold, Italic, and Underline features of both the Format and Context menus to reflect the attributes of the text at that location. In other words, if they just finished typing a line of bold text, then click on a word that is not bold, the check mark on the Bold menu items should be unchecked, and visa versa. So we need an event procedure that is raised whenever the user moves the cursor around in a RichTextBox. The SelectionChanged event procedure should do the job nicely. Add the following code to the txtEditor_SelectionChanged event procedure to adjust the Checked property of the Bold, Italic, and Underline menu items of the Format and Context menus when the user moves the cursor around in the document (Note: To avoid a possible null reference error, we need to be sure SelectionFont is not Nothing):
If Not txtEditor.SelectionFont Is Nothing Then
mnuBold.Checked = txtEditor.SelectionFont.Bold
mnuItalic.Checked = txtEditor.SelectionFont.Italic
mnuUnderline.Checked = txtEditor.SelectionFont.Underline
cmnuBold.Checked = txtEditor.SelectionFont.Bold
cmnuItalic.Checked = txtEditor.SelectionFont.Italic
cmnuUnderline.Checked = txtEditor.SelectionFont.Underline
End If
As you can see, we only need to set the Checked property of the menu items to the value in SelectionFont.<Attribute> that they represent. These attributes are either True or False depending upon the attribute of the text where the cursor is located.
Testing the program so far
Before testing the project, click on the Save All button on the toolbar to save it. Now run the program and try out the Edit and Format features we have enabled. Fix any bugs.
Spell Checking with the Microsoft Word spell checker
Microsoft Word is an ActiveX (OLE server) application. This means that it was written and compiled so that most, if not all, of its functionality is exposed. You can write applications that launch Word, open and modify documents, and do everything that Word does, all from within your own applications. In order to access the exposed functionality of Microsoft Word, we must set a reference to the Microsoft Word Object Library. This object library contains declarations and definitions for all of the exposed classes that Microsoft Word contains.
Setting a Reference to the latest version of the Microsoft Word Object Library
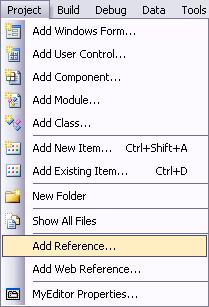
Drop down the Project menu and select the Add Reference... item:
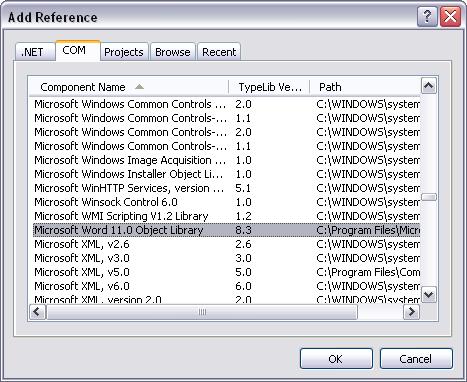
On the Add Reference dialog box, click on the COM (Component Object Model) tab to display all the COM libraries. Note: The Component Object Model (COM) is related to the COM-based technologies of DCOM, COM+, MTS and ActiveX« which comprise the most widely-used component software model in the world. For more information on COM, I suggest you visit http://www.microsoft.com/com/about.asp.
Scroll down the Component Name list and select the Microsoft Word ##.0 Object Library item (where ##.0 is the version number). We are using the Microsoft Word 12.0 Object Library in the classroom:
Now click the OK button to set the reference and close the Add Reference dialog.
Creating a Word Object Reference variable
Just as we did with the StatusStrip, we will use an object constructor at run-time to access the exposed functionality of Microsoft Word. Start to type the following dimension statement to the Declarations section at the top of the code window:
Dim WordObj As
When typing a dimension statement, as soon as you type As and a space a dropdown list of available class types appears (Note: If you are using the Microsoft Word 11.0 Object Library or higher the Word item may not appear in the class list as shown in the illustration below. If that is the case, add the following Imports line at very top of your code window (above the Public Class frmMyEditor line):
Imports Microsoft.Office.Interop
Only add the above Imports statement if the Word item is not available in the class list as shown below:
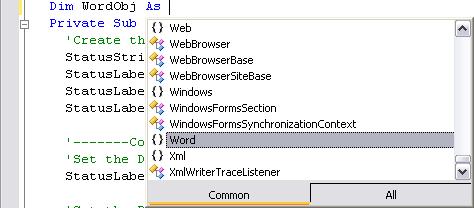
Normally the Word class would not be listed here. But because we set a reference to the Microsoft Word XX.0 Object Library in the previous step, a Word class is now available. After selecting Word, type a dot (.) to see a list of classes that the Word object contains:
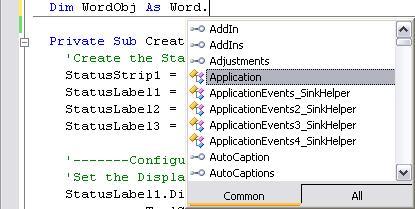
Select Application so that you have access to all the exposed functionality of the Microsoft Word application (Note: In some versions of the Microsoft Word Object Library you need to select the ApplicationClass item instead). Your finished line of code in the Declarations section should look like this:
'Dimension a Word.Application reference variable
Dim WordObj As Word.Application
Using the Microsoft Word Spell Checker from within our application
We will use an object constructor to create an instance of Word, like this:
'Make sure that WordObj is not already referencing
' an instance of Microsoft Word.
If WordObj Is Nothing Then
'Use the Word.Application object constructor
' to create an instance of Microsoft Word.
WordObj = New Word.Application
End If
To avoid accidentally creating multiple instances of Word, it's always a good idea to make sure that your reference variable (WordObj) is not already referencing something. The key word Nothing is the state of an unassigned reference variable. By making sure that WordObj Is Nothing before using the object constructor, we avoid launching Word multiple times unnecessarily. Add the above code to the mnuSpell_Click event procedure.
Once we've used our object constructor above (New), an instance of Word is created—The Microsoft Word application is actually launched in the background. Now let's look at some of the commands and capabilities that Word has exposed for our use. The following seven steps let us spell check the text in our txtEditor textbox:
- We begin by adding a new document to our instance of Word:
'Use the Add method of the Documents class
' to add a new blank document to Word.
WordObj.Documents.Add()
- Next we select the text in the txtEditor textbox and copy it to the clipboard. The second parameter of the Clipboard's SetText method is where we specify the format of the text as Rich Text Format (TextDataFormat.Rtf):
'Use the SelectAll method of txtEditor to select
' all the text, and copy it to the Clipboard with
' it's SetText method, preserving the RTF format.
txtEditor.SelectAll()
Clipboard.SetText(txtEditor.SelectedRtf, _
TextDataFormat.Rtf)
- Paste the contents of the clipboard into the word document:
'Paste the text on the clipboard into
' the Word document.
WordObj.Selection.Paste()
- Now we can check the text for spelling errors with the CheckSpelling method of the Item collection (which is a collection of all the documents):
'Use the CheckSpelling method of the Item
' collection to check the spelling of the text
' in the new document.
WordObj.Documents.Item( _
WordObj.Documents.Count).CheckSpelling()In the above line of code, the Count property of the Documents collection is equal to the index value of the new document we added in step 1 above. Note: In Microsoft Word it is possible to have multiple documents open at the same time. When we added a new document with the WordObj.Documents.Add() call in step 1, our new document was added to the end of the Item collection of existing documents. For example, if there were already 3 documents open, the new document we added would be document number 4. The WordObj.Documents.Count property would then be equal to 4, so it represents the index value of our new document—the first document in the Item collection is at index value 1 in this case, not 0.
- Once the spell checking is complete, select all the spelling-corrected text in the document and copy it back to the clipboard:
'Copy the spelling-corrected text from
' the document to the Clipboard.
WordObj.Documents.Item( _
WordObj.Documents.Count).Select()
WordObj.Selection.Copy()
- Paste the spelling-corrected version of the document from the Clipboard back into the txtEditor textbox:
'Paste the clipboard contents into txtEditor.
txtEditor.Paste()
- To complete the process, we must close the new document that we had created. Quit from Word, and disconnect the WordObj object reference variable by setting it to Nothing. This allows our instance of Word to terminate.
'Close the document we created above
' without saving any changes to it.
WordObj.Documents.Close( _
Word.wdSaveOptions.wdDoNotSaveChanges)
'Quit Microsoft Word
WordObj.Quit()
'Set the WordObj reference variable to
' Nothing so that our instance of Word
' can terminate.
WordObj = Nothing
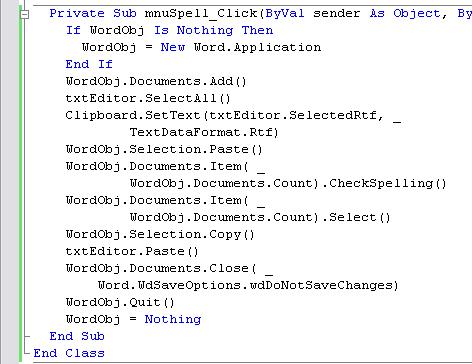
Add the code from steps 1 through 7 to the mnuSpell_Click event procedure, below any code you previously added to it. When you are finished, the mnuSpell_Click event procedure should like this (comments removed for this example):
Testing the program so far
Before testing the project, click on the Save All button on the toolbar to save it. Now run the program and type a single line of text into the Editor Text textbox and deliberately make a couple of spelling errors. Note: Do Not try spell checking a large document on your first test! Then drop down the Options menu and choose the Spell Check item. Does it work?
Implementing the New menu item
In it's simplest version, the code for the mnuNew_Click event procedure would include this single line of code:
'Clear the contents of the txtEditor textbox.
txtEditor.Clear()
But what if the user had just typed a 5 page document and had not yet saved it? Clearing the txtEditor textbox unconditionally when the New menu item is selected is not very user-friendly. To properly implement the New menu item, you must do the following before clearing the txtEditor textbox:
Hints for the implementing the New menu item
- The user should be prompted to save the contents of the txtEditor textbox when they select the New menu item if the contents of the txtEditor textbox has been changed since they last saved it. How can you detect when the contents of a Textbox changes?
- To prompt the user to save the contents of the txtEditor textbox, use a message box with three buttons: Yes, No, and Cancel.
- Be aware that even if the user chooses to save the contents of the txtEditor textbox, they still have the option to click the Cancel button on the SaveFileDialog. You must detect this, and NOT clear the txtEditor textbox until either of these 3 things happen:
- When prompted to save, the user explicitly selected the No button on your message box.
- When prompted to save, the user selected the Yes option and saved the contents of the txtEditor textbox to a file.
- The contents of the txtEditor textbox had not been modified since it was last saved.
Required Enhancements
More Spell Checking Options
Spell Checking Selected Text
A textbox control has a SelectedText property that stores any text that is selected in a textbox, or is blank if no text is selected. We can easily modify our spell checking procedure so that selected text is spell check, or all the text is spell checked if no text is selected (Note: This code is identical to the code you already have in the mnuSpell_Click event procedure except that the txtEditor.SelectAll() line is only executed on the condition that there is no other selected text). Add just the two large italic font lines of code to the mnuSpell_Click event procedure:
'Make sure that WordObj is not already referencing
' an instance of Microsoft Word.
If WordObj Is Nothing Then
'Use the Word.Application object constructor to
' create an instance of Microsoft Word.
WordObj = New Word.Application
End If
WordObj.Documents.Add()
'If the SelectedText property is blank, select
' all the text for spell checking
If txtEditor.SelectedText = "" Then
'Select all the text in the document.
txtEditor.SelectAll()
End If
'Copy the selected text to the Clipboard with
' it's SetText method, which preserves the
' RTF format.
Clipboard.SetText(txtEditor.SelectedRtf, _
TextDataFormat.Rtf)
'Use the CheckSpelling method of the Item collection
' to check the spelling of the text in the new document.
WordObj.Documents.Item( _
WordObj.Documents.Count).CheckSpelling()
'Copy the spelling-corrected text from the
' document to the Clipboard.
WordObj.Documents.Item( _
WordObj.Documents.Count).Select()
WordObj.Selection.Copy()
'Paste the clipboard contents into txtEditor.
txtEditor.Paste()
'Close the document we created above without
' saving any changes to it.
WordObj.Documents.Close( _
Word.WdSaveOptions.wdDoNotSaveChanges)
WordObj.Quit()
WordObj = Nothing
Counting Spelling Errors
Before actually going to all the trouble of spell-checking a document, here is a method of counting and displaying the number of spelling errors in a document (Put this code into the Click event procedure of a new Count Spelling Errors menu item):
'Stores the number of spelling errors
Dim iErrCount As Integer
'Make sure that WordObj is not already referencing
' an instance of Microsoft Word.
If WordObj Is Nothing Then
'Use the Word.ApplicationClass object
' constructor to create an instance of
' Microsoft Word.
WordObj = New Word.ApplicationClass()
End If
WordObj.Documents.Add()
'Copying the contents of txtEditor to the document
' with the TypeText method does NOT preserve
' the RTF format. Which isn't needed for counting.
WordObj.Selection.TypeText(txtEditor.Text)
'The Count property of the SpellingErrors class
' of the ActiveDocument class is equal to the
' number of spelling errors found.
iErrCount = _
WordObj.ActiveDocument.SpellingErrors.Count()
'Close the document we created above without
' saving any changes to it.
WordObj.Documents.Close( _
Word.WdSaveOptions.wdDoNotSaveChanges)
WordObj.Quit()
WordObj = Nothing
'If iErrCount > 0, display the number spelling errors found.
If iErrCount > 0 Then
MessageBox.Show("This document contains: " & _
iErrCount & " spelling errors!")
Else
MessageBox.Show("No spelling errors found.")
End If
To copy a Project folder from your Projects folder on the Hard Drive to a floppy diskette or pen-drive follow these steps:
- Exit Visual Studio 2010 and insert the floppy diskette or pen-drive, that you want to copy the MyEditor folder to:
- Select the My Documents item on the Start Menu to open the My Documents folder.
- In the My Documents folder, double-click the Visual Studio 2010 folder to open it.
- Double-click on your Projects folder to open it.
- Open the MyEditor folder by double-clicking on it. Inside the MyEditor folder, delete the Obj and Bin folders—these folders are created automatically when you open a project. You do not need to copy them, or their contents, to your floppy diskette or pen-drive. Important: Be sure not to delete the My Project folder or Resources folder.
- Once you have deleted the Obj and Bin folders, hit the Backspace key once—or click the Back button on the toolbar. This moves you from inside the MyEditor folder to back inside your Projects folder.
- Right-click on the MyEditor
folder and
selected: 31/2" Floppy A: or your
pen-drive on the
Send To fly-out menu. This copies
the MyEditor folder to your floppy diskette
or pen-drive.