Set DbFile = OpenDatabase("a:\prj2data.mdb") ‘Precede
filename with Path
Print "Database: "; DbFile.Name
‘3) Opens the first Table in the Database and prints its name
‘TableDefs is an collection of
the Tables
Set TdTable = DbFile.TableDefs(0)
Print "Table Name: "; TdTable.Name
‘4) Counts the records in the Table and prints
that number
Set RsRecord = TdTable.OpenRecordset
‘MoveLast sets the value of RecordCount
RsRecord.MoveLast
Print "Record Count: "; RsRecord.RecordCount
‘5) Prints the Type and Name of each Field in
a record
Dim i As Integer
For i = 0 To RsRecord.Fields.Count - 1
‘Fields is an collection of the fields
Set FField =
RsRecord.Fields(i)
Print "Field Name: ";
FField.Name;
Print Tab(30); "Type: ";
FField.Type
Next i
Now let’s try this code. Run Visual Basic. Pull down the File menu and choose New Project (make it a Standard project). Type all of the Code above into the Form_Click event
procedure. Before running the program, pull down the Project menu and choose References. Put a
checkmark in front of the Microsoft DAO
3.6 Object Library item and click the OK button.
This reference is required so that you can dimension the Database,
TableDef, Recordset
and Field data types. Be sure include
the full path to your prj2data.mdb database file where you specify it in the code
for part (1). Run the project and click anywhere on the form to execute this code.
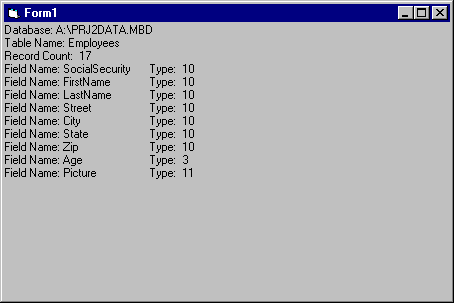
The printout on your form should look something like this:
The numbers listed after Type: are the Record Field Type codes:
| Type Code |
Means |
| 10 |
Text |
| 3 |
Integer |
| 11 |
OLE Object |
If you’d like to save the above exercise for later reference,
do so now (Use any descriptive name you like for the Form and Project files).
Note: To see an ADO
version of the DAO code above, refer to the end of this project.
A Collection of objects
verses an Array of objects : What's the difference?
When you create an Array
of controls or variables, they must all be of the same data type
(and array of Textboxes, for example).
Instead of creating an Array, you
can create a Collection of controls
and they don't have to share the same data type. A Collection provides a convenient way to
refer to a related group of items as a single object. The items, or Members, in a
Collection need only be related by the fact that they exist in the
Collection. I mention Collection here, because when you dimension a Database object, it comes with several
collections of objects (i.e. Tabledefs, Fields, etc.).
Note: Get help on
the Collection Object to find out more about
Collections verses Arrays.
Be sure to Start a new project
now before going on!
Control List
In this phase you will add the following controls to the form (Controls
are followed by a suggested Name in parenthesis, and when relevant a Caption
in quotes:)
CommonDialog (CommonDialog1)
Listbox (lstTables)
Command Button (cmdOpen) "Open Database"
Command Button (cmdExit) "Exit"
Data control (daoSnooper)
Performance Description
When Phase 1 is completed and the program is run, you
should be able to:
- Click the Open Database button to see an Open Files
dialog box.
- Select a Database (.mdb extension) file from Open Files
dialog box.
- Any Tables in the selected Database file are listed in
the lstTables Listbox.
- Clicking the Exit button exits the program.
Hint Section
- Click the Open Database button to see an Open Files
dialog box
In order to allow access to any number of database files, your
program will need an Open File dialog. This is accomplished with the CommonDialog
control.
- Place a CommonDialog control on the form by double clicking its icon in the Control Toolbox
(to add the CommonDialog control icon to the Control Toolbox, right-click on the
Control Toolbox and select Components from the context menu. Put a checkmark in front of Microsoft Common Dialog Control 6.0
and click the OK button). After placing the control on the form it appears as a
small icon. The user will never interact with this control directly (it has no event
procedures), so drag its icon to a corner of your form and leave it there. You
don’t need to change the name of the CommonDialog control from its default name CommonDialog1 because you will only
ever need 1 of these controls in any program you create.
- The CommonDialog control allows you to use Windows’ own built-in dialog boxes, which
include the File Open, File Save, Select a Color, Select a Font,
Print, Printer Setup, and Help dialogs. You can avoid a lot of
programming by using this handy control.
- Place a DAO Data control on the form by double clicking its icon in the Control Toolbox.
Please use the name I suggested in the Control List above, change its Align property
to Bottom,
and set it's Connect
property to Access 2000. Note:
The Access 2000 option will not appear
in the list unless you have Microsoft Visual
Studio Service Pack 4 installed. To get Service Pack 4
visit this website: http://msdn.microsoft.com/vbasic/.
- Place a Command
Button on the form and Name it cmdOpen. Set its Caption
property to Open Database.
- Place another Command
Button on the form and Name it cmdExit. Set its Caption
property to Exit.
Following is the code to generate the File Open dialog. This
code goes inside the cmdOpen_Click event procedure. Only 2 properties of the CommonDialog control
need to be set:
The DialogTitle property sets the text that appears in the caption bar of the dialog:
CommonDialog1.DialogTitle = "Select A Database To Open"
The Filter property is a string that you assign to display only certain file types in
the File Open dialog’s list of files. In order to make sure that the user
opens only Access type database files (which have an MDB extension), you must
specify a Filter value like so:
CommonDialog1.Filter = "MDB Files (*.mdb) | *.mdb"
The first part of the above string: MDB Files (*.mdb), is the description which
appears in the List Files of Type dropdown list box of the File Open dialog.
The last part of the string which comes after the a pipe symbol delimiter (which can
usually be found on the key with the backslash on it): *.mdb is the actual filter. (You can provide
multiple descriptions and Filters by separating each part with the pipe
symbol (|).)
Once the DialogTitle and Filter properties are set, displaying the File Open dialog is easy
with the ShowOpen method:
CommonDialog1.ShowOpen
Here’s a summary of the code you need to display the File
Open dialog:
‘(Add this code to the cmdOpen_Click event procedure)
CommonDialog1.DialogTitle = "Select A Database To Open"
CommonDialog1.Filter = "MDB Files (*.mdb) | *.mdb"
CommonDialog1.ShowOpen
If you test run the program now and click the cmdOpen button, you get an Open
Files dialog. If the Filter property was set correctly, the dialog should only list folders
and MDB files.
- Select a Database (.mdb extension) file from
the Open Files dialog box
The CommonDialog1.ShowOpen command
(above), generates the File Open dialog box. The user can select a file with an MDB
extension (set by the Filter property above). The name of the file they
select is stored in the Filename property of the CommonDialog control. Assign that name to a
descriptive string variable like so (This command follows the 3 lines already entered
above in the cmdOpen_Click event procedure. sDataBName must be dimensioned as a String in the General Declarations
section):
sDataBName = CommonDialog1.filename
In the event the user clicks the File Open dialog’s Cancel
button, the value of the sDataBName variable could be an empty string. You must test for that possibility
like this (we will talk later about actually capturing the Cancel Error generated
by the Cancel button of a CommonDialog control):
If sDataBName = "" Then Exit Sub
If sDataBName is an empty string the above code
terminates the procedure.
Here’s a summary of the code entered so far—from hints
1 and 2:
‘(In the General Declarations section)
Dim sDataBName as String
‘(In the cmdOpen_Click() event procedure)
CommonDialog1.DialogTitle = "Select A Database To Open"
CommonDialog1.Filter = "MDB Files (*.mdb) | *.mdb"
CommonDialog1.ShowOpen
sDataBName = CommonDialog1.filename
‘Exit here if no Database was selected
If sDataBName = "" Then Exit Sub
- Any Tables in the selected Database
file are listed in the lstTables Listbox
At this point you should have the name of the Database in
your sDataBName
string variable (see the code from the hints above), and you’re ready to Open
the Database and access any Tables it may contain. (By the way, sDataBName contains the
complete path name, including the drive, to the Database file). In order to access the
Database you're about to open from any other procedure in your program, you’ll
need to dimension the Database object in the General
Declarations section. While we're at it,
let's also dimension the Recordset object we'll need
in Phase 2 as well:
Dim DbFile As Database
Dim RsRecord As Recordset
Then following the code from hints 1 & 2 above, enter this code
into the cmdOpen_Click event procedure to Open the Database file:
Set DbFile = OpenDatabase(sDataBName)
You’ll need a counter to keep track of the number of Tables,
and a string array to store the names of the Tables that the DbFile Database
contains. Every array must have a limit, so let’s pick 25 as the maximum
number of Tables per Database: Add these declarations to the General Declarations section of the form:
Const MAXTABLES = 25 ‘Maximum Tables constant
Dim sTableName(MAXTABLES) as String ‘Stores Table
names
Dim iTableCount as Integer ‘Table counter
You will also need a TableDef object. This can be declared
locally since it’s only going to be used to help extract the Table names from
the DbFile Database. So add this dimension statement to the beginning of the cmdOpen_Click event
procedure:
Dim TdTable As TableDef
Following is the code to extract the Table names from the DbFile
Database (Don’t forget to dimension i as an Integer at the beginning of the cmdOpen_Click event procedure).
Add this code to the cmdOpen_Click event procedure, below the code that you’ve entered there already:
iTableCount = 0
For i = 0 To DbFile.TableDefs.Count - 1
'TableDefs is an collection of the Tables
α Set TdTable = DbFile.TableDefs(i)
‘Store
the Table names in the sTableName array
α
sTableName(iTableCount) =
TdTable.Name
iTableCount = iTableCount + 1
'If
iTableCount equals MAXTABLES display a MsgBox and Exit
If iTableCount = MAXTABLES Then
MsgBox "Too Many
Tables...Exiting", vbOKOnly + _
vbCritical,
MAXTABLES & "
Table Limit Exceeded!"
Exit For
‘Terminate the For-Next loop
End If
Next i
The TdTable object used in the above code is not really required to do the job. In
fact it’s only used here so that you can see what the TableDef object type can
be used for. Here is how the above code would look without TdTable. A little tighter:
iTableCount = 0
For i = 0 To DbFile.TableDefs.Count - 1
α sTableName(iTableCount) =
DbFile.TableDefs(i).Name
iTableCount = iTableCount + 1
'If
iTableCount equals MAXTABLES display a MsgBox and Exit
If iTableCount
= MAXTABLES Then
MsgBox "Too
Many Tables...Exiting", vbOKOnly + _
vbCritical,
MAXTABLES & "
Table Limit Exceeded!"
Exit For
‘Terminate the For-Next loop
End If
Next i
Notice how in the arrowed line of code in the above example the Table
names in the DbFile.TableDefs collection are being assigned directly to the sTableName
array (via the Name property of each of the TableDefs objects in the TableDefs collection),
without using the TdTable (TableDef) variable as a go-between. Since the above code is
tighter, change your code to match it (you can also remove the Dim TdTable As TableDef line at the top of the event procedure).
Now you are ready to copy the names of the Tables from the sTableName array to your lstTables Listbox. If
you have not yet added a Listbox to the form, do so now. Name it lstTables. Below is the code
that will copy the Table names from the sTableName array to the lstTables Listbox (Be sure to enter this code below the code you've previously
entered into the cmdOpen_Click event procedure.):
lstTables.Clear ‘Make sure the Listbox is empty
before filling it
For i = 0 To iTableCount - 1
lstTables.AddItem sTableName(i)
Next i
Here’s a summary of the code
entered so far—from hints 1, 2 and 3:
‘(In the General Declarations section)
Dim sDataBName as String ‘Variable for Database
name
Dim DbFile As Database ‘The Database object
Dim RsRecord As Recordset ‘The Record Set object
Const MAXTABLES = 25 ‘Maximum Tables constant
Dim sTableName(MAXTABLES) as String ‘Stores Table
names
Dim iTableCount as Integer ‘Table counter
‘(In the cmdOpen_Click() event procedure)
Dim i as Integer
CommonDialog1.DialogTitle = "Select A Database To Open"
CommonDialog1.Filter = "MDB Files (*.mdb) | *.mdb"
CommonDialog1.ShowOpen
sDataBName = CommonDialog1.filename
‘Exit here of no Database was selected
If sDataBName = "" Then Exit Sub
Set DbFile = OpenDatabase(sDataBName) ‘Open the
Database
iTableCount = 0 ‘Initialize the Table Counter
For i = 0 To DbFile.TableDefs.Count - 1
'TableDefs(i)
is an array of the Tables
sTableName(iTableCount) = DbFile.TableDefs(i).Name
iTableCount = iTableCount + 1
'If
iTableCount equals MAXTABLES display a MsgBox and Exit
If iTableCount = MAXTABLES Then
MsgBox "Too Many
Tables...Exiting", vbOKOnly + _
vbCritical,
MAXTABLES & " Table Limit Exceeded!"
Exit For
‘Terminate the For-Next loop
End If
Next i
‘Make sure the Listbox is empty before filling it
lstTables.Clear
‘Fill the Listbox with the Table names
For i = 0 To iTableCount - 1
lstTables.AddItem sTableName(i)
Next i
Now you are ready to give it a try. Save the project and run it.
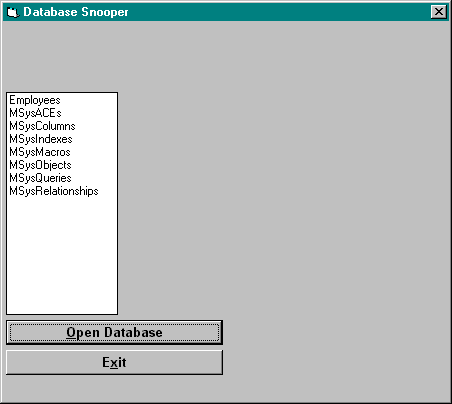
Choose the prj2data.mdb file from project 2. Your screen should look similar to the following
example (you should also see a Data control at the bottom of your screen which this
illustration doesn’t have). How many Tables does the prj2data.mdb Database
contain?
What are those Msys Tables?
(the number you have my vary)
The only Table in DbFile is Employees.
The TableDefs array (DbFile.TableDefs) contains more than just the names
of Tables however:
- MSysACEs
- MSysColumns
- MSysIndexs
- MSysMacros
- MSysObjects
- MSysQueries
- MSysRelationships
These MSys files are not Tables (your list may actually vary a little). They are important to Microsoft
Access and every MDB Database file you open will contain all or some of
these (These extra "Tables" contain Query info, Relationship info,
etc).
But if you treat them like Tables and try to open them, a runtime error will occur.
You need to avoid loading their names into the sTableName array by inserting the code below into the code in your cmdOpen_Click event
procedure (The 2 arrowed lines):
iTableCount = 0 ‘Initialize the Table Counter
For i = 0 To DbFile.TableDefs.Count - 1
‘Avoid
using names from the TableDefs array that
‘
contain the
letters "msys"
α If InStr(DbFile.TableDefs(i).Name,
"MSys") = 0 Then
sTableName(iTableCount) = DbFile.TableDefs(i).Name
iTableCount = iTableCount + 1
'If iTableCount equals MAXTABLES display a MsgBox and Exit
If iTableCount = MAXTABLES Then
MsgBox "Too Many Tables...Exiting",
vbOKOnly + _
vbCritical, MAXTABLES & "
Table Limit Exceeded!"
DbFile.Close
End
End If
α End if
Next i
Add only the 2 arrowed lines above to your existing code. This is an InStr (In String)
test, get help on the InStr function to see how it works. By
skipping names in the DbFile.TableDefs collection that contain "MSys",
you extract only valid Table names (Unless, of course, a valid Table just
happens to have msys as part of its name. Oh well, nothing’s perfect). Make
these changes to your code, then save and test run your program again with the prj2Data.mdb file. This time the only Table
you should see in the lstTables listbox is Employees.
There are three other database files which you can examine (To
download a self-extracting archive that contains those databases, click on this link.
If you're doing this project in the CIS computer lab, you'll find these database
files in the Shared folder on drive C). There are also 2 database files
in your Visual Basic program folder:
c:\Program
Files\Visual Studio\vb98
Test your program thoroughly
with these files (the Bookprob.mdb database-found in the archive-contains 4 tables. The
Nwind.mdb database-found in the Visual Basic program folder (vb98)
contains even more tables) before going on to Phase 2. Be sure to save
the project.
Control List
In this phase you will add the following controls to the form (Controls
are followed by a suggested Name in ():
An array of 10 Labels (lblField)
An array of 10 Textboxes (txtField)
A single Label (lblOLEField – not part of the lblField array)
An OLE control (OLEField)
Performance Description
When Phase 2 is completed and the program is run, the user can do everything they could
after Phase 1 plus
the following:
- Clicking on a Table in the Listbox control displays the
Field names in the array of Label controls, and the Field values in the
array of Textbox controls.
- They can scroll from one record to the next by clicking the
directional arrow buttons on the DAO Data control.
Hint Section
- Clicking on a Table in the Listbox control
displays the Field names in the array of Label controls, and the Field values in the
array of Textbox controls. The only
purpose of the DAO Data control to scan through the records of a Table.
The DAO Data control (added in Phase 1) is so powerful that all you need to add to
your program are 2 lines of code in order to initialize it:
‘Initialize the Data control by setting its DatabaseName
and RecordSource
‘ properties.
daoSnooper.DatabaseName = sDataBName
daoSnooper.RecordSource = lstTables.List(lstTables.ListIndex)
Place this code into the lstTables_Click event procedure. The lstTables.List property is an array
of all the entries in the Listbox. The lstTables.ListIndex property is
always equal to the index value of the entry in lstTables
that the user selected by clicking on it (ListIndex is equal to -1 if no item in the
listbox is selected).
Add arrays of 10 Labels and 10 Textbox controls to the form. Pair them up so that 1 Label goes with 1 Textbox.
Step by step instructions for creating an array of controls follows.
To create an array of Textbox controls do the following:
- Place 1 Textbox control on your form and size it accordingly.
- Set its Name property to txtField
- Set its Text property to (Empty).
- Set its DataSource property to daoSnooper.
- Right click on the textbox and choose Copy from the
context menu which appears.
- Right click on any blank part of the form (not on a control)
and choose Paste from the context menu which appears.
- A message box pops up, warning you that you already have a control
with the name txtField and asking you if you want to create a Control
Array. Click the Yes button.
- The new Textbox control is pasted into the upper left corner
of the form (that’s where they will all appear when you paste). Drag the new
control from the corner to where you want it.
- Repeat steps 6 and 8 until done (Once you’ve
chosen to create an array of controls, the message box in step 7 will not appear again).
Use the same technique to create the array of Labels to go
with the Textboxes. Note: The properties you set on the first control you create will be inherited by
each new array element you create (Do
not set the DataSource property of the Labels--leave DataSource blank).
In projects 1 and 2, you used Labels and Textboxes to
display a Record’s Field names and Field values. In this project you
will use the same technique. The 2 vital properties of the Textbox controls that
you need to set are DataSource and DataField. The value for
the DataSouce property you already know—It’s daoSnooper,
which is the DAO Data control on the form. The value for DataField is
another matter. We need to set the DataField prorperty of
our Textboxes manually. That's where the following code comes in.
Start by adding these 3 lines of code after any code in the lstTables_Click event
procedure:
‘Previously entered code is here
Set RsRecord = DbFile.OpenRecordset(daoSnooper.RecordSource, _
dbOpenSnapshot)
Set daoSnooper.Recordset = RsRecord
daoSnooper.Refresh
Once you’ve dimensioned the Recordset variable (RsRecord),
it’s just a matter of using the OpenRecordset method along with the name of
the Table and you have access to the tables Records. Note the final
parameter of the OpenRecordset method: dbOpenSnapshot
is one of 3 ways you can open a Recordset. Calling OpenRecordset with the dbOpenSnapshot parameter opens
the Recordset for examination only (SnapShot). After all, the goal of this
project is to snoop databases, not edit them. The second Set
command above references the Recordset
object built into the Data control (daoSnooper) to the record set assigned to RsRecord.
Add the following code at the end of the lstTables_Click event
procedure (below the previously entered code):
iField = 0
For i = 0 To RsRecord.Fields.Count - 1
If iField < 10 Then
lblField(iField).Caption =
RsRecord.Fields(i).Name
‘Once
you set the DataField property of a Textbox to the
‘ name
of field, the value for that field is
displayed
txtField(iField).DataField =
RsRecord.Fields(i).Name
iField = iField + 1
End If
Next i
Don’t forget to dimension iField and i as integers at the beginning of the lstTables_Click event
procedure. In this code, you’re only grabbing the first 10 Fields from a Record.
If there are more than 10, they just won’t be displayed. Note the Fields collection in the
above code which is included in a Recordset object (RsRecord.Fields). It is a collection of the Fields that a
record from the Table contains.
Now you're going to insert a call to a custom procedure named ClearFields
as the first line of code in the lstTables_Click event procedure (below the Dim statements but above all other
code in the procedure):
‘A custom procedure to clear the
Textboxes and
‘ Labels
of any previous Record values
ClearFields
You must create the custom ClearFields procedure to avoid an embarrassing run-time error. It is important that the DataField
properties of the Textbox controls are set to empty string values before
opening a new Table. If the DataField property of a control is set to a Field
value that the records from the Table being opened do not contain, your program
comes crashing down. It’s also a good idea to clear the Caption property of
the Labels and the Text properties of the Textboxes, so they
don’t show values from the records of the previous Table that was open. To
that end, you're going to add a custom procedure to your program named ClearFields. Below is the
code it must contain (type this code at the bottom of the General Declarations
section, on the line above the first Private
Sub statement):
Private Sub ClearFields()
Dim i As Integer
For i = 0 To 9
lblField(i).Caption =
""
txtField(i).DataField =
""
txtField(i).Text =
""
Next i
End Sub
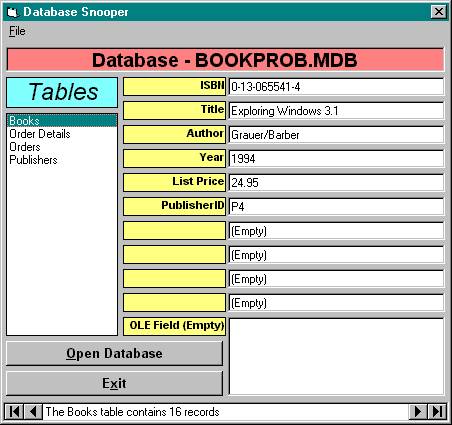
Save the project and test run it. If you load the prj2data.mdb
Database file, and click once on the Employees Table in the lstTables
listbox, your screen should resemble this example:
Let’s not forget about the support you’re going to add for
an OLE Field:
Place an OLE control along with another Label control
(see the Control List at the start of Phase
2) onto the form (Getting kind of crowded now I
bet). To extract any OLE Fields that a Table may contain, you now need to
check each Field’s Type before assigning them by default to a Textboxes’
DataField property. Here, I repeated the above code, from the lstTables_Click event
procedure, with the new code inserted (arrowed
lines) to detect whether a field is an OLE
Type or not:
α bOLEFound
= False ‘Flag to show only 1 OLE Field at a time
ClearFields
iField = 0
For i = 0 To RsRecord.Fields.Count - 1
α Select Case RsRecord.Fields(i).Type
‘Fields of Type 1 through 10 are Textbox displayable
α Case 1 To 10
If iField < 10 Then
lblField(iField).Caption
= RsRecord.Fields(i).Name
‘Once you set the DataField property of a
Textbox to the
‘ name
of field, the value for that field is
displayed
txtField(iField).DataField
= RsRecord.Fields(i).Name
iField =
iField + 1
End If
α Case 11 ‘Fields of Type 11 are
OLE control displayable
α
If bOLEFound = False Then
α
lblOLEField.Caption
= RsRecord.Fields(i).Name
α
OLEField.DataField =
RsRecord.Fields(i).Name
α
bOLEFound = True
α
End If
α End Select
Next i
A Select Case structure is ideally suited
here. Any Type between 1 and 10 can be displayed as text, so it is assigned to a Textbox. A Field that
is type 11 is an OLE object, so it is assigned to the OLEField’s DataField
property. You only have room to display 1 OLE Field. In the unlikely
event that there is more than 1 OLE Field in the Table, we use a flag, bOLEFound, to avoid
assigning one OLE Field on top of another. Make sure you dimension bOLEFound
as a Boolean at the beginning of this procedure.
As a last touch, you need to add a few lines of code to
the end of your ClearFields
procedure to take care of the OLEField control, because it also has a DataField
property that must be cleared (add these lines as the last lines of code in the ClearFields
procedure, below the Next i statement):
OLEField.DataField = ""
lblOLEField.Caption = ""
OLEField.Delete ‘Deletes any picture in the OLE field
Below is a summary of the code entered
in Phase 2:
(This code belongs in the lstTables_Click() event procedure)
Dim iField As Integer
Dim i As Integer
Dim bOLEFound As Boolean
ClearFields ‘A custom procedure to clear the Textboxes
and
‘ Labels of any previous Table values
‘Initialize the Data control by setting its DatabaseName
and
‘ RecordSource properties. Refresh rebuilds the set of associated
‘ records
daoSnooper.DatabaseName = sDataBName
daoSnooper.RecordSource = lstTables.List(lstTables.ListIndex)
Set RsRecord = DbFile.OpenRecordset(daoSnooper.RecordSource, _
dbOpenSnapshot)
Set daoSnooper.Recordset = RsRecord
daoSnooper.Refresh
bOLEFound = False
iField = 0
For i = 0 To RsRecord.Fields.Count - 1
Select Case RsRecord.Fields(i).Type
‘Fields of Type 1 through 10 are Textbox displayable
Case 1 To 10
If iField < 10 Then
lblField(iField).Caption
= RsRecord.Fields(i).Name
‘Once you set the DataField property of a
Textbox to the
‘ name
of field, the value for that field is
displayed
txtField(iField).DataField
= RsRecord.Fields(i).Name
iField =
iField + 1
End If
‘Fields of Type 11 are OLE control displayable
Case 11
If
bOLEFound = False Then
lblOLEField.Caption = RsRecord.Fields(i).Name
OLEField.DataField = RsRecord.Fields(i).Name
bOLEFound = True
End
If
End Select
Next i
(This code belongs in the ClearFields() procedure)
Dim i As Integer
For i = 0 To 9
lblField(i).Caption = ""
txtField(i).DataField = ""
txtField(i).Text = ""
Next i
OLEField.DataField = ""
lblOLEField.Caption = ""
OLEField.Delete ‘Deletes any picture the OLE field
contains
Save the project, and take it for a test spin. Required enhancement:
Display the name of the currently open database somewhere on the form (hint: get the name
from the FileTitle property of the CommonDialog control). That
completes this project.
Note: What follows is for those who are interested in comparing
the DAO and ADO
code only database access methods:
Dim DbFileCon As NEW ADODB.Connection
Dim DbFileCmd As NEW ADODB.Command
Dim DbFileRs As NEW ADODB.RecordSet
Unlike the DAO
object--where declaring a single Database
object automatically creates the TableDef,
Recordset, and Field
objects within it (though we also declared them separately in our DAO
example)--you must explicitly declare each component of the ADO
object. The Connection class
of the ADO object lets you specify
the connection mode, which includes the sharing options in multi-user
environments. It also lets you set the Cursor
option--that is whether the data is cached on the client (your computer) or
the server. The Cursor
setting also deals with data synchronization mechanisms and provides options
for reducing network traffic as much as possible.
‘2) Define the Connection
mode and Cursor (data caching)
options:
'This mode setting allows anyone access
DbFileCon.Mode = adModeShareDenyNone
'Store the data cache locally
DbFileCon.CursorLocation = adUseClient
The adModeShareDenyNone
ADO constant sets the access mode
to allow multiple users to access the database (not opened yet) at the same
time. Other options that restrict database access to one or just
a limited number of users are also available. The adUseClient
ADO constant sets the Cursor
location to the local (client) computer.
‘3) Define the connection Provider
and Connection string parameters, then open the
database:
'Specify Jet database engine 3.51
DbFileCon.Provider = "Microsoft.jet.OLEDB.4.0"
'Set security settings and the database file name
DbFileCon.ConnectionString = "Persist Security Info=False;"
& _
"Data Source=a:\prj2data.mdb"
'Open the database
DbFileCon.Open
In the above code, we set the Provider
option which specifies the version of the Jet
database engine (3.51). The ConnectionString
is where we set security settings and actually specify the location and name
of the database file. As a comparison, all of the code above code, and more come, is equivalent to this single line of code when using the DAO
object library:
Set DbFile = OpenDatabase("a:\prj2data.mdb")
While much simpler, the DAO
method does not provide equivalent Sharing,
Cache location, or Security
settings as the ADO method
does.
‘4) Set the ADO
Command object options
before opening the Record Set:
'Set a reference to our Connection object
Set DbFileCmd.ActiveConnection = DBFileCon
'Tell it we are opening a Table
DbFileCmd.CommandType = adCmdTable
'Specify the Table Name
DbFileCmd.CommandText = "Employees"
Okay, we are not finished yet. In the above code
we are preparing the ADO Command
object before opening the Record Set (Table). Each step of
the process must be specified by you. Almost nothing is automatic with ADO.
‘5) Set the ADO
RecordSet object options
and open the Record Set:
'Allow multiple edit sessions of same record
DbFileRs.LockType = adLockOptimistic
'More data Cache stuff
DbFileRs.CursorLocation = adUseClient
DbFileRs.CursorType = adOpenKeyset
'Open the Record Set...Finally!
DbFileRs.Open DbFileCmd
The last line of code above actually opens our
RecordSet (Table).
‘6) Display the Fields and their Types
from the open RecordSet:
'This code will look familiar to the DAO version
Dim i As Integer
For i = 0 to DbFileRs.Fields.Count - 1
Print "Field Name: ";
DbFileRs(i).Name;
Print Tab(30); "Type: ";
DbFileRs(i).Type
Next i
ADO is the
newest and most recommended method for doing database access with Visual
Basic. But DAO is still alive and
kicking. While the extra control when it comes to Sharing,
Cache location, and Security
that ADO provides are essential in
corporate environments, the simplicity of DAO
is still best for personal applications and small businesses. There are
many situations where using DAO
over ADO is recommended. The
extra overhead that goes along with ADO
is often overkill for smaller projects with simple databases. So DAO
is fully supported by Microsoft because it is still used in some many
applications.