Advanced Visual Basic - Project 2
Adding an OLE object to your
Database
Accessing a Database with DAO
Including a Photograph in Your
Employee Database Viewer
In order to enhance our Database
Viewer from Project 1, you are going to add the ability to view
a photograph of each employee. The Visual Data Manager
provided with Visual Basic is a powerful, quick way, to create a database. Unfortunately,
everything has its limitations, and you cannot create a database with an OLE object (a
picture, sound file, multimedia file, etc.) in it with Visual
Data Manager. To create an Access (Jet) database that includes a
photograph of each employee, you need to use Access. This isn’t a class on how
to use Microsoft Access, so I’ve provided you with the database you’ll need to
do this project (prj2data.mdb). If you're doing this
project in the CIS computer lab, you'll find the prj2data.mdb
file in the c:\shared folder. Copy this file to your floppy disk.
If you're not doing this project in the CIS computer lab, then download a Zip archive of this database by clicking
here.
The Second Project
In this project you are going to modify your previous Database Viewer program from Project 1
(data1) so that it includes a photograph of each employee.
Begin by launching Visual Basic.
- Drop down the File menu and
choose Open Project.
- Open your data1 project.
Then make sure the frmData1 form is selected in the Project Explorer
window.
- Drop down the File menu and
choose Save frmData1.frm As... (this will let you save
the Form file with a different name. If you don’t see a Save frmData1.frm As... item on the File menu, open the Forms folder in the Project
Explorer window—the little window in the upper right corner of the VB IDE titled Project – data1—then click once on the frmData1 form to select it, and try again).
Save the Form as frmData2.frm.
- Drop down the File menu again and
choose Save Project As.... Save the project as data2.vbp.
Click the View Object button on
the Project Explorer window (or press Shift+F7) to view the Form if
it is not already visible.
If you had created Add, Cancel, Delete, and Save buttons as enhancements to the previous version of this
project, remove them now. That's right, I
said remove them and their associated event
procedures. You will not be able to Add records to a database with an OLE control in it
unless you also include the code to assign graphic files (BMP’s) to the OLE
control—which is beyond the scope of this project.
- View the Form’s properties and change its Height property to at least
4400. Change the Form’s Name
property to frmData2.
Replacing the ADO
data control with a DAO
data control
We need to replace the ADO
data control with the DAO
data control. Despite the fact that the ADO
control is newer than the DAO
control, because of the nature of system migration, the DAO
control still has move functionality than the newer ADO
control (as of version 6 of VB). In fact, we must use a DAO
control if want to display an OLE
(Picture) field from a database, as the ADO
control does not yet support that capability.
- Select the ADO
control at the bottom of the form and delete it! Then right-click on
the Control Toolbox,
choose Components and
uncheck the Microsoft ADO Data Control
6.0 object library and click the OK button.
This should remove the ADO
control icon from the Control Toolbox. Unlike the ADO control, the
DAO data control is intrinsic to Visual
Basic. That is, it is a common control which is always available in the
control toolbox like a command button or textbox, so you don't need to add it
to the Control Toolbox
by check marking it's object library. In fact, it's so built-in
(intrinsic) to Visual Basic that they don't call it the DAO
Control. They call it the Data Control.
To search for help on the DAO
data control, you need to search for the Data
Control. I'll be calling it the DAO
data control in this exercise so that we can distinguish between DAO
and ADO.
- Now this next part is tricky. Go to your code
view window and delete all the code except
for the code in:
- General Declarations
(leave Option Explicit)
- Form_Activate
- txtFind_Change
- cmdFind_Click
- cmdExit_Click
We are going to modify and reuse this code with the DAO
data control. Now add a DAO
control to the form (it's at the bottom of the Control Toolbox, the
tool-tip that appears when you hold your mouse over the DAO
control says Data).
Make it's Name property, daoEmployees.
Set it's Align property to Align
Bottom, and set it's Caption
property to Employees.
After setting those values, the DAO
should look just like the ADO
control at the the bottom of the Form. But that is were the
similarities end. The DAO
and ADO controls
share practically none of the same event procedures, and very few of the
same properties. For example, instead of setting the single ConnectionString
property of the ADO
control, you must set the DAO
control's DatabaseName, Connect,
and DataSource properties:
-
Select the DatabaseName
property of the DAO
control and click on it's ellipses button. Find your prj2data.mdb
file on drive A: and select it. You should then see a:\prj2data.mdb
as the value for DatabaseName.
There are no Security or Provider options as in the ADO
ConnectionString property.
- Set the DAO's
Connect
property to Access 2000 (use the drop
down list). Note: The Access
2000 option will not appear in the list unless you have Microsoft
Visual Studio Service Pack 4 installed. To get
Service Pack 4 visit this website: http://msdn.microsoft.com/vbasic/.
- Set its RecordSource
property to the Employees table
(use the drop down list).
Fixing Our References
To
add new controls to the Control Toolbox,
we right click on it and select Components
and put a check mark in front of a new Component
object library. The icons of the new controls appear in the Control
Toolbox. There is another type of Object
Library that does not necessarily contain visual
components:
- Drop down the Project
menu and select the References
item. The References
dialog should appear.
You should see the following check-marked list of Object
Library references:
-
Visual Basic for Applications
- Visual Basic runtime objects and procedures
- Visual Basic objects and procedures
- OLE automation
- Microsoft ActiveX Data Objects 2.0 Library
- Microsoft DAO 3.51 Object Library
The first four items in this list are the Default
object libraries that go with every project you create. The next item
(in bold) was automatically included when you added an ADO
control to your form back in Project 1. Since we have already removed
the ADO control, we
should also remove this unneeded object library reference that supported it,
so uncheck the Microsoft ActiveX Data Objects 2.0 item now. The last item in the
list (in italics) is the Object Library that supports our recently
added DAO
control. This reference was automatically set when we placed a DAO
control on the form. Normally we would accept this reference and go on
with our programming, but there is actually a newer version of this object
library that we want to use instead. So uncheck the Microsoft DAO 3.51 Object Library
item in the
list now. Scroll down the list and put a check mark in front of the Microsoft
DAO 3.6 Object
Library item (Note: if you have Visual Studio Service Pack 4
installed, the reference to the newer 3.6 object library was set already). Now click the OK button to
accept the changes and close
the References dialog.
Note: Setting a reference to the 3.6
version of the DAO
object library is required if we want to open database (.mdb) files
created with the latest version of Access (Office 2000).
- Change the DataSource
property of the data bound textboxes from adoEmployees
to daoEmployees. Be sure
to use the drop down list of the DataSource
property to select daoEmployees.
You don't need to type it in.
Fixing Our Code
We need to change the code from Project 1 so that it
will work with our new DAO
data control. Fortunately, these changes should be minor because both
data controls have a Recordset property
with many of the same properties and methods. We'll do it one event procedure at a
time (new and modified code is italicized):
- Change the code in the Form_Activate event procedure
to this:
'Move to the end of
the Table to initialize the RecordCount property
daoEmployees.Recordset.MoveLast
'Move back to the beginning
so we start off displaying the first record
daoEmployees.Recordset.MoveFirst
lblTotRecs.Caption = daoEmployees.Recordset.RecordCount
In order to use initialize the RecordCount property of
the DAO control, you must move to the end of the table (MoveLast).
Then we move back to the beginning (MoveFirst) so we start off displaying
the first record. Notice how the DAO
control contains a Recordset object just
like the ADO control.
- Change the code in the cmdFind_Click
event procedure
to this:
Dim iStartRecord As Integer
'Save the starting record location before searching
iStartRecord = daoEmployees.Recordset.AbsolutePosition
'Search for the Matching last name. The Search criteria format
' for DAO's FindFirst is identical to the ADO's Find
daoEmployees.Recordset.FindFirst
"LastName = " & "'" & txtFind.Text & "'"
'If the search fails, NoMatch is True (so is
EOF),
' so return the the record we started on
If daoEmployees.Recordset.NoMatch Then
daoEmployees.Recordset.AbsolutePosition = iStartRecord
MsgBox "Record Not Found!", vbOKOnly + _
vbExclamation, "Find Failed"
End If
Very few changes are required here.
The Recordset object of the DAO
data control has four methods for finding data (ADO
just has the Find method):
- FindFirst --
Automatically starts searching from the beginning (no MoveFirst
required) to the end.
- FindNext --
Starts searching to the end from the current record.
- FindLast --
Automatically starts searching from the end (no MoveLast required) to
the beginning.
- FindPrevious --
Starts searching to the beginning from the current record.
Instead of checking for an EOF condition, as
in the ADO version of
this code, a NoMatch
property is provided which is True if no match was found.
- To get the current record number display to work, we
need to use the DAO
control's Reposition event
procedure, which is triggered when the user changes from one record to
another (recall that the equivalent event procedure for the ADO
control was MoveComplete). Add this line of code to the daoEmployees_Reposition
event procedure:
lblRecNum.Caption = daoEmployees.Recordset.AbsolutePosition + 1
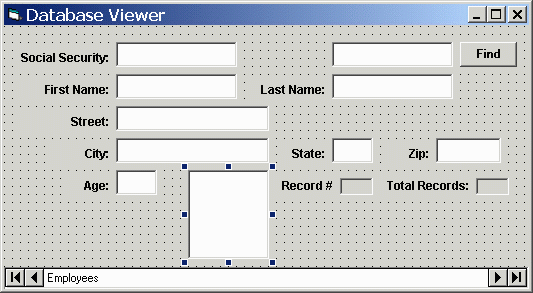
Adding an OLE
control
Now go to Object View
so you can add an OLE control to your form:
- Single click the OLE
control in the Control Toolbox. OLE stands for Object Linking and
Embedding--more on this later. When you place an OLE control on your form, an Insert
Object dialog box will automatically appear. When it does, click the
dialog’s Cancel button—we
want our OLE control
to dynamically support all object types, not a preset type. Use the example below to
place an OLE control on the Form
where shown (click and drag on the Form to draw the OLE
control):
After drawing the OLE control
on the Form, set these properties of the OLE
control like so:
| Property |
Value |
| Name |
OLEPicture |
| DataSource |
daoEmployees
(Use the dropdown list) |
| DataField |
Picture (Use the dropdown list) |
| Height |
1335 |
| Width |
1065 |
Take it for a test spin
Save and run the project. You should be able to scroll through
the records now, and see a picture for each person in the Employees
table. The Find option should also work. Test everything. If
something doesn't work, check your code and get it working before going on to the next step.
Using SQL statements in Visual Basic
SQL (pronounced
S-Que-L) stands for: Structured
Query Language (Standard Query Language or even Stinking
Query Language when it's not doing what you want) and is often called sequel.
SQL
is a query language that is the closest thing to a universal standard
for performing database queries. Just as there are many dialects of BASIC,
there are also many dialects of SQL, but
most share a core of common commands. We will be using SQL
statements to enhancement this project.
Simple SQL Query Example
A simple SQL query
statement looks like this:
SELECT fields FROM table WHERE condition ORDER BY field
- fields is a
list of fields from which data will be retrieved. Often an *
(asterisk) is used to indicate that all fields will be included. If individual field names
are needed, just separate the field names with commas (i.e. SELECT FirstName, LastName,
etc.).
- table is the
database Table name (i.e. Employees).
- condition can
use relational operators such as =, <, >, or LIKE.
In the example above, the ORDER BY
statement sorts the table by a specific field from the record.
To sort the Records in the table (Employees) we need to set the RecordSource property of the DAO
data
control to a string containing a valid SQL query:
'Sort the Employees
table by 'LastName'
daoEmployees.RecordSource = "SELECT *
FROM Employees ORDER BY LastName"
'Refresh the database to
update the data bound controls
daoEmployees.Refresh
In the code above we are including all the fields and records from the Employees table (SELECT * FROM Employees) sorted by the LastName field (ORDER
BY LastName). We are going to use several SQL statements within our Visual Basic code to
give the User a choice of sorting options to choose from:
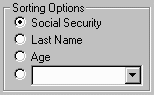
Use the illustration below as a guide and add the following controls
to the form in the order they are listed (be sure to create the Option buttons
and Combo box inside the frame):
| Control |
Property |
Value |
Frame
(place this first!) |
Caption |
Sorting Options |
Option
Button
(place the option buttons inside the Frame) |
Name |
optSocialSecurity |
| |
Caption |
Social Security |
| |
Value |
True |
| Option Button |
Name |
optLastName |
| |
Caption |
Last Name |
| Option Button |
Name |
optAge |
| |
Caption |
Age |
| Option Button |
Name |
optSortBy |
| |
Caption |
Erase it and place it
directly to the left of the Combo Box (as shown above) |
Combo Box
(a regular Combo box) |
Name |
cbSortBy
|
Let's code the top 3 Option
Buttons first. The sorting option for Social Security may seem redundant since the
Employee table is already sorted by the Social Security
by default (which is why that option button must be on by default). However, what happens after the User sorts the table
by Last Name and then wants to
change the sort order back to Social Security?
Here's the code that goes in the optSocialSecurity_Click
event procedure:
'Sort the Employees
table by 'SocialSecurity'
daoEmployees.RecordSource = "SELECT *
FROM Employees ORDER BY SocialSecurity"
'Refresh the database to
update the data bound controls
daoEmployees.Refresh
Here's the code that goes in the optLastName_Click event
procedure:
'Sort the Employees
table by 'LastName'
daoEmployees.RecordSource = "SELECT *
FROM Employees ORDER BY LastName"
'Refresh the database to
update the data bound controls
daoEmployees.Refresh
I want you to figure out the code that goes in the optAge_Click event
procedure (use the examples above).
This gets a little repetitive after awhile! After entering the
above code, save the project and run it. Do the first 3 Sorting Option
buttons do their job?
Make sure they work before going on.
Putting the Field names into the
cbSortBy Combo box
We are responsible for writing the code that will fill
the Combo box (cbSortBy) with the names of the
Fields from the Employees table. We can accomplish this by using the Count property of the Fields
object of the Recordset object.
Fields is a collection of
the fields in the Employees table. Every collection has a
Count property that is equal to the number
of items in the collection--in this case, Count
is equal to the number of Fields
that a record from the Employees
table
contains. Here's how the first line of a For-Next loop would look using the
Count property as our limit:
For i = 0 To
daoEmployees.Recordset.Fields.Count
The following line of code uses the Name
property of the Fields collection
to
extract and add each field name from the Employees table to the cbSortBy
combo box:
cbSortBy.AddItem daoEmployees.Recordset.Fields(i).Name
Since Fields is an
collection of the fields in the table, the names of the fields can be extracted by looking at
the Field's Name property: Fields(i).Name. When used inside a For-Next loop, we can populate the cbSortBy combo box with the names of the fields
from the Employees table by adding
the following code to the Form_Activate
event procedure:
Dim i As Integer
'The Picture field is
the last field, so do -2 to not include it
For i = 0 To daoEmployees.Recordset.Fields.Count
- 2
cbSortBy.AddItem daoEmployees.Recordset.Fields(i).Name
Next i
Remember that Arrays
and Collections begin with element 0,
so normally you'd have to subtract 1 from Count
in the above code (Count is equal to 9 because there are 9 fields in a record).
However, the index values of the fields in the Fields
collection are 0 through 8. So a For-Next loop only needs to go from 0 to 8. This
is normally accomplished by subtracting 1
from Count in a For-Next loop. Above
we are subtracting 2 from Count so that the last field, the Picture field, is not included in the cbSortBy combo box (Sorry, we can't sort the table
by an OLE field). Be sure to add the above code to the Form_Activate event procedure before going on.
Here's the code that goes in the optSortBy
option button's Click event procedure:
'Make sure 'cbSortBy.Text'
is not empty
If cbSortBy.Text = "" Then Exit Sub
'Sort the Employees
table by the value in 'cbSortBy.Text'
daoEmployees.RecordSource = "SELECT *
FROM Employees ORDER BY " & cbSortBy.Text
daoEmployees.Refresh
Notice how the last part of the SQL
SELECT query command above includes the cbSortBy.Text
property instead of a fixed field name. To avoid a critical error, you've got to
make sure that cbSortBy.Text is not blank before you try and
execute this query, hence the If-Then test above that exits the procedure
if cbSortBy.Text is equal to an empty string. Be sure to add the above code to your optSortBy_Click event procedure (Note:
That is the optSortBy_Click event procedure, not
the cdSortBy_Click event procedure).
The above code works if the User selects a name in the cbSortBy Combo box, and then clicks on the optSortBy option button (if the optSortBy option button is not already turned on).
It would be more user-friendly if when the User selects a field from the
Combo box the optSortBy option button is
automatically turned on for them. Add the following code to the cbSortBy_Click event procedure to make this
happen (Note: That is the cdSortBy_Click
event procedure, not the optSortBy_Click
event procedure):
'Turn on the optSortBy option button. If
optSortby was off, turning
' it on triggers it's Click event procedure automatically
optSortBy.Value = True
'In case it was already on,
and the above line of code didn't trigger
' it's Click event procedure, call it manually anyway
optSortBy_Click
Setting the Value property
of optSortBy to True turns it on. Then
calling the optSortBy_Click event procedure
executes the query. After adding this code to your cbSortBy_Click
event procedure, save it and take it for a test spin. Try the different sorting
options. That completes the basic project.
Required Enhancement
Add a button that when clicked enlarges the form
(either vertically or horizontally) to display a Frame containing tiny pictures of
everyone in the database. When the user clicks on one of the pictures, the data for that
record is displayed. Below is an example illustration that stretches the form
vertically to display the tiny pictures. The first image from the list is selected,
so it is hidden:
Add a new
Command Button to the Form and name it cmdPicPick.
Set its caption to Picture Pick. Stretch the Form
larger (either vertically or horizontally—you decide) and make an empty area big
enough to fit a Frame. Remember, the Frame must be big enough to display 17
tiny pictures. Once you have the Frame placed, place an OLE
control inside the Frame (remember to click the
Cancel button when the Insert Object dialog automatically appears). Set the
following properties of this new OLE
control:
| Property |
Value |
| Name |
OLEPic |
| DataSource |
daoEmployees (Use the dropdown list) |
| SizeMode |
1 – Stretch |
| Height |
550 |
| Width |
500 |
Important Note: The DataField property is not
set to anything, leave it blank.
Now select the OLEPic
control and copy it. Right-click inside
the Frame and choose Paste from the
context menu. When asked if you want to create an array of the OLEPic
control, select Yes. Grab the newly pasted OLEPic control from the upper left corner of
the Frame and drag it next to the original OLEPic
control. Keep pasting, and positioning OLEPic
controls inside the Frame until you have 17
of them. Examine the Form’s properties and take note of the current value of
the Height or Width property (depending upon which way you
stretched your Form to fit the Frame), and write that number
down—you’ll need it later. Now resize your Form back to its original size
(this will hide the Frame and OLEPic controls that you just added).
Add the following code to the General
Declarations section:
'Stores the Form's starting
Height or Width
Dim iOrgSize As Integer
'Stores the
Index of the last selected OLEPic
Dim iLastPic As Integer
Add the following code to the Form_Load
event procedure:
‘(or frmData2.Width, whichever way you stretched the form to fit the frame)
iOrgSize = frmData2.Height
Add the following code to the cmdPicPick_Click
event procedure. Wherever I use the word newSize
in the following code, be sure to substitute
the number you wrote down above for the height or width of your form when it
was stretched to show the Frame and the little OLEpic controls:
Dim i As Integer
Dim iStartRecord As Integer
If frmData2.Height (or Width)
= newSize
Then
frmData2.Height = iOrgSize
Exit Sub
End If
frmData2.Height (or Width)
= newSize
'Store the Starting Record location
iStartRecord = daoEmployees.Recordset.AbsolutePosition
'Start with the first record
daoEmployees.Recordset.MoveFirst
For i = 0 To 16
'Show the Picture of the current record
OLEPic(i).DataField = "Picture"
'Prevent the Picture from being changed
' when we move to the next record
OLEPic(i).DataField = ""
If i < 16 Then 'Avoid moving past EOF
daoEmployees.Recordset.MoveNext
End If
Next i
'Hide the
OLEPic of the current record
OLEPic(iStartRecord).Visible = False
'Store the Index of the currently selected OLEPic
' so we can unhide it when the user picks another
iLastPic = iStartRecord
'Return to the starting record
daoEmployees.Recordset.AbsolutePosition = iStartRecord
When the cmdPicPick
button is pressed the first time, the above code expands the form to display the frame
that contains the little OLEPic controls (the expansion is either vertical or horizontal,
depending upon whether you're changing the Height or Width
of the form). The For-Next loop in the above code move through the
records and copies the picture of each employee into the corresponding OLEPic
control from the array. We do this by setting the DataField
property of each OLEPic control to the Picture field--which
copies the actual picture into the control. It's important that we then
set the DataField property equal to an
empty string ("") to make sure that when we move to the next record
the picture doesn't change.
Add the following code to the OLEPic_Click
event procedure. This code will display the record of the picture the user has
selected. It also hides the OLEPic that the user selected, and unhides any OLEPic
control that was previous selected and hidden:
Dim i As Integer
'Display the record that corresponds to the
' selected OLEPic
daoEmployees.Recordset.AbsolutePosition = Index
'Hide the Selected OLEPic
OLEPic(Index).Visible = False
'UnHide the OLEPic that was selected last
OLEPic(iLastPic).Visible = True
'Store the Index of the currently selected OLEPic
' so we can unhide it when the user picks another
iLastPic = Index
Take it for a test spin.