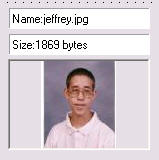
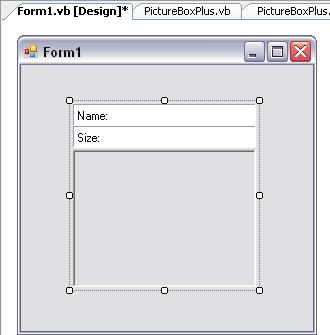
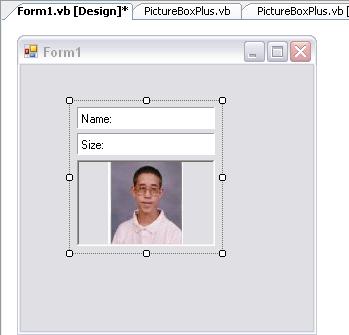
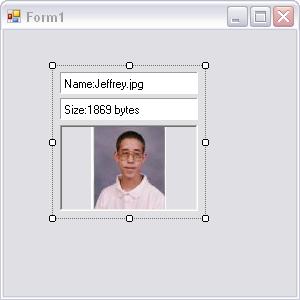
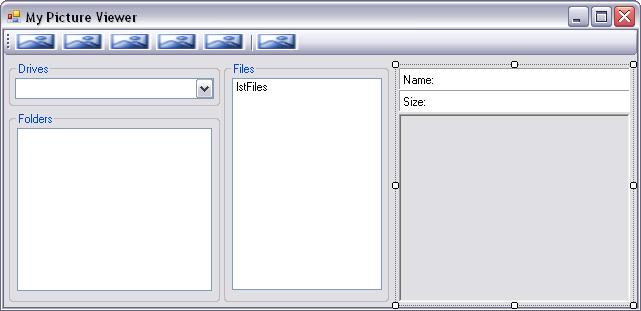
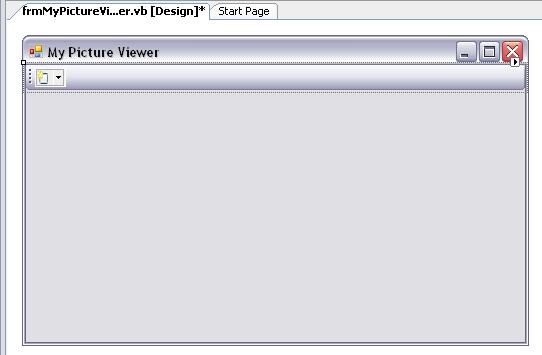
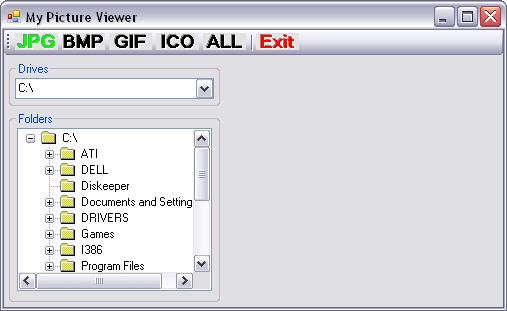
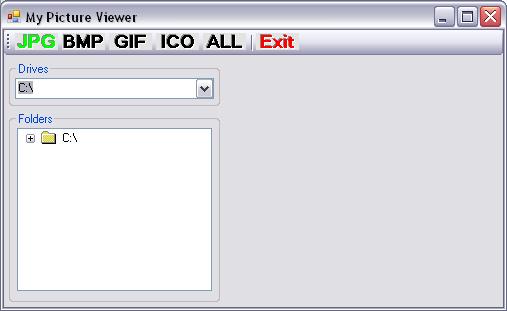
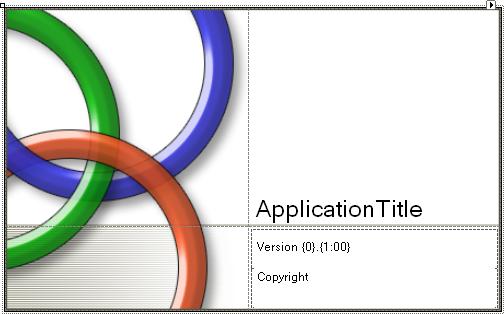
The My Picture Viewer application will allow the user to browser their drives and folders for picture files. A ToolStrip will let them choose the type of graphic files to be listed in a files listbox. When they click on a graphic file it will be displayed in a picturebox on the right side of the form (see the illustration above).
Launch Microsoft Visual Studio 2010. Drop down the File menu and select New Project...
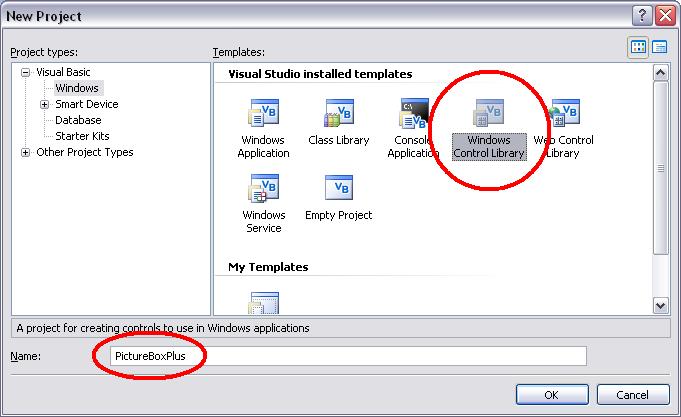
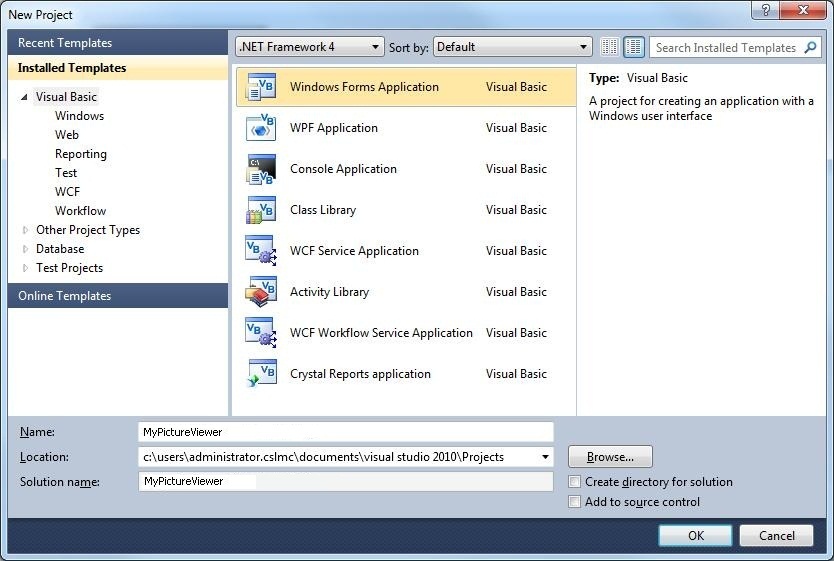
Be sure the Windows Forms Application template in the New Project dialog is selected in the Templates pane on the right side, then type MyPictureViewer in the Name textbox (as shown below):
Now click the OK button.
Save the project by clicking on the Save All button on the toolbar. This displays the Save Project dialog box, as shown:
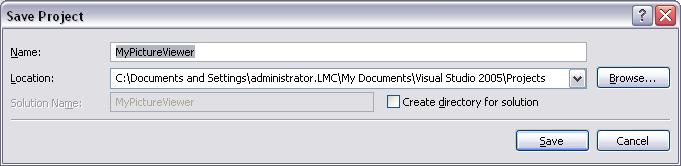
Do not change the default Location path. Be sure to uncheck the Create directory for solution option, as show above, before clicking on the Save button.
This creates a new folder inside the My Documents\Visual Studio 2010\Projects\ folder named MyPictureViewer:
My Documents\Visual Studio 2010\Projects\MyPictureViewer
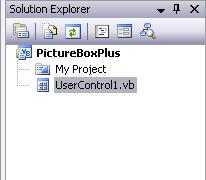
Rename the Form file
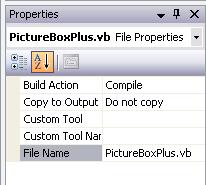
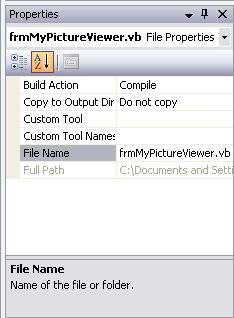
With the form file (Form1.vb) selected in the Solution Explorer window (as shown above), the Properties window directly below it displays it's File properties. Click on the File Name property and type frmMyPictureViewer.vb and press the enter key (don't forget to include the .vb extension, as shown in the illustration below):
Change the Name and Text properties of the Form
To display the properties of the form in the Properties window, click once on the blank Form, which should be displayed on the left side of the screen in the Design window. Make sure the Name property—which is in parentheses (Name) at the top of the property list so that it's easy to find—is frmMyPictureViewer. It should have been set to that automatically when we named the form file. Then scroll the properties windows down—the properties are listed alphabetically—and change the Text property to My Picture Viewer as shown below:

Adding a ToolStrip control to the form
Find the ToolStrip control in the Menus & Toolbars section of the control toolbox and double-click it once to add a ToolStrip to the form:
The new ToolStrip appears in the component tray, like this:
Click on it once to select it, and take a look at how the new empty ToolStrip appears at the top of the form:
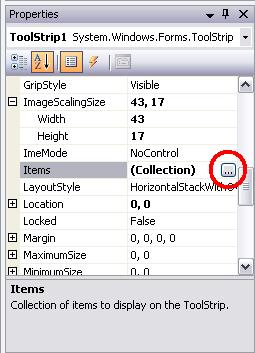
The new ToolStrip has one new item place-holder and appears empty the rest of the way across the top of the form. The default location of a ToolStrip is along the top edge of a form, below the menu. The default value of it's Anchor property is Top, Left. The bitmaps for the ToolStripbuttons we are going to add to the ToolStrip are 43 pixels wide by 17 pixels high. Set the following properties of ToolStrip1 before we start adding ToolStripbuttons:
| ToolStrip1 | |
| Property | Value |
| ImageScalingSize.Width | 43 |
| ImageScalingSize.Height | 17 |
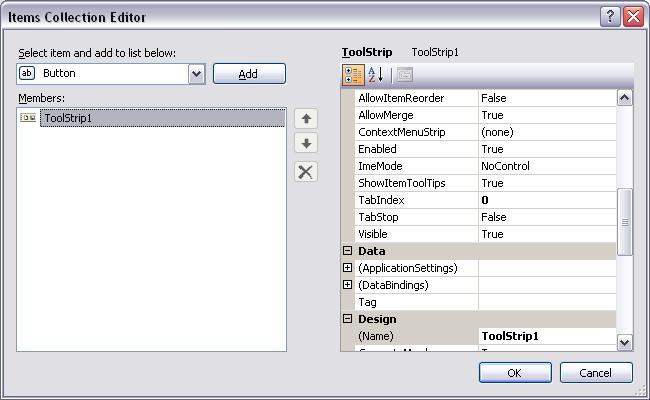
Now click on the ellipses button of the toolstrip's Items collection, as shown in the following illustration:
The Items Collection Editor dialog is displayed:
Adding ToolStripButtons to ToolStrip1
Click on the Select item and add to list below combobox to see all the items you can add to a ToolStrip:
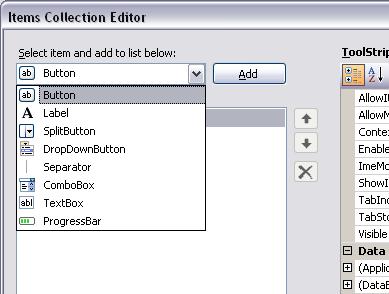
Most ToolStrips contain only buttons. But all those other item options (shown in the above illustration) are quite impressive. We are going to be boring and just include buttons and a single separator on our ToolStrip control. Pick the Button item and click the Add button. The following illustration should match your screen. Be sure to click the Alphabetical sort button at the top of the properties pane, as shown below to list the properties alphabetically, so that it matches the illustration below:

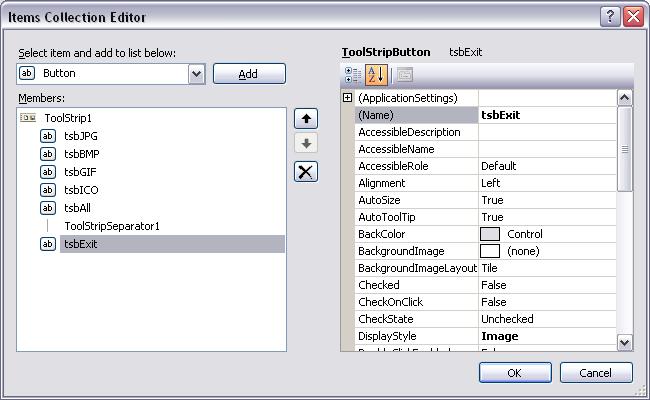
Make sure that ToolStripButton1 is selected, like in the above illustration, so that you can see its properties in the properties pane. Set the following properties:
| ToolStripButton1 | |
| Property | Value |
| Name | tsbJPG |
| Text | (blank) |
| ToolTipText | List Jpeg Files |
Use the following illustration and add 5 more Buttons and a Separator as shown:
Set the their properties as follows:
| ToolStripButton2 | |
| Property | Value |
| Name | tsbBMP |
| Text | (blank) |
| ToolTipText | List Bitmap Files |
| ToolStripButton3 | |
| Property | Value |
| Name | tsbGIF |
| Text | (blank) |
| ToolTipText | List Gif Files |
| ToolStripButton4 | |
| Property | Value |
| Name | tsbICO |
| Text | (blank) |
| ToolTipText | List Icon Files |
| ToolStripButton5 | |
| Property | Value |
| Name | tsbAll |
| Text | (blank) |
| ToolTipText | List All Graphic Files |
| ToolStripSeparator1 | |
| Property | Value |
| Name | (default name) |
| ToolStripButton6 | |
| Property | Value |
| Name | tsbExit |
| Text | (blank) |
| ToolTipText | Exit My Picture Viewer |
Click the OK button to close the Items Collection Editor dialog. Notice how we didn't set the Image property of any of the ToolStripButtons. We will take care of that in the next step. Save the project before continuing.
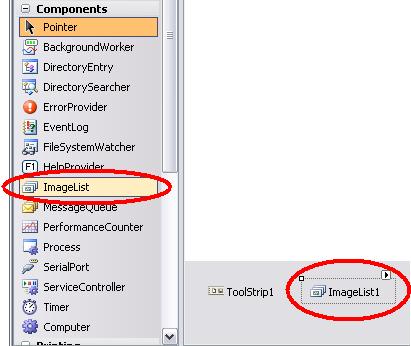
Adding an ImageList component to the form
An ImageList control is ideal for storing multiple images within a project. Once the images are stored inside an ImageList control, you have easy access to them at run-time. Accessing the images in an ImageList is fast and easy, as compared to reading the images from image files—bitmaps, jpegs, etc.—which is much slower. You can populate an ImageList dynamically at run-time by filling it with images from image files, or you can populate it at design time; which is what we will do.
Double-click on the ImageList control in the Components section of the control toolbox (as shown below) to add an ImageList control to the Component Tray:
It's default name is ImageList1, set these properties of the new ImageList control as follows:
|
ImageList |
|
| Property | Value |
| Name | imgListToolStrip |
| ImageSize.Width | 43 |
| ImageSize.Height | 17 |
Adding Images to the imgListToolStrip control
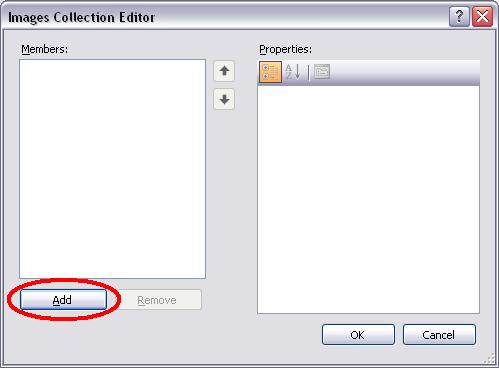
With the imgListToolStrip imagelist control selected in the Component Tray so that it's properties are displayed in the Properties window, click on the ellipses button of it's Images collection property to open the Image Collection Editor, as shown below:
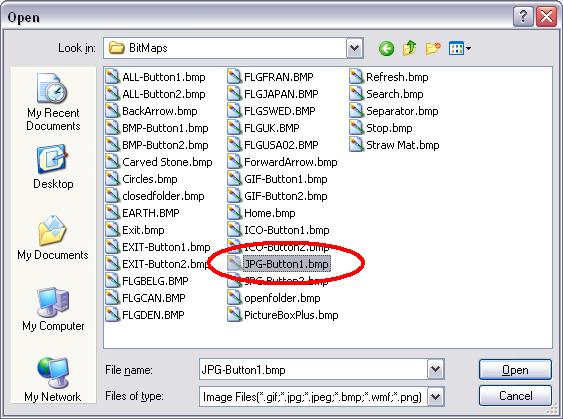
Click on the Add button. Navigate to the c:\shared\Bitmaps folder and select the JPG-Button1.bmp bitmap file, as shown below, and click the Open button (Note: If you are doing this project off campus, you may download an archive containing these bitmap files by clicking this link):
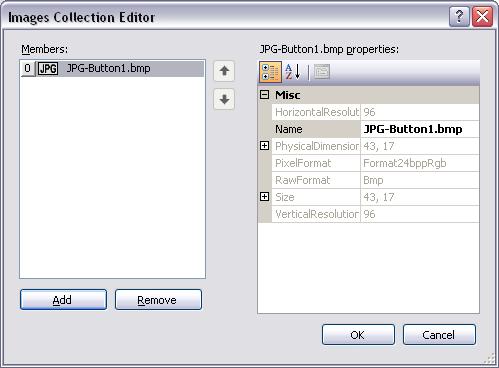
With the addition of the JPG-Button1.bmp bitmap file, the Image Collection Editor dialog should now look like the following illustration:
Use the following table and add 11 more bitmap files to the images collection—that's 12 bitmap files altogether including the JPG-Button1.bmp bitmap file in position zero. Be sure to place the bitmaps in the order shown. (Note: You can rearrange the order of the bitmaps by selecting them in the Members list and moving them up and down using the up/down arrow buttons at the upper right corner of the Members list):
|
Add these Images to imgListToolStrip |
|
| Position | File Name |
| 0 | JPG-Button1.bmp |
| 1 | BMP-Button1.bmp |
| 2 | GIF-Button1.bmp |
| 3 | ICO-Button1.bmp |
| 4 | ALL-Button1.bmp |
| 5 | EXIT-Button1.bmp |
| 6 | JPG-Button2.bmp |
| 7 | BMP-Button2.bmp |
| 8 | GIF-Button2.bmp |
| 9 | ICO-Button2.bmp |
| 10 | ALL-Button2.bmp |
| 11 | EXIT-Button2.bmp |
When you've added all the bitmaps, your Image Collection Editor dialog should look just like this:
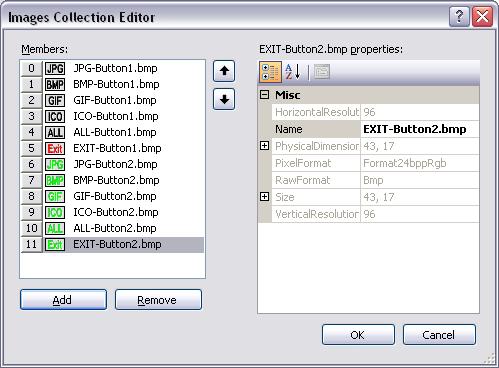
Because our ToolStripButtons act like toggles, when the user clicks one we will simulate turning it on and off by changing the image displayed on it. This list of images in imgListToolStrip represent the buttons in their off (black, top six images) and on (green, bottom 6 images) states. Note: Once graphic files are added to an ImageList the individual source graphic files are no longer required, since they are actually embedded inside the ImageList control.
Creating Enumerated data types for the On and Off bitmaps
Enumerated data types are used extensively in Visual Studio to improve readability in code. The Color.<color name> enumerated data type is a prime example. Take a look at the following code example (don't type this code):
Me.BackColor = Color.Brown
txtBox1.BackColor = Color.DarkBlue
The Color.Brown and Color.DarkBlue enumerated data types store the number values, in the proper format, that actually represent those colors. Here's a version of the above code using the actual number values of those colors:
'Set the BackColor of the form to Brown
Me.BackColor = _
System.Drawing.ColorTranslator.FromOle(10824234)
'Set the BackColor of txtBox1 to DarkBlue
txtBox1.BackColor = _
System.Drawing.ColorTranslator.FromOle(139)
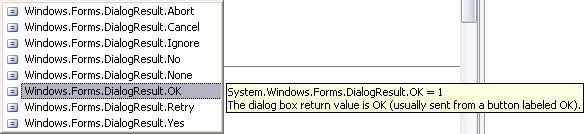
Which version of the code is easier to read? Thanks to the Color enumerated data type, the first two lines of code are not only self-documenting but far easier to modify later if we want to change to different colors. Enumerated data types exist for virtually every property/method. Since all properties/methods require a limited range of values (i.e. BackColor is limited to a specific range of number values). Here is another example. The Show method of the MessageBox control returns one of 6 different number values depending upon which button the user clicked to close it, as shown in the following illustration:
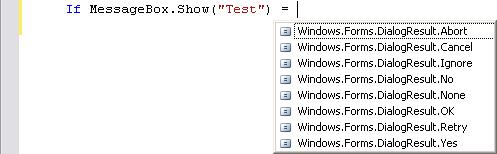
The declaration of the intrinsic DialogResult enumerated data type probably looks like this (don't type this code):
Enum DialogResult
None = 0
OK = 1
Cancel = 2
Abort = 3
Retry = 4
Ignore = 5
Yes = 6
No = 7
End Enum
Each of those return values is really just a number, as shown, DialogResult.OK is 1:
Enumerated data types do two important things: They make code self-documenting. And they limit a programmer's choices to a list of values that a property or method can accept or return. This makes for better code, which is easier to maintain and is less error-prone.
We will now create our own enumerated data types to represent the index numbers for the On and Off versions of the bitmaps stored in imgListToolStrip for our ToolStripButtons.
Go to the Code View of your frmMyPictureViewer form and type the following code in the Declarations section:
'Create an enumerated data type for the
' On/Off buttons. Each member represents
' the index value of the corresponding On
' and Off versions of the images stored
' in the imgListToolStrip imagelist.
Enum TSButton
Jpeg_ON = 6
Jpeg_OFF = 0
Bitmap_ON = 7
Bitmap_OFF = 1
Gif_ON = 8
Gif_OFF = 2
Icon_ON = 9
Icon_OFF = 3
All_ON = 10
All_OFF = 4
Exit_ON = 11
Exit_OFF = 5
End Enum
Setting the Image property of the ToolStripButtons
With the declaration of the TSButton enumerated data type added to the Declarations section, add the following code to the frmMyPictureViewer_Load event procedure to set the starting images of the ToolStripButtons (Note: The Jpeg button will be on by default when the program starts.):
tsbJPG.Image = _
imgListToolStrip.Images(TSButton.Jpeg_ON)
tsbBMP.Image = _
imgListToolStrip.Images(TSButton.Bitmap_OFF)
tsbGIF.Image = _
imgListToolStrip.Images(TSButton.Gif_OFF)
tsbICO.Image = _
imgListToolStrip.Images(TSButton.Icon_OFF)
tsbAll.Image = _
imgListToolStrip.Images(TSButton.All_OFF)
tsbExit.Image = _
imgListToolStrip.Images(TSButton.Exit_OFF)
Without the TSButton enumerated data type we'd have to use the actual index numbers and the above code would look like this (don't type this code):
'Set the image of the JPG button to the On button bitmap
tsbJPG.Image = imgListToolStrip.Images(6)
'Set the image of the BMP button to the Off button bitmap
tsbBMP.Image = imgListToolStrip.Images(1)
'Set the image of the GIF button to the Off button bitmap
tsbGIF.Image = imgListToolStrip.Images(2)
'Set the image of the ICO button to the Off button bitmap
tsbICO.Image = imgListToolStrip.Images(3)
'Set the image of the EXIT button to the Off button bitmap
tsbExit.Image = imgListToolStrip.Images(4)
I'd rather not need to memorize the numbers that represent the image indexes of the bitmaps in the imgListToolStrip imagelist control. Using the TSButton enumerated data type not only makes the code self-documenting and easier to modify later, but you can be lazy and significantly reduce the number of comments you need to add to your code. Important: Enumerated data types are restricted to Integer values only. That's right, all the thousands of intrinsic enumerated data types in Visual Studio are just numbers.
Testing the program so far
Save the project now. Run the program. Your ToolStrip should look like the following illustration:
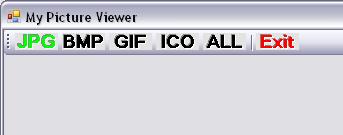
Note how the Separator we inserted between the All and Exit buttons adds a small gap between them with a vertical indented line.
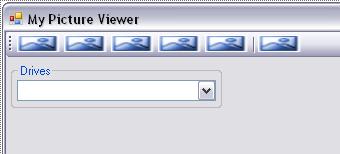
Adding a Drives combobox to the form
The user will use a Drives combobox to select the drive on the computer that they want to browse for picture files:
Add a GroupBox and a ComboBox to the form, as shown in the above illustration. Use the following table to set these properties:
| GroupBox | |
| Property | Value |
| Text | Drives |
| ComboBox | |
| Property | Value |
| Name | cboDrives |
Populating the Drives combobox
We will populate the cboDrives combobox automatically when the program starts. So we need to add some more code to the frmMyPictureViewer_Load event procedure. In project 8 we created a Drives combobox to test the pDisk class of the Computer component we created. In fact, the code we need to populate this Drives combobox is identical to the code we used in project 8. So the following code should look familiar. Add this code to the frmMyPictureViewer_Load event procedure:
'Copy the contents of the string array returned
' by the GetLogicalDrives method into an
' sDrives string array.
Dim sDrives As String() = _
System.Environment.GetLogicalDrives()
'Clear the contents of the combobox before filling it
cboDrives.Items.Clear()
'Create an sDrive variable to grab each element
' of the array with a For-Each loop, and add
' it to the combobox.
Dim sDrive As String
For Each sDrive In sDrives
cboDrives.Items.Add(sDrive)
Next
Let's make drive C: the default drive. To do this we need to set the SelectedIndex property of cboDrives to the index value of the C:\ entry in the combobox. We cannot assume that C:\ will always be the second entry in the combobox (after A:\), so we need to examine all the drive entries one-by-one, searching for C:\. Add the following code—after the code above—to the frmMyPictureViewer_Load event procedure, to make drive C:\—or at least the first fixed disk—the default drive in the cboDrives combobox:
'i is an index counter. Remember that number
' variables are automatically initialized to
' zero when they are created.
Dim i As Integer
'Loop through the entries in the Items
' collection of cboDrives.
For Each sDrive In cboDrives.Items
'Test for the C:\ entry.
If sDrive.ToString.ToUpper.Equals("C:\") Then
'Setting SelectedIndex raises the
' SelectedIndexChanged event procedure.
' Which is where we will add the code to
' populate the TreeView control with
' Folder Info.
cboDrives.SelectedIndex = i
End If
'Increment the index counter.
i += 1
Next
'If C:\ is not found, set SelectedIndex to the
' second item in the list (the second item is
' unlikely to be a floppy drive).
If cboDrives.SelectedIndex = -1 Then
Try
'If the attempt to assign 1 to SelectedIndex
' fails, display a MessageBox.
cboDrives.SelectedIndex = 1
Catch
MessageBox.Show("No fixed disks found!", _
"Drive Error!", MessageBoxButtons.OK, _
MessageBoxIcon.Exclamation)
End Try
End If
Testing the program so far
Save the project now. Run the program. Is drive C:\ set as the default entry in the cboDrives combobox? Be sure to take a look at the other entries in the cboDrives combobox. Are all the drives on the computer listed?
Using a TreeView control to create a DirListBox
In Visual Basic 6 there was a DirListBox control. All you had to do was drop it on your form and set a couple of it's properties and you had a nicely displayed directory hierarchy of the current drive. The old DirListBox control is gone, so in Visual Studio 2010 we need to create our own. We will use a TreeView control for this purpose. The following illustration shows how adding Nodes—that represent the folders on a drive—to a TreeView control can create a familiar looking folder hierarchy display:
Adding a TreeView control to the form
The images used to represent the Nodes of a TreeView come from an ImageList control. We will add another ImageList control to the component tray that will be for the exclusive use of the TreeView control. Add a new ImageList control to the component tray now. Use the following table to set these properties:
| ImageList | |
| Property | Value |
| Name | imgListFolders |
| ImageSize.Width | 16 |
| ImageSize.Height | 16 |
Adding 2 folder Images to the imgListFolders control
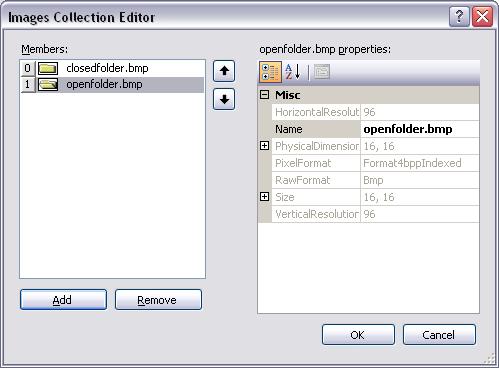
We need just two images for the Nodes of our TreeView control: One of a closed folder and one of an open folder. With the imgListFolders imagelist control selected in the Component Tray, so that it's properties are displayed in the Properties window, click on the ellipses button of it's Images collection property. This opens the Image Collection Editor dialog. Use the table below and add the following bitmap files at the positions shown. Use the Add button to add each image. Look inside the c:\Shared\Bitmaps folder for the bitmap files (Note: If you are doing this project off campus, you may download an archive containing these bitmap files by clicking this link):
|
Add these Images to imgListFolders |
|
| Position | File Name |
| 0 | closedfolder.bmp |
| 1 | openfolder.bmp |
When you are finished, your Image Collection Editor dialog should look like this:
Click the OK button to close the dialog.
Add a GroupBox and a TreeView control where show—in the illustration prior the one above. Set their properties like this:
| GroupBox | |
| Property | Value |
| Text | Folders |
| TreeView (inside the GroupBox) | |
| Property | Value |
| Name | tvFolders |
| ImageList | imgListFolders |
| ImageIndex | 0 |
| SelectedImageIndex | 1 |
The SelectedImageIndex property is set to the index of the opened folder image in imgListFolders. The ImageIndex property is set to the index of the closed folder image in imgListFolders. These two properties determine which image from imgListFolders will be used when a Node is selected and not selected respectively.
Populating the tvFolders TreeView control
We want to populate the tvFolders TreeView control with a hierarchy of all the folders (also called Directories) on the selected drive. Each folder will be added as a new Node to the TreeView. To create a true hierarchy, we will also add Nodes inside other Nodes when folders are found inside other folders (called Sub-Folders or Sub-Directories). Let's begin by adding the following code to the cboDrives_SelectedIndexChanged event procedure:
'If this drive contains hundreds of folders, this
' may take some time, so make the mouse
' pointer an hourglass.
Windows.Forms.Cursor.Current = _
Cursors.WaitCursor
'Clear the TreeView control before populating it
' with nodes of the drive's folder hierarchy.
tvFolders.Nodes.Clear()
'Add the selected drive (i.e. C:\) as the first
' (root) Node.
tvFolders.Nodes.Add(cboDrives.Text)
'Call the AddDirectories procedure to populate
' the TreeView control, passing it the Root
' node of the hierarchy.
AddDirectories(tvFolders.Nodes(0))
'Restore the default mouse pointer.
Windows.Forms.Cursor.Current = _
Cursors.Default
The above code changes the mouse pointer to an hourglass during the process of populating tvFolders, because on a large drive this may take awhile. We then clear any existing nodes from tvFolders and add the Root of the selected drive as the first Node. After adding the above code, the AddDirectories procedure call should have a blue squiggly underline, since we have not created it yet. Note: The cboDrives_SelectedIndexChanged event procedure will be raised once at program startup because we explicitly set the SelectedIndex property of the cboDrives combobox to the index value of the drive C:\ entry—in the frmMyPictureViewer_Load event procedure.
Creating an AddDirectories procedure
Our call to the AddDirectories procedure above is passed a node from the tvFolders TreeView control. So our procedure declaration for AddDirectories must include a TreeNode variable (called Node) as the argument that's passed to it. Create the AddDirectories procedure by typing the following line of code on a blank line above the End Class statement at the bottom of the code window:
Private Sub AddDirectories(ByVal Node As TreeNode)
Press enter at the end of the line to automatically add the End Sub statement that terminates it. Now your cursor should be flashing between the AddDirectories declaration and the End Sub statement, which is where you need to be to add the code that follows.
We will construct the node hierarchy for tvFolders by finding the folders inside Node, and adding each folder as a new node. How do we list the folders on a drive? This is were a DirectoryInfo object from the System.IO class library comes in handy.
Constructing DirectoryInfo objects to list folders on a drive
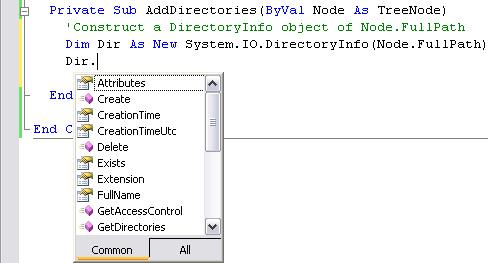
We begin by creating a DirectoryInfo object (named Dir), for the folder represented by Node. Type this code inside the AddDirectories procedure:
'Construct a DirectoryInfo object of Node.FullPath
Dim Dir As New _
System.IO.DirectoryInfo(Node.FullPath)
The DirectoryInfo constructor requires a string argument that is the explicit path to a folder on the drive. TreeNode objects have a FullPath method that returns a string containing the complete path to the location of the folder the Node represents.
Once we've created a DirectoryInfo object for Node—named Dir in this case—we have access to the many properties and methods that a DirectoryInfo object provides, some of which are shown in the following illustration:
We will use the GetDirectories method of the DirectoryInfo object (Dir) to get an array of DirectoryInfo objects for all the folders located at Node.FullPath. The following line of code constructs an array (named Folders) of DirectoryInfo objects of all the directories at Node.FullPath. Add this code to the AddDirectories procedure:
'Construct and reference a DirectoryInfo object
' array of all the folders inside Node.FullPath.
Dim Folders As System.IO.DirectoryInfo() = _
Dir.GetDirectories()
We can then use a For-Next loop, with the Length property—which is equal to the number of elements in the array—of the Folders DirectoryInfo array as the limit, to add these folders as new nodes inside Node. Add the following code to the AddDirectories procedure:
Dim i As Integer
For i = 0 to Folders.Length - 1
'Add a new node to Node for each folder found.
Node.Nodes.Add(Folders(i).Name)
Next i
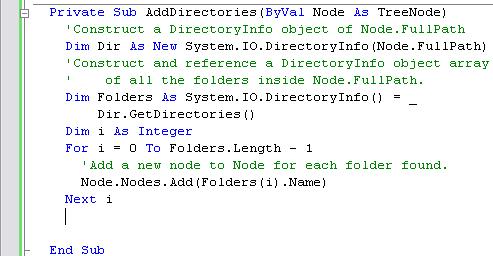
Here's an illustration of the code you've added to the AddDirectories procedure so far. Make sure your code is the same:
Testing the program so far
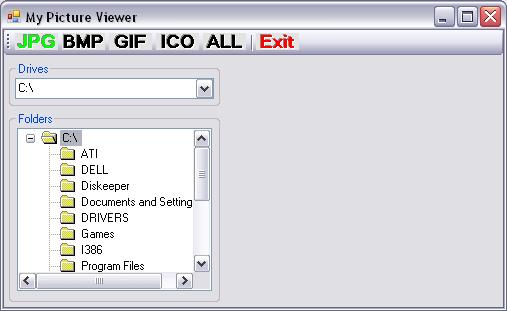
Save the project now. Run the program. Your tvFolders TreeView control should look like this:
Click on the little + box in front of the C:\ folder and it should expand like this (Your folders will be different):
The top C:\ folder in the illustration above is the root node. We passed this node to the AddDirectories procedure which filled it with new nodes for each of the folders on the root (\) of drive C:. But what about all the sub-folders that are inside the other folders? They have not been included in the hierarchy or you would see + expand boxes in front of all the folders. Nodes for those folders are not included until we add them as well.
We need to call the AddDirectories procedure for each node in C:\ to add nodes for the sub-folders that they contain to tvFolders. And then we need to call the AddDirectories procedure for those nodes as well to enumerate the sub-folders they contain, and so on and so on, continuing this process until we've included the lowest sub-folders in the hierarchy.
Using Recursion to enumerate ALL the folders on a drive
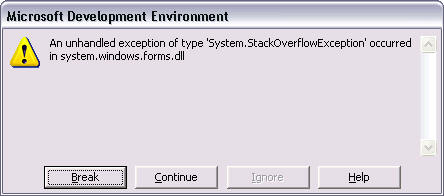
When a procedure calls itself, it is referred to as a Recursive Procedure. This is usually a very bad thing to do. The area in memory where the procedures of your programs are executed (called the Stack space) is limited in size and is quickly depleted when a procedure calls itself. The result of an accidental recursive procedure call is usually the termination of your program with a Stack Overflow error message box like this:
In the case of our AddDirectories procedure, we will be creating a Limited Recursive Procedure because there is a limited depth to the hierarchy of folders on a drive. So our AddDirectories procedure will only need to call itself until the maximum depth of the folder hierarchy is reached. Which should be well before we run out of Stack space (keep your fingers crossed). There are issues to watch out for when calling a procedure recursively. Error trapping becomes more important than ever when you are recursively calling a procedure several hundred, or even thousand, times in a row. One potential problem with our AddDirectories procedure can occur if we call the GetDirectories method on a folder that we don't have the security privileges to access—this can even happen when you are logged on as Administrator. In the event that this happens, we want our program to just skip that folder and move on to the next one. So we need to Try-Catch all the code in the AddDirectories procedure so that execution will continue normally after an access error occurs. Add the following Try-Catch error trapping code to the AddDirectories procedure (large italicized font):
Try
'Construct a DirectoryInfo object of Node.FullPath
Dim Dir As New System.IO.DirectoryInfo(Node.FullPath)
'Construct and reference a DirectoryInfo object array
' of all the folders inside Node.FullPath.
Dim Folders As System.IO.DirectoryInfo() = _
Dir.GetDirectories()
Dim i As Integer
For i = 0 to Folders.Length - 1
'Add a new node to Node for each folder found.
Node.Nodes.Add(Folders(i).Name)
Next i
Catch
'This error trap prevents a crash when
' attempting to access restricted folders.
End Try
Now insert the following line of code where shown (large italicized font) to make the AddDirectories procedure Recursive:
Try
'Construct a DirectoryInfo object of Node.FullPath
Dim Dir As New System.IO.DirectoryInfo(Node.FullPath)
'Construct a DirectoryInfo object array of all the
' folders inside Node.FullPath.
Dim Folders As New System.IO.DirectoryInfo() = _
Dir.GetDirectories()
Dim i As Integer
For i = 0 to Folders.Length - 1
'Add a new node to Node for each folder found.
Node.Nodes.Add(Folders(i).Name)
'Recursively call AddDirectories to enumerate all the
' folders contained inside the newly added Node.
AddDirectories(Node.Nodes(i))
Next i
Catch
'This error trap prevents a crash when
' attempting to access restricted folders.
End Try
All we had to do to make the AddDirectories procedure Recursive is add a call to itself and pass it the new node that was just added to the current Node. Note: The AddDirectories procedure is now Recursive because we are calling the AddDirectories procedure from inside itself. Which means that before the original call to AddDirectories terminates it may call itself again and again, and again, and again—on a drive with a very deep folder hierarchy, there will be several instances of the AddDirectories procedure running in memory simultaneously! Let's try to visualize how this will work on a drive that has the following very simple folder hierarchy that is five levels deep:
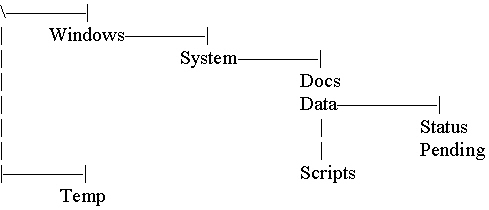
- We begin by passing the root node (\), as Node, to the first call to AddDirectories—from the cboDrives_SelectedIndexChanged event procedure—hereafter called AddDirectories(\).
- AddDirectories(\)--Running
- The Windows folder is discovered and added as a new node to Node(\).
- We recursively call AddDirectories and pass it the Windows node—execution of AddDirectories(\) is suspended while the call to AddDirectories(Windows) is being processed.
- AddDirectories(\)--Suspended
- AddDirectories(Windows)--Running
- Within AddDirectories(Windows) the System folder is discovered and added as a new node to Node(Windows).
- We recursively call AddDirectories and pass it the System node—execution of AddDirectories(Windows) is suspended while the call to AddDirectories(System) is being processed.
- AddDirectories(\)--Suspended
- AddDirectories(Windows)--Suspended
- AddDirectories(System)--Running
- Within AddDirectories(System) the Docs folder is discovered and added as a new node to Node(System).
- We recursively call AddDirectories and pass it the Docs node—execution of AddDirectories(System) is suspended while the call to AddDirectories(Docs) is being processed.
- AddDirectories(\)--Suspended
- AddDirectories(Windows)--Suspended
- AddDirectories(System)--Suspended
- AddDirectories(Docs)--Running
- Within AddDirectories(Docs) no folders are discovered, so the AddDirectories(Docs) procedure exits and execution of the AddDirectories(System) procedure resumes.
- AddDirectories(\)--Suspended
- AddDirectories(Windows)--Suspended
- AddDirectories(System)--Running
- Within AddDirectories(System) the Data folder is discovered and added as a new node to Node(System).
- We recursively call AddDirectories and pass it the Data node—execution of AddDirectories(System) is suspended while the call to AddDirectories(Data) is being processed.
- AddDirectories(\)--Suspended
- AddDirectories(Windows)--Suspended
- AddDirectories(System)--Suspended
- AddDirectories(Data)--Running
- Within AddDirectories(Data) the Status folder is discovered and added as a new node to Node(Data).
- We recursively call AddDirectories and pass it the Status node—execution of AddDirectories(Data) is suspended while the call to AddDirectories(Status) is being processed. Note: We are now at the deepest level in the folder hierarchy, so five is the maximum instances of the AddDirectories procedure that will be running simultaneously.
- AddDirectories(\)--Suspended
- AddDirectories(Windows)--Suspended
- AddDirectories(System)--Suspended
- AddDirectories(Data)--Suspended
- AddDirectories(Status)--Running
- Within AddDirectories(Status) no folders are discovered, so the AddDirectories(Status) procedure exits and execution of the AddDirectories(Data) procedure resumes.
- AddDirectories(\)--Suspended
- AddDirectories(Windows)--Suspended
- AddDirectories(System)--Suspended
- AddDirectories(Data)--Running
- Within AddDirectories(Data) the Pending folder is discovered and added as a new node to Node(Data).
- We recursively call AddDirectories and pass it the Pending node—execution of AddDirectories(Data) is suspended while the call to AddDirectories(Pending) is being processed. Note: Here we are again, at the deepest level in the folder hierarchy, with five instances of the AddDirectories procedure running simultaneously.
- AddDirectories(\)--Suspended
- AddDirectories(Windows)--Suspended
- AddDirectories(System)--Suspended
- AddDirectories(Data)--Suspended
- AddDirectories(Pending)--Running
- Within AddDirectories(Pending) no folders are discovered, so the AddDirectories(Pending) procedure exits and execution of the AddDirectories(Data) procedure resumes.
- AddDirectories(\)--Suspended
- AddDirectories(Windows)--Suspended
- AddDirectories(System)--Suspended
- AddDirectories(Data)--Running
- Within AddDirectories(Data) no other folders are discovered, so the AddDirectories(Data) procedure exits and execution of the AddDirectories(System) procedure resumes.
- AddDirectories(\)--Suspended
- AddDirectories(Windows)--Suspended
- AddDirectories(System)--Running
- Within AddDirectories(System) the Scripts folder is discovered and added as a new node to Node(System).
- We recursively call AddDirectories and pass it the Scripts node—execution of AddDirectories(System) is suspended while the call to AddDirectories(Scripts) is being processed.
- AddDirectories(\)--Suspended
- AddDirectories(Windows)--Suspended
- AddDirectories(System)--Suspended
- AddDirectories(Scripts)--Running
- Within AddDirectories(Scripts) no folders are discovered, so the AddDirectories(Scripts) procedure exits and execution of the AddDirectories(System) procedure resumes.
- AddDirectories(\)--Suspended
- AddDirectories(Windows)--Suspended
- AddDirectories(System)--Running
- Within AddDirectories(System) no other folders are discovered, so the AddDirectories(System) procedure finally exits and execution of the AddDirectories(Windows) procedure resumes.
- AddDirectories(\)--Suspended
- AddDirectories(Windows)--Running
- Within AddDirectories(Windows) no other folders are discovered, so the AddDirectories(Windows) procedure exits and execution of the AddDirectories(\) procedure resumes.
- AddDirectories(\)--Running
- Within AddDirectories(\) the Temp folder is added as a new node to Node(\).
- We recursively call AddDirectories and pass it the Temp node—execution of AddDirectories(\) is suspended while the call to AddDirectories(Temp) is being processed.
- AddDirectories(\)--Suspended
- AddDirectories(Temp)--Running
- Within AddDirectories(Temp) no folders are discovered, so the AddDirectories(Temp) procedure exits and execution of the AddDirectories(\) procedure resumes.
- AddDirectories(\)--Running
- Within AddDirectories(\) no other folders are discovered, so the AddDirectories(\) procedure finally exits.
As you can see, by the time we reach step 12 above, there are five instances of the AddDirectories procedure running in memory.
The following table compresses and graphically illustrates the above 26 steps. The running instances of the AddDirectories procedure are in the green boxes (Italicized Bold Font), the suspended instances are in the red boxes (Normal Font):
| Folder Being Processed | Folder | Folder | Folder | Folder | Folder |
| \ | \ | ||||
| Windows | \ | Windows | |||
| System | \ | Windows | System | ||
| Docs | \ | Windows | System | Docs | |
| System | \ | Windows | System | ||
| Data | \ | Windows | System | Data | |
| Pending | \ | Windows | System | Data | Pending |
| Data | \ | Windows | System | Data | |
| Status | \ | Windows | System | Data | Status |
| Data | \ | Windows | System | Data | |
| System | \ | Windows | System | ||
| Scripts | \ | Windows | System | Scripts | |
| System | \ | Windows | System | ||
| Windows | \ | Windows | |||
| Temp | \ | Temp | |||
| \ | \ |
The depth of the folder hierarchy determines the maximum number of instances
that the recursively called AddDirectories
procedure will
be running simultaneously. The maximum folder hierarchy depth is
restricted to the sum of the number of characters in the folder's names, including the
number of characters in the longest
file name in the deepest folder in the hierarchy—which cannot exceed 255
total characters. This puts a built-in restriction on the depth of a
folder hierarchy with reasonable folder names (like in our above example).
But what about a folder hierarchy created by someone who is insane, like this:
c:\a\b\c\d\e\f\g\h\i\j\k\l\m\n\o\p\q\r\s\t\u\v\w\x\y\z
The above folder hierarchy would require AddDirectories to recurse 26 times, with 26 instances running in memory at the same time—sounds like a stack overflow error could happen. That could be a problem! Fortunately, within Windows XP there is also sub-folder depth limit which prevents the above folder hierarchy from being created even though it complies with the 255 character length limit. I believe that folder depth limit is about 8 folders deep, but I have never tested it myself. Knowing that ahead of time would have made the above 26 step analysis unnecessary, since having up to a maximum of 8 instances of AddDirectories running at the same time would likely never cause a stack overflow.
Testing the program so far
Save the project now. Run the program—it will take longer to load this time, because the entire folder hierarchy of drive c: is being enumerated when it starts. Expand the root folder. Your tvFolders TreeView control should look like this (your folders will be different):
Notice the + expand boxes in front of many of the sub-folders. Click on them. Does the folder hierarchy go deeper and deeper as you expand other folders?
Adding a Splash Screen to the project
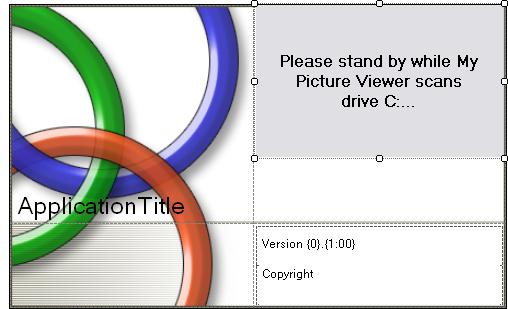
With the addition of the recursive AddDirectories procedure and the folder enumeration of drive C: that occurs when we start the program now, there is a significant delay before the My Picture Viewer form is displayed whenever we launch the program. A long enough delay, in fact, that on some computers with a huge drive c: the user might assume your program has crashed and frozen at launch. This might be a good time to add a Splash Screen to this project. So that when the user launches the program they see the Splash Screen right away and don't assume that something is wrong because of the long delay before they see the main form.
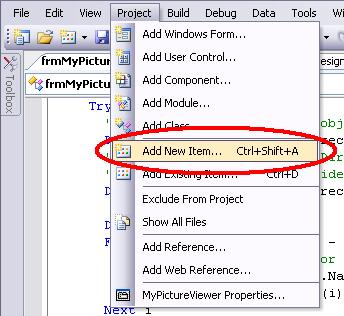
Drop down the Project menu and choose Add New Item... as shown below:
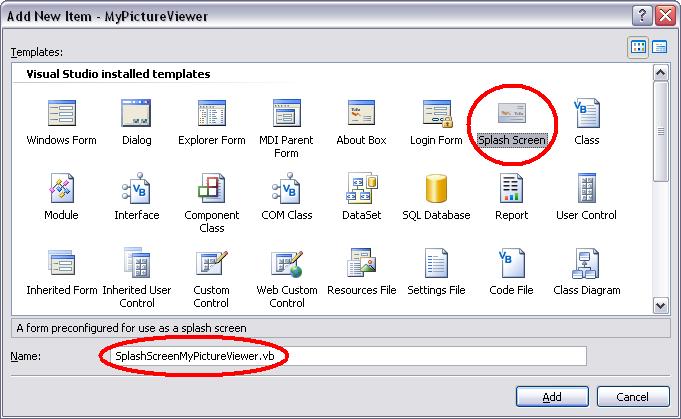
Use the following illustration and selected the Splash Screen template on the Add New Item dialog. Change the name to SplashScreenMyPictureViewer.vb, as shown, and click the Add button:
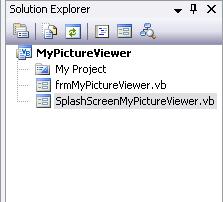
Your solution explorer window should now include the new SplashScreenMyPictureViewer.vb form, as shown:
Drop down the Project menu and select the MyPictureViewer Properties item to display the project properties:
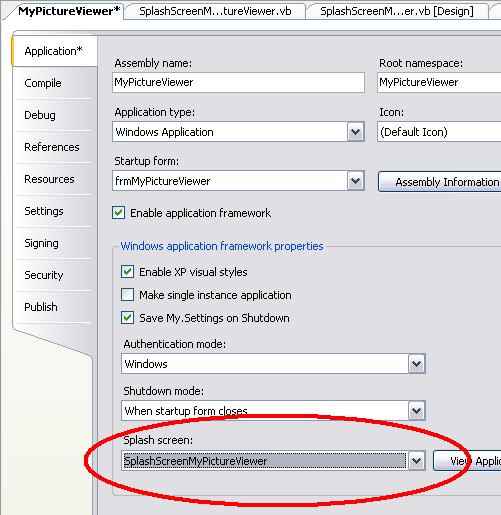
Set the Splash Screen item, as shown above, to SplashScreenMyPictureViewer. Now save the project.
Configuring the Splash Screen
Take a look at the design view of your splash screen:
Add a Label to the splash screen, like in the following illustration, to let the user know what is happening when they launch the program:
I leave it to you to customize the splash screen however you like. Save and run the program now. Is the splash screen displayed while the folders on drive c: is being enumerated?
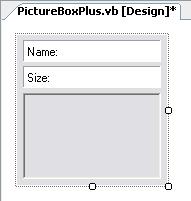
Adding a File Listbox
Add a GroupBox and a ListBox to the form, as shown in the above illustration on the right. Use the following table to set these properties:
| GroupBox | |
| Property | Value |
| Text | Files |
| ListBox | |
| Property | Value |
| Name | lstFiles |
Populating the Files listbox
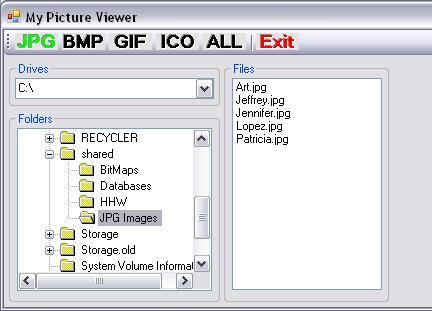
The Files listbox needs to list the graphic files of the type—selected on the ToolStrip—that are contained inside the selected folder in the TreeView control. In the above illustration, only JPG files are listed because the JPG button on ToolStrip1 is selected.
TreeView controls have a BeforeSelect event procedure. They also have an AfterSelect event procedure, which we will not use. The BeforeSelect event procedure is raised when the user selects a node in the TreeView. BeforeSelect is raised before the graphic for the node is updated to the image represented by the SelectedImageIndex property—That would be the Open Folder image. This is the ideal place to put the code to enumerate any graphic files the selected folder contains.
Enumerating the Files inside a Folder
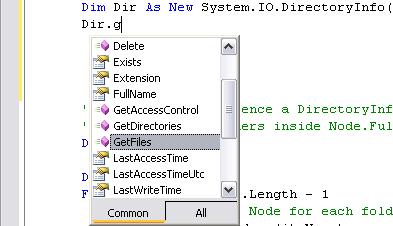
In addition to the GetDirectories method, which returns an array of DirectoryInfo objects, a DirectoryInfo object also has a GetFiles method that returns an array of System.IO.FileInfo objects, as shown in the following illustration:
We can use this GetFiles method to enumerate the files inside a folder. The code to achieve this goal is below. Add the following code to the tvFolders_BeforeSelect event procedure:
'Construct a DirectoryInfo object of
' the selected Node.
Dim Dir As New _
System.IO.DirectoryInfo(e.Node.FullPath)
'Construct a FileInfo object array of all the
' files inside e.Node.FullPath that match
' FilePattern.
Dim Files As System.IO.FileInfo() = _
Dir.GetFiles(FilePattern)
Note: FilePattern should have a blue squiggly underline, because we haven't declared it yet. Notice that the e parameter, that is passed to the tvFolders_BeforeSelect event procedure by the operating system, includes the Node that was selected. So we can extract the FullPath to the folder the Node represents to create our DirectoryInfo and FileInfo objects. Then we can enumerate the files located there.
The GetFiles method, in the code above, takes a FilePattern parameter in this format: <filename>.<extension>. For example *.jpg for JPG files, or *.bmp for BMP files. The asterisk (*) is a wildcard character that represents any file name. The specification of a file extension—which determines the type of file—limits the enumeration of files to that type only. After executing the above code, which creates our Files array of FileInfo objects, we can add the names of the files that were found to the lstFiles listbox with a For-Each loop like this. Add the following code to the tvFolders_BeforeSelect event procedure:
'Create a FileInfo object (File) for the
' For-Each loop and clear the lstFiles
' listbox before filling it.
Dim File As System.IO.FileInfo
lstFiles.Items.Clear()
For Each File In Files
'Add the file name to the lstFiles listbox
lstFiles.Items.Add(File.Name)
Next
Before this code will work, we need to create a FilePattern variable. Add this dimension statement for a FilePattern string variable to the Declarations section:
Dim FilePattern As String = "*.jpg"
The value of FilePattern should be set when the user selects a graphic file type button on the ToolStrip—we'll work on that code in a moment. In our dimension statement above, we've set the default value of FilePattern to *.jpg, because the JPG files button on the ToolStrip is selected by default when the program starts.
Testing the program so far
With FilePattern set to the default value *.jpg, we can test the program. Save the project now. Run the program. Use the illustration above and select the c:\Shared\JPG Images folder on drive C: in the TreeView control—or any folder that you know contains some JPG files. You should see the JPG files listed in the lstFiles listbox.
Setting the FilePattern in the ToolStrip1_ItemClicked event procedure
When the user selects a different graphic file type button on the ToolStrip, we need to change the value of the FilePattern variable to the pattern that matches that file type, i.e. *.bmp, *.ico, etc. We are also changing the graphic on the selected button from black to green to indicate it is selected—recall that we added two sets of images to the imgListToolStrip imagelist control with identical button images that are black and green. So where do we put the code to do all this? The ItemClicked event procedure of the ToolStrip is raised when a user clicks on a ToolStrip button. So let's do it there. Add the following code to the ToolStrip1_ItemClicked event procedure:
'Turn Off the previously selected button. Since we don't
' know which button it was, turn off all the buttons.
tsbJPG.Image = _
imgListToolStrip.Images(TSButton.Jpeg_OFF)
tsbBMP.Image = _
imgListToolStrip.Images(TSButton.Bitmap_OFF)
tsbGIF.Image = _
imgListToolStrip.Images(TSButton.Gif_OFF)
tsbICO.Image = _
imgListToolStrip.Images(TSButton.Icon_OFF)
tsbAll.Image = _
imgListToolStrip.Images(TSButton.All_OFF)
tsbExit.Image = _
imgListToolStrip.Images(TSButton.Exit_OFF)
We can use the ClickedItem.Name member of e within the ItemClicked event procedure to determine which ToolStripButton was clicked. Add the following Select Case structure to the ToolStrip1_ItemClicked event procedure, below the code above:
'Turn On the button the user selected and
' set the FilePattern variable.
Select Case e.ClickedItem.Name
Case tsbJPG.Name 'They clicked the Jpeg button
tsbJPG.Image = _
imgListToolStrip.Images(TSButton.Jpeg_ON)
FilePattern = "*.jpg"
Case tsbBMP.Name 'They clicked the Bitmap button
tsbBMP.Image = _
imgListToolStrip.Images(TSButton.Bitmap_ON)
FilePattern = "*.bmp"
Case tsbGIF.Name 'They clicked the Gif button
tsbGIF.Image = _
imgListToolStrip.Images(TSButton.Gif_ON)
FilePattern = "*.gif"
Case tsbICO.Name 'They clicked the Icon button
tsbICO.Image = _
imgListToolStrip.Images(TSButton.Icon_ON)
FilePattern = "*.ico"
Case tsbAll.Name 'They clicked the All button
tsbAll.Image = _
imgListToolStrip.Images(TSButton.All_ON)
FilePattern = "*.*"
Case tsbExit.Name 'They clicked the Exit button
tsbExit.Image = _
imgListToolStrip.Images(TSButton.Exit_ON)
Me.Close()
End Select
'More code to go here soon
The code above is incomplete. After assigning a new value to FilePattern we need to update the list of files in the lstFiles listbox to show those files that match the new file pattern. A call to the tvFolders_BeforeSelect event procedure would do the job. But when we call an event procedure where the e parameter is used in the code there, we must be sure to provide the correct value for e in our call. The e parameter of the BeforeSelect event procedure of a TreeView control is a TreeViewCancelEventArgs data type. So we need to construct our own. Replace the 'More code to go here soon comment in the above code, with the following line of code that creates a new TreeViewCancelEventArgs object:
'Create an e parameter so we can manually
' call the BeforeSelect event procedure of
' the tvFolders TreeView control.
Dim eParam As New _
TreeViewCancelEventArgs( _
tvFolders.SelectedNode, False, _
TreeViewAction.Expand)
We need to provide three parameters to the TreeViewCancelEventArgs constructor declaration. The first is a TreeView node (tvFolders.SelectedNode). The second parameter (False) is a boolean that indicates whether the event is being canceled or not. And the last parameter (TreeViewAction.Expand) is the TreeView action. The important parameter is the first one, which is the node that represents the folder with the files we want listed in the Files listbox. Now that we've constructed a TreeViewCancelEventArgs object (eParam), we can manually call the tvFolders_BeforeSelect event procedure. Add this line of code below the line above:
'Call the BeforeSelect event procedure of tvFolders
tvFolders_BeforeSelect(sender, eParam)
For the sender parameter (which we are not using in the tvFolders_BeforeSelect event procedure), we are passing along the sender value of the ToolStrip1_ItemClicked event procedure. Here is a summary of the code in the ToolStrip1_ItemClicked event procedure. Make sure your code matches this before going on:
'Turn Off the previously selected button. Since we don't
' know which button it was, turn off all the buttons.
tsbJPG.Image = _
imgListToolStrip.Images(TSButton.Jpeg_OFF)
tsbBMP.Image = _
imgListToolStrip.Images(TSButton.Bitmap_OFF)
tsbGIF.Image = _
imgListToolStrip.Images(TSButton.Gif_OFF)
tsbICO.Image = _
imgListToolStrip.Images(TSButton.Icon_OFF)
tsbAll.Image = _
imgListToolStrip.Images(TSButton.All_OFF)
tsbExit.Image = _
imgListToolStrip.Images(TSButton.Exit_OFF)
'Turn On the button the user selected and
' set the FilePattern variable.
Select Case e.ClickedItem.Name
Case tsbJPG.Name 'They clicked the Jpeg button
tsbJPG.Image = _
imgListToolStrip.Images(TSButton.Jpeg_ON)
FilePattern = "*.jpg"
Case tsbBMP.Name 'They clicked the Bitmap button
tsbBMP.Image = _
imgListToolStrip.Images(TSButton.Bitmap_ON)
FilePattern = "*.bmp"
Case tsbGIF.Name 'They clicked the Gif button
tsbGIF.Image = _
imgListToolStrip.Images(TSButton.Gif_ON)
FilePattern = "*.gif"
Case tsbICO.Name 'They clicked the Icon button
tsbICO.Image = _
imgListToolStrip.Images(TSButton.Icon_ON)
FilePattern = "*.ico"
Case tsbAll.Name 'They clicked the All button
tsbAll.Image = _
imgListToolStrip.Images(TSButton.All_ON)
FilePattern = "*.*"
Case tsbExit.Name 'They clicked the Exit button
tsbExit.Image = _
imgListToolStrip.Images(TSButton.Exit_ON)
Me.Close()
End Select
'Create an e parameter so we can manually
' call the BeforeSelect event procedure of
' the tvFolders TreeView control.
Dim eParam As New _
TreeViewCancelEventArgs( _
tvFolders.SelectedNode, False, _
TreeViewAction.Expand)
'Call the BeforeSelect event procedure of tvFolders
tvFolders_BeforeSelect(sender, eParam)
Testing the program so far
Save the project now. Run the program. Navigate to the \Shared\Bitmaps folder on drive C:—or any folder that you know contains BMP, GIF, ICO, or JPG graphic files. There are no JPG files at this location, so your Files listbox should be empty. Now click on the BMP button on the ToolStrip. You should see enough BMP files to completely fill the Files listbox. This folder also contains an ICO (icon) file or two as well, but it should not be listed with the BMP button selected. Click on the ICO button on the ToolStrip. Are the ICO files listed now? As a final test, click on the ALL button on the ToolStrip. Now the BMP files and the ICO file should be listed in the File listbox—the files are sorted alphabetically.
Adding a PictureBox to the form
Use the first illustration, at the beginning of this project, and add a PictureBox control on the right side of the form, where shown. Set it's properties like this:
| PictureBox | |
| Property | Value |
| Name | PictureBox1 |
| BorderStyle | Fixed3D |
| SizeMode | CenterImage |
Displaying the selected Picture in the Files listbox
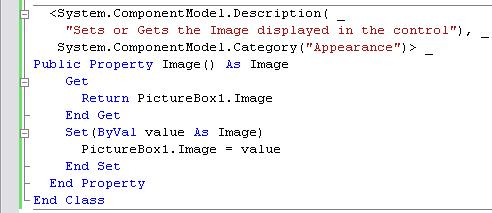
When the user selects a graphic file in the Files listbox—raising its SelectedIndexChanged event procedure—we want to display the image it contains in the PictureBox. To display the picture in the selected file, we will use the FromFile method of the intrinsic Image object to set the Image property of the picturebox. The Image.FromFile method requires a string parameter that is the full path and filename of the image file. Let's create a string variable with that information. Add the following code to the lstFiles_SelectedIndexChanged event procedure:
Dim sImageFile As String = _
tvFolders.SelectedNode.FullPath & _
"\" & lstFiles.SelectedItem
If the Jeffrey.jpg file, located inside the c:\Shared\JPG Images folder, was selected in the lstFiles listbox—as shown in the first illustration at the beginning of the project—the above line of code would assign the following value to the newly dimensioned sImageFile string variable:
c:\Shared\JPG Images\Jeffrey.jpg
Now add the following line of code to the lstFiles_SelectedIndexChanged event procedure—below the previous line of code—to display the selected image in PictureBox1:
PictureBox1.Image = _
Image.FromFile(sImageFile)
Testing the program so far
Save the project now. Run the program. Navigate to the \Shared\JPG Images folder on drive C: and select the Jeffrey.jpg file. Is the image of Jeffery displayed in the picturebox? Try viewing other graphic files.
Important: As a final test, click on the ALL button on the ToolStrip—which lists all files, even those that are not graphic files—and select a non-graphic file. What happens? The most likely scenario involves the following message box, which will appear as your program crashes:
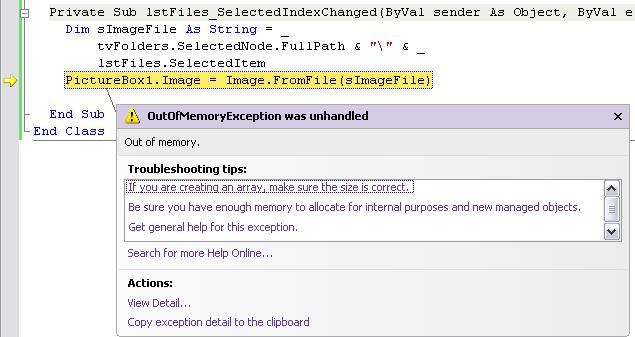
Creating a ValidGraphicFile function
If the user has the ALL button selected on the ToolStrip—which displays even non-graphic files in the Files listbox—and they select a non-graphic file in the Files listbox, your program will crash hard. The FromFile method of the intrinsic Image object gets really upset if you pass it a non-graphic file. There are two ways we can prevent this problem:
- List only JPG, BMP, GIF, and ICO files if the ALL button is selected. This would require some modification of the code in the tvFolders_BeforeSelect event procedure.
- Ignore non-graphic files if the user selects them in the Files listbox. This would require some modification of the code in the lstFiles_SelectedIndexChanged event procedure.
Either way, we need to devise a method for determining whether a file is a valid graphic file or not.
Let's create a ValidGraphicFile function that will return True or False if the file name we pass to it does or does not qualify as a valid graphic file. We can then use this ValidGraphicFile function to implement either of the two options above. Make a blank line above the End Class statement at the bottom of the code window and type the following function declaration and press enter:
Private Function ValidGraphicFile( _
ByVal sFileName As String) As Boolean
We can examine a file's extension to determine if it is a valid graphic file. Add the following Select Case statement to the ValidGraphicFile function:
'Examine the file extension of sFileName to
' determine if it is a valid graphic file or not.
Select Case sFileName.ToLower.Substring( _
sFileName.Length - 3)
Case "jpg", "bmp", "gif", "ico"
Return True
Case Else
Return False
End Select
The last three characters of sFileName is the file extension, i.e. Jeffrey.jpg. In the code above, we are using the SubString method to extract a lowercase (ToLower) version of the file extension of sFileName so that we can compare it to the extensions of the four graphic file types our program supports. If it matches one of those types, we return True. If not, we return False.
Use the ValidGraphicFile function like this:
If ValidGraphicFile(<FileName>) Then
Now modify the code in either the tvFolders_BeforeSelect or lstFiles_SelectedIndexChanged event procedures to implement either of the two options I outlined above to prevent your program from crashing if the user tries to view a non-graphic file.
Testing the program so far
When you are finished, save the project and test it thoroughly before going on to Part B.