Nothing . . . almost. In fact, many OLE Servers are also standalone programs (They have an EXE extension verses an OLE Server that is not standalone which has a DLL extension). Excel, Word, Access, and PowerPoint—just to name a few—are all OLE Server applications. In project 9 you created an ActiveX DLL file which is essentially an OLE Server application, which is not designed to standalone. By adding a Form Module, and using its Show method, and then making a few modifications to the project’s properties, you were able to run the project as an ActiveX EXE in a standalone mode for debugging purposes. But project 9 doesn’t need a Form module at all to do its job. However, without an OLE Client application to access its functions, it would be useless.
In this project, you will create an OLE Client for your ActiveX OLE Server.
Load Visual Basic and select New Project under the File menu. Make this a Standard project. Press the F4 key to view the Form’s properties—if they are not already visible.
- Change the form’s Caption property to Client for System Information Server
- Change the form’s Name property to frmClient
- Open the Properties dialog by selecting Project1 Properties under the Project drop-down menu. Make sure the General tab on the Properties dialog is selected. In the Startup Object combobox select frmClient (it should be by default). In the Project Name textbox type OLEClient. In the Project Description textbox type the following: An OLE Client application for my ActiveX OLE Server. Leave all other settings at their defaults and click the OK button.
- Pull down the File menu and choose Save Project. Save the form as: Client.frm. Save the project as Client.vbp.
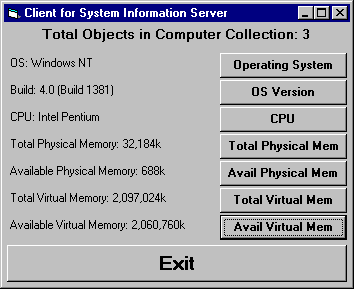
Use the following illustration as a guide and place 8 Labels and 8 Command buttons where shown. Use the Properties list below the illustration to assign Name and Caption values.
Object Property Setting Command Button Name cmdOS Caption Operating System Command Button Name cmdBuild Caption OS Version Command Button Name cmdCPU Caption CPU Command Button Name cmdTotPhysMem Caption Total Physical Mem Command Button Name cmdAvailPhysMem Caption Avail Physical Mem Command Button Name cmdTotVirtMem Caption Total Virtual Mem Command Button Name cmdAvailVirtMem Caption Avail Virtual Mem Label Name lblObjectCount (Title at top) Label Name lblOS Label Name lblBuild Label Name lblCPU Label Name lblTotPhysMem Label Name lblAvailPhysMem Label Name lblTotVirtMem Label Name lblAvailVirtMem
Now let’s get down to doing some coding. The first thing you’ll need to do is create 4 Object variables which will be used to reference your OLE Server’s Objects: one each for Computer, OS, CHIP, and MEMORY . Add the following declarations to the General Declarations section of frmClient:
Private objComputer As Object
Private objOS As Object
Private objCHIP As Object
Private objMEMORY As Object
Now go to the Form_Load event procedure and enter the following code:
Set objComputer = CreateObject("Sysinfo.Computer")
lblObjectCount.Caption = _
"Total Objects in Computer Collection: " _
& objComputer.Parts.Count
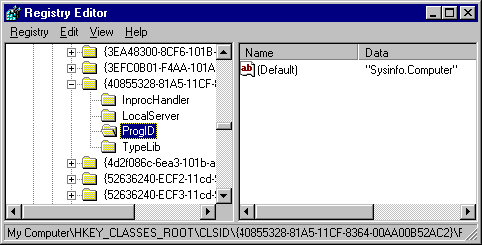
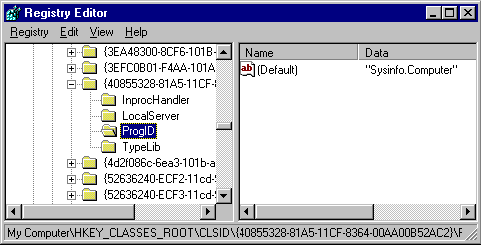
The first line of code above creates an instance of your Sysinfo.Computer object. Recall that the hierarchy of objects in your ActiveX OLE Server application are called a Collection. Notice that this CreateObject function is looking for Sysinfo.Computer. This is because the name of your server application is Sysinfo (Sysinfo is the name you gave project 9 in the Project Properties dialog box), and Computer is the top-level object in the Object Hierarchy which has its Instancing property set to MultiUse.
The second line of code (above, broken onto multiple lines for readability), extracts the value of Count, which is a property of the Collection object, Parts. Count tells you how many objects there are in the Collection which is below the Computer object in the Object Hierarchy. This value is copied to lblObjectCount.Caption.
Important: Don’t try running this program until all of the following code is entered. Add this code to the cmdOS_Click event procedure:
Set objOS = objComputer.OS
lblOS.Caption = "OS: " & objOS.Name
Examine the above code. Notice how creating a reference to the OS object of objComputer, lets you access its Name property. Of course we could also access the Name property of OS directly through the objComputer object like this:
lblOS.Caption = "OS: " & objComputer.OS.Name
This works because of the object hierarchy we created in Project 9; the OS, CHIP, and MEMORY objects are actually embedded in the Computer object. But I wanted you to see how you can set a reference directly to each of the objects. Doing so avoids unreadable code like this:
lblBytes.Caption = "Bytes: " & Computer.Board.Slot.Card.Memory.Size.Bytes
In the above example (don't type it!) we are dealing with a hypothetical object hierarchy that is 6 levels deep (ours is only 2 levels deep). The above code would be more readable if a reference were set directly to the Size object in order to access it's Bytes property, like this:
Set objSize = Computer.Board.Slot.Card.Memory.Size
lblBytes.Caption = "OS: " & objBytes.Bytes
Let's continue now with our coding. Add this code to the cmdBuild_Click event procedure:
Set objOS = objComputer.OS
lblBuild.Caption = "Build: " & objOS.Build
Just like the code in cmdOS_Click, this is how to access the OS object’s Build property.
Add this code to the cmdCPU_Click event procedure:
Set objCHIP = objComputer.CHIP
lblCPU.Caption = "CPU: " & objCHIP.CPU
Add this code to the cmdTotPhysMem_Click event procedure:
Set objMEMORY = objComputer.MEMORY
lblTotPhysMem.Caption = "Total Physical Memory: " & _
objMEMORY.TotPhys
Add this code to the cmdAvailPhysMem_Click event procedure:
Set objMEMORY = objComputer.MEMORY
lblAvailPhysMem.Caption = "Available Physical Memory: " & _
objMEMORY.AvailPhys
This is starting to get monotonous J. Add this code to the cmdTotVirtMem_Click event procedure:
Set objMEMORY = objComputer.MEMORY
lblTotVirtMem.Caption = "Total Virtual Memory: " & _
objMEMORY.TotVirt
Add this code to the cmdAvailVirtMem_Click event procedure:
Set objMEMORY = objComputer.MEMORY
lblAvailVirtMem.Caption = "Available Virtual Memory: " & _
objMEMORY.AvailVirt
Finally, add this code to the Form_Unload event procedure. Note: Be sure to us Unload Me in the cmdExit_Click event procedure, so that the following code will be executed when the user exits with either the Exit button or the form's Close button:
Set objComputer = Nothing
Set objOS = Nothing
Set objCHIP = Nothing
Set objMEMORY = Nothing
Save the project. Before you can test your OLE Client application, you must load Project 9—the OLE Server application—and compile it as a DLL. Follow these instructions:
- Load your Project 9 (Sysinfo.vbp).
- View the Code of the modSysinfo module, and remove or comment out the frmTest.Show command from the Sub Main procedure.
- Select Sysinfo Properties from the Project dropdown menu, and change the Project Type option to ActiveX DLL. Now click the OK button.
- When you click the OK button you may see a message box that says. Project ‘Start Mode’ property has been changed. This means that the Start Mode has been changed from Standalone to ActiveX Component automatically. Remember, a DLL file cannot be a standalone application. Click the OK button to close this message box.
- Select Make Sysinfo.dll from the File dropdown menu. Be sure you remember in which folder the DLL file is being created, and specify Sysinfo.dll as the file name. Then click the OK button to make the DLL file.
If all went well you should now have a Sysinfo.dll file. Now exit from Visual Basic for the next part of this exercise.


