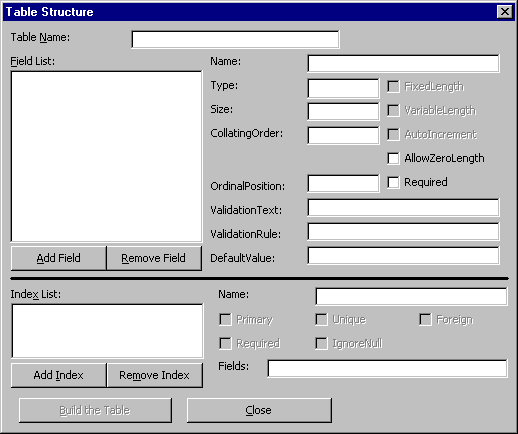
When you finish adding these Fields,
click the Close button on the
Add Field dialog box. Then click the Build the
Table button on the Table Structure
dialog box.
The name of your new Table
appears in the Database Window
(as shown above). Now
you’re going to add some data to the new Employees table
of your prj1data.mdb database.
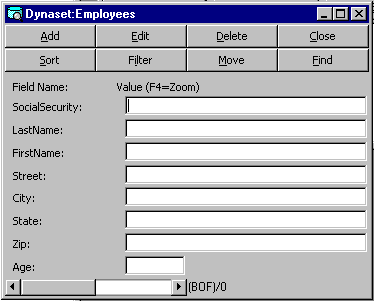
Double-click the Employees table
icon in the Database Window and the Add Data dialog appears (as shown above).
Add a new record by first clicking the Add
button once, then type the data for a record, then press the Update
button to insert that data into the database. Press the Add
button again and repeat the process until you’ve added the following records to
the Employees table. If you make a mistake, use the
horizontal scroll bar at the bottom of the dialog to locate the offending record then
press the Edit button, modify it, and press the Update button again. When you’re finished entering
records, click the Close button:
| SocialSecurity |
FirstName |
LastName |
Street |
City |
State |
Zip |
Age |
| 129-95-5993 |
Suzy |
Block |
2995 Chatsworth Blvd |
Chatsworth |
CA |
92112 |
24 |
| 288-24-4344 |
Dennis |
Anderson |
1622 Billings Circle |
Ventura |
CA |
92213 |
25 |
| 293-11-1293 |
Kevin |
Cary |
2993 Claudia Drive |
Simi Valley |
CA |
93065 |
35 |
| 299-55-1685 |
Martha |
Heyman |
3994 East Western Road |
Ventura |
CA |
92213 |
25 |
| 334-19-4493 |
Debra |
Smith |
344 East Lester |
Ventura |
CA |
92214 |
22 |
| 385-34-1009 |
Mary |
Chekov |
3078 Sycamore Road |
Simi Valley |
CA |
93065 |
32 |
| 395-11-2344 |
Lori |
Sanchez |
1121 Cranston |
Newbury Park |
CA |
91135 |
35 |
| 399-43-2200 |
Sharon |
Butterfield |
2334 Tampa Ave |
Northridge |
CA |
91125 |
25 |
Give yourself a pat on the back for entering all this data. Select Exit from the Visual Data
Manager’s File drop down
menu. The records you entered are saved automatically.
So now you’ve created a small database and exited from Visual Data Manager. On the screen is the blank Form
of the new project you’re about to create. Press the F4 key to view the Form’s
properties, if the Properties Window is not already visible.
- Change the Form’s Caption
property to Database Viewer
- Change the default Name of the
form (form1) to frmData1
- Set the Width to 8000 and the Height
to 3700
- Select Project1 Properties
under the Project menu. Make sure the General tab is selected. Make frmData1
the Startup Object and type DatabaseViewer (no space) as the Project Name. The Project
Description is: Viewing a Database with
Visual Basic. Now click the OK button.
- Pull down the File menu and
choose Save Project. Save the form as: frmData1.frm. Save the project as Data1.vbp.
Now we need to add a Data
control to the Form. There are two
different Data controls available: DAO-Data
Access Object and ADO-ActiveX
Data Object. DAO
is the older (been around since version 4 of Visual Basic). We will be
using the newer and much more powerful ADO
data control. While there are many differences between DAO
and ADO, the most significant
difference is ADO's simpler object
model. We will compare the DAO
and ADO object models in more
detail in a later project.
Right-click on the Control
Toolbox and select Components. Put a checkmark in front of the Microsoft
ADO Data Control 6.0 object library and click the OK
button. The ADO data control
icon should
appear at the bottom of the Control
Toolbox (the tool-tip that appears when you hold
the mouse pointer over it says adodc).
Add an ADO Data control to
the blank Form by double clicking on its icon in the Control Toolbox.
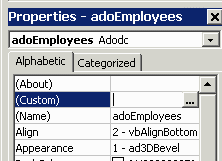
Set these properties of the ADO control
as shown:
| Property |
Value |
| Name |
adoEmployees |
| Align |
Align Bottom |
| Caption |
Employees |
Using the Custom wizard to configure the
ConnectionString property
The ConnectionString
property of the ADO control is much
more complicated than properties you've encountered before. The ConnectionString
can support up to five arguments separated by semicolons. They
include:
- Provider-The
name of a provider to use for the connection.
- File Name-The
name of a provider-specific file containing preset connection information.
- Remote Provider-The
name of a provider to use when opening a client-side connection (Remote
Data Service only).
- Remote Server-The
path name of the server to use when opening a client-side connection
(Remote Data Service only).
- URL-The
connection string as an absolute URL identifying a resource, such as a
file or directory (the Database file).
Instead of trying to type all these arguments into the ConnectionString
property manually (which masochists are free to do if they like), we can use
the Custom
wizard to make configuring the ConnectionString
much easier.
Make sure the ADO
(adoEmployees) control is selected
and click on the Custom
item in its Properties
window. Now click on the ellipses button to start the Custom
wizard:
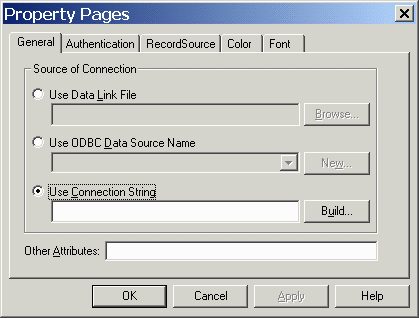
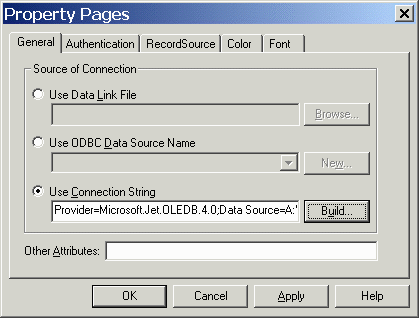
The Property Pages
dialog should pop open, as shown above. The Use
Connection String option is selected by default. To build
the ConnectionString click on the Build
button now:
The Data Links Properties
dialog appears (shown above). It lists the different Providers
(Database Engines) that are available. We want to use the latest version
of the Jet database engine (which is built into Visual Basic), click on the
Microsoft Jet 4.0 OLE DB Provider item in the list, then click
on the Next button:
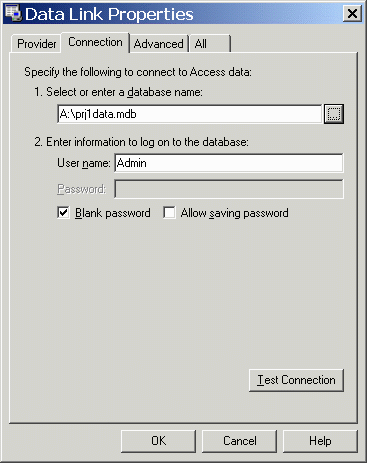
Now we can set our Connection
options, which include the Database name,
and Logon security settings. Use the
ellipses button to the right of the database name textbox to find your prj1data.mdb
file on drive A: and select it. We
don't want to set any Logon security, so
just leave the default settings: User Name is Admin with a blank
password. Now click on the Test Connection
button:
If you've done everything correctly so far, you should
see the Test Connection Succeeded
message box above. If not, make sure you've specified the correct
location of your prj1data.mdb
file. Once you've closed the Test Connection Succeeded
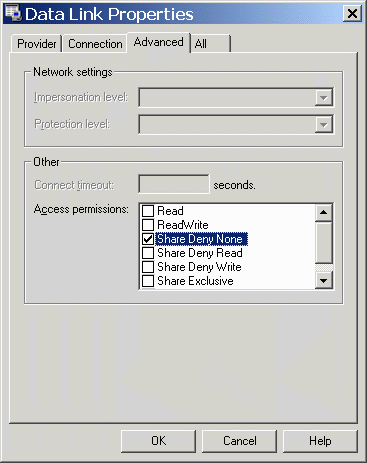
message box, click on the Advanced
Tab at the top of the Data Link
Properties dialog:
The Share Deny None
access permission is selected by default, which is what we want. Now click on the
OK button to
close the Data Link Properties
dialog and return to the Property Pages
dialog:
Notice how the Use Connection
String textbox is automatically filled with the parameters we
selected. Typing these parameters ourselves would be tricky and
prone to typos, but using the Build button makes it easy. As a last step we
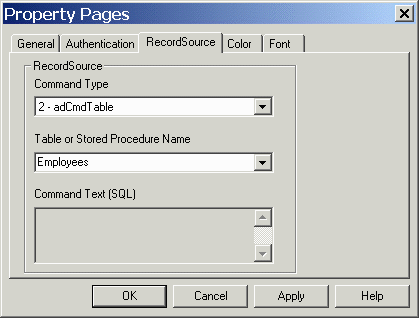
need to specify the Record Source
(Table) that we want to access from the database. Click on the Record
Source tab at the top of the Property
Pages dialog:
Drop down the Command Type list
and choose 2-adCmdTable,
since it is a table from the database that we want to open. After a
short delay, as the database is accessed, the Table
or Stored Procedure Name drop down list will become enabled.
Drop it down and choose the only table that our database contains: Employees.
Now you can click on the OK button to close the Property
Pages dialog and accept the settings.
That takes care of the ADO
(adoEmployees) control. Now it’s time to add Textboxes
to the form—One for each Field from
the records in the Employees table
from your database. Let’s set the properties of the first Textbox together, so that you get the idea
of how this works. Place a Textbox
anywhere on the form (you’ll position it later). This first Textbox
will represent the SocialSecurity
field from the Employees table of
your database. Set its properties like so:
| Property |
Value |
| Name |
txtSocialSecurity |
| DataSource |
adoEmployees
(Use the dropdown list) |
| DataField |
SocialSecurity (Use the dropdown list) |
| Text |
(make it blank) |
You Must set the DataSource property first
before trying to set the DataField
property. After setting the DataSource
property, setting the DataField
property is easy—Just choose the Field
from the DataField dropdown
list.
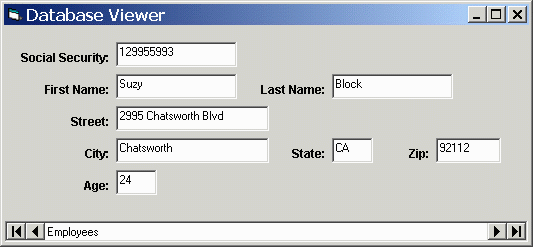
Now use the example below (you don’t need to copy it exactly)
and place 7 more Textboxes
for the 7 Fields remaining in your
database. Be
sure to use proper Naming Conventions
when naming your Textboxes.
Set their DataSource and DataField
properties like you did for the Social Security textbox. Add Labels as shown to
describe each Field. I
set the Font property
of the Labels to Arial 9pt Bold,
and I aligned them to the Right:
Save and then run the project. When you get it working correctly,
you can scan from one Record to the next by clicking the arrow buttons on
the Data control. You have yet to enter any
actual code, but this program is a fine (yet simple) Database Viewer.
That’s how powerful the ADO Data control
is—Just configure it's ConnectionString
property with name of
the Database and the Table to be accessed (and a
few other not-so-minor details), and it takes care of
the rest.
Adding
More Features
So far, no code has been required to get our program
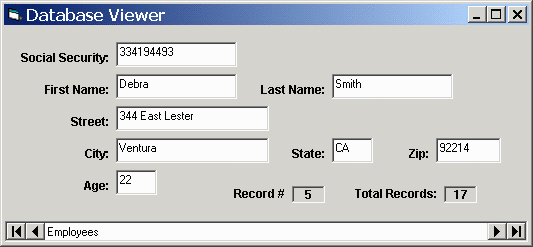
working. But now we want to display the current Record Number and
Total Records Number (as shown below), so the addition of a little code is required:
I used four Label
controls to display the current record number and and total
records in the above example--set the BorderStyle
of the labels that display the numbers (I suggest the names lblRecNum
and lblTotRec) to Fixed
Single.
The MoveComplete
event procedure of the ADO (adoEmployees)
control is triggered after the user changes from one record to
another. This makes it the perfect place to add the code to display
the current record number. There are four parameters passed to the MoveComplete
event procedure by the ADO control, we can use the AbsolutePosition
property of the RecordSet
object (pRecordSet is the last parameter) to display the current record
number:
Private Sub adoEmployees_MoveComplete(ByVal adReason As
ADODB.EventReasonEnum,
_
ByVal pError As ADODB.Error, _
adStatus As ADODB.EventStatusEnum, _
ByVal pRecordset As ADODB.Recordset)
lblRecNum.Caption = pRecordset.AbsolutePosition
End Sub
Note:
The pRecordset parameter is a reference
(that's a pointer to you C programmers) to the Employees table in the database. Because
there is a Recordset object embedded
inside the ADO control, we could
have used code like this to achieve the same purpose as the code above:
lblRecNum.Caption =
adoEmployees.Recordset.AbsolutePosition
But since the pRecordset
parameter is conveniently passed to the MoveComplete
event procedure, I didn't want to waste it.
We can get the total records number with the Recordset's
RecordCount property:
Private Sub Form_Activate()
lblTotRecs.Caption =
adoEmployees.Recordset.RecordCount
End Sub
This code needs to be executed only once when the program starts, so the Form_Activate
procedure is a good place for it.
Adding
A Find
Option
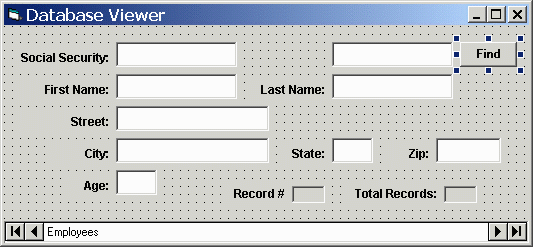
To enhance this program further, you are going to add
the ability to Find a record by the Last
Name. Add a new Textbox (txtFind)
and button (cmdFind) next to each
other, where shown on
the following example:
To make sure the Find
button is disabled until the user types something into the Find
Textbox, set the Enabled property of cmdFind
to False. Now add this code to the
txtFind_Change event procedure to
enable the Find button when the user types
something into it:
Private Sub txtFind_Change()
'Strip
leading and tailing spaces, then check length of txtFind.Text
If
Len(Trim(txtFind.Text)) > 0 Then
cmdFind.Enabled = True
Else
cmdFind.Enabled = False
End If
End Sub
Examine the above code carefully. The cmdFind
button is enabled only when the txtFind
textbox contains something other than spaces (Trim
removes leading and trailing spaces). To make the Find
button work, we will use the Recordset's
Find
method. Add this code to the cmdFind_Click
event procedure:
Private Sub cmdFind_Click()
Dim iCurrRecord As Integer
'Save
the current record location before searching
iCurrRecord = adoEmployees.Recordset.AbsolutePosition
'Move
to the first record to start searching
adoEmployees.Recordset.MoveFirst
'Build
the seach string in this format: LastName = 'Campbell'
adoEmployees.Recordset.Find "LastName
= " & "'"
& txtFind.Text
& "'"
'If
the Find failed EOF (End of File) will be True, so return to the record we
started on
If
adoEmployees.Recordset.EOF Then
adoEmployees.Recordset.AbsolutePosition = iCurrRecord
MsgBox "Record Not Found!", vbOKOnly + vbExclamation, "Find Failed"
End If
End Sub
We begin the Find
process by storing the current record position, so if the Find fails we
can go back to it. Then we do a MoveFirst
so that we start searching from the beginning of the Table. We need to
pass the Find method a string in this
format: <Field Name> = '<Search Value>'
which is all in double quotes. Note the required
single quotes (') around the Search
Value. If the search succeeds, the record that was found is
displayed automatically. If no matching record is found, an EOF
(End of File) condition is set. To avoid the error that would result if
we attempted to display a record when EOF
(or BOF for that matter) is True, we set
the AbsolutePosition property back to the
value of the record we were on before the search began. The message box,
telling the user that no matching record was found is a user-friendly addition
(Tell you're users what is going on!). The Recordset's
Find method can include other optional parameters, including the Search
Direction (Forward is default), and what record number to start searching from.
That completes the basic project, be sure to save
and test it thoroughly.
Enhancements
Suggestions
Note: Before
attempting these enhancements, I suggest you make a backup copy of your
database (make a copy of your prj1data.mdb file) so that if you destroy
it--oh, that will never happen!--you can restore it from the backup.
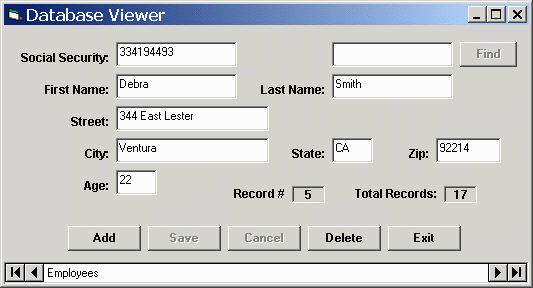
Create an Add button that allows
users to add records to the Employees table. Hint: Use the Recordset’s AddNew method:
adoEmployees.Recordset.AddNew
Create a Save button that allows
users to Save records they’ve added. Hint: Use the Recordset’s Update method. Here’s the code:
adoEmployees.Recordset.UpDate
Create a Cancel button that
allows users to cancel out of the AddNew option. Hint:
Save the position of the current record before executing the AddNew method by
putting the following line of code above the AddNew code in the cmdAdd_Click event
procedure:
'Stores the
location of current record. vBookmarkCurrRec is a Variant
vBookmarkCurrRec = adoEmployees.Recordset.Bookmark
Then put this code in the cmdCancel_Click event procedure:
adoEmployees.Recordset.CancelUpdate
'Return to the record before
AddNew started
adoEmployees.Recordset.Bookmark = vBookmarkCurrRec
Create a Delete button that
allows users to delete records from the Employees table. Hint: Use the Recordset’s
Delete method. Here’s the code:
adoEmployees.Recordset.Delete
It’s important to remember that you are always responsible for guiding user interaction with the
applications you create. To that end, you must disable buttons which should not be
selectable, until they are needed, i.e. the Save and Cancel buttons should
be disabled until the Add button is pressed. Once the Add button is pressed,
the Delete button should become disabled. When the Save or Cancel buttons
are pressed, the Save and Cancel buttons should become disabled
and the Add and Delete buttons should become enabled. Guiding
user interaction in this way, makes your applications more User Friendly, and
prevents many potential problems.