For your Ninth Visual Basic project, you will create a program where the only Controls are a Timer and a Menu with the following structure (suggested Names are italicized in parentheses following the Caption names):
| Level 1 Caption |
Level 2 Caption |
Level 3 Caption |
Suggested Name |
| &File | mnuFile | ||
| &Shape | mnuShape | ||
| &Square | mnuSquares | ||
| &Rectangle | mnuRect | ||
| &Circle | mnuCircles | ||
| &Ellipse | mnuEllipses | ||
| &Clear | mnuClear | ||
| &Go | mnuGoStop | ||
| — | mnuBrk (a single hyphen) | ||
| E&xit | mnuExit |
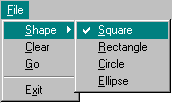
When completed, the menu should resemble the illustration above.
When the user selects a Shape (Squares will be the default), and then chooses the Go menu item, the Timer control will be activate. The Go menu item’s Caption changes to Stop once the Timer has started. The shape the user selected will be drawn on the Form at random places, in random sizes, and with random colors. Each tic of the Timer will draw another shape, until the user selects Stop from the Menu. When the user selects Stop, the Timer is deactivated, and the Stop menu item’s Caption changes back to Go. Choosing the Clear menu item erases any shapes on the form.
Begin with a blank form (Choose New Project under the File menu. Make the project type: Standard) and press the F4 key to view the form’s properties—if the Properties Window is not already showing.
- Change the Caption property to Project 9
- Change the default Name of the form (form1) to frmProj9
Select Project1 Properties on the Project dropdown menu. Make sure the General tab is selected and set the options described in the next bullet.
In the Startup Object combobox make sure frmProj9 is selected (it should be by default). In the Project Name textbox type Project9. In the Project Description textbox type the following: Use a menu to select a shape, and a timer to draw that shape randomly on the form. Leave all other settings at their defaults and click the OK button.
Pull down the File menu and choose Save Project. Save the form as: frmProj9.frm. Save the project as project9.vbp.
Use the menu hierarchy illustrated above as a guide and create the Menu. As before, no Properties/Procedures Table is provided for this project. Please use the Naming Conventions for your Controls and Variables that we have followed so far in this class.
Add the Timer control to your form by double clicking on the Timer control icon in the Control Toolbox. The Timer control appears as a small stop watch icon on your form. This will be invisible when your program is run. Select the Timer control after you place it on your form and press the F4 key to view its properties. Set the following properties like so:
- Set the Interval property to 200 (1000 is one second)
- Set the Enabled property to False
- Set the Name property to tmrDraw
A Timer control has only 1 event procedure—Timer. The code that you place in the tmrDraw_Timer event procedure is executed every time the Timer ticks. The number of ticks per second is set with the Interval property which uses milliseconds (milliseconds is thousandths of a second). So setting the Interval property to 200 milliseconds makes the Timer tick every 2/10’s of a second.
The following constants should be declared in the General Declarations section (Why do we declare most Constants and some Variables in the General Declarations section of your form? So that their scope will be Public (global)):
Const SQUARE = 1
Const RECT = 2
Const CIR = 3
Const ELLIPSE = 4The number values of these constants are irrelevant, as long as each one is unique. The following variable should also be declared in the General Declarations section:
Dim iDrawWhat As Integer
Use iDrawWhat to let your Timer event procedure know what shape it is supposed to draw.
The default shape is the SQUARE, so the following code should be added to the Private Sub Form_Load() event procedure (which is executed only once when the program starts and the form is first loaded).
'Set SQUARE as the default shape
iDrawWhat = SQUAREIn order to make it easy to see the objects as they are drawn, set the window background color to white (which is the system default windows background color) by adding this line in the Form_Load() event procedure as well:
frmProj9.BackColor = vbWindowBackground
vbWindowBackground is a Visual Basic Constant. (Hint: To clear the form, get help on a form’s Cls method).
Here is the code from the mnuGoStop_Click event procedure:
If mnuGoStop.Caption = "&Go" Then
mnuGoStop.Caption = "&Stop"
tmrDraw.Enabled = True
Else
mnuGoStop.Caption = "&Go"
tmrDraw.Enabled = False
End IfNotice how a Menu’s Caption property value can be examined and changed. The Timer is also turned on and off within this procedure via its Enabled.
Here is the code from the tmrDraw_Timer event procedure that generates the random number values needed to draw the shapes with random colors (iColor), at random sizes (iSize), and at random places on the screen (iX, iY):
Dim iColor As Integer
Dim iX As Integer
Dim iY As Integer
Dim iSize As IntegerRandomize 'Initialize random-number generator
'Generate a random value between 1 and 15
iColor = Int((15 * Rnd) + 1)
'Generate a random value between 100 and 599
iSize = Int((500 * Rnd) + 100)
'Generate x and y starting points for the
iX = Int((frmProj9.Width * Rnd) + 1)
'Shape within the form area
iY = Int((frmProj9.Height * Rnd) + 1)Get Visual Basic Help on the Randomize statement, and the Rnd function to find out what they do and how they work (an explanation of Rnd follows).
The Rnd function returns a random number between 0 and .9999. Let’s say you want a random number between 1 and 15. This is how the code to do that would look (don't type this code example into your program!):
Int((15 * Rnd) + 1)
Here is it broken down into 3 basic parts:
'Generates a number between 0 and 14.9999999999
(15 * Rnd)'Makes the number between 1 and 15.9999999999
(15 * Rnd) + 1'Removes decimal value so number is 1 to 15
Int((15 * Rnd) + 1)Here’s the rest of the code from the tmrDraw_Timer event procedure (place this below the code you added already). Here you use a Select Case statement to draw the different shapes depending upon the value of iDrawWhat (get help on the Select Case structure, and the Line and Circle functions):
Select Case iDrawWhat
Case SQUARE
Line (iX, iY)-(iX + iSize, iY + iSize), QBColor(iColor), B
Case RECT
Line (iX, iY)-(iX + iSize + (iSize / 2), iY + iSize), _
QBColor(iColor), B
Case CIR
Circle (iX, iY), iSize, QBColor(iColor)
Case ELLIPSE
Circle (iX, iY), iSize, QBColor(iColor), , , 2
End SelectHere's the code from the mnuSquares_Click event procedure:
If mnuSquares.Checked <> True Then
mnuSquares.Checked = True
mnuCircles.Checked = False
mnuEllipses.Checked = False
mnuRect.Checked = False
iDrawWhat = SQUARE
End IfThe code for the Click event procedures of the other shape menu items is very similar to this.
Test your program thoroughly. That completes this project.