Removing your old project and creating a new one
Run Visual Basis .NET and open your Solution (<your name>.sln).
Right-click on the Project8 project in the Solution Explorer window and select Remove from the context menu. Click the OK button when warned that Project8 will be removed from the Solution. Drop down the File menu. Under the Add Project menu item select New Project. When the Add New Project dialog appears, be sure that the Visual Basic Projects folder is open in the Project Types pane, and that the Windows Application template is selected in the Templates pane. Type Project9 in the Name textbox. Then click the OK button. This creates a new folder inside the \Visual Studio Projects\<Your Name> folder named Project9:
...My Documents\Visual Studio Projects\<Your Name>\Project9.
Note: When class is over, be sure to follow the instructions at the end of this project that tell you how to copy your project to your floppy diskette so you can take it home with you.
Rename the Form file and change it's Name, BackColor, and Text properties
With the form file (Form1.vb) selected in the Solution Explorer window, so that it's File properties are displayed in the Properties window, change the File Name property to frmProj9.vb (don't forget to include the .vb extension).
Now click on the form in the Designer window to display it's properties:
- Change the Name property to frmProj9 (Remember: No spaces are allowed in the form’s Name property, or the name property of any control).
- Change the Text property to Project 9
- Change the BackColor property to White.
Setting the Startup Object
Right-click on the Project9 project in your Solution Explorer window, click on the Properties item at the bottom of the context-menu. In the Project9 Property Pages dialog drop down the Startup object list and choose frmProj9 and click the OK button.
Before going on, click on the Save All button on the toolbar to save your project.
Creating a Menu
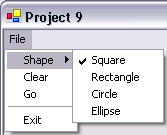
For your Ninth Visual Basic project, you will create a program where the only Controls are a Timer and a Menu with the following structure (suggested Names are italicized in parentheses following the Caption names):
| Menu Table | ||||
| Level 1 Text |
Level 2 Text |
Level 3 Text |
Name | Checked |
| &File | (default name) | |||
| &Shape | (default name) | |||
| &Square | mnuSquares | True | ||
| &Rectangle | mnuRectangles | False | ||
| &Circle | mnuCircles | False | ||
| &Ellipse | mnuEllipses | False | ||
| &Clear | mnuClear | False | ||
| &Go | mnuGoStop | False | ||
| (Insert Separator) | ||||
| E&xit | mnuExit | False | ||
The Menu Table above builds this menu:
Adding a MainMenu control to the form
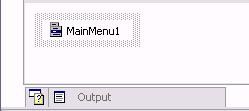
Double-click on the MainMenu item on the Control toolbox to add a MainMenu control (MainMenu1) to the Component Tray. Once added to your project, the MainMenu control appears in the Component Tray, like this:
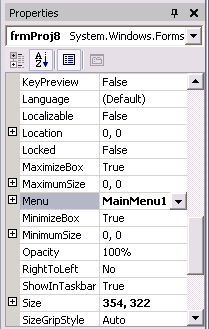
To add MainMenu1 to the form, set the Menu property of the form to MainMenu1, like this (this illustration is from Project 8):
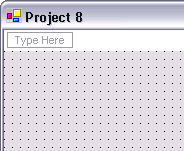
After setting the Menu property to MainMenu1 (which may have been set automatically when you added it to the component tray) click once on the MainMenu1 control in the Component Tray to selected it. Once ManuMenu1 is selected in the Component Tray, the new menu blank should appear in the upper left corner of the form, like this (this illustration is from Project 8):
Use the Menu Table above to guide you, and complete the rest of the menu.
Adding a Timer control to the form
When the user selects a Shape (Squares will be the default), and then chooses the Go menu item, the Timer control will be enabled. The Go menu item’s Text changes to Stop once the Timer has started. The shape the user selected will be drawn on the Form at random places, in random sizes, and with random colors. Each tic of the Timer will draw another shape, until the user selects Stop from the Menu. When the user selects Stop, the Timer is disabled, and the Stop menu item’s Text changes back to Go. Choosing the Clear menu item erases any shapes on the form.
Add the Timer control to the Component Tray by double clicking on the Timer control icon in the Control Toolbox (You may need to scroll down to the bottom of the component list to find it). The Timer control appears as a small stop watch icon in the Component Tray, like this:

Set these properties of the Timer control:
|
Timer |
|
| Property | Value |
| Name | tmrDraw |
| Enabled | False |
| Interval | 200 |
A Timer control has only 1 event procedure—Tick. The code that you place in the tmrDraw_Tick event procedure is executed every time the Tick event procedure happens. The number of ticks per second is set with the Interval property which uses milliseconds (milliseconds is thousandths of a second). So setting the Interval property to 200 milliseconds makes the Tick event go off every 2/10Æs of a second, and setting the Interval property to 1000 milliseconds makes the Tick event go off once a second.
Add the following code to the Declarations section:
'Create a constant with a unique value for each shape
Const SQUARE As Integer = 1
Const CIR As Integer = 2
Const RECT As Integer = 3
Const ELLIPSE As Integer = 4
'iDrawWhat will be set to the shape the user
' selects. SQUARE is the default shape.
Dim iDrawWhat As Integer = SQUARE
The code for the mnuGoStop event procedure
Here is the code that goes into the mnuGoStop_Click event procedure:
'Does the mnuGoStop menu item say Go?
If mnuGoStop.Text= "&Go" Then
'Change the mnuGoStop menu item to Stop
mnuGoStop.Text = "&Stop"
'Turn on the tmrDraw timer
tmrDraw.Enabled = True
Else
'Change the mnuGoStop menu back to Go
mnuGoStop.Text = "&Go"
'Turn off the tmrDraw timer
tmrDraw.Enabled = False
End If
Notice how a Menu’s Text property value can be examined and changed dynamically. The Timer is also turned on and off within this procedure by setting its Enabled property to True or False.
The code for the tmrDraw_Tick event procedure
Here is the code from the tmrDraw_Tick event procedure that generates the random number values needed to draw the shapes with random colors (iColor), at random sizes (iSize), and at random places on the screen (iX, iY):
'Values for all these variables will be randomly generated
Dim iRed, iGreen, iBlue As Integer
Dim iX, iY As Integer
Dim iSize As Integer
'Determines the width of rectangles and ellipses
Dim iRectWidth As Integer
'Create a Graphics class reference variable
Dim g As Graphics
'Refer g to the Graphics object of the form (Me). This will allow
' us to use the DrawRectangle and DrawEllipse methods.
g = Me.CreateGraphics'Seed the random-number generator. We really only need to do this
' once, so you could move this line of code to the frmProj9_Load.
Randomize()'Generate a random values between 0 and 255 for the color
' luminosity values--remember Project 2.
iRed = Int(Rnd() * 256)
iGreen = Int(Rnd() * 256)
iBlue = Int(Rnd() * 256)
'Create a drawing Pen, specifying it's color and thickness
Dim DrawPen As New _
Pen(System.Drawing.Color.FromArgb(iRed, _
iGreen, iBlue), 1)'Generate a random value between 5 and 50, for the size
' of the shapes in pixels.
iSize = Int(Rnd() * 46) + 5
'Generate X and Y starting points for drawing the shape
' within the form area.
iX = Int(Rnd() * Me.Width) + 1
iY = Int(Rnd() * Me.Height) + 1
Get Visual Basic Help on the Randomize command, and the Rnd function to find out what they do and how they work (a brief explanation of Rnd follows):
The Rnd function returns a random number between 0 and .99999. Let’s say you want a random number between 1 and 15. This is how the code to do that would look (don't type this code example into your program!):
Int(Rnd() * 15) + 1
Here it is broken down into 3 basic parts:
'Generates a number between 0 and 14.99999, because
' (15 * 0) = 0, and (15 * .99999) = 14.99999
Rnd() * 15'Makes the number between 1 and 15.99999, because
' (15 * 0) + 1 = 1, and (15 * .99999) + 1 = 15.99999
Rnd() * 15 + 1'Removes decimal value so number is 1 to 15
Int(Rnd() * 15) + 1
Drawing shapes with the Graphics object of the form
We created a g Graphics object reference variable in the first part of the code from the tmrDraw_Tick event procedure above so that we could set a reference to the Graphics class of the form like this:
'Create a Graphics class reference variable
Dim g As Graphics
'Refer g to the Graphics object of the form (Me). This will allow us to
' use the DrawRectangle and DrawEllipse methods.
g = Me.CreateGraphics
This gives us access the many drawing methods that are part of the form's Graphics class. A small list of some of these methods include:
- DrawRectangle - Draw rectangles and square
- DrawEllipse - Draw ellipses and circles
- DrawPolygon - Draw multi-sided shapes
- DrawArc - Draw arcs of different lengths
- DrawBezier - Draw Bezier curves
There are many more:
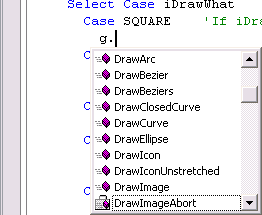
Here is the rest of the code for the tmrDraw_Tick event procedure (place this below the code you added to the tmrDraw_Tick event procedure already). We will use a Select Case statement to determine which shape to draw depending upon the value of iDrawWhat--which is an Integer that we dimensioned in the Declarations section--get help on the Select Case structure):
'Since iDrawWhat can be one of 4 different values, a Select Case
' structure is better suited to test it than If-Then-Else--which is
' best for testing for 2 different values.
Select Case iDrawWhat
Case SQUARE 'If iDrawWhat is equal to SQUARE do this
g.DrawRectangle(DrawPen, iX, iY, iSize, iSize)
Case RECT 'If iDrawWhat is equal to RECT do this
iRectWidth = iSize / 2
g.DrawRectangle(DrawPen, iX, iY, iRectWidth, iSize)
Case CIR 'If iDrawWhat is equal to CIR do this
g.DrawEllipse(DrawPen, iX, iY, iSize, iSize)
Case ELLIPSE 'If iDrawWhat is equal to ELLIPSE do this
iRectWidth = iSize / 3
g.DrawEllipse(DrawPen, iX, iY, iRectWidth, iSize)
End Select
Most of the drawing methods take a Pen as their first parameter. The code we used to create a Pen (DrawPen) in the tmrDraw_Tick event procedure looked like this:
'Create a drawing Pen, specifying it's color and thickness
Dim DrawPen As New _
Pen(System.Drawing.Color.FromArgb(iRed, iGreen, _
iBlue), 1)
The Pen determines the color and thickness (in pixels) that the lines will be drawn in:
g.DrawRectangle(DrawPen, iX, iY, iSize, iSize)
The second and third parameters passed to the drawing methods specify the X, Y location on the form where the upper left corner of the shape will be drawn:
g.DrawRectangle(DrawPen, iX, iY, iSize, iSize)
The last two parameters specify the width and height of the shape:
g.DrawRectangle(DrawPen, iX, iY, iSize, iSize)
Because most of the drawing methods are Overloaded, the parameters you pass to them can be formatted several different ways. For example, the DrawRectangle method can be called with just two parameters, a Pen and a Rectangle, like this (do not type this code):
Dim MyRect As New Rectangle()
MyRect.X = iX
MyRect.Y = iY
MyRect.Width = iSize
MyRect.Height = iSize
g.DrawRectangle(DrawPen, MyRect)
In the code above we pass a Rectangle class variable as the single second parameter to the DrawRectangle method call.
Using the menu to pick Shapes
Not too much information here. Just the code from the mnuSquares_Click event procedure:
If mnuSquares.Checked <> True Then
mnuSquares.Checked = True
mnuCircles.Checked = False
mnuEllipses.Checked = False
mnuRectangles.Checked = False
iDrawWhat = SQUARE
End If
The code for the Click event procedures of the other shape menu items is very similar to the above code.
Testing the program so far
Test your program thoroughly.