Close your last project and creating a new one
If you still have the Project6-7 project open, select the Close Project item on the file menu to close it.
With no open projects, click on the Project... option next to Create: on the Start Page, or pick New Project item on the File drop-down menu.
The Add New Project dialog appears. With the Windows Application template selected, type Project8 for the name and click the OK button. Now click the Save All button on the toolbar to save the project. Be sure to uncheck the Create directory for solution option on the Save Project dialog box. Do not change the default Location path and click the Save button.
This creates a new folder inside the My Documents\Visual Studio 2010\Projects\ folder named Project8:
My Documents\Visual Studio 2010\Projects\Project8
Rename the Form file and the Form
With the form file (Form1.vb) selected in the Solution Explorer window, the Properties window directly below it displays it's File properties. Click on the File Name property and type frmProj8.vb (don't forget to include the .vb extension). To display the properties of the form in the Properties window, click once on the blank Form, which should be displayed on the left side of the screen in the Design window. Make sure the Name property—which is in parentheses (Name) at the top of the property list so that it's easy to find—is frmProj8. Then scroll the properties windows down and change the Text property to Project 8.
Before going on, click on the Save All
button on the toolbar to save your project.
Creating a Menu
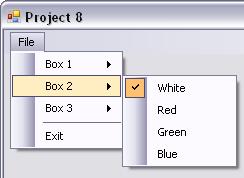
For your eighth Visual Basic project, you will create a program that displays three Labels and an Exit Button. A Menu with the following structure will allow the user to choose the background color of each Label. A check mark will appear on the Menu next to the color that has been selected, and the corresponding Label’s background color will change to that color. Suggested Names (use them!) for the menu items follow the Text names.
| Menu Table | ||||
|
Level 1 Text |
Level 2 Text |
Level 3 Text |
Name | Checked |
| &File | (default name) | |||
| Box &1 | (default name) | |||
| &White | mnuB1White | True | ||
| &Red | mnuB1Red | False | ||
| &Green | mnuB1Green | False | ||
| &Blue | mnuB1Blue | False | ||
| Box &2 | (default name) | |||
| &White | mnuB2White | True | ||
| &Red | mnuB2Red | False | ||
| &Green | mnuB2Green | False | ||
| &Blue | mnuB2Blue | False | ||
| Box &3 | (default name) | |||
| &White | mnuB3White | True | ||
| &Red | mnuB3Red | False | ||
| &Green | mnuB3Green | False | ||
| &Blue | mnuB3Blue | False | ||
| (Insert Separator) | ||||
| E&xit | mnuExit | False | ||
The Menu Table above builds this menu:
Adding a MenuStrip control to the form
Double-click on the MenuStrip item in the Menus & Toolbars section of the Control Toolbox to add a MenuStrip control (MenuStrip1) to the Component Tray. Once added to your project, the MenuStrip control appears in the Component Tray at the bottom of the design window, like this:
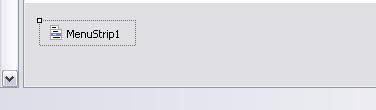
Note: The Component Tray at the bottom of the display window is normally hidden when it is empty. Items that appear in the Component Tray either have no visual interface (like a Timer control for example) or, in the case of a MenuStrip control, can be used on multiple forms in the same project.
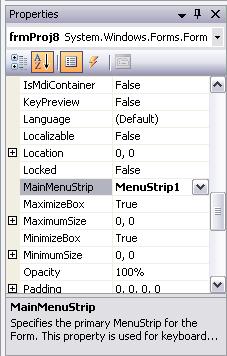
To add the MenuStrip1 to the form, set the MainMenuStrip property of the form to MenuStrip1, like this:
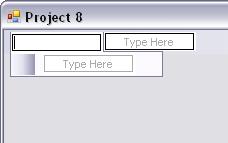
After setting the MainMenuStrip property to MenuStrip1, click once on the MenuStrip1 control in the Component Tray to selected it. Once MenuStrip1 is selected in the Component Tray, the new blank menu should appear in the upper left corner of the form, like this:
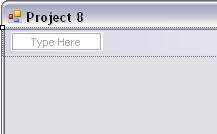
Place the cursor in the Type Here text area by clicking on it, and the menu will look like this:
Type &File for the text value. Now place the cursor in the first menu entry on the File menu by clicking it, as shown:
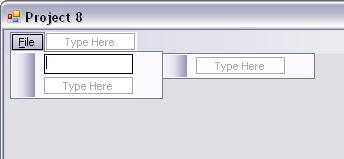
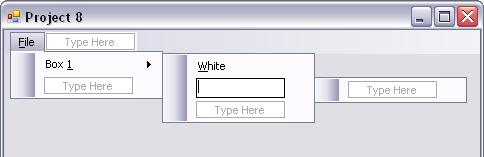
Type Box &1 for the text value. Place the cursor in the first menu item on the Box 1 submenu by clicking on it, as shown:

Type &White as the text value and hit the Enter key to set it. Now click on the White menu item to select it, as shown:
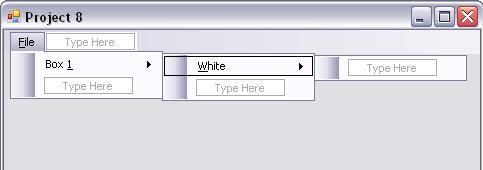
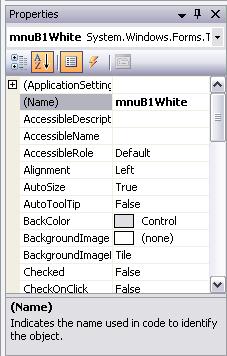
A black border appears around it to let you know it's selected and its properties are displayed in the Properties Window. Change the Name property from the cumbersome auto-generated name WhiteToolStripMenuItem to the naming-convention-friendly mnuB1White, like this:
Now place the cursor in the second Box 1 submenu item—direction below the White menu item—like this:
Type &Red as the text value, hit Enter, then click on the Red menu item to select it. Change its Name property (in the Properties Window) to mnuB1Red.
Use the Menu Table above to guide you, and complete the rest of the menu.
When you get to the addition of the separator (near the bottom of the Menu Table between Box 3 and Exit), right-click on the menu item where the separator is to go and choose Separator from the Insert submenu off the context menu, as shown:

Don't forget to set the Checked Property of mnuB1White, mnuB2White, and mnuB3White, to True.
Adding the Label controls to the form
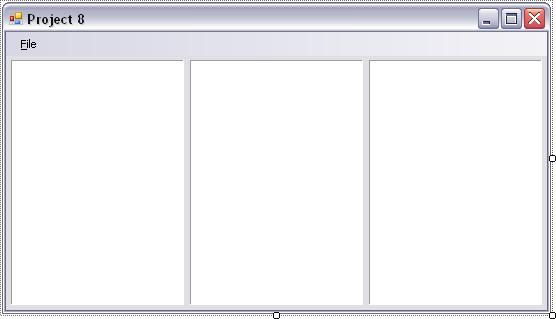
Place a Label control on the form, as shown:

- Change the Name property to lblBox1
- Set the AutoSize property to False
- Set the BackColor property to White
- Change the BorderStyle property to Fixed3D
- Set the Text property to blank.
The lblBox1 label should now look like this:

Use the following illustration as a guide and add the 2 more Labels as shown. Name them lblBox2 and lblBox3. Set the other properties you set for for lblBox1 to the same values. Important: Besides dragging a control around with the mouse, you can make fine adjusts to the positions of controls on the form by selecting the control and pressing the arrow keys on the keyboard—Holding down Shift plus the arrow keys lets you resize the selected control:
Here’s how you do it
To set the BackColor property of the Labels in code, we will be using the Color.FromKnownColor method, like this (don't type this line of code):
lblBox1.BackColor = _
Color.FromKnownColor(<Color Value>)
For the <Color Value> parameter, we will use members from the KnownColor enumerated collection, like this (don't type this line of code):
lblBox1.BackColor = _
Color.FromKnownColor(KnownColor.White)
An example of the code in mnuB1Blue_Click
As an example of the code which should appear in the Click event procedure for each sub-menu item—White, Red, Green, and Blue—here is the code from the mnuB1Blue_Click event procedure. The mnuB1Blue_Click event procedure is executed whenever the User selects the Blue sub-menu item under the Box 1 menu. Each line is described below:
'Is the Box1 Blue menu item not checked already?
If mnuB1Blue.Checked <> True Then
mnuB1White.Checked = False
mnuB1Red.Checked = False
mnuB1Green.Checked = False
mnuB1Blue.Checked = True
lblBox1.BackColor = _
Color.FromKnownColor(KnownColor.Blue)
End If
- The first line of code above examines the Checked property of mnuB1Blue. If its value is True then it’s already checked and there’s nothing left to do (<> means not equal to).
- The second line above sets the Checked property of the mnuB1White menu item to False. Why? Because the User just selected the mnuB1Blue menu item; if the mnuB1White menu item was checked before, setting its Checked property to False will uncheck it.
- The third line above sets the Checked property of the mnuB1Red menu item to False, for the same reason mentioned in 2 above.
- The fourth line above sets the Checked property of the mnuB1Green menu item to False, for the same reason mentioned in 2 above.
- The fifth line above sets the Checked property of the mnuB1Blue menu item to True, to add a check mark to the menu item.
- The sixth—line broken onto two lines for readability—uses the FromKnownColor method to set the BackColor property of lblBox1 to the color blue.
Save and test your program thoroughly. That completes this project.