In your fourth Visual Basic project, you will modify the 3rd Project. Instead of pointing and clicking on the form to move a PictureBox, you will change it so that you point at an PictureBox with the mouse then click and drag it to a new location. When you drop the PictureBox it will stay at the new location.
Creating Project 4 from Project 3
Note: Be sure that you have a backup copy of your Project3 files (per the instructions at the end of each project) on your floppy diskette before preceding.
Run Visual Basic .NET and open your Solution (<your name>.sln).

Select (click once on) Project3 in the Solution Explorer window (as shown above). Then drop down the File menu:
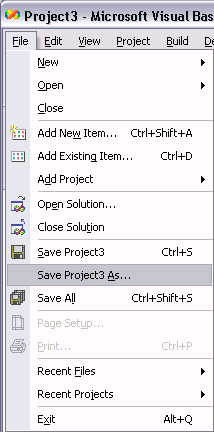
Choose Save Project3 As... on the File menu. Note: If Save Project3 As... is not listed on the file menu then you have not selected Project3 in the Solution Explorer window.
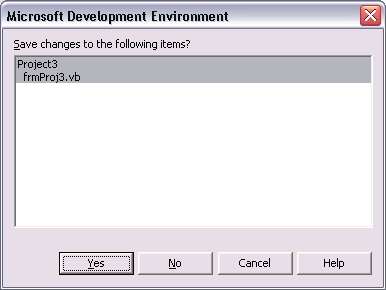
If you see the above dialog, click the Yes button to display the Save File As dialog:
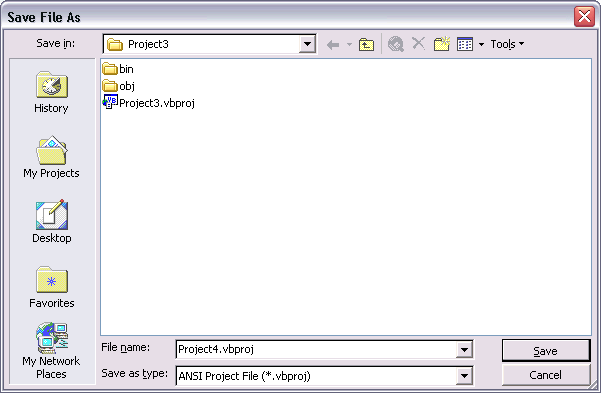
In the File Name text box change the project file name to Project4.vbproj, and click the Save button.
Rename the Form file by changing its File Name property

Select the frmProj3.vb form file in the Solution Explorer window (as shown above).
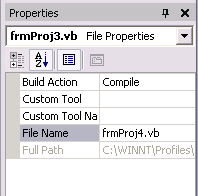
In the Properties window, change the File Name property (shown above), to frmProj4.vb (don't forget to include the .vb extension).
Rename the Form by changing its Name and Text properties
Now click on the form in the Designer window to display the form's properties:
- Change the Name property to frmProj4 (Remember: No spaces are allowed in the form’s Name property, or the name property of any control).
- Change the Text property to Project 4
Setting the Startup Object
Right-click on the Project4 project in your Solution Explorer window, click on the Properties item at the bottom of the context-menu. In the Project4 Property Pages dialog drop down the Startup object list and choose frmProj4 and click the OK button. Note: Also make sure that the Assembly Name is set to Project4.
Before going on, click on the Save All button on the toolbar to save your project:

Setting the AllowDrop property to enable Dragging and Dropping on a form
By default, the AllowDrop property of every control is set to False. This prevents the control from detecting if something has been dragged and dropped onto it. To allow dragging and dropping on our form, select the form in Design view, so that it's properties are displayed in the Properties window, and set it's AllowDrop property to True now.
Using the DoDragDrop method and the DragEnter and DragDrop event procedures
The DoDragDrop method of the PictureBoxes allows the user to drag and drop them. Let's do the code for the picCircles picturebox first. Add the following code to the picCircles_MouseDown event procedure so that Dragging will be enabled when the user points at the picturebox and clicks down on the left mouse button:
'Allow dragging only if the rdoCircles radio button on and the user
' clicks down on the Left mouse button
If rdoCircles.Checked = True And e.Button = MouseButtons.Left Then
picCircles.DoDragDrop(picCircles, DragDropEffects.Move)
End If
The DoDragDrop method requires two parameters (as shown above), they are:
- The object to be dragged. In our case we use the name of the picturebox itself (picCircles) since the entire picturebox control is being moved. If we wanted to just copy the Image from the picturebox to another picturebox (for example) we would have used picCircles.Image for this parameter.
- The DragDropEffects specification. There are several choices that include Move, Copy, None, etc. This affects how the mouse cursor looks during the actual dragging process.
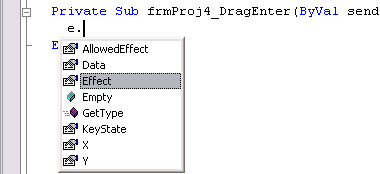
An object's DragEnter event procedure is raised once when the user drags something onto an object. We must include a DragDropEffects specification here to control how the mouse pointer appears as dragging is happening. This may seem redundant after including the DragDropEffects.Move parameter in the call to the DoDragDrop method of the picturebox (above in picCircles_MouseDown). But this is important because it allows us to dynamically change the appearance of the mouse pointer as we drag it over different controls on our form---more on this later--for now, we will add this code to only the DragEnter event procedure of the form. Note: To access the Event Procedures of the form, drop down the Class Name list at the top left side of the code window and choose (frmProj4 Events). Then choose the DragEnter event procedure from the Method Name list at the top right side of the code window. Add the following line of code to the frmProj4_DragEnter event procedure:
'Apply the Move effect to the mouse pointer while dragging
e.Effect = DragDropEffects.Move
The e parameter of the DragEnter event procedure--and all other Drag related event procedures--such as DragOver, DragDrop, and DragLeave--represents the item that is actually being dragged. The e's Effect property (shown in the illustration below) is set to the DragDropEffects specification that the mouse will display while being dragged over the object.
The DragDrop event procedure of the form is where we add the code that actually moves the PictureBox to where the user drops it. In fact, the user never really drags the object at all. The dragging effect is all they see--the object is not actually moving as they are dragging it. We need to add the code to move the object to the location they actually drop it. Add the following code to the frmProj4_DragDrop event procedure:
Dim MyForm As Form
'To access the properties of the sender object you need to dimension an object variable
' of the sender type (Form in this case) and reference the sender object with it.
MyForm = sender
'Move the PictureBox if it's radio button is on
If rdoCircles.Checked = True Then
picCircles.Left = e.X - MyForm.Location.X
picCircles.Top = e.Y - MyForm.Location.Y
End If
Normally e.X and e.Y would represent the location of the mouse pointer relative to the upper left corner of the form--as they do in the form's MouseDown, MouseUp, and MouseMove event procedures. But in the DragDrop event procedure e.X and e.Y represent the location of the mouse point relative to the upper left corner of the screen, NOT the form! To calculate X and Y coordinate values relative to the upper left corner of the form, we need to subtract the X and Y coordinates values of the form's position on the screen (MyForm.Location.X and MyForm.Location.Y) from e.X and e.Y. This will give us the actual mouse pointer location relative to the upper left corner of the form, so that we can move the PictureBoxes to where the user dropped them.
Testing the program so far
Click on the Save All button on the toolbar to save your project. Now click the start button to run the project. With the Circles radiobutton selected, click on and drag the picCircles picturebox down a few inches on the form and drop it. Did it move? Did the mouse pointer change while you where dragging it to indicate that dragging was happening? What happens when you drop the picCircles picturebox on top of one of your buttons? Does the picturebox end up on top of the button, or behind it?
Improving the Drag and Drop effect and other minor issues
First of all, let's make sure that the PictureBoxes don't end up behind any of the other controls when they are dropped. One control can be on top of another, or behind it, depending upon it's location in the z-order. All controls have BringToFront and SendToBack methods so that you can change where they are in the z-order in code. The z-order only affects controls on the same form (or in the same container control, like a GroupBox). To make sure that the PictureBoxes don't end up behind any of the other controls when they are dropped, we need to bring them to the front of the z-order. This is easier to do at design time. Select all three of the PictureBoxes and right-click on one of them. Choose Bring to Front on the context menu (as shown below), to bring all three of them to the top of the z-order:

If the picCircles picturebox was dropping behind any of the buttons during your first test run of the program, run the program now and test it. The picCircles picturebox will drop on top of the buttons from now on.
As it is now, when you drop the picturebox it is moved to a position below and to the right of the mouse pointer. This just doesn't look right. One thing that we didn't take into account when we calculated the position of the mouse pointer in the frmProj4_DragDrop event procedure was the border width of the form, and the height of the caption at the top of the form. Let's add those values to our location calculation in the frmProj4_DragDrop event procedure. Begin by add these two lines of code to the Declarations section at the top of the code view window (add the follow two lines below the Inherits System.Windows.Forms.Form line):
'The form's border is 4 Pixels wide
Const FORM_BORDER = 4
'The form's caption bar is 30 Pixels high
Const FORM_CAPTION = 30
The above two lines of code create two constants. A constant is a descriptive name that represents some value. By using constants instead of the just the values they represent in your code, it makes your code much easier to read. Modify the the two lines of code that set the Left and Top properties of the picCircles picturebox in the fromProj4_DragDrop event procedure to include these constants, like this:
picCircles.Left
=
_
e.X
-
MyForm.Location.X
-
FORM_BORDER
picCircles.Top
=
_
e.Y
-
MyForm.Location.Y
-
FORM_CAPTION
Test the program again
Click on the Save All button on the toolbar to save your project. Now click the start button to run it. With the Circles radiobutton selected, click on and drag the picCircles picturebox down a few inches on the form and drop it. Is the mouse pointer pointing at the upper left corner of the picCircles picturebox? It should be, because that is the point where the Left and Top property values cross each other.
It still doesn't look right!
The mouse pointer should be pointing at the center of the picturebox after we move it, not the top left corner of it. What would happen if we also subtracted half of the value of picCircles.Width from the e.X value, and half of the value of picCircles.Height from the e.Y value? Would this shift the picturebox so that the mouse pointer was pointing at the center of it? Modify the the two lines of code that set the Left and Top properties of the picCircles picturebox in the fromProj4_DragDrop event procedure one more time, like this:
picCircles.Left
=
_
e.X
-
MyForm.Location.X
-
FORM_BORDER -
picCircles.Width / 2
picCircles.Top
=
_
e.Y
-
MyForm.Location.Y
-
FORM_CAPTION -
picCircles.Height / 2
Test the program again
What happens now when you drag and drop the picCircles picturebox? is the mouse pointer left pointing at the center of it when it's dropped? That looks a lot better!
Moving the PictureBox while it is being dragged - the DragOver event procedure
One other problem is that the picCircles picturebox just sits there while we are dragging it, and doesn't move until it's dropped. It would look a lot better if it actually moved while we were dragging it. Instead of moving the picturebox in the DragDrop event procedure of the form, we could move it in the DragOver event procedure. The DragOver event procedure is raised over and over again as the user drags something over the form. Select all the code in frmProj4_DragDrop and move it to the frmProj4_DragOver.
Test the program again
Click on the Save All button on the toolbar to save your project. Now click the start button to run the project. What happens when you drag the picCircles picturebox now? It should move as you are dragging it.
Getting Drag and Drop working for picCarved and picStraw
The code you've added so far to the project to get dragging and dropping working for the picCircles picturebox should help you get dragging and dropping working for the picCarved and picStraw pictureboxes. Use that code as a template and get dragging and dropping working for the picCarved and picStraw pictureboxes.