Beginning Visual Basic - Project 10
The Common Dialog
The 10th Project
For your Tenth Visual Basic project, you will create a program with
2 Textboxes and a simple Menu. One of the Textboxes (txtEnter)
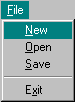
will allow the User to type text. By choosing Save from the Menu (shown
below) the contents of the txtEnter Textbox can be saved to a file. The New
menu item clears the txtEnter Textbox. The second Textbox (txtView),
lets the user view up to the first 50 lines of any text (TXT) file. The Open menu
item lets the user choose the file to be viewed.
Level 1
Caption |
Level 2
Caption |
Suggested
Name |
| &File |
|
mnuFile |
| |
&New |
mnuNew |
| |
&Open |
mnuOpen |
| |
&Save |
mnuSave |
| |
— |
mnuBrk (a single hyphen) |
| |
E&xit |
mnuExit |
When completed, the menu should resemble the illustration above.
Begin with a blank form (Choose New Project under the File menu—make is a Standard
project) and press the F4 key to view the form’s properties—if they
are not already displayed.
- Change the Form’s Caption property to Project 10
- Change the default Name of the form (form1) to frmProj10
Open the Properties dialog by selecting Project1
Properties under the Project drop-down menu. Make sure the General tab
on the Properties dialog is selected. In the Startup
Object combobox make sure frmPrj10 is selected (it should be by
default). In the Project Name textbox type Project10. In the Project
Description textbox type the following: Using the CommonDialog control to save and open TXT files. Leave all other settings at their defaults and click the OK button.
Pull down the File menu and choose Save Project. Save the form as: frmProj10.frm. Save the project file as project10.vbp.
Use the menu hierarchy shown above as a guide and create the Menu
(suggested names are in parentheses). As before, no Properties/Procedures Table
is provided for this project. Note: Please use the Naming Conventions for your Controls and Variables that
we have followed so far in this class—I Mean it! J.
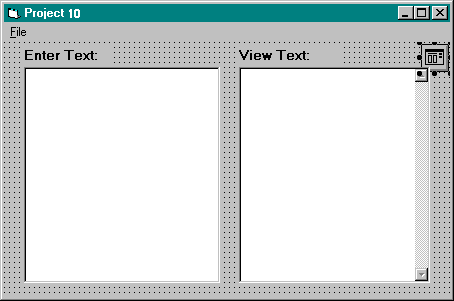
As described in step 4 below, before placing the Textboxes,
you will place a Common Dialog control in the upper right corner of the Form. To learn more
specific details about the CommonDialog control use the online help
provided by Visual Basic.
Use the example above and add 1 CommonDialog control, 2 Textboxes,
and 2
Labels to the form as shown (Note: If the CommonDialog control is not available in the Control Toolbox,
right-click on the Control Toolbox and select the Components item from the context menu. With
the Controls tab selected, put a checkmark in front of the Microsoft Common Dialog Control 5.0 or 6.0 item in the Components dialog and click the OK
button):
Place the CommonDialog on the form first and drag it to one
of the corners of the form to get it out of the way. This control appears as a small icon
on the form which is hidden at run-time. In fact, the user will never directly interact
with it. The CommonDialog control has no event procedures. You will use methods
of the control to display a Save As dialog box, which lets the User specify a name to save a
file, and an Open dialog box which allows the user to select a file to open.
- Name the Textbox below the Enter Text Label
txtEnter.
- Name the Textbox below the View Text Label
txtView.
- Set the ScrollBar property of the txtView Textbox to Vertical. So if the User opens a file with more text than the txtView Textbox can
hold, they can use the Vertical
Scrollbar to view it all.
- Set the MultiLine property of both Textboxes to True.
- Set the Locked property of the txtView Textbox to True. You don’t want Users typing into a text file that they are only
supposed to be viewing.
Before the User can Open a text file, they need to
create one. So you’ll enter the code for the Save menu option first. Here you will
use the CommonDialog control to display a Save As dialog box where the User can
make up a name for the file they are about to save. Below is the code for the mnuSave_Click event
procedure. Each line is explained in a preceding comment. You may type the code without the
comments.
Private Sub mnuSave_Click()
‘sFileName is where you will store
the filename the User creates
Dim sFileName As String
‘Assign the dialog’s Title
(this is displayed in the caption bar of the Save As dialog)
CommonDialog1.DialogTitle = "Enter Name To Save File
As"
‘The Filter property lets
you specify which file types will to be listed in the Save As dialog.
'The text after the = sign and to the left of the I (vertical bar) is
the text displayed in the
'Save As Type dropdown listbox on the Save As dialog. The last part *.txt
is the actual
'Filter ‘specification, which means only files with a TXT extension will be
displayed.
CommonDialog1.Filter = "Text File (*.txt) | *.txt"
‘The InitDir property lets
you specify the start up directory that is displayed when the
‘Save As dialog first opens
CommonDialog1.InitDir = "A:\"
‘The ShowSave method
actually displays the Save As dialog box on the screen
CommonDialog1.ShowSave
‘The Name the User designated in
the Save As dialog is stored in the CommonDialog’s
'filename property. This code copies it to the sFileName variable, then sets
the
'filename property to null
sFileName = CommonDialog1.filename
CommonDialog1.filename = ""
'Make sure sFileName isn't blank before
trying to open the file. It could be blank if
‘the User doesn't select an existing file or type a file name in the Save As dialog
box
If sFileName <> "" Then
'Here’s how you open a file for Output.
When a file is open for input or output,
'you must assign a number to it (in this case #1).
Then use the number later to
'refer to the file.
Open sFileName For Output As
#1
'By printing txtEnter.Text to #1, the
contents of the txtEnter Textbox is written
'to the file opened as device #1 on the line
above
Print #1, txtEnter.Text
‘You must remember to Close a file when
you’re done accessing it
Close #1
End If
End Sub
After entering this code, the User can create and save a
file. Now they need to be able to open a file. Below is the code for the mnuOpen_Click event
procedure. You’ll be using the CommonDialog again, but this time you’ll
be generating an Open File dialog. Each line is explained in a preceding comment.
You may type the code without the comments.
Private Sub mnuOpen_Click()
‘sFileName, sText, sLine, and
iLineCount are explained as they are used
Dim sFileName As String
Dim sText As String
Dim sLine As String
Dim iLineCount As Integer
‘Assign the dialog’s Title
(this is displayed in the caption bar of the Open File dialog)
CommonDialog1.DialogTitle = "Enter File Name To Open"
‘The Filter property lets
you specify which file types will to be listed in the Open File dialog.
‘The text after the = sign and to the left of the I
(vertical bar) is the text displayed in the
‘Show File Types dropdown listbox on the Open File dialog. The last part *.txt
is the
‘actual Filter specification, which means only files with a TXT extension will
be displayed.
CommonDialog1.Filter = "Text File (*.txt) | *.txt"
‘The InitDir property lets
you specify the start up directory that is displayed when the
‘Open File dialog first opens (I've specified A:, you may choose a different drive)
CommonDialog1.InitDir = "A:\"
‘The ShowOpen method
actually displays the Open File dialog box on the screen CommonDialog1.ShowOpen
‘The Name the User designated as
the File to open is stored in the CommonDialog’s
‘filename property. Here you copy it to the sFileName variable, and set it to null
sFileName = CommonDialog1.filename
CommonDialog1.filename = ""
'Just like in the Save As procedure,
you must make sure sFileName isn't blank before
‘trying to open the file. It could be blank if the User doesn't select a file to open
in the
‘Open File dialog box.
If sFileName <> "" Then
'Here’s how you open a file for Input.
When a file is open for input or output, you must
‘assign a number to it (in this case #1).
Then use the number to refer to the file.
Open sFileName For Input As #1
‘As you read each line from the file, you need
to append it to the sText string. You make
‘sure sText is blank to begin with by
setting it to null. iLineCount is used to make
‘sure that only up to the first 50 lines are
read from the file
sText = ""
iLineCount = 0
‘EOF(1) checks for the end of file #1, which
is the number designator you assigned to the
‘file when you opened it. This Do While loop
will keep reading lines from the file until
‘the End of File is reached, or
iLineCount reaches 50.
Do While Not EOF(1) and iLineCount
< 50
‘The Line Input command reads a line
from the file designated by #1 into a string (sLine)
Line
Input #1, sLine
‘Here sLine is appended to sText
along with a Carriage Return (13) and a Linefeed
‘(10) character. The Line Input command
reads lines from a file, but fails to
‘preserve Carriage Return and Linefeed
characters, so you have to add them back
‘manually. When this loop is finished, sText
will contain all of the lines that were read.
‘Or use the Visual Basic constant vbCrLf
sText
= sText & sLine & Chr(13) & Chr(10)
‘This increments iLineCount (adds 1 to
it each time through the loop)
iLineCount
= iLineCount + 1
Loop
‘You must remember to Close a file when
you’re done accessing it
Close #1
‘This copies sText to the Text
property of the txtView Textbox
txtView.Text = sText
End If
End Sub
That almost completes this project. What about the New menu item?
What should it do? Try to figure out the code for New on your own.
Trapping the CommonDialog's Cancel button
By default, when you use a CommonDialog
control to display Save or Open file dialog boxes, you can't detect when the User
clicks the dialog's Cancel button.
The CommonDialog's CancelError
Property
All CommonDialog
controls come with a CancelError
property which is specifically designed to help you detect when the User clicks
the Cancel button of a CommonDialog generated dialog box. When a
CommonDialog's CancelError property
is set to True, a critcal error is
generated whenever the User clicks the Cancel
button of a CommonDialog generated dialog
box. Normally this would cause your program to crash, but we can trap the error to
prevent that from happening. Take a look at the basic code required to trap a
program crashing (critical) error:
Private Sub mnuOpen_Click()
On Error Goto ErrorHandler
...
... Code that may cause
the critical error goes here
...
Exit Sub
ErrorHandler:
... Error
handling code would go here
End Sub
Just 3 new lines of code are required to implement an Error Trap:
- On Error Goto ErrorHandler
— The "On Error Goto <Tag>" command gets inserted at the
beginning of the event procedure (before the code that may cause the error). If a
critical error happens, this line of code stops the normal execution of code and jumps to
the line of code following the tag (ErrorHandler:).
- Exit Sub —
This line of code must be inserted above the error handler tag so that if no error
occurs it exits the procedure before executing the error handler code.
- ErrorHandler:
— This is the jump tag (specified in the On Error Goto line).
It can be any word, but it should be descriptive, followed by a colon (:).
Here's how the above error trapping code would look inserted into
your mnuOpen_Click event procedure:
Private Sub mnuOpen_Click()
Dim sFileName As String
Dim sText As String
Dim sLine As String
Dim iLineCount As Integer
α On Error Goto ErrorHandler
CommonDialog1.DialogTitle =
"Enter File Name To Open"
CommonDialog1.Filter =
"Text File (*.txt) | *.txt"
CommonDialog1.InitDir =
"A:\"
CommonDialog1.ShowOpen
sFileName =
CommonDialog1.filename
CommonDialog1.filename = ""
If sFileName <>
"" Then
Open sFileName For Input As #1
sText = ""
iLineCount = 0
Do While Not EOF(1) and iLineCount < 50
Line Input #1, sLine
sText = sText & sLine & Chr(13) &
Chr(10)
iLineCount = iLineCount + 1
Loop
Close #1
txtView.Text = sText
End If
α Exit Sub
α ErrorHandler:
'No actual error code is required in
this situation, since if the User
' decides to cancel opening a file, no real
error has occured
End Sub
Normally, we would be using error trapping code like this to catch
unexpected errors (like the error caused when a CDbl
conversion function tries to convert a string of non-numeric characters into a
number—an error that results when a User enters text into a number
field). However, in this situation, we are actually forcing the CommonDialog control
to generate a critical error by setting it's CancelError
flag to True (this is the ONLY way to detect
the Cancel button on a CommonDialog
generated dialog box). We are using the error trap to re-route the execution of the
program in the event of an error.
You can use error trapping code like this to prevent procedures that
are prone to cause intermittent errors from crashing your program. For those really
hard to track down errors, It's a good idea to display an informative message box so that
you know where the error occurred after your program is compiled, like this:
Private Sub <Procedure Name>
On Error Goto ErrorHandler
...
... Code that may cause
the critical error goes here
...
Exit Sub
ErrorHandler:
'The Number
and Description properties of the Err object
' can be used to
display useful information about the error
MsgBox
Err.Number & ": " & Err.Description, _
vbExclamation, "Error"
End Sub