For your tenth Visual Basic project, you will create a program with 2 Textboxes and a simple Menu. The first Textbox will allow the user to type text and then save it to a file by choosing Save from the Menu (shown below). The second Textbox will allow the user to view text files (.txt) that the user opens with the Open menu item.
| Menu Table | ||
| Level 1 Text |
Level 2 Text |
Name |
| &File | mnuFile | |
| &New | mnuNew | |
| &Open | mnuOpen | |
| &Save | mnuSave | |
| (Insert Separator) | ||
| E&xit | mnuExit | |
Removing your old project and creating a new one
Run Visual Basis .NET and open your Solution (<your name>.sln).
Right-click on the Project9 project in the Solution Explorer window and select Remove from the context menu. Click the OK button when warned that Project9 will be removed from the Solution. Drop down the File menu. Under the Add Project menu item select New Project. When the Add New Project dialog appears, be sure that the Visual Basic Projects folder is open in the Project Types pane, and that the Windows Application template is selected in the Templates pane. Type Project10 in the Name textbox. Then click the OK button. This creates a new folder inside the \Visual Studio Projects\<Your Name> folder named Project10:
...My Documents\Visual Studio Projects\<Your Name>\Project10.
Note: When class is over, be sure to follow the instructions at the end of this project that tell you how to copy your project to your floppy diskette so you can take it home with you.
Rename the Form file and change it's Name and Text properties
With the form file (Form1.vb) selected in the Solution Explorer window, so that it's File properties are displayed in the Properties window, change the File Name property to frmProj10.vb (don't forget to include the .vb extension).
Now click on the form in the Designer window to display it's properties:
- Change the Name property to frmProj10 (Remember: No spaces are allowed in the form’s Name property, or the name property of any control).
- Change the Text property to Project 10
Setting the Startup Object
Right-click on the Project10 project in your Solution Explorer window, click on the Properties item at the bottom of the context-menu. In the Project10 Property Pages dialog drop down the Startup object list and choose frmProj10 and click the OK button.
Creating a Menu
Use the Menu Table above as a guide and create the Menu. Hint: As before, begin by adding a MainMenu control to the Component Tray, then set the Menu property of the form to MainMenu1. Use the Menu Table above to guide you, when adding items to the menu.
Adding Textboxes and Labels to the Form
Use the illustration below and place two Labels and two Textboxes as shown:
Set their properties like this:
| Left Label | Right Label | ||
| Property | Value | Property | Value |
| Text | Enter Text: | Text | View Text: |
| Font | Bold | Font | Bold |
| Left Textbox | Right Textbox | ||
| Property | Value | Property | Value |
| Name | txtEnter | Name | txtView |
| Multiline | True | Multiline | True |
| Scrollbars | Vertical | Scrollbars | Vertical |
| Text | blank | Text | blank |
Adding
OpenFileDialog
and SaveFileDialog
controls to the Form
Scroll down the Control toolbox and add one (double-click once) OpenFileDialog control and SaveFileDialog control to the Component Tray:
Once added, your Component Tray should look like this:
Using a SaveFileDialog control to help you save files
Why do the Open file and Save file dialogs that most applications use look very similar to each other (see the illustration below)? The idea of a Common User Interface is an important driving force behind the development of windows applications. In theory, if all applications work in a similar way, a user will be more productive and take less time learning how to use new applications. To that end, the Save and Open file dialog boxes look and behave the same way between different applications. In fact, the code that generates these dialog boxes exists inside a Dynamic Link Library (DLL) file that is part of the operating system. So the Save file and Open file dialog boxes don't just look the same between different applications; they are the same!
When we use a SaveFileDialog control, we are actually displaying the same Save dialog that most other applications will display. This is how the SaveFileDialog looks. This should look familiar to you:
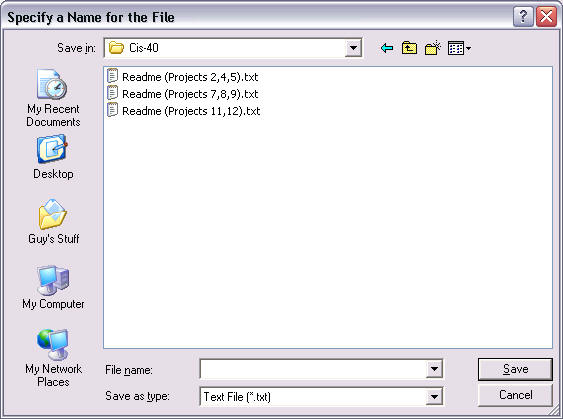
Here is the code that uses the SaveFileDialog control to create the above Save dialog box:
'Assign the dialog’s Title property (this is displayed in the caption bar of the Save dialog)
SaveFileDialog1.Title = "Specify a Name for the File"
'The Filter property lets you specify which file types will to be listed in the Save dialog.
' The text after the = sign and to the left of the | (vertical bar) is the text displayed in the
' Save As Type dropdown listbox (shown above). The last part: *.txt is the actual filter
' specification, which means only files with a TXT extension will be displayed.
SaveFileDialog1.Filter = "Text File (*.txt) | *.txt"
'The AddExtension property makes sure that the .txt extension is automatically
' added to any file name the user specifies.
SaveFileDialog1.AddExtension = True
'By setting the OverwritePrompt property to true, a warning dialog will appear
' if the user attempts to save over an existing file.
SaveFileDialog1.OverwritePrompt = True
'The InitialDirectory property lets you specify the start up directory that is displayed
' when the Save dialog first opens.
SaveFileDialog1.InitialDirectory = "C:\"
'Clear the FileName property of SaveFileDialog1
SaveFileDialog1.FileName = ""
'The ShowDialog method displays the Save dialog. Any code that follows this
' line of code will not be executed until the Save dialog is closed.
SaveFileDialog1.ShowDialog()
Type the above code into the mnuSave_Click event procedure. The code above does not actually save a file. All it does is use the SaveFileDialog to display the Save dialog where the user specifies the name of the file to be saved--or they can browse and select an existing file to overwrite it. It is still up to us to write the code that will save the contents of the txtEnter textbox to the file that the user specifies.
Creating a System.IO.FileStream object to write to a file
We need to create a FileStream to do file input and output. We can dynamically create a FileStream object by dimensioning an instance of it with it's object constructor, like this (do not type the following code yet):
Dim FStream As New System.IO.FileStream(<File Name>, IO.FileMode.Create)
Using the FileStream method of System.IO class to create the FileStream object requires two parameters:
- The File Name--the name of the file to be created or opened, which must include the full path and name of the file.
- The FileMode--which determines how the file is to be opened. The FileMode options that are available include, Append, Create, CreateNew, Open, OpenOrCreate, and Truncate.
Once we have created a FileStream object--which gives us a connection to the file and determines how it is opened--we can create a StreamWriter object for the FileStream that makes writing to the file easy, like this:
Dim SWriter As New System.IO.StreamWriter(FStream)
The FStream parameter is the FileStream object we had just created. Once the StreamWriter object is created we can write to the file with the StreamWriter's Write method, like this:
SWriter.Write(<String>)
To close the File once we are finished writing to it, we must use the Close methods of both the StreamWriter and FileStream objects, like this:
SWriter.Close()
FStream.Close()
Type the following code below the code you had previously added to the mnuSave_Click event procedure:
'Make sure the user specified a file name for the file to be created. If the FileName property
' is blank, the user either clicked the Cancel button or clicked Save without specifying a file
' name in the Name text box of the SaveFileDialog control.
If SaveFileDialog1.FileName <> "" Then
æCreate a FileStream object that connects to the file and opens it in create mode.
Dim FStream As _
New System.IO.FileStream(SaveFileDialog1.FileName, IO.FileMode.Create)
æCreate a StreamWriter object for the FileStream to make writing to the file easy.
Dim SWriter As New System.IO.StreamWriter(FStream)
æWrite the contents of the txtEnter textbox to the file.
SWriter.Write(txtEnter.Text)
æClose the StreamWriter and FileStream.
SWriter.Close()
FStream.Close()
æDestroy the StreamWriter and FileStream objects.
SWriter = Nothing
FStream = Nothing
End If
Using an OpenFileDialog control to help you read from a file
The only significant difference between the OpenFileDialog and SaveFileDialog controls is that the text on the button of the OpenFileDialog says Open and the text on the button of the SaveFileDialog says Save. Add the following code to the mnuOpen_Click event procedure to display an OpenFileDialog:
OpenFileDialog1.Title = "Choose a File to Open"
'List files with a .txt extension only.
OpenFileDialog1.Filter = "Text File (*.txt) | *.txt"
'If the user types a filename the .txt extension is added
' automatically if they don't include it.
OpenFileDialog1.AddExtension = True
‘The InitialDirectory property lets you specify the start up directory that is displayed
' when the Open dialog first opens.
OpenFileDialog1.InitialDirectory = "C:\"
'Clear the FileName property of OpenFileDialog1
OpenFileDialog1.FileName = ""
'The ShowDialog method displays the Open dialog. Any code that follows this
' line of code will not be executed until the Open dialog is closed.
OpenFileDialog1.ShowDialog()
The OpenFileDialog has no OverwritePrompt property since the user is picking a file to be opened, not saved.
Creating a System.IO.FileStream object to read from a file
The FileStream object that we'll need to read from a file will be created exactly the same way we constructed the FileStream object to write to a file, except for the FileMode parameter. Instead of using IO.FileMode.Create, we will use IO.FileMode.Open, like this (do not type the following code yet):
Dim FStream As New System.IO.FileStream(<File Name>, IO.FileMode.Open)
Instead of a StreamWriter which lets us write to a FileStream, we need to create a StreamReader so that we can read from a FileStream:
Dim SReader As New System.IO.StreamReader(FStream)
Now, reading the contents of the file into the txtView textbox is easy with the StreamReader's ReadToEnd method, like this:
txtView.Text = SReader.ReadToEnd()
Type the following code below the code you had previously added to the mnuOpen_Click event procedure:
æMake sure the user specified a file name for the file to be created. If the FileName property
' is blank, the user either clicked the Cancel button or clicked Save without specifying a file
' name in the Name text box of the SaveFileDialog control.
If OpenFileDialog1.FileName <> "" Then
æCreate a FileStream object that connects to the file and determines how the file is opened.
Dim FStream As _
New System.IO.FileStream(OpenFileDialog1.FileName, IO.FileMode.Open)
æCreate StreamReader object for the FileStream to make reading from the file easy.
Dim SReader As New System.IO.StreamReader(FStream)
æRead the contents of the file into the txtView textbox.
txtView.Text = SReader.ReadToEnd()
æClose the StreamReader and FileStream.
SReader.Close()
FStream.Close()
æDestroy the StreamReader and FileStream objects.
SReader = Nothing
FStream = Nothing
End If
Testing the program so far
Before testing the project, click on the Save All button on the toolbar to save it. Now run the program and type something into the Enter Text textbox, and save it to a file with the Save menu item. Then use the Open menu item and open the file so that it is displayed in the View Text textbox.
That almost completes this project. What about the New menu item? What should it do? Try to figure out the code for the New menu item on your own.
Hints for the implementing the New menu item
- The user should be prompted to save the contents of the Enter textbox when they select the New menu item if the contents of the Enter textbox has been changed since they last saved it. How can you detect when the contents of a Textbox changes?
- To prompt the user to save the contents of the Enter textbox, use a message box with three buttons: Yes, No, and Cancel.
- Be aware that even if the user chooses to save the contents of the Enter textbox, they still have the option to click the Cancel button on the SaveFileDialog. You must detect this, and NOT clear the Enter textbox until either of these 3 things happen:
- The contents of the Enter textbox had not been modified since it was last saved.
- When prompted to save, the user explicitly selected the No button on your message box.
- When prompted to save, the user selected the Yes option and saved the contents of the Enter textbox to a file.