You can use Excel as a custom control in a manner similar to
any custom control. To illustrate this, you are now going to enhance the previous project
by inserting an Excel Worksheet object in an OLE control.
Load Visual Basic and select Open Project under the File menu. Open your loancalc.vbp project (project
7). Press the F4 key to view the Form’s properties—if they are
not already displayed.
- Change the Caption property to Loan Repayment
Calculator
- Change the previous Name of the form (frmCalc) to frmRepay
- Open the Properties dialog by selecting LoanCalculator
Properties under the Project drop-down menu. Make sure the General
tab on the Properties dialog is selected. In the Startup Object combobox make sure frmRepay is selected (it
should be by default). In the Project
Name textbox type LoanRepayment. In the Project Description
textbox type the following: A Calculator that
uses a Microsoft Excel Worksheet to calculate repayment of a loan. Leave all other settings at their defaults and click the OK button.
- Pull down the File menu and choose Save
frmCalc.frm As. Save the form as: frmRepay.frm. Then choose Save Project As, and save
the project file as loanrep.vbp.
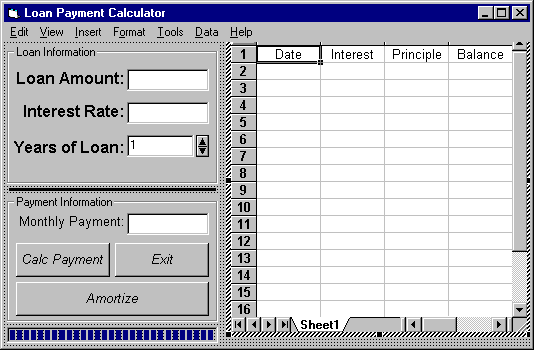
Use the illustration below. Stretch your Form wider and place
an OLE control where shown. When the Insert Object dialog box appears, select Microsoft Excel Worksheet and
click the OK button.
Notice how after you add the OLE control and select it, visual
basic’s menu is modified to include part of the actual Excel menu. The Excel
part of the menu disappears when you deselect the OLE control. After
deselecting the OLE control, you can select it again by right-clicking on it and
choosing Edit
from the context menu. By the way, the addition of the Excel menu to
your visual
basic menu occurs because Visual Basic is also an OLE server application, and it’s
menu structure is exposed to other applications for modification (in a later project
you will be modifying visual basic’s menu structure from within your own application).
- After placing the OLE control and imbedding the Excel
Worksheet in it, set its Name property to OLESheet.
- Add the Column Headings: Date, Interest, Principle, and Balance in the top row of the Excel Worksheet (Right click on the
imbedded Excel Worksheet control and select Edit off of the context menu that appears to
re-enable editing after you deselect it).
- Use the left mouse button to click and drag over the range of cells
from A2 to A14. Right click in the
middle of the selected cells and choose Format
Cells from the context menu. Make sure the Number tab is selected and
choose Date
from the Category list. Click on the type of date format that displays the
date as mm/dd/yy.
Then click the OK button.
- Click and drag over the range of cells from B2 to D14. Right click in the
middle of the selected cells and choose Format
Cells from the context menu. Make sure the Number tab is selected and
choose Currency
from the Category list. You’ll use the default Currency format, so just
click the OK button.
- Click on the column heading button of the Balance column
(column D) to
select the entire column. Right-click anywhere in the selected column and choose the Column Width item on the
context menu. Type 12 for the column width and click the OK button. Note: Make sure
your Form is extra wide so that you can stretch the OLE control wide enough to
display the four columns of the Excel worksheet (Date, Interest, Principle, Balance)
shown in the illustration above.
Save the project before going on.
- Add 1 Command Button to
the Payment Information frame (see the illustration at the top). Set its Name property
to cmdAmort,
and its Caption property to Amortize.
Before going further, I want to warn you. The following code, which
you will insert into your Amortize button’s Click event procedure (cmdAmort_Click),
is a tedious affair. Here’s a summary of what this code will do:
- Hide the OLESheet control. (As the control is updated with data, it will flicker—you
don’t need to baffle the User with that sight).
- Assign a reference to the control, so that you can issue commands to
it.
- Perform calculations to produce data and use each Cell’s Value method to place this
data into the cells of the control.
- Unhide the OLESheet control.
Before this program will work, you need to set a Reference
to the Microsoft Excel 9.0 Object Library. This will allow you to dimension a variable of an Excel.Worksheet data
type. Select the References item on the Project dropdown menu, and put a check mark in front of Microsoft Excel
9.0
Object Library, then click the OK button (you should have already set this in
project 7).
Note: Microsoft
Excel may be left running in memory if your program does not terminate normally (of
course this won't happen to you because your program will run perfectly the first time J ). To check if Excel is still
in memory after your program terminates, run the Task Manager by pressing
Ctrl+Alt+Delete (Note: Windows NT/2000 users, press Ctrl+Shift+Esc. Then click on the Processes
tab). If you find EXCEL.EXE in the list of running processes, click on it and press the End Task button. If prompted
to Wait or End Task Now, choose End
Task Now. It’s a good idea to do this after test
running your program the first couple of times, even if it appears to exit normally. If Excel
is still left running in memory, even though everything else seems to be working
normally, be sure that you properly implemented the code in the step above.
Test your program thoroughly and make sure it’s working
properly before going onto the next step, where you will add a Progress Bar.
Now that you have the program working and you’ve tested it
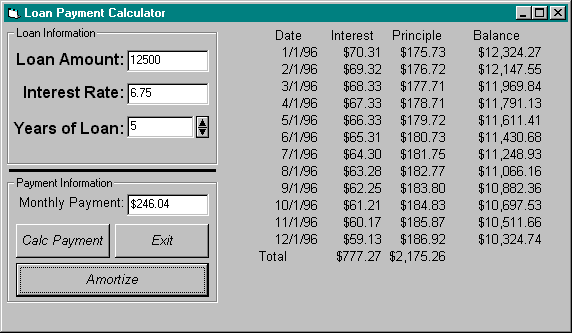
thoroughly (you’re output should look similar to the example above), you still need
to deal with one last problem. There’s really nothing you can do to reduce the delay
the User must suffer though after clicking the cmdAmort button. Many impatient Users
(on slower computers) might even think that their computer had ceased to function and
be inclined to press the reset button. To prevent that from happening, you will place a Progress Bar control
on the form. A Progress Bar lets the User know that something is happening, and about how long
it’s going to take. Note: To add the Progress Bar control to the Control Toolbox, add the Microsoft Windows Common Controls 6.0 component—right-click on the Control Toolbox and
choose Components.
- Use the illustration at the beginning of this document and place a Progress Bar control
on your form (in the lower left corner)
- Leave it’s default Name the same (ProgressBar1).
- Set its Max property to 16 and leave its Min property at 0
- Set its Visible property to False
The code below, which is from your cmdAmort_Click event
procedure, is the same as the code you’ve already typed (Don’t Re-Type it!) with the Progress Bar code
inserted into it (the bold and numbered lines). Since the Progress
Bar must be updated while the amortization spreadsheet
is being generated, these lines of code are inserted directly into the pre-existing code.
The Progress Bar code is numbered and explained after the listing below.
‘Insert the Progress Bar code (bold,
numbered lines) into your pre-existing code where shown
Dim iRow As Integer
Dim dRate As Double
Dim curBalance As Currency
'Unhide the Progress Bar
1. ProgressBar1.Visible = True
Screen.MousePointer
= vbHourglass
'Set the Progress Bar's Value to Min.
2. ProgressBar1.Value = 1
cmdCalc_Click
‘Increment the Progress Bar’s Value property.
3. ProgressBar1.Value = 2
dRate = CDbl(txtRate.Text) / 100 / 12
curBalance = CCur(txtLoan.Text)
OLESheet.Visible = False
If SheetObj Is Nothing Then
Set SheetObj = OLESheet.object.Worksheets(1)
End If
‘Increment the Progress Bar’s Value property.
4. ProgressBar1.Value = 3
For iRow = 2 To 13
'Display
the Month and Year in column 1
SheetObj.Cells(iRow,
1).Value = DateSerial(1996, iRow - 1, 1)
'Calc and
display the Interest amount in column 2
SheetObj.Cells(iRow,
2).Value = curBalance * dRate
'Calc and
display the Principle amount in column 3
SheetObj.Cells(iRow,
3).Value = curPayment - SheetObj.Cells.Item(iRow, 2)
'Calc the
new Current Balance and display it in column 4
curBalance =
curBalance - SheetObj.Cells.Item(iRow, 3)
SheetObj.Cells(iRow, 4).Value = curBalance
‘Increment the Progress Bar’s Value property.
5. ProgressBar1.Value = iRow + 1
Next iRow
SheetObj.Cells(14, 1).Value = "Total"
SheetObj.Cells(14, 2).Value = "=SUM(B2:B13)"
SheetObj.Cells(14, 3).Value = "=SUM(C2:C13)"
‘Set the Progress Bar’s Value property to Maximum value
6. ProgressBar1.Value = ProgressBar1.Max
OLESheet.Visible = True
Screen.MousePointer = vbDefault
‘Hide the Progress Bar after it’s served its purpose
7. ProgressBar1.Visible = False
- Initially the Progress
Bar should be hidden. But now that it is needed, this
command makes it visible.
- Set the Value property of the Progress Bar to 1 so the user can see that
some progress is being made (this makes the indicator grow 2 ticks).
- By setting the Value property of the Progress Bar to 2, the progress
indicator grows to 4 ticks.
- Adding 1 more Increments the progress indicator 2 more ticks.
- Add 1 to the Value property of the Progress Bar
each time through the loop. The Progress
Bar’s maximum value is 16 (according to its Max
property which you set earlier). After completing the loop, the Progress Bar’s Value
property will be 14, and the progress indicator will be just 2 ticks from the end.
- This sets the progress indicator to it maximum.
- Hide the Progress Bar now that it has served its purpose.
After inserting the Progress
Bar code into the cmdAmort_Click event procedure
code, give it a try. That completes this project. There are no required enhancements.

