What’s a Code Library worth without OLE Client applications to use it's functions?
Nothing . . . almost. In fact, many Code Libraries are also standalone programs. Ok, let me rephrase that: Many standalone programs are also Code Libraries. They have EXE extensions and are called OLE Server applications. Excel, Word, Access, and PowerPoint—just to name a few—are all OLE Server applications. A pure Code Library is not a standalone application and it has a DLL extension. In project 7 you created a pure Code Library file (CompInfo.dll). Without another standalone program--an OLE Client application--to access its functions, it would be useless.
In this project in Part A, you will create a simple OLE Client application for your CompInfo.dll code library. In Part B, you will learn how to convert a Code Library into a Component Library. We will discuss the differences between a Code Library and a Component Library when you get to part B.
Part A
Creating an OLE Client application for the CompInfo.dll code library
Run Visual Basic .NET and open your Solution (<your name>.sln).
Important: Before preceding, be sure that the bin folder inside your CompInfo project folder contains a CompInfo.dll file--look for it now. This file should have been created during the last part of project 7. If this file is missing, return to the section in project 7 titled Compiling your Project to create a Code Library file (DLL) and follow the steps there to the end of the project to create your CompInfo.dll file before going on.
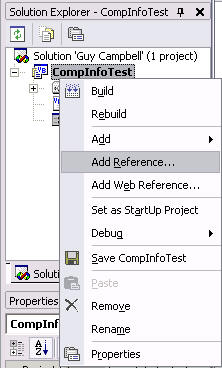
Right-click on the CompInfo project in the Solution Explorer window and select Remove from the context menu. Click the OK button when warned that CompInfo will be removed from the Solution. Drop down the File menu and select New Project under the Add Project menu item. When the Add New Project dialog appears, be sure that the Visual Basic Projects folder is open in the Project Types pane, and that the Windows Application template is selected in the Templates pane. Type CompInfoTest in the Name textbox. Then click the OK button. This creates a new folder inside the \Visual Studio Projects\<Your Name> folder named CompInfoTest:
...My Documents\Visual Studio Projects\<Your Name>\CompInfoTest
Note: When class is over, be sure to follow the instructions at the end of this project that tell you how to copy your project to your floppy diskette so you can take it home with you.
Rename the Form file and change it's Name and Text properties
With the form file (Form1.vb) selected in the Solution Explorer window, so that it's File properties are displayed in the Properties window, change the File Name property to frmCompInfoTest.vb (don't forget to include the .vb extension).
Now click on the form in the Designer window to display it's properties:
- Change the Text property to CompInfo Test
- Change the Name property to frmCompInfoTest
Setting the Startup Object
Right-click on the CompInfoTest project in your Solution Explorer window, click on the Properties item at the bottom of the context-menu. In the CompInfoTest Property Pages dialog drop down the Startup object list and choose frmCompInfoTest and click the OK button.
Adding a Reference to the CompInfo.dll code library
We will begin by adding a Reference to the CompInfo.dll Code Library we created in project 7. Right-click on the CompInfoTest project in the solution explorer window and select Add Reference from the context menu:
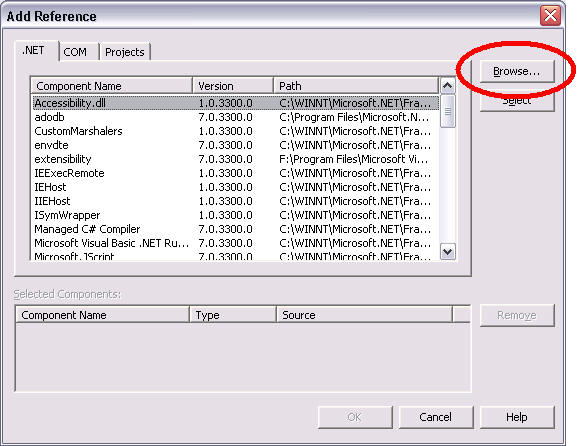
On the Add Reference dialog click on the Browse button (as shown below):
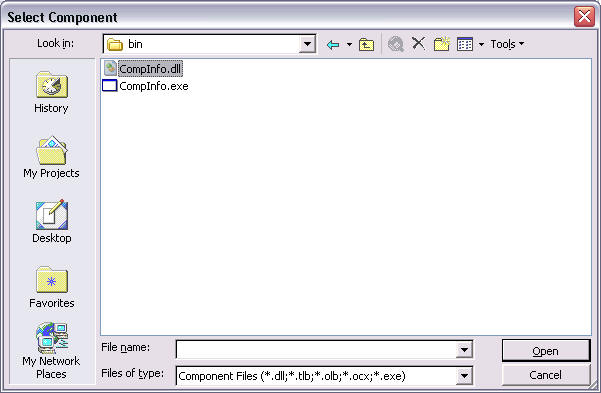
Navigate to the CompInfo.dll file inside the ..\CompInfo\bin folder of your CompInfo project. Be sure you select the DLL file, not the EXE (as shown below), and click the Open button:
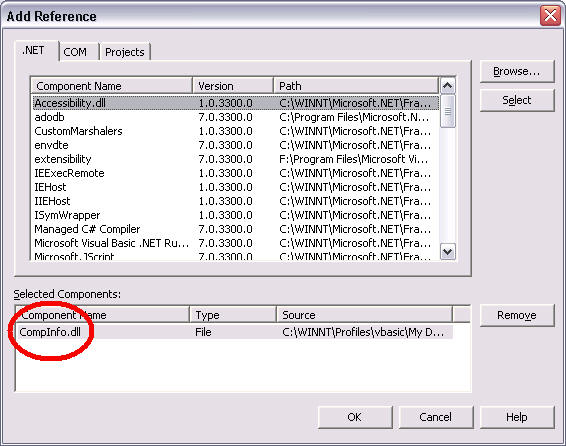
You should now see an entry for the CompInfo.dll code library in the Select Components section at the bottom of the Add Reference dialog (as shown below). Click the OK button:
Once the reference to the CompInfo.dll file is add to the project, you should see an entry for CompInfo inside the References folder of the solution explorer window, as shown:

Using the Object Browser to browse the classes of Code Libraries
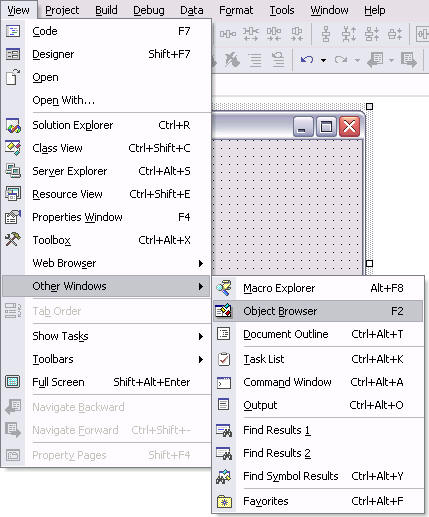
To actually see what classes a Code Library contains, we can use the Object Brower. Drop down the View menu and choose Object Browser under the Other Windows menu item, as shown:
Click on the + box in front of CompInfo item at the top of the Objects pane to expand it and see the four classes it contains (as show below):
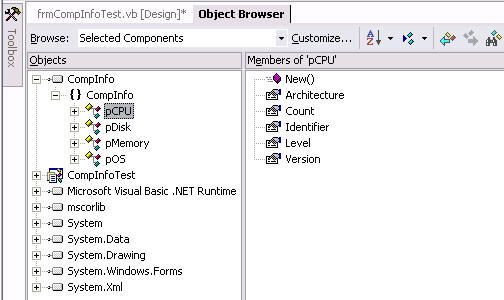
When you click on a class (for example pCPU, as shown above), any properties, methods or other classes it contains are listed in the Members pane on the right.
Close the Object Browser window when you are finished looking at it.
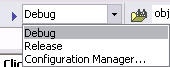
Change the Solutions Configuration option back to Debug
Because the last thing we did in project 7 was change the Solutions Configuration option to Release, it may have kept this setting. Be sure to drop down the Solutions Configuration listbox, on the middle of the standard toolbar, and change it back to Debug so that debugging information is included when we compile our project. Without the inclusion of debugging information, we cannot set break points, and code that generates critical errors will not be highlighted when the program crashes.
Creating the CompInfoTest form
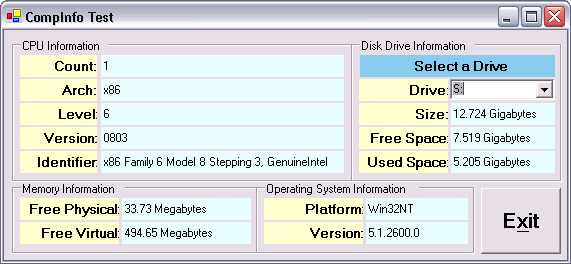
The above illustration is an example of the finished application. We will be constructing this form one GroupBox at a time, and testing it as we go.
Adding the CPU Information groupbox
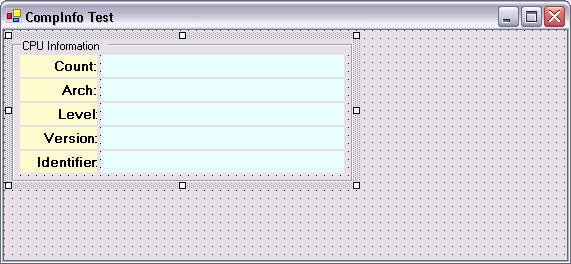
Use the illustration above to guide you as you add a GroupBox to the upper left corner of the form that contains ten Labels with these property settings. Note: Only the Labels on the right will be referenced in code. So the labels on the left keep their default names and the labels on the right get descriptive names:
| GroupBox | |
| Property | Value |
| Text | CPU Information |
| Property | Label | Value | Property | Label | Value | ||||||
| Text | Count: | Name | lblCount | ||||||||
| TextAlign | MiddleRight | TextAlign | MiddleLeft | ||||||||
| Property | Label | Value | Property | Label | Value | ||||||
| Text | Arch: | Name | lblArchitecture | ||||||||
| TextAlign | MiddleRight | TextAlign | MiddleLeft | ||||||||
| Property | Label | Value | Property | Label | Value | ||||||
| Text | Level: | Name | lblLevel | ||||||||
| TextAlign | MiddleRight | TextAlign | MiddleLeft | ||||||||
| Property | Label | Value | Property | Label | Value | ||||||
| Text | Version: | Name | lblVersion | ||||||||
| TextAlign | MiddleRight | TextAlign | MiddleLeft | ||||||||
| Property | Label | Value | Property | Label | Value | ||||||
| Text | Identifier: | Name | lblIdentifier | ||||||||
| TextAlign | MiddleRight | TextAlign | MiddleLeft | ||||||||
Using the Load event procedure to populate the CPU Information labels
Most of the code for this application can go in the form's Load event procedure (frmCompInfoTest_Load). Add this line of code at the top of the frmCompInfoTest_Load event procedure to construct an instance of a pCPU object:
Dim objCPU As New CompInfo.pCPU()
After typing New and a space, the list of available classes that popped up included our CompInfo code library because we had set a Reference to it above. Now all we need to do is set the Text property of the named labels in the CPU Information groupbox to the appropriate properties of objCPU. Add this code to the frmCompInfoTest_Load event procedure:
'Display the CPU Information
lblCount.Text = objCPU.Count
lblArchitecture.Text = objCPU.Architecture
lblLevel.Text = objCPU.Level
lblVersion.Text = objCPU.Version
lblIdentifier.Text = objCPU.Identifier
Testing the program so far
Save the project now. Run the program. Is the CPU Information displayed?
Adding the Memory Information groupbox
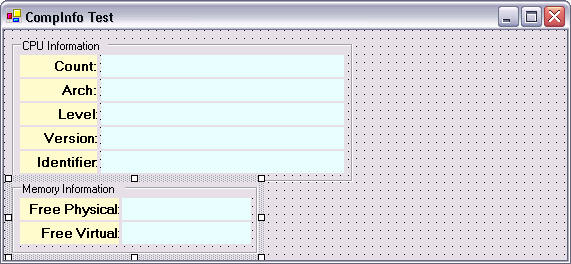
Use the illustration above to guide you as you add a GroupBox to the lower left corner of the form that contains four Labels with these property settings. Note: Like before, only the Labels on the right will be referenced in code, so they get descriptive names:
| GroupBox | |
| Property | Value |
| Text | Memory Information |
| Property | Label | Value | Property | Label | Value | ||||||
| Text | Free Physical: | Name | lblFreePhys | ||||||||
| TextAlign | MiddleRight | TextAlign | MiddleLeft | ||||||||
| Property | Label | Value | Property | Label | Value | ||||||
| Text | Free Virtual: | Name | lblFreeVirt | ||||||||
| TextAlign | MiddleRight | TextAlign | MiddleLeft | ||||||||
Using the Load event procedure to populate the Memory Information labels
Add this line of code at the top of the frmCompInfoTest_Load event procedure to construct an instance of a pMemory object:
Dim objMem As New CompInfo.pMemory()
Recall that the FreePhys, and FreeVirt properties of the pMemory class are String values. Look at this code for the declaration of the FreePhys property from project 7:
ReadOnly Property FreePhys() As String
The As String specification at the end of this property declaration says that FreePhys returns a String value. That means that if the amount of free physical memory was 64,394 kilobytes, the value that FreePhys would return would look like this:
64394
To make this number easier to read, let's convert it from kilobytes into megabytes, and add two decimal places to it. So that the above number would look like this:
64.39
We can use the CDbl conversion function to convert the strings returned by FreePhys and FreeVirt into numbers. Then we can divide the values by 1024 to convert kilobytes into megabytes. Finally, the Format function makes it easy to add two decimal places to the number. Add the following code to the frmCompInfoTest_Load event procedure (after the code that sets the values for CPU Information groupbox) :
'Display the Memory Information, converted to megabyte
' values with 2 decimal places.
lblFreePhys.Text = Format(CDbl(objMem.FreePhys) / 1024, _
"#,##0.00") & " Megabytes"
lblFreeVirt.Text = Format(CDbl(objMem.FreeVirt) / 1024, _
"#,##0.00") & " Megabytes"
Testing the program so far
Save the project now. Run the program. Is the Memory Information displayed and formatted correctly?
Adding the Operating System Information groupbox
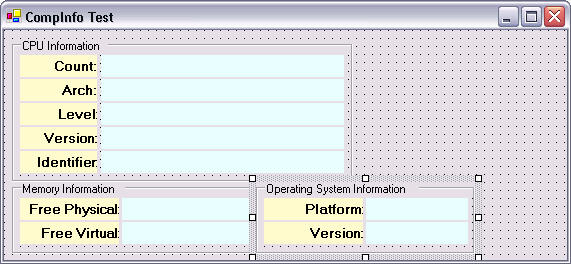
Use the illustration above to guide you as you add a GroupBox to the lower middle of the form that contains four Labels with these property settings:
| GroupBox | |
| Property | Value |
| Text | Operating System Information |
| Property | Label | Value | Property | Label | Value | ||||||
| Text | Platform: | Name | lblOSPlatform | ||||||||
| TextAlign | MiddleRight | TextAlign | MiddleLeft | ||||||||
| Property | Label | Value | Property | Label | Value | ||||||
| Text | Version: | Name | lblOSVersion | ||||||||
| TextAlign | MiddleRight | TextAlign | MiddleLeft | ||||||||
Using the Load event procedure to populate the Operating System Information labels
Add this line of code at the top of the frmCompInfoTest_Load event procedure to construct an instance of a pOS object:
Dim objOS As New CompInfo.pOS()
No special formatting is required for the operating system's Platform and Version values, so add the following code to the frmCompInfoTest_Load event procedure (after the code that sets the values for the Memory Information groupbox) :
'Display the Operating System Information
lblOSPlatform.Text = objOS.Platform
lblOSVersion.Text = objOS.Version
Objects that are constructed within a procedure are usually deconstructed automatically when the procedure exists and they fall out of scope. But just in case, it's always a good idea to deconstruct objects when you are finished using them. So add the following code to the bottom of the frmCompInfoTest_Load event procedure:
'Deconstruct the pCPU, pMemory, and pOS objects
objCPU = Nothing
objMem = Nothing
objOS = Nothing
By setting an object's reference variable to Nothing, the instance of that object is destroyed. We can always construct new instances of the objects later if we need them.
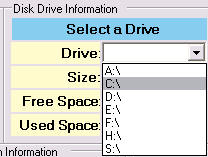
Adding the Disk Drive Information groupbox
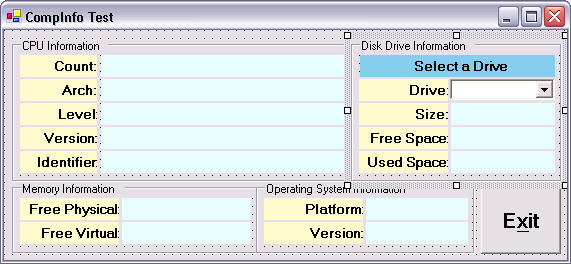
Use the illustration above to guide you as you add a GroupBox to the upper right corner of the form that contains eight Labels and a ComboBox with these property settings:
| GroupBox | |
| Property | Value |
| Text | Disk Drive Information |
| Property | Label | Value | (this space available for lease) | ||||||||
| Text | Select a Drive | ||||||||||
| TextAlign | MiddleCenter | ||||||||||
| Property | Label | Value | Property | ComboBox | Value | ||||||
| Text | Drive: | Name | cboDrives | ||||||||
| TextAlign | MiddleRight | ||||||||||
| Property | Label | Value | Property | Label | Value | ||||||
| Text | Size: | Name | lblSize | ||||||||
| TextAlign | MiddleRight | TextAlign | MiddleLeft | ||||||||
| Property | Label | Value | Property | Label | Value | ||||||
| Text | Free Space: | Name | lblFreeSpace | ||||||||
| TextAlign | MiddleRight | TextAlign | MiddleLeft | ||||||||
| Property | Label | Value | Property | Label | Value | ||||||
| Text | Used Space: | Name | lblUsedSpace | ||||||||
| TextAlign | MiddleRight | TextAlign | MiddleLeft | ||||||||
Using the Load event procedure to populate the Drives combobox
Before we can get information about the drives on the computer, we need to find out what drives are installed. We can use the GetLogicalDrives method of the System.Environment class to determine what drives are installed on the computer. GetLogicalDrives returns a string array that contains the drive letters of all the installed drives--one in each element of the array--in this format: <drive letter>:\ or for example: C:\. We can use a command like this to create and fill a string array named sDrives with the installed drives on the computer:
'Copy the contents of the string array returned by the
' GetLogicalDrives method into an sDrives string array.
Dim sDrives As String() = System.Environment.GetLogicalDrives()
'Clear the contents of the combobox before filling it
cboDrives.Items.Clear()
Add the two lines of code above at the end of the frmCompInfoTest_Load event procedure (below the objOS = Nothing line).
Once the sDrives array contains the drive letters of the valid drives on the computer, we need to populate the cboDrives combobox with those values. We could add the drive letters to the cboDrives combobox like this (don't type this code):
cboDrives.Items.Add(sDrives(0))
cboDrives.Items.Add(sDrives(1))
cboDrives.Items.Add(sDrives(2))
etc...
But we don't know how many elements the sDrives array contains! Unlike a collection, an array variable has no Count property that tells you how many items it contains. We could use the old fashioned UBound() function to determine the number of elements in the sDrives array, like this (don't type this code):
Dim i As Integer
'The UBound functions returns the index value of
' the last element in an array.
For i = 0 to UBound(sDrives) - 1
cboDrives.Items.Add(sDrives(i))
Next i
But with VB.NET, string variables now have a Length method that returns the total number of elements in the array. So we could use it instead, like this (don't type this code):
Dim i As Integer
'The Length method returns the total number
' of elements in an array.
For i = 0 to sDrives.Length() - 1
cboDrives.Items.Add(sDrives(i))
Next i
While the two methods I described above would work just fine, there is a third way that we will actually use. Not because it is better, but because I want you to become more familiar with it. Instead of a For-Next loop, we will use a For-Each loop. We actually used For-Each loops twice in project 7 to create the FreePhys, and FreeVirt properties of the pMemory class. Here is how the For-Each loop version of the code to fill the cboDrives combobox looks:
'The String variable to grab each element of the array
Dim sDrive As String
For Each sDrive In sDrives
cboDrives.Items.Add(sDrive)
Next
Add the above code at the end of the frmCompInfoTest_Load event procedure. With the For-Each loop method, we don't need to determine how many elements of the array there are. This is especially convenient in situations where determining the number of items in the array or collection is not a simple process.
Testing the program so far
Save the project now. Run the program. Use it's down-arrow and take a look inside the cboDrives combobox. Are all the drives on the computer listed:
Your drive letters list will vary. When the user selects a drive from the list, we want the Size, Free Space, and Used Space information to be displayed. We can use the SelectedIndexChanged event procedure of cboDrives to determine when the user has selected an item in the drive list.
Begin by adding this line of code to the cboDrives_SelectedIndexChanged event procedure to construct an instance of a pDisk object:
Dim objDisk As New CompInfo.pDisk()
Recall that our Size, Free Space, and Used Space methods require the programmer to pass them the drive letter in this format: c: That is, the drive letter followed by a colon (:), like this for example:
objDisk.Size("c:")
The entries in the cboDrives combobox include a backslash (\) as their last character, like this: c:\, (as shown in the above illustration). We need to trim off the backslash (\) character from the end of the string when we pass the selected value from the cboDrives combo box to the methods of objDisk. Fortunately this is really easy to do with the SubString method and Length property of cboDrives.Text, like this:
Dim sDrive As String = _
cboDrives.Text.SubString(0, cboDrives.Text.Length - 1)
The first parameter we pass to SubString (0) specifies the position in the string to start the extraction (0 is the first character), the second parameter (cboDrives.Text.Length - 1) is how many characters from the starting location to extract. By starting at character position 0 and extracting to the Length of the string minus 1, we trim off the trailing backslash (\). Add the above line of code to the cboDrives_SelectedIndexChanged event procedure.
Because the values returned by the Size, Free Space, and Used Space methods are strings that represent gigabyte values, we will need to use CDbl again to convert them into numbers that can be formatted to with the Format function. This time we will format the number to three decimal places, so that information about zip and floppy drives can be displayed. Add this code to the bottom of the cboDrives_SelectedIndexChanged event procedure:
'Use the Size, FreeSpace, and UsedSpace methods of
' pDisk class to determine info about sDrive.
lblSize.Text = Format(CDbl(objDisk.Size(sDrive)), _
"#,##0.000") & " Gigabytes"
lblFreeSpace.Text = _
Format(CDbl(objDisk.FreeSpace(sDrive)), _
"#,##0.000") & " Gigabytes"
lblUsedSpace.Text = _
Format(CDbl(objDisk.UsedSpace(sDrive)), _
"#,##0.000") & " Gigabytes"
objDisk = Nothing
Testing the program so far
Save the project now. Run the program. Use select a drive in the cboDrives combobox (if you pick drive A, make sure you have a floppy diskette inserted). Does it work?
As a final detail, add an Exit button to the lower right corner of the form:
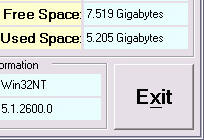
That completes Part A - Creating an OLE Client application for the CompInfo.dll code library
Part B
Converting a Code Library into a Component
Begin by removing the CompInfoTest project from your solution. Right-click on CompInfoTest in the solution explorer window and select Remove from the context menu. Now pull down the File menu, choose Add Project, and click on the Existing Project item. Navigate to your CompInfo project folder (from project 7), open it, and add the CompInfo project to the solution.
Adding a Component to the CompInfo code library project
The first step to converting the CompInfo code library into a Component is to add a Component file to the project. Right-clicking on the CompInfo project in the solution explorer window and selecting Add Component from the Add fly-out menu (as shown below):
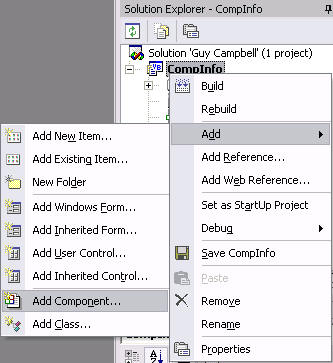
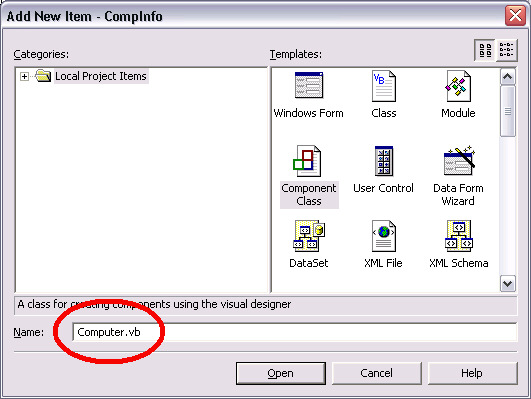
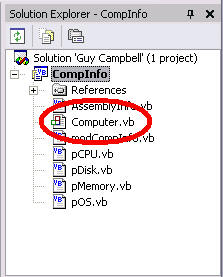
On the Add New Item dialog, be sure to change the name from the default Component1.vb to Computer.vb, as shown below, and then click the Open button:
Take a look in your solution explorer window and you should now see a new Computer.vb component file as part of the project:
While a Class Library can contain many different objects (with each Class file containing one or more objects), none of those objects actually exist until you construct an instance of them, with a command like this:
Dim objCPU As New CompInfo.pCPU()
By adding a Component file to the CompInfo class library and constructing instances of all the classes within the Component file, we can have access to all of the objects that the class library contains without manually constructing them ourselves. We do this by privately constructing all the objects within the Component file and adding Properties to the Component file that return a reference to each of the private objects. This is called exposing objects.
Constructing the four Objects to be exposed through Computer.vb
Display the code view of the Computer.vb component file, and add the following code to the Declarations section:
Private objCPU As New pCPU()
Private objDisk As New pDisk()
Private objMem As New pMemory()
Private objOS As New pOS()
These are the for objects (constructed from classes here) that we will expose through the component file Computer.vb. It's important to declare these four object constructors as Private, so that programmers will not be able to access these objects directly through our Computer component. We will make these instances of pCPU, pDisk, pMemory, and pOS available, but only as the return value of four properties.
Adding four Object properties to Computer.vb
Insert a blank line above the End Class statement in the code view of the Computer.vb component file and add the following four properties:
'The CPU property returns the private instance of pCPU
ReadOnly Property CPU() As pCPU
Get
Return objCPU
End Get
End Property'The Disk property returns the private instance of pDisk
ReadOnly Property Disk() As pDisk
Get
Return objDisk
End Get
End Property'The Memory property returns the private instance of pMemory
ReadOnly Property Memory() As pMemory
Get
Return objMem
End Get
End Property'The OS property returns the private instance of pOS
ReadOnly Property OS() As pOS
Get
Return objOS
End Get
End Property
Save the project now.
Rebuilding your Code Library into a Component Library
Take a look at the Solution Configurations listbox and change the Debug setting to Release to exclude debugging information from the finished CompInfo.dll file:
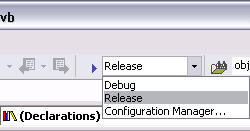
Note: The inclusion of debugging information in the compiled version of your project allows you to step though the program so you can debug it during the program development process. To significantly speed up, and reduce in size, the final version of your program, change the Solution Configurations option from Debug to Release when compiling your applications prior to release.
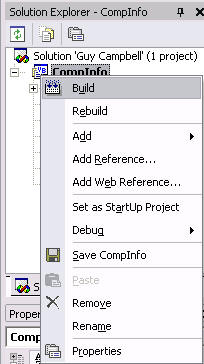
Right-click on the CompInfo project in the solution explorer window and select the Build menu item, as shown:
Once the compilation is complete (after just a few seconds), you should see this message in the Output window at the bottom of the screen:
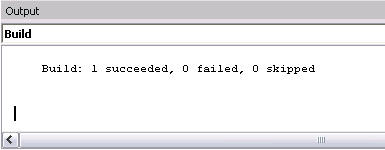
Now your CompInfo.dll file has been transformed from Code Library into a Component Library!
Using your new Component Library
Here we go again! We need to remove the CompInfo project from your solution. Right-click on CompInfo in the solution explorer window and select Remove from the context menu. Now pull down the File menu, choose Add Project, and click on the Existing Project item. Navigate to your CompInfoTest project folder, open it, and add the CompInfoTest project back to the solution.
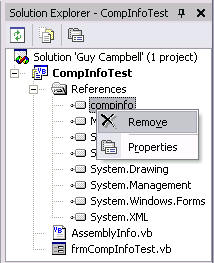
The first thing we need to do after adding the CompInfoTest project back to the solution is remove the reference to the old CompInfo code library. Open the Reference folder in the solution explorer window and right-click on the CompInfo reference item (as show below). Select the Remove item to remove the CompInfo reference from the project:
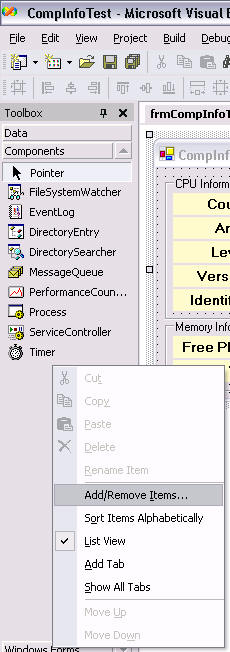
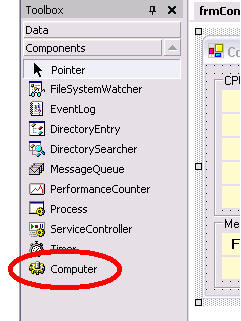
Open the Control Toolbox and click on the Components button (at the top of the toolbox as shown below) to activate it. Notice that there are about ten intrinsic Components already included in the list. We will now add our Computer component to the list. Right-click anywhere in the area where the other components are listed on the Control Toolbox and select Add/Remove Items... from the context menu, as shown below:
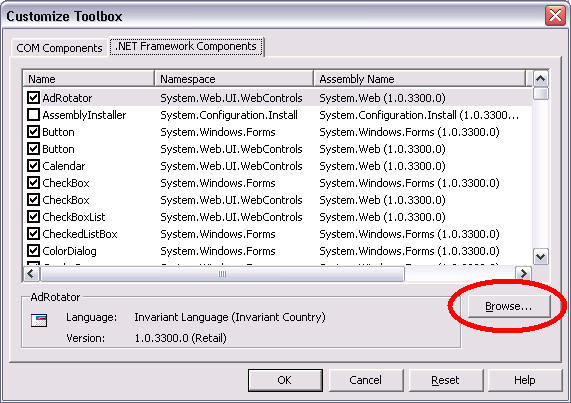
When the Customize Toolbox dialog appears, click on the .NET Framework Components tab. This is a list of all of the Components that are included with VB.NET. Click on the Browse button (as show below) so that we can add our CompInfo.dll component library to the list:
Navigate to the the bin folder inside the CompInfo project folder (as shown below) and select the newly created CompInfo.dll file (Note: It is not inside the bin folder inside CompInfoTest). Click the Open button:

You should now see a new Computer entry in the .NET Framework Components list, as shown below:
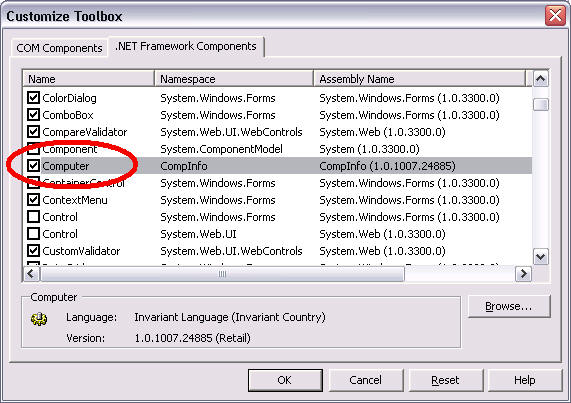
Notice that the Namespace column says CompInfo. That is because the Namespace value for project 7 was not modified when we added a component file to the project. In fact, we could have added multiple components to the project and the Namespace would remain unchanged. But the name of the Computer component is listed in the Name column. The Name columns lists only the Components in the CompInfo.dll file. Now click the OK button to add your Computer component to the Components list in the Toolbox, as shown below
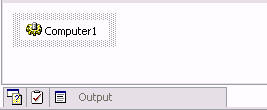
To add the Computer component to your project, double-click on the new Computer item in the Toolbox now. You should then see a new Computer1 item in the Component Tray at the bottom of the designer window, like this:
Modifying the code to use the new Computer Component
Go to code view window of frmCompInfoTest, and delete these three object constructor statements from the frmCompInfoTest_Load event procedure:
Dim objCPU As New CompInfo.pCPU()
Dim objMem As New CompInfo.pMemory()
Dim objOS As New CompInfo.pOS()
Recall that we added constructors for these objects to the Declaration section of the Computer component. So we don't need to create them again here. Let's take a look at the first line of code that displayed the number of CPU's in the computer by using the Count property of the pCPU object:
'Display the CPU Information
lblCount.Text = objCPU.Count
Modify this line of code to use the new Computer1 component, like this:
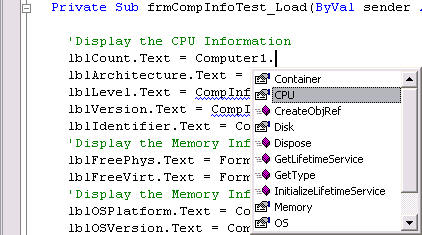
Notice that Computer1 has a CPU property.
Important: Recall that the CPU property of our Computer component returns a reference to the pCPU object that we privately constructed in the Declarations section of the component file.
Select CPU from the properties/methods pop-down list and type a dot (.) to see this:
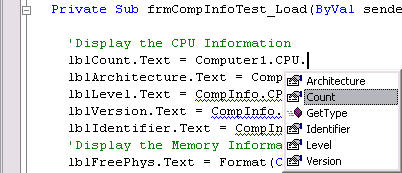
All the properties of the pCPU object are listed! Select Count so that the finished line of code looks like this:
'Display the CPU Information
lblCount.Text = Computer1.CPU.Count
Continue modifying the other lines of code in the frmCompInfoTest_Load event procedure to use the Computer1 component. For example, change:
lblArchitecture.Text = objCPU.Architecture
lblLevel.Text = objCPU.Level
lblVersion.Text = objCPU.Version
lblIdentifier.Text = objCPU.Identifier
To:
lblArchitecture.Text = Computer1.CPU.Architecture
lblLevel.Text = Computer1.CPU.Level
lblVersion.Text = Computer1.CPU.Version
lblIdentifier.Text = Computer1.CPU.Identifier
Continue modifying the remaining code in the frmCompInfoTest_Load event procedure to use the Computer1 component. Don't forget to delete these three lines:
objCPU = Nothing
objMem = Nothing
objOS = Nothing
Important: Don't forget to also modify the code in the cboDrives_SelectedIndexChanged event procedure to use the Computer1 component.
Recall that before we added our custom Computer component to this project we removed the reference to the CompInfo code library from the References folder in the solution explorer window. Take a look inside the References folder now (as shown below). Notice that the reference to CompInfo is back! This was set automatically by the addition of the Computer component to the project. When a Component references a code library, as the Computer component does, these references are inherited by the project that uses that component automatically:
Testing the program
Before running the project, be sure to change the Solutions Configuration option back to Debug. Save the project and run it. Does it work?
A Code Library verses a Component
We've done this program both ways. First with a Code Library, where we had to construct the objects as we needed them. Second with a Component, where the objects are constructed and exposed through the component, so no explicit construction was required. If you can recall back to projects 2 and 3, we've actually done this before. In project 2 we used Connection, Data Adapter, and Dataset components to access a database. In project 3 we used no components at all, but instead constructed these objects ourselves to do the same thing.
While a Class Library doesn't need to contain components, where ever you find a Component you will also find a Class Library. Microsoft doesn't really distinguish between the two. As our CompInfo.dll file is right now, nothing is stopping a programmer from setting a reference it and constructing the pCPU, pDisk, pMemory, and pOS objects manually—as we did in part A of this project. Or they can add the CompInfo.dll file to the control toolbox as the Computer component. Then when they insert a Computer component into their project they can access the pCPU, pDisk, pMemory, and pOS objects that are pre-constructed and exposed through it.