Advanced Visual Basic - Project 4
Adding a Menu, About dialog and Help
File to Database Snooper
This Project will add enhancements to
the Database Snooper program
As it currently stands, the Database Snooper program is
incomplete. A primary feature of virtually all Windows applications is a comprehensive
on-line help system. Help systems come in a couple of strengths: A Help File provides a
basic level of user assistance, while Context
Sensitive Help provides a higher level of user aid. This
project will begin by adding a Help File to the Database Snooper program
(Context Sensitive Help comes in project 5).
The Fourth Project
This project will be an enhancement of the last project (Project
3).
Begin by launching Visual Basic.
- Drop down the File menu and
choose Open Project.
- Open your data3 project.
- Change the form’s Name
property to frmSnooper
- Select DatabaseSnooper Properties
under the Project menu. Make sure the General tab is selected. Make frmSnooper
the Startup Object. Now click the OK button.
- Drop down the File menu and
choose Save frmData3 As. Save the form as Snooper.frm. Now drop down the File
menu again and choose Save Project As. Save the
project as Snooper.vbp.
The common way to access an application’s Help
File is via the Contents item
under its Help dropdown menu. In an effort to maintain
the Windows Program Design Philosophy that gives all windows applications a
consistent look and feel, you will now add a menu structure to your project which will
include a Help menu. Make sure the Form is
selected and use the Menu Editor to create the menu structure outlined below (suggested Names for
the menu items follow their Captions):
Level 1
Caption |
Level 2
Caption |
Suggested
Name |
| &File |
|
mnuFile |
| |
&Open Database |
mnuOpen |
| |
— |
mnuBrk (a single hyphen) |
| |
E&xit |
mnuExit |
| &Help |
|
mnuHelp |
| |
Contents |
mnuContents |
| |
Help on help |
mnuHelpOnHelp |
| |
— |
mnuBrk2 (a single hyphen) |
| |
About |
mnuAbout |
I leave it to you to supply functionality to the menu items under
the File dropdown menu (Open Database and Exit). Do so
before continuing.
Creating an About Dialog.
Add a new Form to the project:
- Right-click on the Forms
folder in the Project Explorer window.
Choose the Add menu item and select Form from the Context menu. (Or you can choose Add Form from the Project
drop-down menu). Then click on the About
Dialog form in the Add Form dialog box. Click the
Open button.
- The Name of the new form is already set to frmAbout for you. Choose Save
frmAbout As from the File menu. Give the
new Form the name frmAbout.frm.
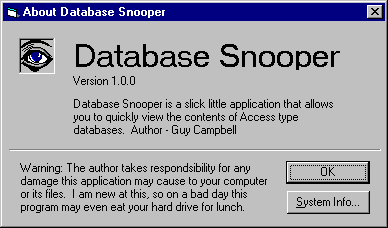
Before you begin modifying the captions of the different labels on
your new About Dialog, I want you to View the code window for the frmAbout form. You’ll notice that a lot of code has
already been entered for you (Including all the code for the System Info and OK
buttons). Take a look at this code from the Form_Load
event procedure:
Me.Caption = "About " & App.Title
lblVersion.Caption = "Version " & App.Major & "." &
App.Minor & "." & _
App.Revision
lblTitle.Caption = App.Title
The Me object is another way of referring to the frmAbout Form. Don’t modify this code! Notice the App.Title, App.Major, App.Minor, and App.Revision properties. Go ahead and set these properties by selecting DatabaseSnooper Properties under the Project drop-down menu now.
Click on the Make tab. Set the Application
Title property to Database Snooper. Notice the other settings
that are available. Leave the other settings unchanged for now. Then click the OK
button.
View the frmAbout form
again. The only Labels whose Caption properties must be set manually
are lblDescription and lblDisclamer. You don’t need to copy my example above, but you get the idea (I set
the Font size of the lblTitle label to 24 pt.). Don’t bother
setting the Caption properties of the other Labels or the Form’s
Caption, since they are set automatically by the code in the Form_Load event
procedure. Note:
The System Info button on your About Dialog requires that you have installed
the MsInfo application that comes with most Microsoft products (i.e. Microsoft
Office). If your System Info button isn’t working, it’s probably
because you don’t have this application installed. I believe you can download the
latest version of MsInfo for free from http://www.microsoft.com/, check out the free downloads area.
Close the Code
View and Object View windows for the frmAbout form (you
won’t need to access them again), and open the Code View window for the frmSnooper form. Add the
following code to the mnuAbout_Click event procedure of the frmSnooper
form:
frmAbout.Show
That takes care of the About dialog box. Save the project,
and test it if you like.
A simplified description
of the process of creating a Help File follows:
- Create the Help Text File (RTF) with a Rich Text Format capable editor.
- Create the Help Project File (HPJ) with a Text editor.
- Compile the Help Text File using the Help Compiler and
a Help Project File. This generates the actual Help File (HLP).
- Declare a reference to the Help File in your Visual
Basic application.
Creating the Help Text File
Rich Text Format—it sounds a lot more glamorous than it is—is a file format that
supports Underline, Double-Underline, and Hidden text attributes. Microsoft Word, Wordpad, and most
big-name Windows word processors support the Rich Text Format. Why do you need Underline,
Double-Underline, and Hidden text in a Help Text File?
- A Help File contains topics that are linked together with text called Hypertext.
Hypertext are "jump phrases" that you designate
while creating a Help Text File. Here’s an example of a Hypertext
phrase (Open Database) embedded in a sentence from a Help Text File:
Click the Open
Database button.
When creating a Help Text file Double-Underline is how you
designate a Hypertext phrase. Note: Because HTML documents do not support double underline text,
phrases in this document that are supposed to represent double underlined text will be
displayed as bold, italized and underlined like this:
Open Database
- Hypertext is
linked to other text by a Tag phrase. Here is the above example as it would appear in a Help
Text file with the Tag phrase showing.
Click the Open
DatabaseOPEN_DATABASE button.
The Tag phrase (OPEN_DATABASE) is inserted immediately after the Hypertext phrase—no space
in-between. It's attribute is set to Hidden text. The Tag phrase serves as a link to other text on another page. (When the user
clicks on the Hypertext phrase—which appears as green underlined text in the compiled
version of the help text file—the text linked by the Tag phrase is displayed.)
- Each Tag phrase is linked to other text. You type that other text
onto its own page and use a custom Footnote symbol to link it to the Tag phrase.
Here’s an example of the previous Hypertext and Tag phrase, with the linked text on its own page.
Click the Open
DatabaseOPEN_DATABASE button.
<Page Break here>
# Opening a Database File
Open an "Access" Database file by clicking the Open
Database button. Or select Open Database from the File dropdown menu.
<Page Break here>
In the above example from a Help Text file, the Open Database Hypertext phrase is followed immediately by the OPEN_DATABASE Tag phrase. The Tag phrase is
linked to the page with the title Opening a Database File by the custom Footnote
symbol # (which must be the first item on the new page). The text of the footnote
itself (not shown above) looks like this:
#OPEN_DATABASE
Notice that this footnote text is identical to the hidden Tag
phrase attached to the link text (Open
Database).
Note: Two completed versions of the snooper.rtf
help text file have been included with this project (snooper.rtf and snooper2.rtf).
Don’t try to open these files with a normal Text file
editor like Notepad. Creating a Help text file is easy once
you know how. But unless I’m looking over your shoulder as you create this type of
file for the first time, far too many small things can go wrong that would prevent the Help
text file from compiling. The following instructions (starting below at the next
bulleted paragraph and ending at the Creating
the Help Project File with Help Workshop heading later
on), shows you how to create a Help text file with Microsoft Word. If you
have Microsoft Word and would like to try following these instructions to create
your own version of this help file, you may do so. However, you are also free to just use
the completed Help text files that are contained in the self-extracting archive
that you can download by clicking on this link.
If you want to use the Help Text files that I’ve included, please read through
the instructions below anyway so that you get the idea of how it’s done, then go
directly to the section titled: Creating
the Help Project File with Help Workshop.
- Use any version of Microsoft
Word (or any editor that can save a document in Rich
Text Format) to create the Help Text file that begins below. The
following instructions are specific to Word, but they should also apply to any word
processor that supports Rich Text Formatted files.
- Once in Word, set the view to Normal (choose Normal under the View dropdown
menu). Engage the Show/Hide button on the Standard toolbar so that Hidden
text will be visible.
- Be sure to save the file as snooper.rtf in Rich Text Format
(choose Save As and select the Rich Text Format (*.rtf) item from the Save
File As Type dropdown list box displayed at the bottom of the Save As dialog
box).
- To insert the Footnotes at the start of each of the link
pages, enter a Page Break manually by pressing Ctrl+Enter. Place the
insertion point at the start of the new page (Click at the top of the new page) and
choose the Footnote item on the Insert dropdown menu. Click on the Custom
Mark textbox and type a # symbol (Shift+3), then click the OK
button. For the Footnote’s value enter the Tag phrase from the Hypertext that it is
associated with.
Attribute Table (this is how you toggle on and off
these attributes in Word):
| Attribute |
To Turn On/Off |
Looks Like |
| Double-Underline |
Ctrl+Shift+D |
Double-Underlined Text |
| Underline |
Ctrl+U |
Underlined Text |
| Hidden Text |
Ctrl+Shift+H |
Dotted Underlined Text |
To Insert a Page break press Ctrl+Enter.
Below this horizontal line is an example of what you're going to
type into Word. Try to duplicate the format as best you can. Single underlined text
appears underlined, double underlined text is bold, italized and underlined like this Open Database.
Database Snooper Help
The Database Snooper--A quick and easy way to view Access (MDB) style databases. When you load a
database into Database Snooper, you can select from a listing of its Tables and
view the first 10 fields of every record. Database Snooper even has display support
for Tables that contain an OLE field (pictures). You cannot accidentally change field
values, or record structures in Database Snooper. Database Snooper is the Safe,
Fast, and Easy way to view (MDB) databases.
The Database Snooper Menu
| File Menu Items |
Help Menu Items |
| Open DatabaseExit |
ContentsHelp on helpAbout |
<Page Break> - (Insert page breaks by pressing Ctrl-Enter)
# Opening a Database File
Open an Access
database file by clicking the Open Database button. Or select Open Database from
the File dropdown menu.
<Page Break>
# Exiting Database Snooper
Exit Database Snooper by clicking the Exit button. Or select Exit
from the File dropdown menu.
<Page Break>
# Getting Help On Help
Selecting Help on help from the Help dropdown menu activates the Windows
Help on help feature. An in-depth explanation (with examples) of how to use the help
features of Windows applications is displayed.
<Page Break>
# About Database Snooper
Selecting About from the Help dropdown menu displays a dialog box that
lists the Name of the author, program Version Number, and latest Revision
Date.
<Page Break>
# You’re looking at it. It’s this screen.
<Page Break>
# Access databases created with Microsoft Access version 2.0 or later.
<Page Break>
# In Microsoft Access, Tables are a collection of Records,
which in turn are comprised of the Fields where the actual data is stored.
This is how the Footnotes should appear in the Footnote
Viewing Window when you are finished:
# OPEN_DATABASE
# EXIT
# HELP_ON_HELP
# ABOUT
# CONTENTS
# ACCESS
# TABLES
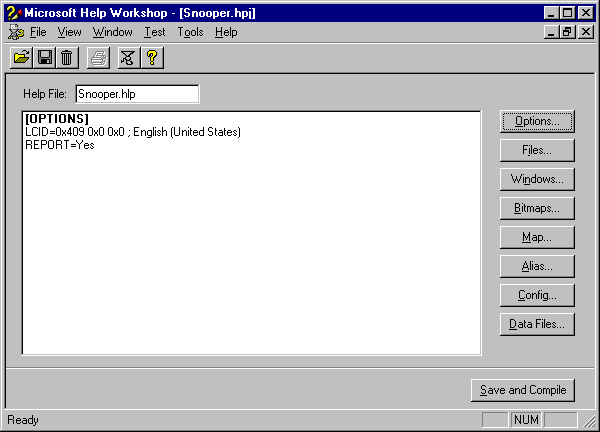
Creating the Help Project File with
Help Workshop
Help Project Files are plain Text files (TXT). So any Text
editor can be used to create them. However, we’re not using a Text editor to
create our Project File. Instead we’re using a utility that is supplied with
Visual Basic called Help Workshop. To use this utility at home, you’ll need to install it (Run the Setup
program located in the \Common\Tools\vb\hcw folder on the VB
version 6.0 CD). After installation is complete, you’ll find a new Help Workshop group
under Programs on the Start menu).
- Run the Help Workshop program (students in the lab, you'll
find it in the Microsoft Help Workshop group under Programs on the Start menu).
- Select the New item on the Help
Workshop’s File dropdown menu.
- Choose Help Project from the New
dialog, and click the OK button.
- Select the folder where your snooper.rtf file is stored
in the Save In dropdown listbox, type just Snooper
(no extension!) for the help project filename
and click the Save button.
Your screen should look like the above example. As you can see, an OPTIONS
section has already been added for you. Other OPTION parameters are available
through the Option button on the right. However, no other OPTIONS need to be
set for this project.
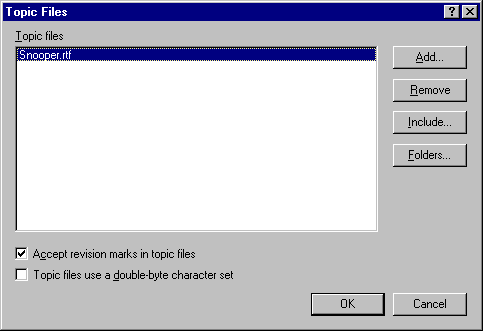
- Click on the Files button on the Help Workshop window.
The Topic Files dialog is where you select the RTF files
that you help file will be built from. Click the Add button and select the Snooper.rtf file (not Snooper2.rtf if you've downloaded the pre-created help text
files). The Topic Files dialog should look like the example above. Then click the OK
button.
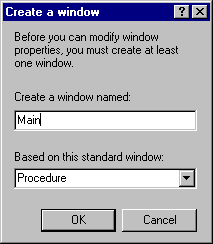
- Now click on the Windows button on the right side of the Help
Workshop window.
- Enter Main for the window name (Create a window named), and click the OK
button.
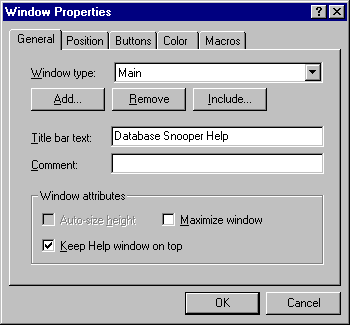
Above is an example of the Windows Properties dialog which
appears next. Type Database Snooper Help for the Title bar text. Now click on the Position tab at the top
of the dialog, and click the Auto-Sizer button on the Position dialog to
display the following dialog.
The Help Window Auto-Sizer is a window that you can
reposition and adjust, so that you can set the initial size and position of your help
window. Make it a lot wider and center it on the screen. Then click the OK button
on the Auto-Sizer window, and click the OK button on the Position dialog
to get back to the main Help Workshop window.
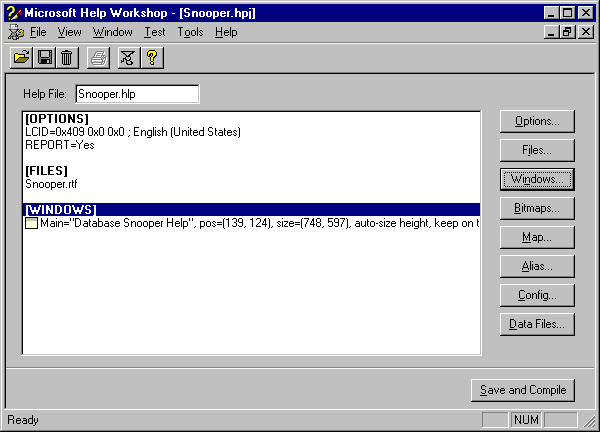
This is how it should look when it’s done (the pos and size
numbers under the WINDOWS parameter may be different on yours, that’s okay).
Let’s try compiling your help file (which, if all goes well, will create your Snooper.hlp
help file). Click the Save and Compile button at the bottom right corner of the window.
An example of the Compilation window is shown above. The most
important part are the last 3 lines:
Created Snooper.hlp, 10903 bytes
Compile time: 0 minutes, 1 second
0 notes, 0 warnings
Yours may differ slightly from the lines above (ignore any Warnings
as they usually won’t prevent your Help file from working properly), and
that’s okay as long as it says that it did create the help file. If the help file was not created because of some
errors, then you need to minimize the Help Workshop window, open your snooper.rtf
file with Word, fix the cause of the errors, save the file and try
again. When you finally succeed, you can exit from the Help Workshop program and
then continue (If you’re using the snooper.rtf file that I’ve
included with this project, you should have no compilation errors).
Declare a reference to the Help File
in your Visual Basic application
Ah, the last step. It’s about time. Run Visual Basic and
load snooper.vbp.
Select the DatabaseSnooper
Properties item from the Project dropdown
menu. Make sure the General tab is selected. For the Help File
Name enter a:\snooper.hlp. Click the OK button. Now all you need to do is add a couple of WinHelp
API calls to your mnuContents and mnuHelpOnHelp click event
procedures (I’ll show you how in a minute).
Before you can add those calls, you must enter the following API
declaration into your program. But where?
Declare Function WinHelp Lib "User32"
Alias "WinHelpA" _
(ByVal hWnd As Long, ByVal lpHelpFile As String, _
ByVal wCommand As Long, ByVal dwData As Long) As Long |
Adding a Module to your Project
Unlike a Form which has a visible (Object) part (the
form itself) and Code part, a Module only has a Code part. The General
Declaration section of a Module (not to be confused with the generic term module
which includes Form files and Module files) is the only place in
your project you can declare Public (Global in the old days) variables. It is also where you must
declare API functions so that they will have the Scope that makes them
callable from any other module (Form, Module, etc.) within
your project.
Select Add Module from the Project dropdown menu. Choose Module from
the Add Module dialog and click the Open button. Press F4 to display
the Properties Windows if it isn't showing and you’ll notice that the only
property a Module has is Name. Set the Module’s Name property to modSnooper. Press Ctrl+R
to view the Project Explorer window, if it’s not already visible. You
should see a new Module folder, which contains your modSnooper module.
Select Save modSnooper As from the File dropdown menu. Save the Module file as modsnoop.bas.
Open the code window of your new modSnooper Module and add the
code for the WinHelp API declaration shown above. In addition to the
declaration for WinHelp, you will also need to declare a couple of Public Constants.
The WinHelp function needs to be passed a Command value that tells it
whether to open your Help File or open Windows’ Help on Help feature.
Here are the Public Constants:
'Display the Project’s Help File
Public Const HELP_INDEX = &H3
'Display Help on Using Help
Public Const HELP_HELPONHELP = &H4
Add these lines below the WinHelp declaration structure you
just added to the General Declaration section of modsnooper.
Add the following code to the mnuContents Click event
procedure in the frmSnooper form (be sure to specify the path to where your snooper.hlp
file is located. In this example I used c:\):
Dim vRetVal As Variant
vRetVal = WinHelp(frmSnooper.hWnd, "c:\snooper.hlp", _
HELP_INDEX, CLng(0)) |
This is the call to WinHelp that displays your Help File.
The parameters passed to WinHelp are as follows:
| Parameter |
Purpose |
| frmSnooper.hWnd |
This is a Handle to the application (a unique
numeric identifier assigned by Windows to all running applications. The Handle also
lets Windows distinguish between multiple instances of the same application) |
| "c:\snooper.hlp" |
The location of the Help File. Be sure to specify
the Path to where your snooper.hlp file is located. When the application is completed
and compiled as an executable, it will be important the path and to change this to simply "snooper.hlp",
which would indicate to the WinHelp function that the Help File is located in the
same directory as the snooper.exe file. |
| HELP_INDEX |
A command constant that tells the WinHelp function
what to do. HELP_INDEX tells WinHelp to open your Help File. |
| CLng(0) |
The CLng function converts an expression to a
Long numeric value. As you can see here, you are passing the number Zero to the WinHelp
function (This parameter is unused). |
Now add the following code to your mnuHelpOnHelp Click even procedure in
the frmSnooper form:
Dim vRetVal As Variant
vRetVal = WinHelp(frmSnooper.hWnd, "c:\snooper.hlp", _
HELP_HELPONHELP, CLng(0)) |
Be sure to specify the Path to where your snooper.hlp file is
located. This is the call to WinHelp that displays Windows’ Help on
Using Help feature (This is the ultimate Nubie resource on using the Help
system). The only parameter differences between this call and the call in the mnuContents
Click event procedure is the Command Flag:
HELP_HELPONHELP
Now you are ready to give your new Help File a try. Save the
project and run it. Choose the Contents item on the Help dropdown menu. Does
it work?
Using your new Help File
Here’s the bad news: When you access your Help File, if
it doesn’t look the way you want it to—There’s a typo, the format
isn’t correct, you left something out, etc.—the only choice you have is to open
your Help Text file, make the appropriate modifications, and recompile it. Again
and again. Only practice will teach you how your Help Files will look when they are
compiled. And only trial and error will get you to the point where you’re satisfied
with the final result.
Notice how the Index button on the help window is disabled
when you open your Help File. Normally, while viewing a Help File you have
the option to search for keywords within the file. For example, it would be nice if you
could click the Index button and type the word Table to find
out what a Microsoft Access Table is. You have that information in
your Help File, but to get to it the way the help File is currently
configured, you need to click on the Tables Hypertext in the first paragraph
of the Help File.
So far you’ve only used the # custom Footnote symbol to tie the Hypertext
Tags to their linked text. What about Index words? That’s where the $ and K custom Footnote symbols come in:
$ Is used to reference the Jump Page Title so that it will appear in the Help
System’s Index list box.
K Let’s you designate a list of Keywords which the user can designate to
search for a topic.
Note: To complete
this step if you don’t have Word (or just get frustrated trying to make
these changes): Delete your snooper.rtf file and rename the snooper2.rtf
file (That you downloaded earlier, or can download now by clicking here.)
to snooper.rtf. Then go directly to the section with the heading, Compiling your new Snooper.rtf file.
Save your project and launch Microsoft Word. Load the snooper.rtf
file. Select Normal from the View dropdown menu. Activate the Show/Hide
button so hidden text is visible. Place the insertion point immediately after the # Footnote symbol at
the top of the first page of Linked text (Page 2 which is titled Opening a Database File).
- Press the spacebar once.
- Select Footnote from the Insert dropdown menu.
- Click in the Custom Mark text box and type a $.
- Click the OK button.
- For the Footnote’s value enter this text (case is
important):
$Opening a Database File
- Click the Close button.
- Select Footnote from the Insert dropdown menu again.
- Click in the Custom Mark text box and type a K (capitalized K).
- Click the OK button.
- For this Footnote’s value enter this text(case is
important, and semi-colons separate the different search phrases):
Kopen;file
open;open file;open database;database open
|
- Click the Close button.
That takes care of just 1 of the Link pages.
There are 6 more to go. Use the following table to do the remaining Link
pages. (Be sure to insert the new Footnotes exactly like you did above):
| Page |
Footnotes |
| 3 |
$Exiting Database Snooper
Kexit;exiting;quit;quiting |
| 4 |
$Getting
Help On Help
Khelp;using help |
| 5 |
$About
Database Snooper
Kabout;author;version |
| 7 (6 was skipped) |
$Access
Databases
Kversion |
| 8 |
$In
Microsoft Access
Krecords;tables;fields |
Compiling your new Snooper.rtf
file
After making these changes to your snooper.rtf file, save and
compile it using the Help Workshop (this time when you run Help Workshop,
choose Open under the File menu to open your help project file (snooper.hpj).
Click the Save and Compile button to re-compile your Help
Text file. If all went well, when you access your Help File again from within Database
Snooper, the Index button should be selectable. Clicking the Index button will display your list of
keywords (your list isn’t very long, but you get the idea). Click on, or type in a
keyword to select it then click the Display button to jump straight to that topic.
What happens when you have one keyword that references more than one topic? To find out,
click on the Index button again and select the version keyword and click display. A new dialog appears which shows you both topics
that use the keyword. Just choose the one you want.
That completes this assignment. No other enhancements are necessary.