The frmAbout dialog
needs only an OK button (btnOk, shown in the illustration above) to
close it. Here's the code
that goes into it's Click event procedure:
Me.Close()
Take some time to get your About dialog finished
and working before preceding.
Using
HTML Help Workshop
to
create a
Help File for
Database Snooper
Note: For installing
HTML Help Workshop at home or work.
HTML Help Workshop does not come with
Microsoft Visual Studio. You can download the latest version of it from
http://www.downloads.com. Do a search
for HTML Help Workshop in the
Windows applications area of the website. Make sure you choose the
application created by Microsoft, not one of several shareware versions of
similar programs that are available.
To create a Help file in HTML Help Workshop, we begin by
building several HTML documents. In fact, creating enough HTML documents to
build a
mini-website is commonly required. This isn't an HTML class, so I've provided
several HTML documents that you will need to create the help file inside the
c:\shared\hhw folder (Note: In some computer labs this folder may
exist on drive D: You may also download a these file by clicking this
link.). Minimize Visual Basic and right-Click on the My
Computer icon on the desktop and choose Explore to open the Windows Explorer
window. Navigate to, and open, the c:\shared\hhw
folder. You should see the following files inside it:
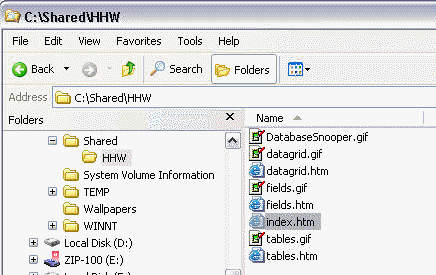
Double-click on the index.htm file, to view it in
Internet Explorer:

This will be the Main page of the Help file for
Database Snooper. This example is relatively simple, but the level of
complexity is up to you. At the bottom of the page are several Links to
three other pages that describe different functions of the Database Snooper
program. Click on them now to see what they look like. At the
bottom of each page is a [Home] link that
takes you back to the index.htm page (shown
above). We will take these four HTML documents and build our Help
file with the HTML Help Workshop
application.
Close the Internet Explorer and Windows Explorer
windows, and leave Visual Basic minimized. Run the HTML Help Workshop
application--you will find it on the Programs menu inside the HTML Help
Workshop folder. Choose New on the
File drop-down menu and the
New dialog should appear:

Select the Project
item and click the OK button. This launches the
New Project wizard:
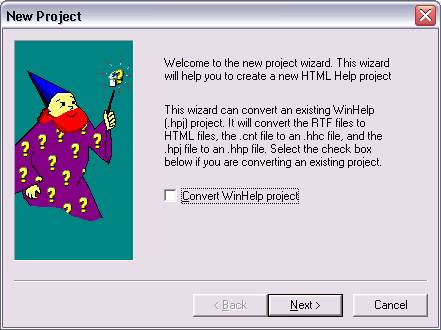
We are not converting a WinHelp project file (WinHelp
is the older--still supported--method of creating help files), so
leave that check box unchecked and click the Next button to display the
Destination dialog:
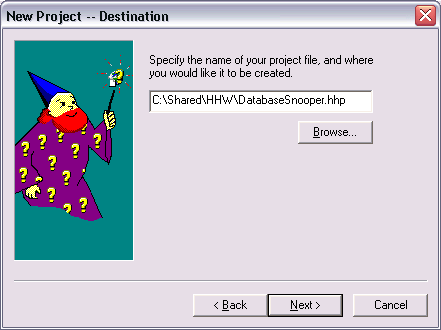
Use the Browse button and browse to the
c:\shared\hhw folder. Type
DatabaseSnooper in the File Name
text box for the project file name and click the
Open button. The
Destination dialog should now look similar to the above
illustration, with the full path to the new DatabaseSnooper.hhp file
displayed. Now click the Next button to display the
Existing Files dialog:
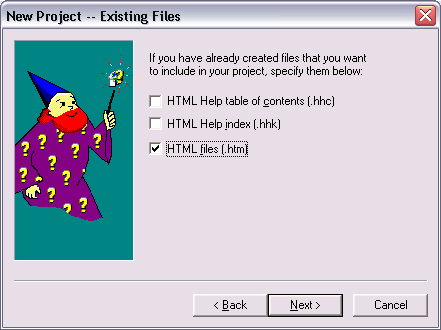
We will be creating our Table of Contents
and Index files later so leave those checkboxes unchecked.
But we already have our HTML files, so put a checkmark in front of
HTML files (.htm) and click the Next
button to display the HTML Files
dialog:

Use the Add button and select each of the HTML
documents in the c:\shared\hhw folder.
Note: Be sure to select the
index.htm document
first. The first file in the list is
assumed by HTML Help Workshop to be
the Main HTML file in the project (like the home page). The order in which you
select the other three files does not matter. Then click the Next
button, and finally, click the Finish button on the final dialog that appears—If
you see a messagebox asking if you want to overwrite any existing files, do so.
Your HTML Help Workshop window
should now look like this:
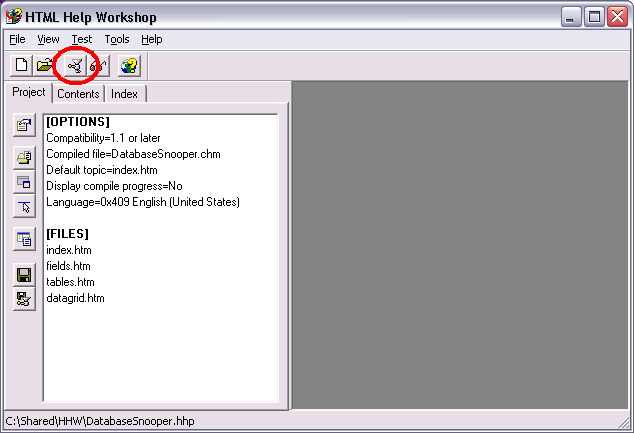
Notice under the [OPTIONS] section that the
Default Topic file is
index.htm, that is because it was the
first HTML file we added in the HTML Files
dialog. Before creating our Table of Contents
and Index files, let's take a look at what the help file will
look like if we compile it right now. Click on the
Compile HTML File button—circled on the above illustration—on
the toolbar to display the Create a Compiled File
dialog:
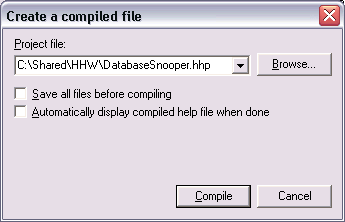
The name for your HTML Help Project file
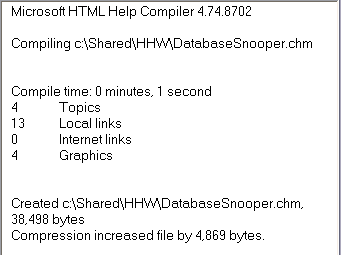
(DatabaseSnooper.hhp) is selected automatically. Click the Compile
button. When compilation is complete, you should see this summary of the
compile in the right panel of the HTML Help
Workshop screen:
Now click the View Compiled
File button on the toolbar (it is next to the Compile button)
to display the View Compiled
File dialog:
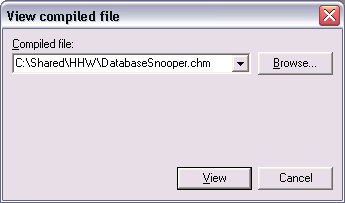
Use the Browse button and select your compiled
Help file (it has a .chm extension).
Your View Compiled
File dialog should match the illustration above. Click on
the View button. When the Help Window
opens you may need to resize it to see it all. Test the links at the bottom of the
page to make sure they work. This should remind you of when we opened
the index.htm file in Internet Explorer
earlier. As you can see, creating the basic Help File components for
HTML Help Workshop just requires the HTML documents of a small website. Close the help window when you are finished testing it.
Creating a
Table of Contents
file in HTML Help Workshop
A Table of Contents is a common component for your help
file. Creating one in HTML Help
Workshop is pretty easy. On the HTML Help
Workshop screen, click on the Contents
tab at the top of the left panel to display the
Table of Contents Not Specified dialog:

Make sure the Create a new
contents file option is selected and click the OK
button. On the Save As dialog, accept the default name,
Table of Contents.hhc, and click the Save
button. You should now see an empty Contents pane, with a column
of buttons down the left side:

To start adding items to the empty Contents pane,
click on the Insert a Heading, button
(shown above), to display the Table of Contents
Entry dialog:
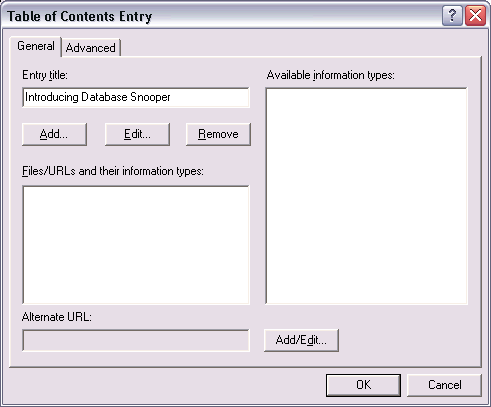
In the Entry Title
text box type: Introducing Database Snooper,
then click the OK button. The new folder entry appears at the top
of the Contents pane:
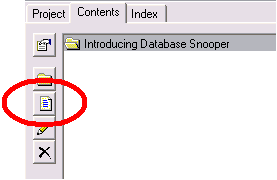
Now let's insert a page inside this folder. Make
sure the folder is selected and click the Insert
a Page button (circled above). The following message
box should appear. To put this new page inside the
Introducing Database Snooper
folder be sure to click on the No button:

The Table of Contents Entry
dialog for the new page appears:

Type Features for
the title of the new page in the Entry Title
text box. Headings (folders) that you add to the contents pane do
not need to have an associated HTML file or URL. But Pages you add
to the contents pane must have an
associated HTML file or URL. Click on the Add
button below the Entry Title text
box and then use the Browse button on the
next dialog to select the index.htm file
as the HTML file to associate with this new page. Then your
Table of Contents Entry dialog should
look exactly like the illustration above. Now click the OK
button.

Your Contents pane should now look like the
illustration above. Add another heading (folder) by clicking the
Insert a Heading button. Type
View Options in the
Entry Title text box and click the OK
button. Your Contents pane show now look like this:
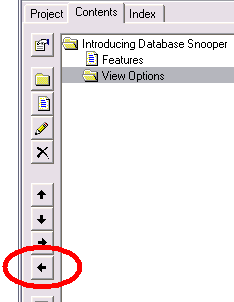
Notice that the new heading you added is actually inside
Introducing Database Snooper
heading. To move it back to the left edge of the pane and take it out of
the Introducing Database Snooper
heading, click the Move Selection Left
button which is circled in the above illustration.
You will now insert three new pages inside the
View Options heading. Click the
Insert a Page
button now. Notice that you should not see the message box asking you if you
want to insert this page at the beginning of the table of contents,
like we did when we added the Features
page to the Introducing Database Snooper
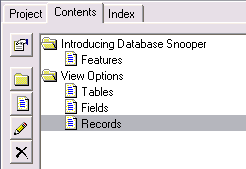
heading (if you do see this message box choose No). Add three new pages to the View
Options folder with these settings:
|
Page # |
Entry
Title |
Associated HTML file |
|
1 |
Tables |
tables.htm |
|
2 |
Fields |
fields.htm |
|
3 |
Records |
datagrid.htm |
Your Contents pane should now match the following
illustration:
Before adding the Index, let's test the new
Table of Contents. Select
Save Project on the
File drop-down. Then click the
Compile HTML file button. When the
compile is finished click the View compiled file button to
view your new help file. Notice the new Toolbar at the top of the
Help window. This toolbar will not appear until we have at least a
Contents pane in our help project:
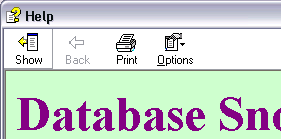
Click on the Show
button to see the Contents pane:
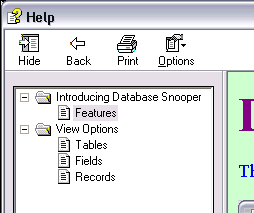
Click on the plus (+) signs in front of the heading
folders to open them and see the pages they contain. Click on the pages
to see their associated HTML documents in the right pane. You can also
click on the Hide button on the toolbar to hide the contents pane again.
With the Contents pane visible, close the help window.
Creating an
Index
file in HTML Help Workshop
By adding an Index, the user will be able to search
for help by selecting from a list of key words that you specify. An
Index is another common component
of help files, and most help files contain one. Creating an
Index in HTML Help
Workshop is pretty easy. On the HTML Help
Workshop screen, click on the Index
tab at the top of the left panel to display the
Index
Not Specified dialog:

Make sure the Create a new
index file option is selected and click the OK button.
On the Save As dialog type
Database Snooper Index.hhk for the index file name, and click the
Save
button. You should now see an empty Index pane, with a column
of buttons down the left side, that looks like this:

To start adding keywords to the empty Index pane,
click on the Insert a keyword button
(circled above) now, to display the Index
Entry dialog:
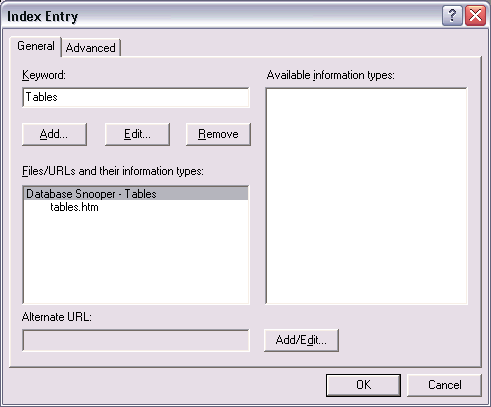
This dialog is identical to the Table of Contents
Entry dialog. In the case of index keywords, each keyword you add must have an
associated HTML file or URL. For the first keyword type,
Tables. Use the Add button, below the
Keyword text box, and
selected the tables.htm file to associate
with it. Click the OK button. Continue adding the follow
keywords with these settings:
| New Keyword
# |
Keyword |
Associated HTML file |
|
1 |
Fields |
fields.htm |
|
2 |
Records |
datagrid.htm |
|
3 |
Features |
index.htm |
|
4 |
Over View |
index.htm |
As you can see, most of this information duplicates what
we added in the Contents pane. When finished adding the above
keywords, your Index pane should match the following illustration. Use
the Sort Keywords Alphabetically button (circled
below) to sort your keywords alphabetically:
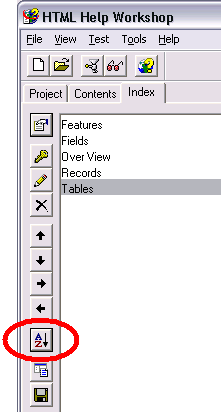
Select
Save Project on the
File drop-down. Then click the
Compile HTML file button. When the
compile is finished click the View compiled file
button to view your new help file. Click on the Index tab at the
top of the left pane. Notice one important difference between the
Contents and Index panes is the the ability to type a keyword to
search the keyword list. That can come in really handy for help files that
use dozens of HTML documents and have Indexes that contain hundreds of
keywords.
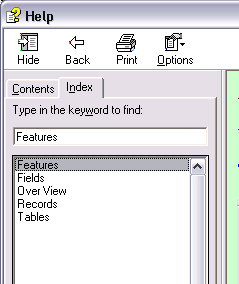
Notice while you are viewing your newly compiled help
file that the caption of the help window is the
generic word Help. This is because we haven't set the
Title option
yet. Close the help window and return to the
HTML Help Workshop screen.
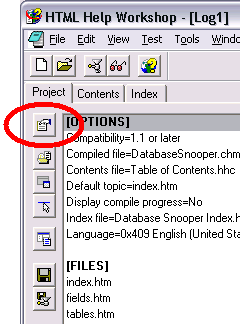
Click on the Project
tab and click the Change Project Options
button (circled above) to open the Options
dialog:
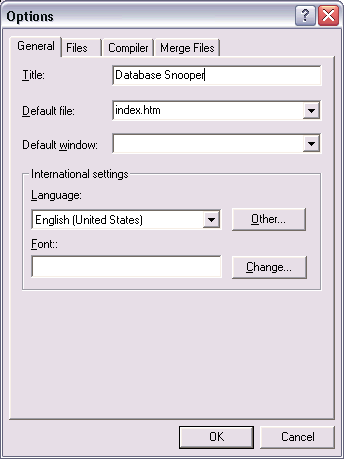
With the General tab
selected, type Database Snooper
in the Title textbox and click the
OK button. Click
Save Project on the
File drop-down. Then click the
Compile HTML file button. When the
compile is finished click the View compiled file
button to view your new help file. The caption of the help window
will now be Database Snooper.
Close the Help window and exit the HTML Help
Workshop application.
Putting a copy of the
finished
Help
file in the
DatabaseSnooper folder
Right-click on the
My Computer icon or the Start menu
button and select Explore on the context menu. Navigate to the c:\shared\hhw
folder and open it. Find your DatabaseSnooper.chm
help file inside it, right-click on it and select copy from the context menu. Now navigate to your project folder:
...\My Documents\Visual Studio Projects\<your
name>\DatabaseSnooper, right-click inside the
DatabaseSnooper folder and select paste to put a copy of your help DatabaseSnooper.chm
file there.
Adding the
Help
file to the Database
Snooper program
Restore the Visual Basic .NET application with your
opened Database Snooper project that we had minimized early. Add the
following dimension statement to the Declarations section:
'Stores the path
and filename of the Help file
Dim
sHelpFile
As String
In Visual Basic 6 there was an
App object that had a
Path property that you could use to
dynamically determine the location of your application at run-time--Path
contained the full path to the folder where your application was installed.
This was useful for specifying the location of your Help file, since your Help
file is usually located in the same folder as your application. The
format of the command in Visual Basic 6 that used
App.Path to specify the location of your help file looked like this:
sHelpFile
= App.Path & "\" & "DatabaseSnooper.chm"
Unfortunately the App
object is gone in VB.NET. Instead we need to use the
Location property (which is a string) of the
System.Reflection.Assembly.GetExecutingAssembly
class. One big difference between Path
and Location is that Location also includes the name of your application file as well.
Since we only need a path to the application install folder, we must
remove the application file name from the Location before appending the name of the
Help file to it. This is how we can
do it with the ever-useful SubString
method built into every string variable:
The above code will only work while we are testing our
program, because our application's executable file is actually created in a
bin folder inside our project folder. When compiling the final version
of our program, the "\bin\" in the InstrRev
function call needs to be replaced with "\". Add the above code
to the frmSnooper_Load event
procedure.
Now we can use the ShowHelp
method of the intrinsic Help class to
display our help file. Add the following line of code to the
mnuContents_Click event procedure:
Help.ShowHelp(Me,
sHelpFile)
Testing the program so far
Save the project now. Run the program. Select
the Contents item on the Help menu. Is your help file displayed?
Using a
HelpProvider
object to add Context
Sensitive Help
In it's most basic role,
adding a HelpProvider object to your
project's component tray--and settings its
HelpNamespace property to the location of your DatabaseSnooper.chm
help file--allows the user to access the help file by pressing the
F1 function key. But the addition of a
HelpProvider object also adds four new
properties to each of the controls on your form including the form itself.
These new properties will allow us to add context sensitive help to Database
Snooper.
Add a HelpProvider
object to the form right now. It will appear in your component tray,
like this:

Leave the default name
HelpProvider1 unchanged. We need to set the
HelpNamespace property of
HelpProvider1 to the location of the DatabaseSnooper.chm
help file. Just add this code at the end of the frmSnooper_Load
event procedure:
'Set the HelpNamespace
property to the path
and filename of the Help file
HelpProvider1.HelpNamespace
= sHelpFile
Take a look at the properties of the form, you should
see these four new properties (the only one we will be modifying is the
HelpString on HelpProvider property):
- HelpKeyword on
HelpProvider -- Specifies the help keyword associated with
this control
- HelpNavigator on
HelpProvider -- Specifies the type of help associated with
this control
- HelpString on
HelpProvider -- Specifies the
help text for context sensitive help for this control
- ShowHelp
on HelpProvider -- Determines if help should be displayed for
this control
For the addition of Context
Sensitive Help, we will only be working with the
HelpString on HelpProvider
property. Type the following help strings into the
HelpString on HelpProvider property of the listed
controls:
|
Controls |
HelpString on HelpProvider1 |
| lblDatabaseName |
This Label displays the name of the currently opened
database file |
| lstTables |
This list box displays the names of the tables of the
currently opened database (shown in the label above). By selecting
one of these tables with the mouse, the fields it contains, and their
data types are shown on the Fields listbox to the right. |
| lstFields |
This list box displays the field names and their data
types of the table that is selected in the listbox directly to the left.
By selecting a field from this list with the mouse, the records
displayed in the data grid on the right are sorted by the field you
select. |
|
DataGrid1 |
This data grid displays the records of the currently
selected table from the Tables list box to the far left. You may
sort these records by selecting the field to sort by from the Fields
list box to the left. |
Adding the
Help Button
to the Database Snooper
form
The final step requires the addition of the
Help Button to the form. While a
help button--which appears as a question mark in next to the Close
button in the upper right corner of the form--is normally only available on
dialog boxes, we will be adding one to database snooper to enable the context
sensitive help option. Take a look at the properties of the form
and set these properties like so:
|
Property |
Value |
| Maximize Box |
False |
| Minimize
Box |
False |
| Help
Button |
True |
The downside of a Help
Button is that you must disable the
Minimize and Maximize buttons
for it to show. That is why you've never seen a dialog box that has a
help button--most of the control panel applets are displayed in this type of
dialog box--that can be minimized or maximized.
Testing the finished program
Save the project now. Run the program. Notice
the question mark (Help) button in the upper right corner of the form
next to the close button? Click on the help button. The mouse
pointer should change so that a big question mark (?) is attached to
it. Point at any of the controls on the form that had text added to
their HelpString on HelpProvider
property and click on it. Does a popup appear displaying the text you
typed into its HelpString on HelpProvider
property? Does pressing the
F1 key display your help file?
There are no further enhancements required for this
project.


