
Database Snooper will allow the user to browse their computer or network and examine the contents of Microsoft Access database files. What Database Snooper does:
- Lets the user browse their computer or network to select a database file.
- Lists all the tables that the database file contains.
- Displays the columns—names and their data types—of any table the user selects from the tables list.
- Displays the records of the selected table in a DataGridView control.
- Allows the user to change the sort order of the records in the data grid by selecting the field to sort by from the fields list.
Launch Microsoft Visual Studio 2008. Drop down the File menu and select New Project...
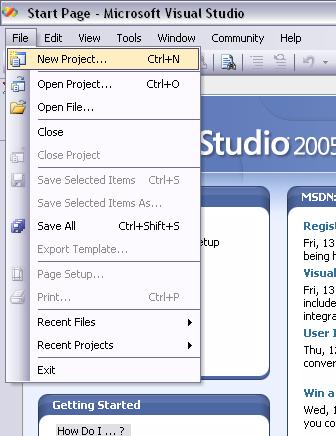
The New Project dialog will appear:
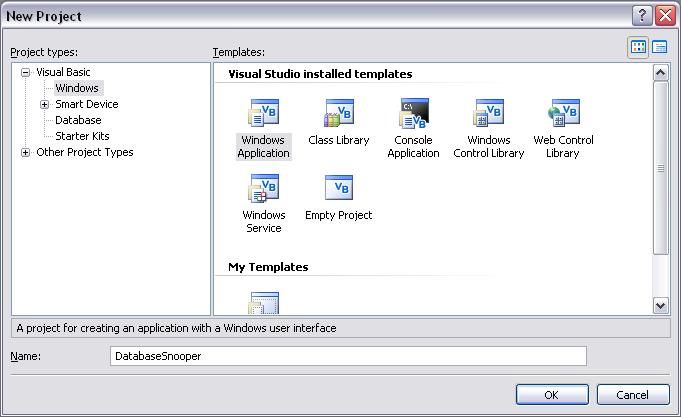
Be sure the Windows Application template is selected in the Templates pane on the right side, then type DatabaseSnooper in the Name textbox (as shown above). Now click the OK button.
Now save the project by clicking on the Save All button on the standard toolbar. This displays the Save Project dialog box, as shown:
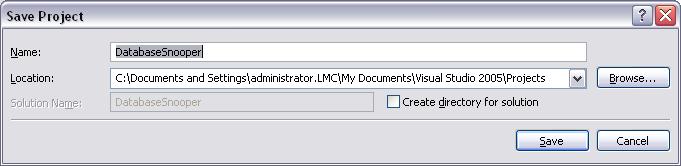
Do not change the default Location path. Be sure to uncheck the Create directory for solution option, as show above, before clicking on the Save button.
This creates a new folder inside the My Documents\Visual Studio 2008\Projects\ folder named DatabaseSnooper:
My Documents\Visual Studio 2008\Projects\DatabaseSnooper
Rename the Form file
Make sure the form is selected in the Solution Explorer window:

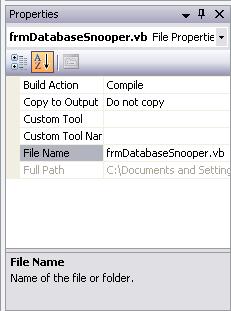
With the form file (Form1.vb) selected in the Solution Explorer window (as shown above), the Properties window directly below it displays it's File properties. Click on the File Name property and type frmDatabaseSnooper.vb and press the enter key (don't forget to include the .vb extension, as shown in the illustration below):
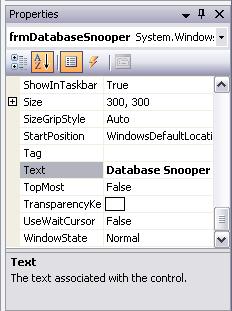
Change the Name and Text properties of the Form
To display the properties of the form in the Properties window, click once on the blank Form, which should be displayed on the left side of the screen in the Design window. Make sure the Name property—which is in parentheses (Name) at the top of the property list so that it's easy to find—is frmDatabaseSnooper. It should have been set to that automatically when we named the form file. Then scroll the properties windows down—the properties are listed alphabetically—and change the Text property to Database Snooper as shown below:
Unlike projects 1 and 2, in this project we cannot pre-connect to a database at design-time. With Database Snooper we allow the user to select database files dynamically, at run-time. So, gone is the luxury of placing a BindingSource control on our form and having the Data Source Configuration Wizard guide us through the process of configuring the Dataset and the TableAdapter objects. In fact, we will not be adding any controls from the Data section of the controls toolbox to this project at design-time.
Part A - Connecting to a Database and listing the Tables it contains in a Listbox
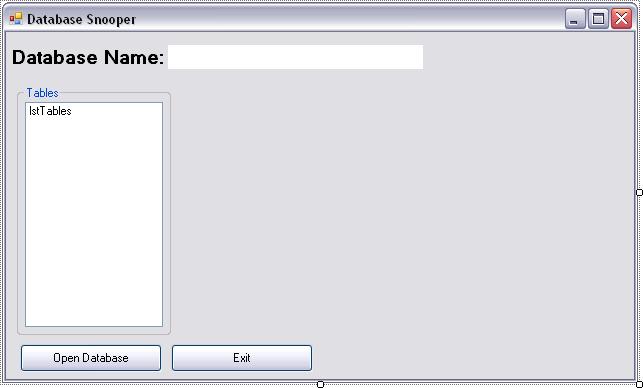
Stretch the blank form wider and add the controls shown in the above illustration. They include, from the top down:
- Two Labels to display the name of the open database file:
| First Label | Second Label | ||
| Property | Value | Property | Value |
| Text | Database Name: | Name | lblDatabaseName |
| AutoSize | False | ||
| BackColor | White | ||
| Text | blank | ||
- A GroupBox with a ListBox control inside it:
| GroupBox | ListBox (Put inside GroupBox) | ||
| Property | Value | Property | Value |
| Text | Tables | Name | lstTables |
- Two Buttons:
| First Button | Second Button | ||
| Property | Value | Property | Value |
| Name | btnOpen | Name | btnExit |
| Text | Open Database | Text | Exit |
- An OpenFileDialog control:
Leave the OpenFileDialog's default name property (OpenFileDialog1) unchanged.
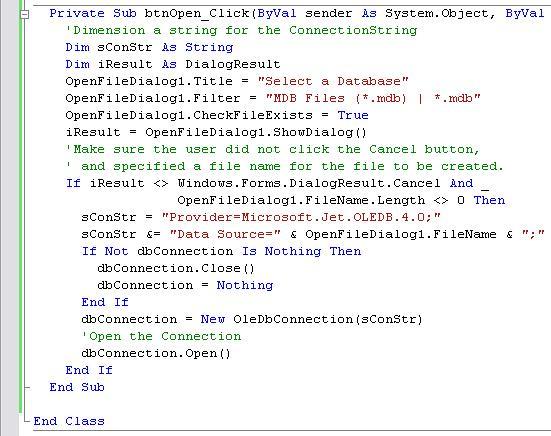
The first thing we'll do is add code to the Open Database button's click event procedure to display the OpenFileDialog. This will allow the user to browse their computer or network for a database file they want to snoop. Add the following code to the btnOpen_Click event procedure:
Dim iResult As DialogResult
'Set the Title and Filter properties, so that only .mdb
' files are listed.
OpenFileDialog1.Title = "Select a Database File"
OpenFileDialog1.Filter = "MDB Files (*.mdb) | *.mdb"
'Set the CheckFileExists property so that a warning
' appears if the user types a filename of a non-existent
' file. Then show the dialog.
OpenFileDialog1.CheckFileExists = True
iResult = OpenFileDialog1.ShowDialog()
'Make sure the user did not click the Cancel button And
' specified a file name for the file to be created.
If iResult <> Windows.Forms.DialogResult.Cancel And _
OpenFileDialog1.FileName.Length <> 0 Then
Using an OleDbConnection object to dynamically connect to a database
My initial goal for this project was to use the new BindingSource and TableAdapter data access classes that we used in projects 1 and 2 (DatabaseViewer). These are new data access objects which are unique to Visual Studio 2008. But these classes are better suited to setting up design-time data connectivity—which is how we used them in projects 1 and 2. For example, in order to create a TableAdapter you need an existing DataSet, or as it says in the Visual Studio 2008 help system:
TableAdapters are created with the Dataset Designer inside of strongly typed datasets. You can create TableAdapters during creation of a new dataset with the Data Source Configuration Wizard. You can also create TableAdapters in existing datasets with the TableAdapter Configuration Wizard.
Because we would need to setup the BindingSource and TableAdapter data access objects at design-time, they won't suit our needs if we want to connect to databases dynamically—at run-time. And run-time is the key word here, because DatabaseSnooper needs to open any Access databases the user selects. A better option for accessing databases dynamically are the System.Data.OleDb data access objects from the beloved .NET framework class library.
Insert the following Imports statement above the Public Class frmDatabaseSnooper declaration at the very top of the code window (the following line will be the first line of code in the code window):
Imports System.Data.OleDb
An Imports specification allows you to refer to a sub-class by name throughout your program without specifying the entire class hierarchy that it belongs to. For example, to create a reference to the OleDb Connection object class: OleDbConnection, you would normally need to specify the fully qualified class hierarchy, like this:
System.Data.OleDb.OleDbConnection
This is required because OleDbConnection is a sub-class of the System.Data.OleDb class library. By including the above Imports specification at the top of the code window, we only need to specify OleDbConnection in our code from then on. Think of an Imports specification as a With clause that encompasses an entire module.
The following three lines of code are all we need to create an OleDbConnection object dynamically (Note: Don't type the following three lines of code yet). The actual control Constructor line of code is the second line that contains the New keyword. The New keyword calls the constructor of the OleDbConnection class, dynamically creating a new instance of a OleDbConnection object:
Dim dbConnection As OleDbConnection
'Use the New keyword to call the constructor of the
' OleDbConnection class, and dynamically create
' a new instance of an OleDbConnection object.
dbConnection = New OleDbConnection(<ConnectionString >)
dbConnection.Open()
The ConnectionString parameter is a literal string or string object that must, as a minimum, specify the:
- Provider—Denoting the type of database file
- Data Source—Designates the location and name of the database file
To allow other enhancement options later, we will dimension the OleDbConnection class reference variable (dbConnection) in the Declarations section—so that it has persistent, public scope. Add the following line of code to the Declarations section now:
Dim dbConnection As OleDbConnection
Once the user has selected a database file—via the code we previously added to the btnOpen_Click event procedure—we will have the minimal information we need to build the ConnectionString parameter for the OleDbConnection Constructor code. Add the following dimension statement at the beginning of the btnOpen_Click event procedure (where you have already entered the code to display the OpenFileDialog):
'Dimension a string for building
' the ConnectionString.
Dim sConStr As String
Now add the following code to build the ConnectionString inside the If-Then statement of the previously added code in the btnOpen_Click event procedure:
'Specify the ConnectionString of the Connection
' object so that it includes, at a minimum, the
' Provider (OLEDB) and Data Source (a user
' selected .mdb file) parameters.
sConStr = "Provider=Microsoft.Jet.OLEDB.4.0;"
'Use the user-selected database file as the
' Data Source value.
sConStr &= "Data Source=" & _
OpenFileDialog1.FileName & ";"
Check your typing. Typos in the above code will cause strange errors that come back to haunt you later. Now that we have built our ConnectionString (sConStr) we can dynamically create an OleDbConnection object (dbConnection). Add the following code to the btnOpen_Click event procedure, below the above code, inside the If-Then statement:
'Close the Connection if it was previously Open,
' and destroy (Nothing) any previously created
' instance of it to completely disconnect it from
' any database.
If Not dbConnection Is Nothing Then
dbConnection.Close()
dbConnection = Nothing
End If
'Dynamically create a New instance of an
' OleDbConnection object and connect
' it to the database specified in the
' ConnectionString (sConStr).
dbConnection = New OleDbConnection(sConStr)
'Open the Connection
dbConnection.Open()
Here is a summary of the code entered into the the btnOpen_Click event procedure. Your code window should look something like this:
The above code from the btnOpen_Click event procedure connects us to an access database file that the user selects. Now we need to enumerate the Tables inside it so that we can list them in the lstTables listbox.
Using the GetOleDbSchemaTable method to enumerate the Tables inside a database
Our OleDbConnection object (dbConnection) has a GetOleDbSchemaTable method that can be used to list the tables inside the database that it is connected to. GetOleDbSchemaTable returns a DataTable object that contains the names and other information about the tables in the database in its rows (records). The first parameter passed to the GetOleDbSchemaTable call is an OleDbSchemaGuid value that specifies the schema table to return. In this case we want just the Tables that the database contains so we specify OleDbSchemaGuid.Tables as the first parameter. The second parameter is an Object array of restriction values that we can specify to filter the rows to be returned in the DataTable. When we pass values in this array, we must include empty strings or nulls for array elements that do not contain values. We are only including "TABLE" as the last parameter to extract the table names—other information that is available includes type, owner, or schema.
Add the following code to the btnOpen_Click event procedure—below the dbConnection.Open() line of code—inside the If-Then statement:
'Use the GetOleDbSchemaTable method of the
' Connection object to extract a DataTable
' that contains the names of the Tables that
' the database contains.
Dim schemaTable As DataTable = _
dbConnection.GetOleDbSchemaTable(OleDbSchemaGuid.Tables, _
New Object() {Nothing, Nothing, Nothing, "TABLE"})
'Once we're extracted the Table information, the
' Connection can be closed.
dbConnection.Close()
Now we can iterate through the rows (records) of our newly created schemaTable to extract the names of the tables and copy them into the lstTables listbox. Add the following code to the btnOpen_Click event procedure—below the dbConnection.Close() line of code—inside the If-Then statement:
'Clear the lstTables listbox before adding
' items to it.
lstTables.Items.Clear()
'The Rows.Count property of the schemaTable,
' is equal to the number of tables that the
' database contains.
For i = 0 To schemaTable.Rows.Count - 1
'The Items collection is the columns of the
' schemaTable. Columns 0, and 1 are Null,
' column 2 contains the table names.
lstTables.Items.Add(schemaTable.Rows(i).Item(2))
Next i
Don't forget to dimension i as an integer at the beginning of the btnOpen_Click event procedure.
Testing the program so far
Save the project now. Run the program. You should be able to browse for an Access database after clicking the Open Database button (you will find some example databases in C:\shared\Databases or use this Link to download one). Selecting a database file should then populate the lstTables listbox with the tables the database contains.
Part B - Listing the Columns and their Data Types of the selected Table in a Listbox
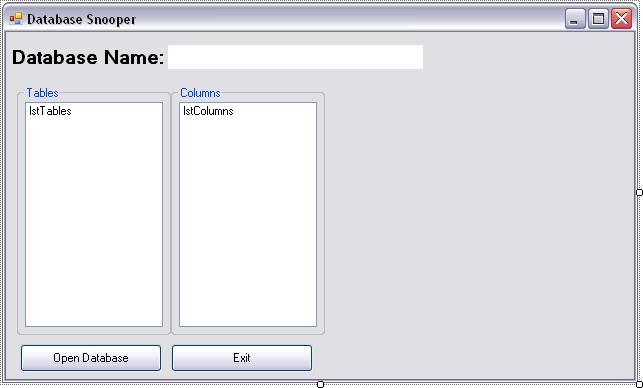
Add a new GroupBox and Listbox that we will use to display column (field) information as shown in the above illustration:
| GroupBox | ListBox (Put inside GroupBox) | ||
| Property | Value | Property | Value |
| Text | Columns | Name | lstColumns |
Using a Data Adapter object to connect to a Table in the database
Like we did with the OleDbConnection object above (dbConnection), we can also dynamically create a Data Adapter. A Data Adapter is a .NET version of the created-at-design-time-only Table Adapter. Let's begin by adding a new dimension statement to the Declarations section of the form:
Dim dbAdapter As OleDbDataAdapter = _
New Oledb.OleDbDataAdapter()
Notice in the above code how we are using the New keyword to actually create an instance of a Data Adapt at the moment it is dimensioned. Unlike our dynamically created OleDbConnection object (dbConnection)—which must be destroyed (set to Nothing) and recreated with each new database it is connected to—a Data Adapter need only to be created once. It can then be reused to connect to different tables from different databases, without destroying it and recreating it each time.
To bind the Data Adapter to a table in the selected database (dbConnection), we need to create an OleDbCommand object (selectCMD) that needs two parameters. The first parameter is an SQL statement that specifies the columns and table name of the table we want the data adapter bound to. The second parameter is the name of the OleDbConnection object (dbConnection) that contains the table specified in the SQL statement of the first parameter. Add the following code to the lstTables_SelectedIndexChanged event procedure:
Dim sFieldInfo, sDataType As String
Dim sTableName As String
Dim i As Integer
'Store the Table name selected in lstTables in sTableName
sTableName = lstTables.Items(lstTables.SelectedIndex)
'Create an OleDbCommand object that specifies an SQL
' Select command string that includes all the columns
' from the selected Table as the first parameter, and the
' name of the OleDbConnection object that contains the
' table (dbConnection) as the second parameter.
Dim selectCMD As OleDbCommand = _
New OleDbCommand("SELECT * FROM " & _
"[" & sTableName & "]", dbConnection)
Brackets ([ ]) are required around the table name (sTableName) in case spaces were used in the name. Once we've created our OleDbCommand object (selectCMD) we can bind the Data Adapter to a table with this single line of code (add the following line of code below the above code, inside the lstTables_SelectedIndexChanged event procedure):
'Bind the Data Adapter to the selected Table
dbAdapter.SelectCommand = selectCMD
Using a DataSet object to enumerate the Columns of the Table
To enumerate the fields (columns) and the field types in the table, we need to use a DataSet. The code to dynamically create a DataSet should look familiar to you after what we've done already with the OleDbConnection and Data Adapter constructors. But instead of dimensioning the DataSet in the Declarations section of the form, we will dimension it locally (inside the lstTables_SelectedIndexChanged event procedure) so that it is recreated each time we connect to a new table. This is important because a DataSet can be filled with multiple tables! Referencing the multiple tables that might fill a DataSet can be done with the dataset's Tables collection (don't type this code):
dbDataSet.Tables(<index>)
But we don't want to keep adding tables to our DataSet each time the user selects a new table. So by constructing it locally, it is recreated and destroyed each time. Add the following code below the previously entered code in the lstTables_SelectedIndexChanged event procedure:
'Create the DataSet object. By creating it locally
' (as apposed to creating it in the Declarations
' section) it is recreated each time, so new tables
' are NOT appended to the DataSet.
Dim dbDataSet As DataSet = New DataSet()
'Clear and fill the new DataSet with the records
' from the selected Table.
dbDataSet.Clear()
dbAdapter.Fill(dbDataSet, sTableName)
Here is a summary of the code entered into the the lstTables_SelectedIndexChanged event procedure so far. Your code window should look something like this:

Once the Dataset is created and filled we can use its Columns collection to enumerate the names and data types of the fields (columns) in a record (row). Add the following code below the above code in the lstTables_SelectedIndexChanged event procedure:
'Clear the lstColumns listbox before filling it
lstColumns.Items.Clear()
'Fill the lstColumns listbox with the names and data
' type of each column in a row (record).
For i = 0 To dbDataSet.Tables(0).Columns.Count - 1
'Use a With clause here to make the code more readable
With dbDataSet.Tables(0).Columns(i)
'.DataType.ToString returns the data type preceded
' by the word System, like this: System.Integer
'The following line of code extracts just the data type
' (i.e. Integer) that follows System.
sDataType = .DataType.ToString.Substring( _
InStrRev(.DataType.ToString, "."))
'Concatenate the DataType info to the
' ColumnName for display in the listbox.
sFieldInfo = .ColumnName & " -- " & _
sDataType.ToLower
lstColumns.Items.Add(sFieldInfo)
End With
Next i
Testing the program so far
Save the project now. Run the program. Use the Open Database button to browse and select a database. Now click on a table in the Tables listbox. Are the names and data types of the columns displayed in the Columns listbox?
Part C - Adding a DataGridView to display the records of the selected Table
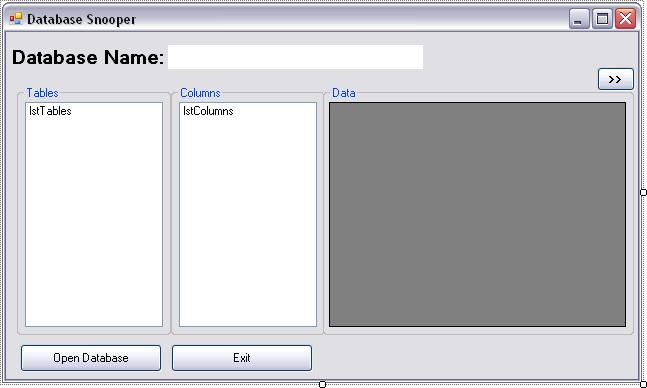
Add a new GroupBox and DataGridView control to display the records of the selected table, along with a Button—above the upper right corner of the groupbox—to let the user pop the form wider to see more columns of the DataGridView, as shown in the above illustration.
| GroupBox | DataGridView (Put inside GroupBox) | ||
| Property | Value | Property | Value |
| Text | Data | Name | DataGridView1 |
| Button (Above the upper right corner of the GroupBox) | |
| Property | Value |
| Name | btnBigSmall |
| Font.Bold | True |
| Text | >> |
The DataGridView control is an improved version of the .NET DataGrid control. To get the DataGridView control to display the rows and columns of the table the user has selected, we need to bind it to a BindingSource control which has its DataSource property bound to a DataTable, which we first need to fill with the records from our Data Adapter (dbAdapter). Okay, let's look at this step by step. Begin by creating a BindingSource control and DataTable control. Type the following code at the end—below the Next i line of code—of the lstTables_SelectedIndexChanged event procedure:
'Create a BindingSource control and DataTable control
Dim MyBindingSource As New BindingSource
Dim MyDataTable As New DataTable
Now fill the DataTable with the records in our Data Adapter (dbAdapter). Add the following line of code below the above code:
'Fill MyDataTable with the records in dbAdapter
dbAdapter.Fill(MyDataTable)
Now bind the DataSource property of MyBindingSource to MyDataTable. Add the following line of code:
'Bind the DataSource property to MyDataTable
MyBindingSource.DataSource = MyDataTable
And last but not least, bind the DataSource property of the DataGridView control to MyBindingSource to populate it with the records. Add this final line of code:
'Bind the DataSource property of DataGridView to
' MyBindingSource to display the records.
DataGridView1.DataSource = MyBindingSource
Testing the program so far
Save the project now. Run the program. Use the Open Database button to browse and select a database. Click on a table in the Tables listbox. Are the records in the table displayed in the DataGridView?
Required Enhancements
- Display the Database file name
You've already added the label (lblDatabaseName) to display the name of the selected database file. Now populate it.
- Get the BigSmall button working
You added the BigSmall button (btnBigSmall) to allow the user to pop the form wider to see more of the columns of the DataGridView control. Get it working.
- Sort the items in the DataGridView by the selected field in the Columns listbox
When the user clicks on a value in the column listbox (lstColumns) make sure that the records in the DataGridView are sorted by that field. (Hint: Get help on the Data Adapter's SelectCommand.CommandText property).
To copy a Project folder from your Projects folder on the Hard Drive to a floppy diskette or pen-drive follow these steps:
- Exit Visual Studio 2008 and insert the floppy diskette or pen-drive, that you want to copy the DatabaseSnooper folder to:
- Select the My Documents item on the Start Menu to open the My Documents folder.
- In the My Documents folder, double-click the Visual Studio 2008 folder to open it.
- Double-click on your Projects folder to open it.
- Open the DatabaseSnooper folder by double-clicking on it. Inside the DatabaseSnooper folder, delete the Obj and Bin folders—these folders are created automatically when you open a project. You do not need to copy them, or their contents, to your floppy diskette or pen-drive. Important: Be sure not to delete the My Project folder or Resources folder.
- Once you have deleted the Obj and Bin folders, hit the Backspace key once—or click the Back button on the toolbar. This moves you from inside the DatabaseSnooper folder to back inside your Projects folder.
- Right-click on the DatabaseSnooper
folder and
selected: 31/2" Floppy A: or your
pen-drive on the
Send To fly-out menu. This copies
the DatabaseSnooper folder to your floppy diskette
or pen-drive.