Open your Solution from project 1 (<your name>.sln).
Changing your Data Connection to a different database
Change to the Designer View and right-click on your data adapter (odaEmployees) object in the component tray:
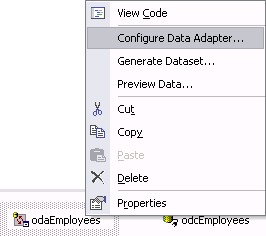
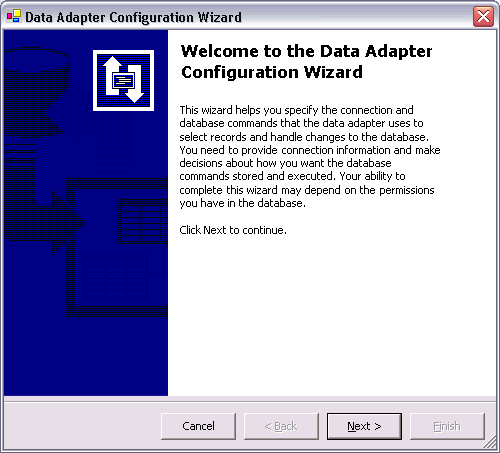
Choose Configure Data Adapter to launch the Data Adapter Configuration Wizard:
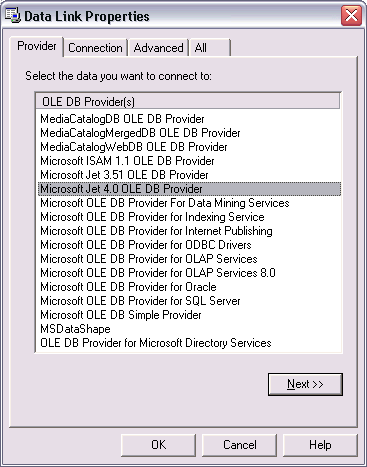
Click on the Next button to move onto the Choose Your Data Connection dialog and click on the New Connection button. Click on the Provider tab and choose Microsoft Jet 4.0 OLE DB Provider on the Providers list, and click Next:
On the Connection dialog, use the browse button [...] and select the provided prj2data.mdb database file (download the prj2data.mdb file here). Test the connection and click the Ok buttons to close the Connection dialog.
Adding the Picture field to the SQL statement
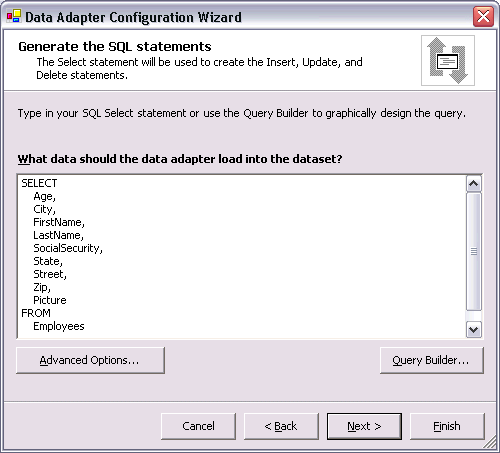
Now click the Next button until you get to the Generate SQL Statements dialog, which should look like this:
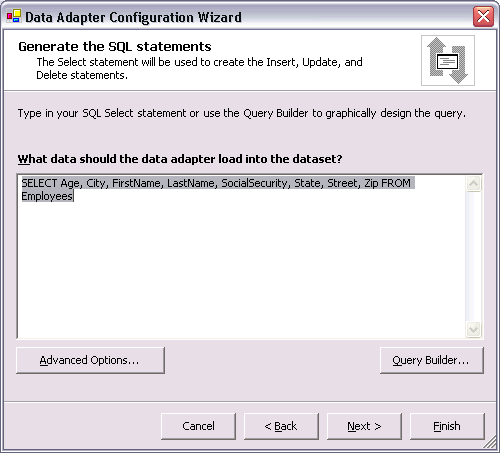
Notice that the SQL statement that had been generated when we had the Data Adapter connected to the prj1data.mdb database is still there. The new prj2data.mdb database includes all of these fields, and an extra field (Picture) that we need to include in the SQL statement. Click on the Query Builder button to open the Query Builder dialog (scroll down the field list until you can see the new Picture field):
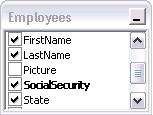
Put a checkmark in front of the Picture field. Click the OK button to close the Query Builder dialog. The Generate SQL Statements dialog should look something like this now:
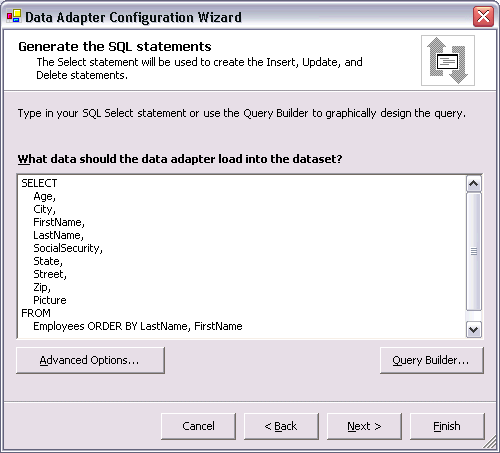
Notice that the SELECT statement now includes the Picture property. We also want to sort the records now by Last and First name. Click after the word Employees on the last line and type the follow SQL code (be sure to include a space after Employees):
ORDER BY LastName, FirstName
The SQL statement should now look like this:
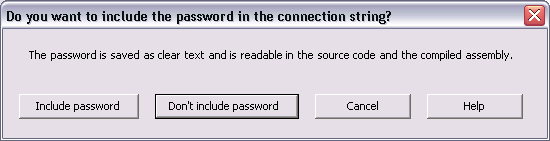
Click on the Finish button to complete the process. Click the Don't include password button on the the Do you want to include the password in the connection string? message box, since we have not specified one anyway:
Deleting our old Connection object and renaming our new one
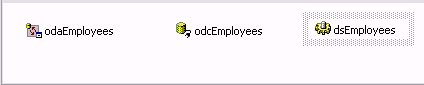
Look in the Component Tray:

Our old Connection object (obcEmployees, selected above) is still connected to the prj1data.mdb database. We no longer need it. Right-click on the odcEmployees Connection object and deleted it. Now rename the new Connection object (OleDbConnection1, which is connected to the prj2data.mdb database) to the same name as the old one: odcEmployees. We also need to generate a new dataset object now that the data adapter's data source has been changed to the prj2data.mdb database. Right-click on the old dsEmployees dataset and delete it as well.
The Component Tray should now look like this, with just the Data Adapter and Connection objects:
Generating a new Dataset object
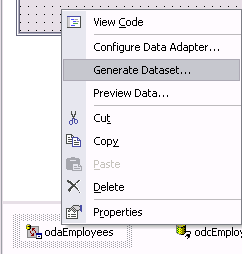
Right-click on the odaEmployees data adapter object and select Generate Dataset from the pop-up context menu. The Generate Dataset dialog appears:
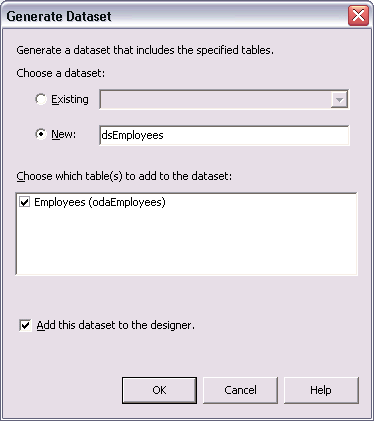
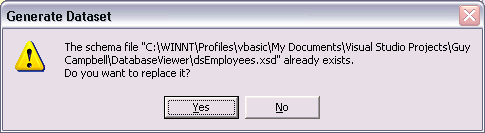
In the New textbox change Dataset1 to dsEmployees, then click the OK button. If you see the following dialog, click Yes to overwrite the old schema file (more on schemas below) that was left over from the previous version of the dsEmployees dataset:
While this sets the DataSetName property of the dataset to dsEmployees, notice that the name of our new dataset object is actually DsEmployees1. Make sure the DsEmployees1 dataset object is selected at the bottom of the form designer window so that you are viewing it's properties in Properties window. Now change the Name property of the dataset to dsEmployees and press enter. You should see the following objects in the component tray:
XML Schema files: When a typed dataset is generated at design time (All Datasets Generated from a Data Adapted are typed by default), a dataset class and an associated XML Schema is created in your project. XML Schemas define and validate the data being imported from XML streams or documents into typed datasets. The XML Schema associated with the dataset can be loading into the XML Designer providing a visual representation of the dataset structure that can be edited and viewed. Notice the markup language schema file dsEmployees.xsd in the Solution Explorer window. This XML Schema file was automatically created for the new dsEmployees dataset:
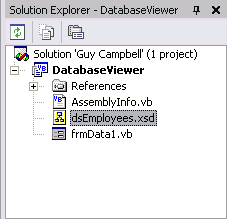
Double-click on the dsEmployees.xsd file above--in the Solution Explorer window--to open the XML Schema designer window, which will look something like this:
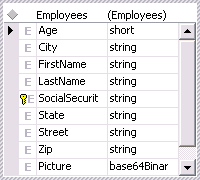
This is a graphical representation of our data source that is generated by the XML Schema file. To see the actually XML code that creates this, take a look at the bottom of the XML Schema designer window:
![]()
See how the Dataset view option is already selected. Click on the XML view icon to see the actually XML code in the dsEmployees.xsd file. In either view, you can actually edit the XML Schema--Do not make any changes to the XML code. An XML schema serves these functions:
- It describes the shape of the XML document ù for example, whether the XML document is constructed hierarchically or in a keyed relationship.
- It validates data being imported from an XML stream or document into a dataset.
- It establishes the relational structure of the dataset's tables and columns, the key columns, constraints, relationships between tables, and so on; this information is used when generating a Dataset Class. In this respect, the schema serves a special role that requires it to support dataset-specific features.
Don't make any changes to the XML code at this time, and close the XML Schema designer window when you're finished examining the XML code. If asked to save the changes to the XML Schema, choose No. Make sure you are in Design view--so that your form is visible--before going on.
Re-Binding the Textbox controls to the new Dataset
When we deleted the old dataset object, all the bindings we had set to each of the textboxes back in project 1 were broken. You now need to re-bind the textboxes to the new dataset. With the txtSS textbox selected, expand its DataBindings property in the Properties window. In the DataBindings' sub-properties, click the dropdown arrow on the Text property to view the available datasets (dsEmployees):
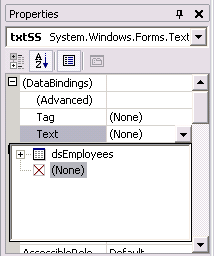
To see a list of the fields that the Employees table contains, click on the plus (+) sign in front of the dsEmployees dataset in the drop-down list to expand its contents:
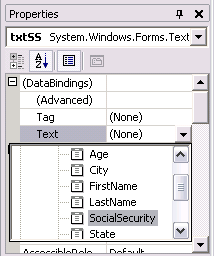
Scroll down the list of fields and click on the SocialSecurity entry. This binds (joins) the SocialSecurity field from the employees table to the txtSS textbox. Select each textbox one by one from the top down and use the method above to bind their DataBindings.Text properties to these fields from the Employees table:
| Textbox | Bind to Field (column) |
| txtSS | SocialSecurity |
| txtLast | LastName |
| txtFirst | FirstName |
| txtStreet | Street |
| txtCity | City |
| txtState | State |
| txtZip | Zip |
| txtAge | Age |
Adding a PictureBox to display the Picture field
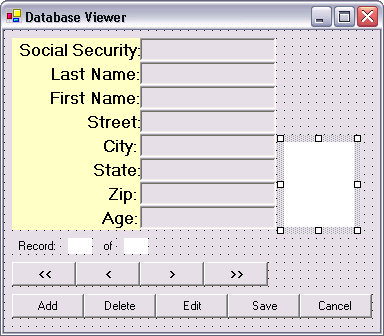
Add a PictureBox control where shown in the illustration above. Be sure the PictureBox is selected so that it's properties are displayed in the Properties window. Set these properties as follows:
| Property | Value |
| Name | PicField |
| Size.Width | 70 |
| Size.Height | 85 |
| Enabled | False |
Displaying the value of an OLE Field in a PictureBox
Note: A field in a Table that stores a picture, sound file, movie file, etc. is a special type of field called an OLE field. OLE is an acronym for Object Linking and Embedding. What this means is that an OLE Field actually has an object (like a file) embedded in it. The database application (Access in this case) cannot open the contents of an OLE field directly. The embedded object can only be opened by the application that either created it or was designed to open and process it, e.g. When you double-click on a file, the application that it is associated with--which is determined by the file's extension--is automatically launched and opens the file. For example, when you double-click on a file with a .txt extension (i.e. Memo.txt), the file is automatically opened in the Notepad application. This means that if you embed a .txt file in an OLE Field of a table, Notepad will be used to open and modify the file.
In theory, we should be able to bind the Image property of a PictureBox control to the Picture field of our new dataset. After all, the Picture field does have a picture embedded it. But an OLE field supports the embedding of many different object types--they don't necessarily need to be pictures. In fact OLE fields can have movie files, sound files, Word documents, and many other object types embedded in them. Because of the diverse types of objects (files) that OLE fields can support, it is not possible to bind the Image property of a PictureBox--which supports pictures only--to an OLE field. We will need to add our own the code to display the value of the Picture field in the PictureBox control.
Creating a custom ShowPic procedure
We will create a custom procedure to copy the embedded picture in the Picture field into the picField picturebox control. To do so will require the following 3 steps:
- Copy the data from the OLE Field (which is binary) of the current record into a Byte array buffer (bytePicData). This stores the binary information as a series of numbers in the Byte array:
Dim
bytePicData()
As Byte = _
dsEmployees.Tables("Employees").Rows(Me.BindingContext(dsEmployees,
_
"Employees").Position)("Picture")
- Copy the Byte array buffer contents (bytePicData), into a System.IO.MemoryStream:
Dim PicMemStream As New System.IO.MemoryStream(bytePicData)
- Use the FromStream method of the intrinsic Image object to convert and copy the MemoryStream into the Image property of the picField picturebox:
picField.Image = Image.FromStream(PicMemStream)
Change to Code View and add the
follow custom procedure to your Custom
Procedures Region that you created back in project 1:
Private Sub ShowPic()
'Make sure that the Table has records in it
If dsEmployees.Tables("Employees").Rows.Count > 0 Then
'Make sure that the Picture field of the current record is not Null
If
Not
dsEmployees.Employees(Me.BindingContext(dsEmployees,
_
"Employees").Position)("Picture")
Is
DBNull.Value
Then
'Dimension a Byte array variable (bytePicData) and store the value in
the Picture field inside it
Dim
bytePicData()
As Byte = _
dsEmployees.Tables("Employees").Rows(Me.BindingContext(dsEmployees,
_
"Employees").Position)("Picture")
'A MemoryStream is a System.IO object--like a FileStream.
By moving the values in the
' bytePicData byte array into a MemoryStream,
we can use the intrinsic Image object's
' FromStream method to convert and copy the picture
directly to the picField's Image property.
Dim
PicMemStream
As New System.IO.MemoryStream(bytePicData)
picField.Image = Image.FromStream(PicMemStream)
Else
'If the Picture field is Null, set the Image property of picField
to Nothing
' to removed any previously displayed image.
picField.Image =
Nothing
End If
End If
End Sub
Testing the program so far
Add the following line of code, which calls the ShowPic procedure, at the end of the delegate SetButtons procedure you added back in project 1:
ShowPic()
Now, when the user moves from one record to
the next, the Picture field of that
record will be displayed. Recall that you made the
SetButtons procedure a delegate procedure to the
PositionChanged event procedure of the
BindingManagerBase class back in
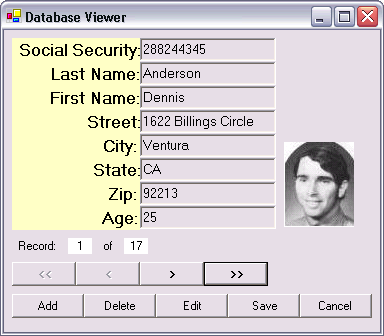
project 1--with the AddHandler command. Save and run
the program. Does the first screen look similar to the following
illustration? What happens when you navigate through the records?
Modifying the Edit option to include the new Picture field
We need to make some modifications to the Edit option to support the new Picture field. For example, when the user decides to Edit a record, they should be able to change the image in the Picture field. To allow the user to select a new picture for the Picture field we will need an OpenFileDialog. Add an OpenFileDialog control to the form now. Leave it's default name value (OpenFileDialog1) unchanged. Your Component Tray should now look like this:

We are now ready to add the code that will allow the user to dynamically choose a new picture for the Picture field. Double-click on the picField picturebox control and add the following code to it's Click event procedure (picField_Click):
'Allow only Jpeg files to be selected by setting the OpenFileDialog's Filter property. Set the
' Title property of the OpenFileDialog and use the ShowDialog method to display the dialog.
OpenFileDialog1.Filter = "(Jpeg Files) *.jpg | *.jpg"
OpenFileDialog1.Title = "Select a JPG file to insert into the Picture field"
OpenFileDialog1.ShowDialog()
If OpenFileDialog1.FileName <> "" Then
'Copy the selected jpeg file into the PictureBox with the FromFile method
' of the intrinsic Image object
picField.Image = Image.FromFile(OpenFileDialog1.FileName)
End If
When you originally added the picField picturebox control up above, you set it's Enabled property to False. This prevents the Click event procedure of the picField control from being triggered until we set it's Enabled property to True. We will only allow the user to change the picture in the Picture field when they are Editing, or Adding a new record. To do that we need to add the following line of code to both the btnEdit and btnAdd Click event procedures:
picField.Enabled = True
Now when the user clicks on either the Edit or Add buttons, they can click on the picField picturebox, and select a new picture for it. Where do we need to disable the picField picturebox control when the user has finished editing or adding a record? Which two Click event procedures need to have the following line of code added to them:
picField.Enabled = False
Testing the program so far
Save and run the program. Click on the Edit button then click on the picField picturebox control and browse for a new jpeg picture file (some are provided) and select it. Does the picture in the picField control change to the new image? Now click on the Save button. Navigate to a different record then come back to the record you just modified, was the new picture you selected for the record saved in it? No!
Saving a new picture to the Picture field of the Employees table
We've added the code to copy a new picture from a file that the user selected into the picField picturebox control (in the picField_Click event procedure). But since the picField control cannot be bound to the dataset (like the textboxes are), any modifications we make to it are not saved when we call the Update method of the data adapter. We need to write additional code to copy the picture in the picField picturebox control to the Picture field of the table. Unfortunately, we cannot simply copy the picture in the Image property of the picField picturebox control to the Picture field of the table. In fact, we need to copy the jpeg file itself into the Picture field. The 4 steps of this process include:
- Create a FileStream object and open the jpeg picture file (use the FileName property of the OpenFileDialog1 control which stores the location (path) and file name of the jpeg file that the user selected):
'Create a FileStream object and open the jpeg picture file
Dim fsPicFile As New System.IO.FileStream(OpenFileDialog1.FileName, _
System.IO.FileMode.Open, System.IO.FileAccess.Read)
- Create an empty Byte array variable (bytePicFile) that is the size of the jpeg picture file (the Length property of the FileStream (fsPicFile) object is equal to the size of the file in bytes):
'Create a Byte array the size of the Picture file minus the EOF marker
Dim bytePicFile(fsPicFile.Length() - 1) As Byte
- Use the Read method of the FileStream (fsPicFile) object to read the jpeg picture file directly into the Byte array (bytePicFile) variable, and close the FileStream:
'Use the FileStream object (fsFicFile) to read the picture into the Byte array
fsPicFile.Read(bytePicFile, 0, bytePicFile.Length)
'Close the FileStream
fsPicFile.Close()
- Copy the picture, which is now stored as a sequence of numbers, in the Byte array (bytePicFile) variable to the Picture field of the current record of the Employees table:
'Copy the byte array contents to the Picture field
dsEmployees.Employees(Me.BindingContext(dsEmployees, _
"Employees").Position)("Picture") = bytePicFile
Where do we add the above code to the program? The Click event procedure of the Save button sounds like a logical spot. Change to Code View and take a look at the existing code in the btnSave_Click event procedure. Modify the btnSave_Click event procedure code by adding the above code where shown below (italicized):
Me.BindingContext(dsEmployees, "Employees").EndCurrentEdit()
'The dataset's HasChanges method returns True when the contents of any bound controls are modified.
' Changing the picture in the picturebox will not affect the HasChanges method because the picturebox
' control is not bound to the dataset. If the FileName property of the OpenFileDialog control is not
' blank, then we can assume the user selected a new picture for the Picture field.
If dsEmployees.HasChanges() = True Or OpenFileDialog1.FileName <> "" Then
'Be sure the user actually changed the value of the PictureBox before updating the Picture field
If OpenFileDialog1.FileName <> "" Then
'Create a FileStream object and open the jpeg picture file
Dim fsPicFile As New System.IO.FileStream(OpenFileDialog1.FileName, _
System.IO.FileMode.Open, System.IO.FileAccess.Read)
'Create an empty Byte array the size of the Picture file
Dim bytePicFile(fsPicFile.Length() - 1) As Byte
'Use the FileStream object (fsFicFile) to read the picture into the Byte array
fsPicFile.Read(bytePicFile, 0, bytePicFile.Length)
'Close the FileStream
fsPicFile.Close()
'Copy the byte array (bytePicFile) contents to the Picture field
dsEmployees.Employees(Me.BindingContext(dsEmployees, _
"Employees").Position)("Picture") = bytePicFile
'Clear the FileName property after copying the jpeg picture to the Picture field
OpenFileDialog1.FileName = ""
End If
odaEmployees.Update(dsEmployees)
'Always clear the Dataset before refilling it
dsEmployees.Clear()
'The Fill method of the Data Adapter fills data sets that are attached to it
odaEmployees.Fill(dsEmployees, "Employees")
End If
Testing the program so far
Save and run the program. Try editing a record. With the addition of the above code (shown italicized above) to the existing code in the btnSave_Click event procedure, you should now be able to Edit a record, change it's picture, click the Save button, and save the new picture in the table of the database. Does it work?
Adding a ComboBox and binding it to the Dataset

Place a new ComboBox
control
on the form where shown above. Like textboxes, a combobox can be bound
directly to a dataset. We will use the combo box to allow the user to
quickly navigate to a new record by selecting a LastName from a list of
all the last names in the table. Be sure the combobox is selected so that
it's properties are displayed in the Properties
window. Set these properties as follows:
| Property | Value |
| Name | cmbLastNames |
| DataSource | dsEmployees |
| DisplayMember | LastName |
| Text | blank |
Note: For the DataSource be sure to select dsEmployees on the dropdown list, not the dsEmployees.Employees item. Because the combobox is bound to the dataset, we should not need to add any extra code to our program to get it to work--unlike the PictureBox.
Testing the program so far
Save and run the program. Navigate through the records. Does the last name in the combobox automatically match the current record? Drop down the combobox and select a last name. Do you jump to the record of that last name?
Adding a Find option
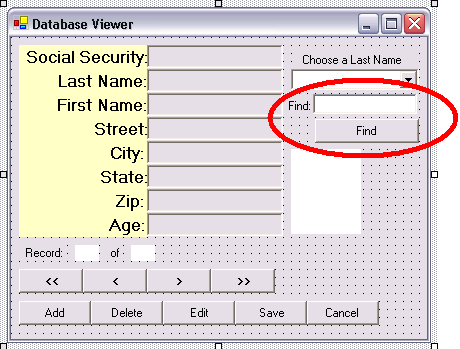
Add
a new Textbox,
Button, and Label control to
your form where show in the above illustration. Select them each in turn so that their properties are displayed in
the Properties window and set these properties:
| TextBox | |
| Property | Value |
| Name | txtFind |
| Text | blank |
| Button | |
| Property | Value |
| Name | btnFind |
| Enabled | False |
| Text | Find |
| Label | |
| Property | Value |
| Text | Find: |
Disabling the Find button unless something is typed into the Find textbox
We set the Enabled property of the find button (btnFind) to false above, so that the user cannot click on it until they have typed a search string into the find textbox (txtFind). Double-click on the find textbox (txtFind) to open the code window and add this code to the txtFind_TextChanged event procedure:
'If the textbox isn't empty, enable the Find button, else disable it.
If txtFind.TextLength > 0 Then
btnFind.Enabled = True
Else
btnFind.Enabled = False
End If
Getting the Find option to work with a DataView object
A DataView object lets us dynamically create different views of the data stored in a Dataset. It can save us the trouble of changing the sort order in our Data Adapter if we want to view the data sorted differently or filtered in several different ways. While we are not going to use a DataView object to change the sort order of the data, it also comes with a handy Find method that makes searching for data easy. Strangely enough, a Dataset does not come with a Find method--I've already written a letter to Microsoft about that little oversight.
Instead of embedding a DataView object into our project by adding a DataView control to the Components Tray, we will create a temporary DataView object with a dataview constructor only where we need it--in the btnFind_Click event procedure. This is how the code to dynamically create a DataView object with a dataview constructor looks:
Dim dvFind As DataView = New DataView(dsEmployees.Tables("Employees"), _
"", _
"LastName", _
DataViewRowState.CurrentRows)
Each of the four parameters (broken onto separate lines above) required to create the DataView object with the DataView constructor are as follows:
- The Table to include in the new DataView.
- The Row (record) filter. Which we are leaving empty ("") so that ALL the rows are included.
- The Sort Column (field). Important: This is the field that will be searched when the Find method is executed. This parameter must be included for the Find method to work. I mention this because there is also an option to create a DataView using the DefaultView property of the table. The command would look like this:
Dim dvFind As DataView = New dsEmployees.Tables("Employees").DefaultView
But this method does not include the Sort Column parameter, so a call to this new dataview's Find method generates an error. Hence, we must do it with the dataview constructor, and include the Sort Column parameter for the Find method to work.
- Row State specification. There are several choices for this parameter that allow you to include only Changed records, Deleted records, etc. CurrentRows means all normal records.
Add the above code to the btnFind_Click event procedure. Once we have created our DataView object with the above code, we can use it's Find method to search for a record by LastName (which is the value specified as the Sort Column parameter). Add the following line of code, below the code above, in the btnFind_Click event procedure:
Dim iRowIndex As Integer = dvFind.Find(txtFind.Text)
The above call to the DataView's Find method returns the row index of the record that matches the search criteria (txtFind.Text). So after the line of code above is executed, iRowIndex will either be equal to a number between 0 and the maximum number of records if a match was found or -1 if no match was found. To complete the Find option, add the following code at the end of the btnFind_Click event procedure (below the code above):
'If iRowIndex is equal to -1 then no match was found
If iRowIndex = -1 Then
MessageBox.Show("No Match Found!")
Else
Me.BindingContext(dsEmployees, "Employees").Position = iRowIndex
End If
If a match is found, we display that record.
Testing the program so far
Save and run the program. Try finding a record by typing it's last name. Does it work? Is the search case sensitive? Does a partially typed name work?
Improving the Find option
As it is now, our Find option is very limited. How can we allow the user to search on different fields from the table? The Sort Column parameter in the DataView constructor specifies the field that the Find method will search, so we should be able to change it to a different field name to allow the user to search other fields.
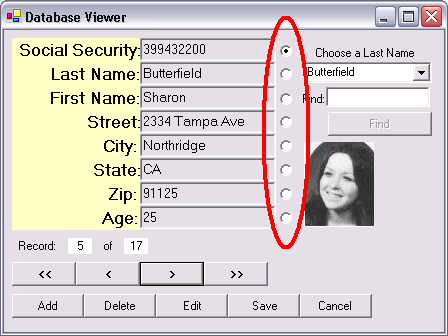
In the illustration above, I've added radio buttons--one for each field (column)--so that the user can select which field they want to search by. Add a new RadioButton control to the form. Position the RadioButton next to the right edge of the SocialSecurty textbox (as shown in the illustration above). Be sure it is selected so that it's properties are displayed in the Properties window. Set these properties as follows:
| Property | Value |
| Name | radSS |
| Text | blank |
| Tag | 0 |
Right-click on the radSS
radio button
and select copy from the context menu. Then right-click on the form and
paste 7 copies of the radiobutton and arrange them as shown in the
above illustration. Starting with the radiobutton next to the
LastName field and working down, set these properties for each button:
| Property | Value |
| Name | radLastName |
| Text | blank |
| Tag | 1 |
| Property | Value |
| Name | radFirstName |
| Text | blank |
| Tag | 2 |
| Property | Value |
| Name | radStreet |
| Text | blank |
| Tag | 3 |
| Property | Value |
| Name | radCity |
| Text | blank |
| Tag | 4 |
| Property | Value |
| Name | radState |
| Text | blank |
| Tag | 5 |
| Property | Value |
| Name | radZip |
| Text | blank |
| Tag | 6 |
| Property | Value |
| Name | radAge |
| Text | blank |
| Tag | 7 |
Notice while we are giving each RadioButton a unique name, we are also setting their Tag properties to a unique number value. More about this in a minute.
Instead of using a constant value ("LastName") as the Sort Column parameter of our DataView constructor, we can now use a string variable (sSortColumn) that is set to the name of the field that we want to search, like this:
Dim dvFind As DataView = New DataView(dsEmployees.Tables("Employees"), _
"", _
sSortColumn, _
DataViewRowState.CurrentRows)
sSortColumn is a string variable that is dimensioned in the Declarations section--at the top of the code window--like so:
Dim sSortColumn As String
After adding the dimension statement above to the Declarations section of the code window, modify the DataView constructor code in the btnFind_Click event procedure so that it includes the sSortColumn variable in place of the constant "LastName" parameter (as shown above).
Here is how we could set the sSortColumn variable when the users clicks on the Social Security option button and triggers the radSS_Click event procedure:
sSortColumn = "SocialSecurity"
Similarly, you could add a line of code to the Click event procedures of all the radiobuttons that set sSortColumn to the field value to be searched. But do not enter this code yet, read on.
Creating a custom Event Handler
In previous versions of Visual Basic, we had the option to create an array of controls that could then share the same set of event procedures (The controls had to be of the same type, and they had to have the same name). In the case of our radiobuttons, if they were all members of a control array, they would share the same Click event procedure. Here's how the code for that control array based Click event procedure would have looked in older versions of Visual Basic:
Select Case Index
Case 0
sSortColumn = "SocialSecurity"
Case 1
sSortColumn = "LastName"
Case 2
sSortColumn = "FirstName"
Case 3
sSortColumn = "Street"
Case 4
sSortColumn = "City"
Case 5
sSortColumn = "State"
Case 6
sSortColumn = "Zip"
Case 7
sSortColumn = "Age"
End Select
The event procedure for an array of controls automatically included an Index parameter that was equal to the index value of the element from the control array that received the event. It was a very useful feature of previous versions of Visual Basic.
Quoted from the Visual Basic .NET help system: In Visual Basic .NET, control arrays are no longer supported. Changes to the event model make control arrays unnecessary. Just as control arrays in Visual Basic 6.0 could share events, the event model in Visual Basic .NET allows any event handler to handle events from multiple controls. In effect, this allows you to create groups of controls of disparate types that share the same events.
Instead of adding a single line of code to the Click event procedures of all our radiobuttons--that would just be too easy--let's create a single custom event handler procedure that will be used by the Click event procedures of all our radiobuttons. To create a custom event handler procedure, we need to familiarize ourselves with the syntax of regular event procedure declarations. Here is the syntax of an event procedure (broken onto two lines for readability):
Private Sub <Object_Event>(ByVal sender As System.Object, _
ByVal e As System.EventArgs) Handles <Object.Event>
We can create a custom event handler procedure by following the above syntax with a few additions to the Handles specification that include the Click event procedures of all our radiobuttons, like this (also on multiple lines for readability):
Private Sub RadioButton_Click(ByVal sender As System.Object, _
ByVal e As System.EventArgs) _
Handles radSS.Click, _
radLastName.Click, _
radFirstName.Click, _
radStreet.Click, _
radCity.Click, _
radState.Click, _
radZip.Click, _
radAge.Click
The really important part of the above code is what follows the Handles specification at the end. This is where you specify the object names and their event procedures that will cause this custom event handler procedure to be executed. To create an event handler procedure, just create a procedure that includes the special sender System.Object and e System.EventArgs parameters (required in all event procedures), then make additions to the Handles specification for each object.event that we want to trigger it. This new RadioButton_Click event handler procedure does not replace the existing Click event procedures of the radiobuttons--In fact, if you had code in them, they would still be executed. But any code in our custom RadioButton_Click procedure is also executed automatically whenever the Click event procedure of a radiobutton--specified in the Handles section--is triggered. Add the above RadioButton_Click procedure to your Custom Procedures Region that you created back in project 1. Inside the RadioButton_Click procedure, type the following code:
Select Case CInt(sender.Tag)
Case 0
sSortColumn = "SocialSecurity"
Case 1
sSortColumn = "LastName"
Case 2
sSortColumn = "FirstName"
Case 3
sSortColumn = "Street"
Case 4
sSortColumn = "City"
Case 5
sSortColumn = "State"
Case 6
sSortColumn = "Zip"
Case 7
sSortColumn = "Age"
End Select
The sender parameter is a reference to the object that sent the event. Recall that when we added the radiobuttons to the form, we set the Tag property of each button to a unique number value. That was so we could determine which radiobutton received the Click event in the code above.
Testing the program so far
Save and run the program. Click on the Last
Name search option button to turn it on, and test the find button. Does it work?
Note the first name of the record that was found and navigate back to the
first record. Now turn on the First Name search option button
and type the first name of record you found while testing the last name
search option. Does it find the record? No! Do any of the
other search fields work consistently? No!
Only the Last Name search option will work consistently. When we
provide a new value for the
Sort Column parameter in our
DataView constructor code, the data is sorted by that field when
the dataview is created--but only inside the dataview object. So the
find is working, but the index value of the found record is in a different
location from our dataset--all except for Last Name which is what our
dataset was sorted by originally. Note:
We cannot use a DataView object
and it's very limited Find method
to search for records by different field values, unless we resort the data
each time we use it.
Getting the Find option to work - Searching for records manually
We need to completely change the code in the btnFind_Click event procedure, so that the user can search through the records for any field value that they select--without re-sorting the records to do it. Instead of using a DataView's Find method, we can search the Dataset (dsEmployees) manually, with a for-next loop, like this:
Dim i As Integer
'Search every record until a match is found, then exit the For-Next loop
For i = 0 To Me.BindingContext(dsEmployees, "Employees").Count - 1
'Use the sSortColumn variable as the field (column) parameter to
' specify the field to search.
If dsEmployees.Employees(i)(sSortColumn) = txtFind.Text Then
'Exit the loop if a match is found
Exit For
End If
Next i
Once the for-next loop exits, the loop variable i will either be equal to a value between 0 and the maximum number of records if a match was found or the value of the Count property of the BindingContext object if no match was found. Note: the Count property of the BindingContext is equal to the number of records (rows), but the index value of the last record is equal to Count - 1 because the index of the first record is 0. Now all we need to do is add the following code, below the code above, where we test the value of i to determine if a match was found or not:
If i = Me.BindingContext(dsEmployees, "Employees").Count Then
MessageBox.Show("No Match Found!")
Else
Me.BindingContext(dsEmployees, "Employees").Position = i
End If
We display a "Not Found" message box if i is equal to the Count property of the BindingContext object (which means the for-next loop went all the way to the end without finding a match), or we change it's Position property to the index of the record that was found. Replace your old code in the btnFind_Click event procedure with the code above (starting with Dim i As Integer).
Testing the program so far
Save and run the program. Try finding a record by typing it's last name. Does it work? Is the search case sensitive?
Unlike the Find method of a dataview object, our search is case sensitive (Note: A dataview object has a property that can be enabled to turn on case sensitivity of it's Find method, it is off by default).
Improving the Find option - Disabling case sensitivity
What if we us the UCase function and convert both the search string and the field value to upper case before comparing them to each other? Note: UCase takes a string as a parameter and returns a version of the string with all the letters capitalized, it doesn't actually change the value in the string. The following code modification removes case sensitivity from our Find option (broken onto 2 lines for readability):
If
UCase(dsEmployees.Employees(i)(sSortColumn))
= _
UCase(txtFind.Text)
Then
Modify the If test in the for-next loop of the btnFind_Click event procedure to match the above code. Save and run the program. Does a search work? Is it still case sensitive?
Improving the Find option - Partial field searching
The rarely used Like operator can be used to make partial field searching easy. The Like operator can recognize wildcard characters in a search string. So our goal is to get a search string, specified by the user, that looked like this:
"Camp"
To look like this:
"*Camp*"
The addition of asterisks (*) to both ends of the search string are wildcard symbols that represent any characters. So any field with the string "Camp" embedded in it will match. So we need to modify the If test in the for-next loop of your btnFind_Click event procedure one last time to include the Like operator instead of an equal sign (=), like this:
If
UCase((dsEmployees.Employees(i)(sSortColumn))
Like
_
"*"
& UCase(txtFind.Text)
& "*"
Then
By concatenating asterisks to both ends of the value in txtFind.Text, a partial field value search should work. Modify the If test in the for-next loop of your btnFind_Click event procedure to match the above line.
Testing the finished program
Save and run the program. Test the find option with full and partial values for different fields.
Recommended Enhancements
Improving the Find option even more
If there are multiple records with the same search field value, our program only finds the first record that matches. This is because our search always starts from the first record. What if the user had the option to start searching from the next record, so that after a match is found, any additional matches could be found. Make the find option as user-friendly and versatile as possible.