Open the DatabaseViewer project we did last week.
Changing the Connection String to use a different database
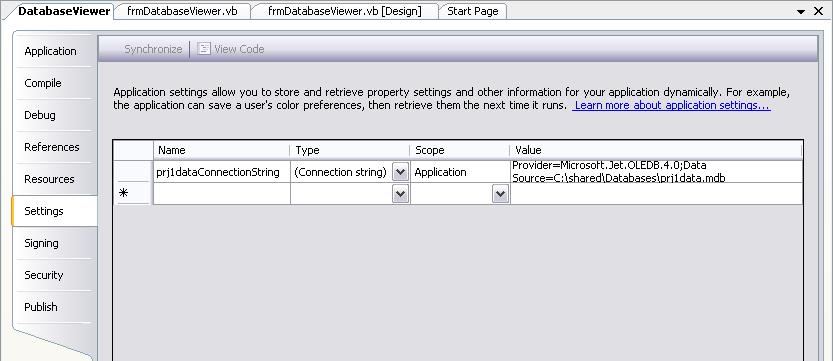
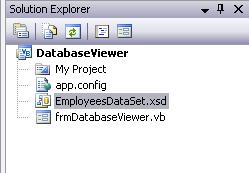
Access the Project Properties by right-clicking on the DatabaseViewer project in the solution explorer window and selecting the Properties item at the bottom of the context menu, as shown:

On the DatabaseViewer Project Designer window click on the Settings tab to display the Connection String value:
Your screen should look like the above illustration. Notice in the Value column that the Source is set to the prj1data.mdb database file. Our goal is to change the Source value of the Connection String to the prj2data.mdb file. This file is located in the \shared\Databases folder on drive C:. Note: If you are working from home, you can download the prj2data.mdb file here. Click once in the Value column then click on the ellipses button, as shown:

The Connection Properties dialog should be displayed:

Use the Browse... button to locate and select the prj2data.mdb file. Located in the \shared\Databases folder on drive C:.
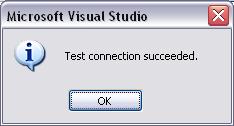
Once you've selected the prj2data.mdb database file, and its name appears in the Database file name textbox, click on the Test Connection button to make sure that the connection to the database is working. This message box, confirming the connection, should appear:
Click the OK buttons on the message box and on the Connection Properties dialog to close them both. The Value column should now look like this:
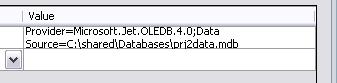
Be sure the Source is set to the prj2data.mdb database file as shown above. Now change the Connection String Name to prj2dataConnectionString, as shown:

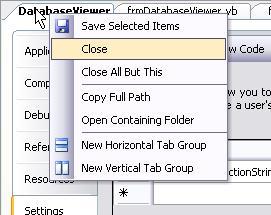
Be sure that the entries in the Name and Value columns match the illustration above. Then save the project by clicking on the Save All button on the standard toolbar. Right-click on the DatabaseViewer properties window tab and close it, like this:
Adding the Picture field to the SELECT query of the Table Adapter
Double-click on the EmployeesDataSet.xsd dataset file in the Solution Explorer window, as shown below, to display the Dataset Designer window:
The Dataset Designer window lets us modify the Dataset, by adding and removing columns. It also lets us modify queries for the Table Adapter, including the SELECT statement that specifies which tables—and which columns from those tables—can be included in the Dataset:
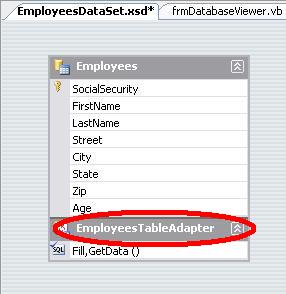
Click once on the EmployeesTableAdapter header, circled above, to display the properties of the Table Adapter in the properties window. Notice how the value of the Connection property is our new connection string, prj2dataConnectionString. Also notice the properties, DeleteCommand, UpdateComand, and InsertCommand. These are the queries for deleting, editing, and adding records to the table which were automatically included in the Table Adapter when it was created:
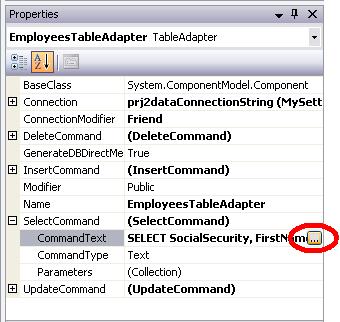
Click on the tiny + in front of the SelectCommand property to expand its sub-properties. Select the CommandText item and click on the ellipses button, circled above, to display the Query Builder window:
In the last project I said you don't need to know SQL to set up the SELECT statement for your Table Adapter (EmployeesTableAdapter)—SQL stands for Simple Query Language. When we used the Data Source Configuration Wizard to configure our BindingSource control and generate a Table Adapter and Dataset, we were able to use a simple graphical hierarchy and checkmark the tables and columns to include in our Dataset—like a windows explorer folder hierarchy with checkboxes in front of the folders (tables) and files (columns). Well, I lied. A little SQL knowledge does help. Especially when it comes to modifying the SELECT query to use a different database or add and remove columns. Fortunately, the Query Builder makes it easy. Even for the SQL-challenged.
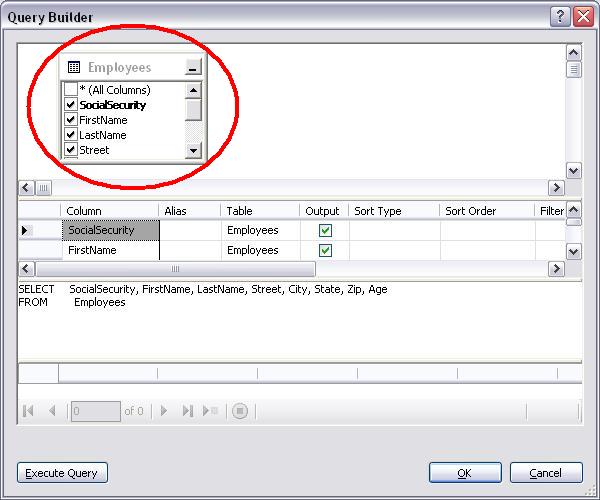
Notice the Employees Table column listbox—the little listbox at the top of the Query Builder, circled in the above illustration. This lists all of the columns included in the Employees table. Also notice this part of the Query Builder, where the SELECT statement command is displayed:
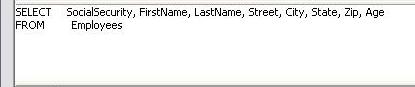
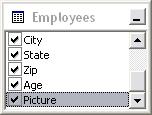
Those who have SQL experience have the option to modify this command directly. We, however, are going to use the checkmark method again. Scroll down to the bottom of the column list in the Employees Table column listbox and put a checkmark in front of the new column—Picture—included in the Employees table of the prj2Data.mdb database, as shown:
Now look what was automatically included in the SELECT statement command:

Notice that the SELECT statement now includes the Picture property. Now we are going to modify the SELECT command to include an ORDER BY statement to sort the rows by Last and First name. Click after the word Employees on the second line and type the following SQL code (be sure to include a space after Employees):
ORDER BY LastName, FirstName
The SQL statement should now look like this:

Check your spacing and spelling, then click the OK button to close the Query Builder. Click on the Yes button on the following messagebox to regenerate the DeleteCommand, UpdateComand, and InsertCommand queries of the Table Adapter so that they include the newly added Picture field:

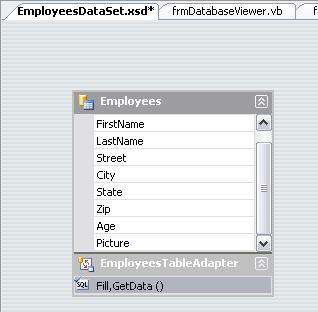
Now that the Picture column is included in the EmployeesTableAdapter, take a looks at the columns included in EmployeesDataSet in the Dataset Designer window. You may need to scroll the list down to see the new Picture item at the bottom, as shown:
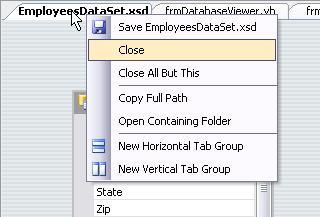
Now save the changes to the EmployeesDataSet.xsd file by clicking on the Save All button on the standard toolbar. Then close the Dataset Designer window by right-clicking on its tab and selecting close on the context menu, like this:
Adding a PictureBox to display the Picture field
Add a PictureBox control where shown in the illustration above. Be sure the PictureBox is selected so that it's properties are displayed in the Properties window. Set these properties:
| Property | Value |
| Name | picField |
| BackColor | White |
| Enabled | False |
| Size.Width | 70 |
| Size.Height | 85 |
Expand the (DataBindings) property of picField, click on the Image sub property and choose the Picture column from the BindingSourceEmployees datasource hierarchy, as shown:
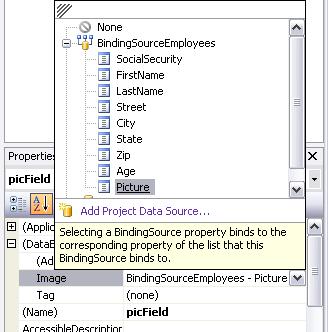
This binds the picField picturebox to the Picture field from the Employees table.
Testing the program so far
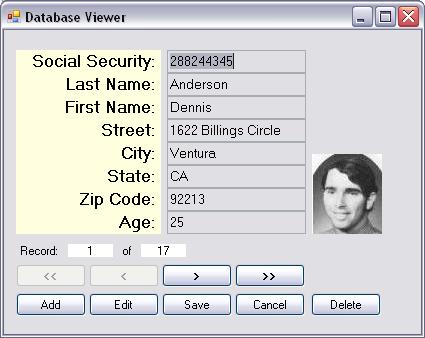
Let's test run the program and see what happens. Click on the Start Debugging button on the toolbar. Does the first screen look similar to the following illustration? What happens when you navigate through the records?
Modifying the Edit option to include the new Picture field
We need to make some modifications to the Edit option to support the new Picture field. For example, when the user decides to Edit a record, they should be able to change the image in the Picture field. To allow the user to select a new picture for the Picture field we will need an OpenFileDialog control. Add an OpenFileDialog control to the form now. Leave it's default name value (OpenFileDialog1) unchanged. Your Component Tray should now look like this:

We are now ready to add the code that will allow the user to dynamically choose a new picture for the Picture field. Double-click on the picField picturebox control and add the following code to it's Click event procedure (picField_Click):
Dim iResponse As DialogResult
'Allow only Jpeg files to be selected by setting
' the OpenFileDialog's Filter property. Set
' the Title property of the OpenFileDialog
' and use the ShowDialog method to display
' the dialog.
OpenFileDialog1.Filter = _
"(Jpeg Files) *.jpg | *.jpg"
OpenFileDialog1.Title = _
"Select a JPG file to insert into the Picture field"
iResponse = OpenFileDialog1.ShowDialog()
If iResponse <> Windows.Forms.DialogResult.Cancel _
And OpenFileDialog1.FileName.Length <> 0 Then
'Copy the selected jpeg file into the PictureBox
' with the FromFile method of the intrinsic
' Image object.
picField.Image = _
Image.FromFile(OpenFileDialog1.FileName)
End If
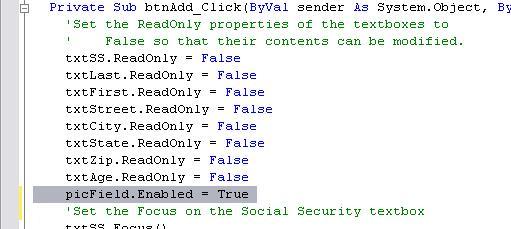
When you originally added the picField picturebox control up above, you set it's Enabled property to False. This prevents the Click event procedure from being raised until we set it's Enabled property to True. We will only allow the user to change the picture in the Picture field when they are Editing, or Adding a new record. To do that we need to add picField.Enabled = True to both the btnEdit and btnAdd Click event procedures—btnAdd_Click code shown below:
Be sure to add the above line of code to the btnEdit_Click event procedure as well. Now when the user clicks on either the Edit or Add buttons, they can click on the picField picturebox and select a new picture for it. Where do we need to disable the picField picturebox control when the user has finished editing or adding a record? Which two Click event procedures need to have the following line of code added to them:
picField.Enabled = False
Testing the program so far
Save and run the program. Click on the Edit button then click on the picField picturebox control and browse to and select a new jpeg picture file (some are provided in C:\shared\JPG Images). Does the picture in the picField control change to the new image? Now click on the Save button. Navigate to a different record then come back to the record you just modified, was the new picture you selected for the record saved in it? How does this work?
Binding properties to columns in a Dataset
Stop the program, and in design view, click once on the picField picturebox to display its properties in the properties window. Scroll down to the Image property and hold your mouse pointer over it, like this:
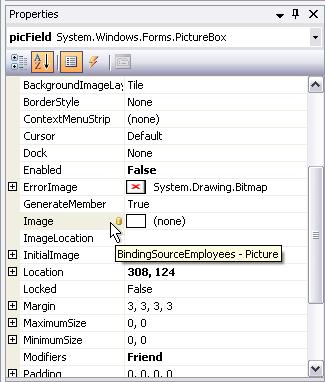
Notice two things about the Image property that stand out. One is the little yellow BindingSource icon to the right of the property name:
![]()
The other is the tooltip popup that says BindingSourceEmployees - Picture. Both of these attributes tell us that the Image property of picField is bound to the Picture column of BindingSourceEmployees. This means that modifying the Image property of picField is actually modifying the Picture column of the BindingSource. The Text properties of the textboxes are the same way. Check it out, select the txtLast textbox and look at it's Text property. See the little BindingSource icon to the right of the property name?
Adding a ComboBox and binding it to the Dataset
Place a new ComboBox
control
on the form where shown above. Like textboxes and pictureboxes, a combobox can be bound
directly to a dataset. We will use the combobox to allow the user to
quickly navigate to a new record by selecting a LastName from a list of
all the last names in the table. After placing the new combobox, be sure
it is selected so that
it's properties are displayed in the Properties
window. Set these properties of the ComboBox
control:
| Property | Value |
| Name | cmbLastNames |
| DataSource | BindingSourceEmployees |
| DisplayMember | LastName |
| Text | blank |
Testing the program so far
Save and run the program. Navigate through the records. Does the last name in the combobox automatically match the current record? Drop down the combobox and select a last name. Do you jump to the record of that last name?
Adding a Find option
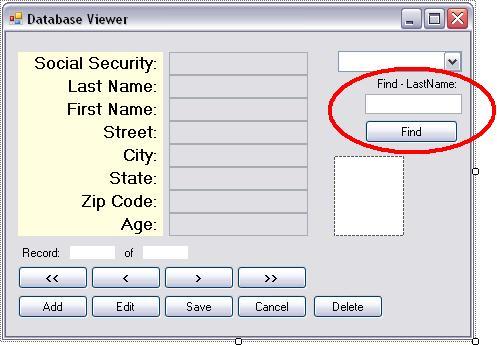
Add
new Label, Textbox,
and
Button controls to
your form where show in the above illustration. Select them each in turn so that their properties are displayed in
the Properties window and set these properties:
| Label | |
| Property | Value |
| Name | lblFind |
| Tag | LastName |
| Text | Find - LastName: |
| TextAlign | MiddleRight |
| TextBox | |
| Property | Value |
| Name | txtFind |
| Text | blank |
| Button | |
| Property | Value |
| Name | btnFind |
| Enabled | False |
| Text | Find |
Notice how instead of using the default name for the find label we have named it, lblFind. This is because we will be changing its Text property dynamically in code later on. Also notice that we are assigning the name of the column being searched to its Tag property.
Disabling the Find button unless something is typed into the Find textbox
We set the Enabled property of the find button (btnFind) to false above, so that the user cannot click on it until they have typed a search string into the find textbox (txtFind). Double-click on the find textbox (txtFind) to open the code window and add this code to the txtFind_TextChanged event procedure:
'If the textbox isn't empty, enable the
' Find button, else disable it.
If txtFind.TextLength > 0 Then
btnFind.Enabled = True
Else
btnFind.Enabled = False
End If
Using the Find method of the BindingSource to locate rows (records)
Add the following code to the btnFind_Click event procedure:
Dim iRowIndex As Integer
iRowIndex = BindingSourceEmployees.Find( _
EmployeesDataSet.Employees.Columns( _
"LastName").ToString, txtFind.Text)
The above code—broken onto multiple lines for readability—calls the Find method of BindingSourceEmployees, which returns the row index of the record that matches the search criteria in txtFind.Text. The Find method takes two parameters. The first is the column from the Employees table to search:
EmployeesDataSet.Employees.Columns( _
"LastName").ToString
The second parameter is what to search for:
txtFind.Text
This code only searches the LastName column. After the Find method is executed, iRowIndex will be equal to a number between 0 and the maximum number of records if a match was found, or -1 if no match was found.
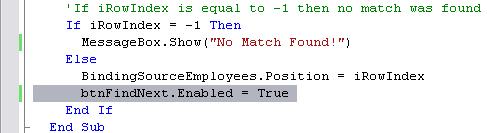
To complete the Find feature, add the following code at the bottom of the btnFind_Click event procedure (below the code above):
'If iRowIndex is equal to -1 then no
' match was found.
If iRowIndex = -1 Then
MessageBox.Show("No Match was Found!")
Else 'Navigate to the found record
BindingSourceEmployees.Position = iRowIndex
End If
If a match is found, we display that record, else we display a messagebox saying no match was found.
Testing the program so far
Save and run the program. Try finding a record by typing it's last name. Does it work? Is the search case sensitive? Does a partially typed name work?
Improving the Find option and adding a Sort feature
As it is now, our Find option is very limited. How can we allow the user to search on different columns from the table? And while we are at it, how can we let the user quickly Sort the data by any column they like?
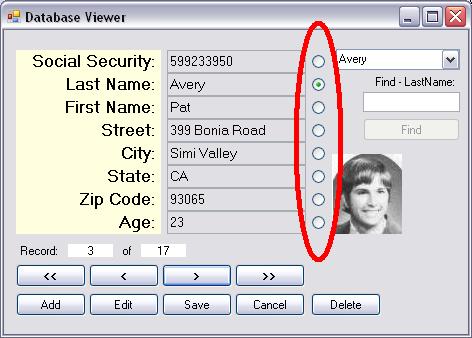
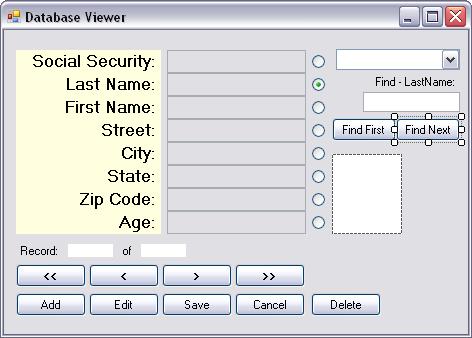
In the illustration above, I've added radio buttons—one for each column (field)—so that the user can select which column they want to Sort by. Clicking a Sort RadioButton will immediately sort the data by that column. We will also tie the sort order to the Find option so that find works on the column the data is sorted by.
Add a new RadioButton control to the form. Position the RadioButton next to the right edge of the SocialSecurty textbox (as shown in the illustration above). Be sure it is selected so that it's properties are displayed in the Properties window. Set these properties of the RadioButton:
| Property | Value |
| Name | rdoSS |
| Text | blank |
| Tag | SocialSecurity |
Right-click on the rdoSS
radio button
and select copy from the context menu. Then right-click on the form and
paste 7 copies of the radiobutton and arrange them as shown in the
above illustration. Starting with the radiobutton next to the
LastName field and working down, set these properties for each button:
| Property | Value |
| Name | rdoLast |
| Checked | True |
| Text | blank |
| Tag | LastName |
| Property | Value |
| Name | rdoFirst |
| Text | blank |
| Tag | FirstName |
| Property | Value |
| Name | rdoStreet |
| Text | blank |
| Tag | Street |
| Property | Value |
| Name | rdoCity |
| Text | blank |
| Tag | City |
| Property | Value |
| Name | rdoState |
| Text | blank |
| Tag | State |
| Property | Value |
| Name | rdoZip |
| Text | blank |
| Tag | Zip |
| Property | Value |
| Name | rdoAge |
| Text | blank |
| Tag | Age |
Notice while we are giving each RadioButton a unique name, we are also setting their Tag properties to the name of the column they represent. More about why we are doing this in a minute.
Creating a custom Event Handler
Instead of adding code to the Click event procedures of all our RadioButtons—that would be too tedious—let's create a single custom event handler procedure that will be used by the Click event procedures of all the RadioButtons. To create a custom event handler procedure, we need to familiarize ourselves with the syntax of regular event procedure declarations. Here is the syntax of an event procedure (broken onto three lines for readability):
Private Sub <Object_Event>(ByVal sender As System.Object, _
ByVal e As System.EventArgs) _
Handles <Object.Event>
We can create a custom event handler procedure by following the above syntax with a few additions to the Handles specification that include the Click event procedures of all the RadioButtons, like this (also on multiple lines for readability):
Private Sub RadioButton_Click(ByVal sender As System.Object, _
ByVal e As System.EventArgs) _
Handles rdoSS.Click, _
rdoLast.Click, _
rdoFirst.Click, _
rdoStreet.Click, _
rdoCity.Click, _
rdoState.Click, _
rdoZip.Click, _
rdoAge.Click
The really important part of the above code is what follows the Handles specification. This is where you designate the object names and their event procedures that will cause this custom event handler procedure to be executed. To create an event handler procedure, just type out a procedure that includes the special sender System.Object and e System.EventArgs parameters (required in all built-in event procedures), then make additions to the Handles specification for each object.event that we want to raise it. Add the above RadioButton_Click procedure to the code window—I recommend inserting a blank line in-between the last End Sub and the End Class statement at the bottom of the code window and typing it there.
Dynamically Sorting the rows
The new RadioButton_Click event handler procedure does not replace the existing Click event procedures of the radiobuttons—In fact, if you had code in them, they would still be executed first, before any custom event handler procedures would be raised. Once you have typed the declaration of the RadioButton_Click event handler procedure, above, type the following code inside it:
'Set the sort order to the column specified
' in the Tag property of the selected
' radiobutton.
BindingSourceEmployees.Sort = _
sender.Tag.ToString
'Display the first record
BindingSourceEmployees.MoveFirst()
'Set the find label to display the new find column
lblFind.Text = "Find - " & sender.Tag.ToString & ":"
'Store the sort column name in lblFind's Tag property
lblFind.Tag = sender.Tag.ToString
The RadioButton_Click event handler procedure should look something like this in your code window:
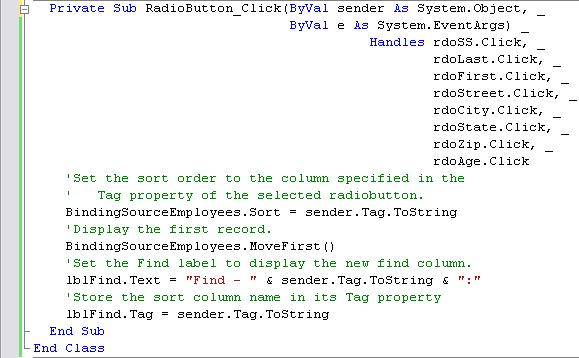
The sender parameter is a reference to the object that sent the event. Recall that when we added the radiobuttons to the form we set the Tag property of each radiobutton to the column name from the Employees table that they represent. That was so we could determine which radiobutton received the Click event. In the code above we use sender.Tag.ToString to set the Sort property of BindingSourceEmployees to the column name which sorts the rows by that column. We are also using the MoveFirst method (equivalent to setting Position to 0) to go to the first record after the rows are sorted. Then we set the Text property of the find label (lblFind) to show which column the Find feature will work for. And, last but not least, we save the name of the sort column in the find label's Tag property for later use.
Testing the program so far
Save and run the program. Try the different Sort radiobuttons. Do they work? If not, did you spell the column names correctly when you typed them into the Tag properties of the radiobuttons?
Getting the Find option to work for the selected Column
Remember this line of code from the btnFind_Click event procedure:
iRowIndex = BindingSourceEmployees.Find( _
EmployeesDataSet.Employees.Columns( _
"LastName").ToString, txtFind.Text)
Now, instead of using the constant "LastName" as the Column specification, use the Tag property of the find label (lblFind), like this:
iRowIndex = BindingSourceEmployees.Find( _
EmployeesDataSet.Employees.Columns( _
lblFind.Tag.ToString).ToString, txtFind.Text)
That is why we are storing the column name in lblFind.Tag when the sort order is changed—the last line of code in the RadioButton_Click event handler procedure in the code window illustration above.
Testing the program so far
Save and run the program. Click on the
First
Name search radio button to turn it on, type in a first name and click the find button.
Does it work? Try sorting by other columns and doing a find.
Improving
the
Find
option
There are several records in the table where their Age column is 25. Run the program, sort by Age and type 25 in the find textbox. After finding the first matching record, click the Find button again. Does it find the next one? Click the move Forward button once, does the next record have 25 in the Age field? One serious limitation of the Find method of BindingSourceEmployees is that it always starts searching from the first record forward.
We need to add a Find Next button, so that the user can find all the records that match the search criteria. Let begin by renaming the original Find button (btnFind) to btnFindFirst. Then change its Text property from just Find to Find First. Do this before continuing.
Adding a Find Next button
Use the above illustration and add another button to the form. Select the new button and set these properties:
| Button | |
| Property | Value |
| Name | btnFindNext |
| Enabled | False |
| Text | Find Next |
Getting the Find Next button to work
The special quality of a Find Next button is that it starts searching from the record after the current record. So it should not be enabled until the Find First button is pressed once. Add the following line of code—highlighted below—to the btnFind_Click event procedure (that is the Click event of the newly named btnFindFirst button):
The method I decided to use, to search for the next record, increments the Position property of BindingSourceEmployees, then examines the Text property of the textbox of the search column for a match with the find string value, like this (this code goes into the btnFindNext_Click event procedure):
'Store the current record Position before searching
iStartRec = BindingSourceEmployees.Position
'Start a While loop that ends when we either find
' a match or Position + 1 is equal to Count.
While BindingSourceEmployees.Position + 1 < _
BindingSourceEmployees.Count
'Move to the next record.
BindingSourceEmployees.Position += 1
'Determine which column we are supposed
' to search and compare txtFind.Text with
' its value.
Select Case lblFind.Tag.ToString
'If we find a match, exit the subroutine
Case "SocialSecurity"
If txtSS.Text = txtFind.Text Then Exit Sub
Case "LastName"
If txtLast.Text = txtFind.Text Then Exit Sub
Case "FirstName"
If txtFirst.Text = txtFind.Text Then Exit Sub
Case "Street"
If txtStreet.Text = txtFind.Text Then Exit Sub
Case "City"
If txtCity.Text = txtFind.Text Then Exit Sub
Case "State"
If txtState.Text = txtFind.Text Then Exit Sub
Case "Zip"
If txtZip.Text = txtFind.Text Then Exit Sub
Case "Age"
If txtAge.Text = txtFind.Text Then Exit Sub
End Select
End While
'We only reach the following lines of code if a
' match was not found--we didn't Exit Sub
' above. Set Position back to iStartRec,
' disable the Find Next button, and display
' a messagebox.
BindingSourceEmployees.Position = iStartRec
btnFindNext.Enabled = False
MessageBox.Show("No more " & txtFind.Text & _
"'s found for " & lblFind.Tag.ToString, _
"Not Found", MessageBoxButtons.OK, _
MessageBoxIcon.Information)
Your code window show match the follow illustration once you've added the code above to the btnFindNext_Click event procedure:
Whenever the user clicks on the Find Next button, it will find the next matching record instead of always starting from the beginning, like BindingSourceEmployees.Find in the Find First procedure does.
Testing the program so far
Save and run the program. Sort the records by the Age column. Type 25 into the Find textbox and press the Find First button. It should stop on the first record with the Age of 25 and enable the Find Next button. Now, press the Find Next button. Did it work? Press it again. There should be about 5 records in sequence that have an Age field value of 25. What happens when you press the Find Next button when there are no more matches?
Improving the Find option - Disabling case sensitivity
One issue with the Find Next option is that it is a case sensitive search (unlike the non-case sensitivity of the BindingSourceEmployees.Find method for the Find First button).
What if we us the ToUpper method of the Text property and convert the Text property values of both strings to uppercase for the comparison? Let's modify the LastName comparison code from the btnFindNext_Click event procedure as an example:
Case "LastName"
If
txtLast.Text.ToUpper
= _
txtFind.Text.ToUpper
Then Exit Sub
This should solve the case sensitivity problem. Use the code above as an example and modify the If-Then code for FirstName, Street, City, and State to use ToUpper to disable case sensitivity. Save and test the program.
Improving the Find option - Partial field value searching
Let's modify the code in the btnFindNext_Click event procedure to allow partial field value searching. The rarely used Like operator can be used to make partial field value searching easy. The Like operator can recognize wildcard characters in a search string. So if we change this code using a partial search string for the last name Campbell:
If txtLast.Text = "Camp" Then
To use the Like operator instead, like this, it will find Campbell with the search string Camp:
If txtLast.Text Like "*Camp*" Then
The addition of asterisks (*) to both ends of the search string are wildcard symbols that represent any characters. So any column with the string "Camp" embedded in it will match—"*Camp*" would find "Campbell". Modify the If-Then test for Last name in the btnFindNext_Click event procedure to include the Like operator instead of an equal sign (=), like this:
Case
"LastName"
If
txtLast.Text.ToUpper
Like
_
"*"
& txtFind.Text.ToUpper
& "*"
Then Exit
Sub
By concatenating asterisks to both ends of the value in txtFind.Text, a partial field value search should work. Make the above modifications to the other column search If-Then tests in the btnFindNext_Click event procedure to enable partial field value searching for them as well. What about the code for the Find First button? How can we get it to support a partial field value search?