Advanced Visual Basic - Project 14
Add Web Browsing capabilities to your
programs
Visual Basic comes with a WebBrowser
Custom Control
In this project you will create a simple application that allows a
user to access the World Wide Web. Visual Basic provides you with a custom WebBrowser
control that has all the functionality built into it that you’ll need to add powerful
web browsing capabilities to your own projects. To run this project, you need a computer
that is connected to the internet (via modem or a direct connection, that has Windows
95/98 or Windows NT with I.E. 4.0+ installed). If your computer
cannot connect to the internet, you can still create this project. When it’s
complete, save it to a floppy diskette and run it on a computer that has VB 5.0 or 6.0
installed and does support an internet connection.
Load Visual Basic and select New Project under the File menu. Make this a Standard
project. Press the F4 key to view the Form’s properties—if the
Properties window is not already displayed.
- Change the form’s Caption property to My Web Browser
- Change the form’s Name and Width properties to frmBrowser and 7000 respectively. Set the form’s Icon property to Earth.ico (This icon
file and several others you’ll need are included with your copy of Visual basic,
inside an Icons folder in VB's Graphics folder—discussed
in an earlier project).
- Select Project1
Properties from the Project menu.
- Make the Project
Name WebBrowser. Make sure that frmBrowser is the Starup
Object. Click the OK button.
- Pull down the File menu and choose Save Project. Save the form as: browser.frm. Save the project as Browser.vbp.
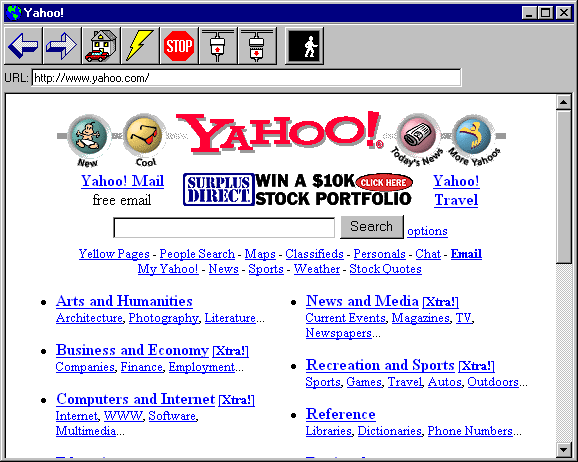
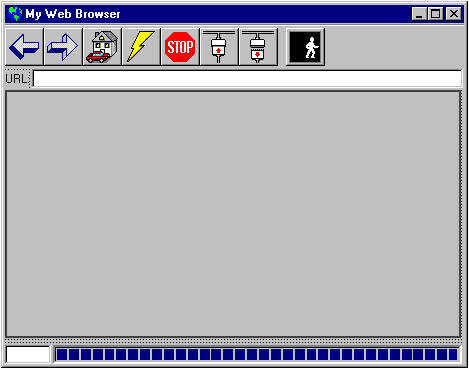
In this example of the finished Browser project, the buttons of a Toolbar
are used to access the different functions that the Browser can perform. These
buttons include (from left to right):
- Go Back
- Go Forward
- Go Home
- Refresh
- Stop
- Connect
- Disconnect
- Exit the Browser
The textbox labeled URL (below the Toolbar) lets the
user type the Web Address of an internet site they would like to visit. As you can
see in this example, the WebBrowser control itself displays web pages just like Microsoft
Internet Explorer or Netscape Navigator.
To complete this project, you’ll be adding the following
controls to your form in this order:
- ImageList
- Toolbar
- 1 Label
- 1 Textbox
- WebBrowser
- 1 Textbox
- ProgressBar
Adding an ImageList control to the form:
The Icons that appear in a Toolbar control are
actually stored in an ImageList control that the Toolbar is linked to. Before adding the Toolbar,
you’ll add an ImageList control to the form. Follow these steps.
- To get the ImageList and Toolbar controls to appear in your Control Toolbox, add the Microsoft Windows Common Controls 6.0 (or 5.0) component (Right-click on the Controls Toolbox and choose Components, then put
a checkmark in front of Microsoft Windows
Common Controls 6.0 (or 5.0).
- Double click the ImageList control button in the Controls
Toolbox to add an ImageList control to your
form. This control is similar to a CommonDialog control in the sense that the User will never see or directly
interact with it, so it doesn’t matter where it sits on the form.
- Press the F4 key to view the ImageList control’s
properties.
- Set the Name property of the ImageList control to iListToolbar.
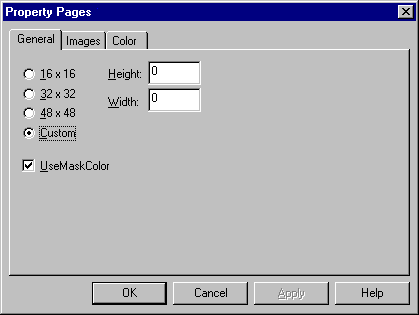
- Click on the Custom property of the ImageList (in the Properties Window) and click on the small ellipses (…) button to produce
the ImageList’s Property Pages dialog:
- For the size, leave the Custom option selected and click on
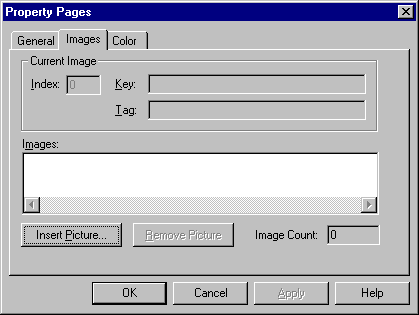
the Images tab.
- The icon files you will need for this project are included
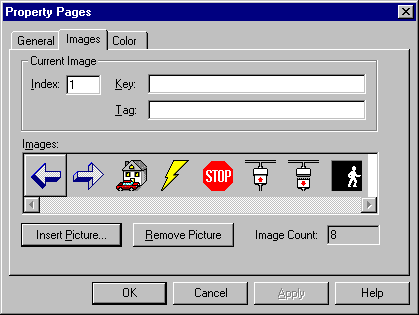
with this project. Use the Insert Picture button and add the following Icons in this order (find them in the various Icons folders in Visual Basic's Graphics folder):
- Arw06lt.ico
- Arw06rt.ico
- House.ico
- Litening.ico
- Trffc14.ico
- Net09a.ico
- Net09b.ico
- Trffc19a.ico
When finished, the ImageList Properties Pages dialog should
look like the above illustration (if you put an icon in the wrong place, click on it and
delete it with the Remove Picture button. Then click on the icon that it’s supposed to follow and
click the Insert Picture button to put it back where it supposed to go.
Click on the OK button when you’ve got
it right.
Adding a Toolbar control to the form:
- Double click on the Toolbar control button in the Controls
Toolbox. By default, the new Toolbar control
appears at the top of the form. Notice that it has no buttons on it.
- Press the F4 key to view the Toolbar control’s
properties.
- Set the Name property of the Toolbar control to tbBrowser.
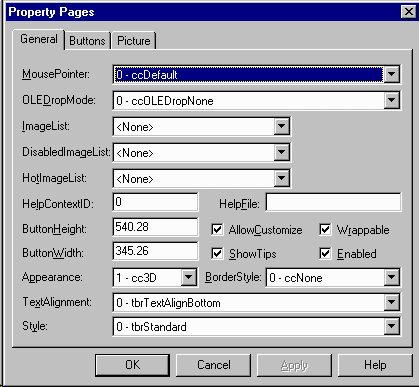
- Click on its Custom property and click on the small ellipses (…) button to produce the Toolbar Property Pages dialog:
- Drop down the ImageList Combobox. Select your iListToolbar ImageList.
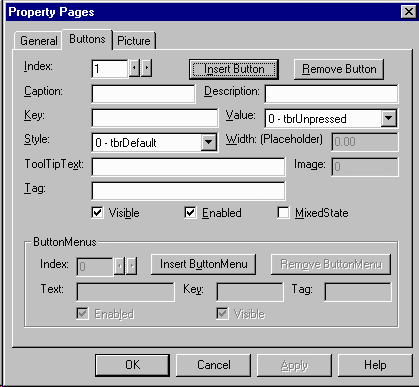
- Click on the Buttons tab.
- Click the Insert
Button button. The Index value 1 should appear.
- Type GoBack for the Key value. You’ll need the Key value to determine which button on the Toolbar was clicked.
- For the ToolTipText type Go Back a Page. A ToolTip is a descriptive string that pops up by a Toolbar button when you
hold the mouse over the button for a second.
- Type 1 for the Image value (this is the index value of the image as it appears in the ImageList)
and click the Apply button. Notice how the first icon in iListToolbar ImageList appears
in your first toolbar button.
- Insert 6 more buttons and set their properties as follows (be sure to click the Apply button before
inserting each new button):
| Key |
ToolTip Text
|
Image
|
| GoForward |
Go Forward a Page |
2 |
| GoHome |
Go to Home Page |
3 |
| Refresh |
Refresh this Page |
4 |
| Stop |
Stop Refreshing this Page |
5 |
| Connect |
Connect to Internet |
6 |
| Disconnect |
Disconnect from the Internet |
7 |
- Add an 8th button and set its Style property to 3 - Separator. This Separator
needs no Key or
Image values.
- Add a 9th button and set its Key value to Exit. Make its ToolTipText string Exit My Web Browser.
And set its Image value to 8.
- Click the OK button to close the Toolbar Control Properties dialog.
As run time, when the User clicks a button on the Toolbar,
this event procedure is executed:
Private Sub tbBrowser_ButtonClick(ByVal Button As Button)
The ByVal statement means that the argument is passed by value only (which
means it cannot be modified. Note: By default, variables are passed to event and regular procedures ByRef—by
reference (like a pointer in C++)—which means you actually have access to the
memory location where the variable resides, so you can plug new values into it to modify
any previously stored values). ByVal passes just the values stored at the memory location of the
variable, and without knowing the memory location the procedure cannot modify the
values stored there. ByVal is specified by this event procedure, so that you cannot
accidentally change the property values of the Button object at runtime in your code.
The Toolbar button that was clicked on by the User can be determined
by examining the Button.Key property. As an example, if the following code were added to the tbIcons_ButtonClick
event procedure, it would make the Exit button on the Toolbar work (don’t add this code yet):
Select Case Button.Key
Case
Is = "Exit"
Unload Me
End Select
You previously set the Key property of the Exit button
to Exit in the Toolbar Property Pages dialog. This Key
property is used to determine which button on the Toolbar was pushed (Case Is =
"Exit").
Adding a Textbox and Label to the form:
Add a Label (Caption = URL:) and Textbox (Name = txtURL) to the form and position them below the toolbar as shown in the
illustration on the first page.
Add the following code to the txtURL_KeyPress event
procedure:
'On Error, prevents a crash if the web site is not
found
On Error Resume Next
If KeyAscii = vbKeyReturn And txtURL <> ""
Then
WebBrowser1.Navigate
(txtURL.Text)
End If
If the user types a web address (a URL) into the txtURL
textbox and presses the Enter key, this code uses the Navigate method
of the WebBrowser control (to be added in the next step) to go to that web
site.
Adding a WebBrowser control to the form:
To get the WebBrowser control to appear in your Control
Toolbox, add the Microsoft Internet Controls component (Right-click
on the Controls Toolbox and choose Components, then put a checkmark in front of Microsoft Internet Controls).
Double-click on the WebBrowser icon in the Controls
Toolbox to place it on the form. Use the
illustration on the first page and resize the WebBrowser control so that it fills the form below the Toolbar, Label and
Textbox.
Leave the WebBrowser’s name property at the default WebBrowser1.
Add this code to the tbBrowser_ButtonClick event procedure (Don’t
type the preceding letters—the Case statements
are lettered (a through h) and explained below):
Select Case
Button.Key
a) Case Is = "GoBack"
‘Go back to a previous page
WebBrowser1.GoBack
b)
Case Is = "GoForward"
‘Go forward to a previous page
WebBrowser1.GoForward
c) Case Is = "GoHome"
‘Go to the user’s homepage
WebBrowser1.GoHome
d) Case Is = "Refresh"
‘Establish a connection
WebBrowser1.Offline = False
‘Reopen the last web page
WebBrowser1.Navigate (txtURL.Text)
e) Case Is = "Stop"
‘Stop downloading a page
WebBrowser1.Stop
f) Case Is = "Connect"
‘Establish a connection
WebBrowser1.Offline = False
‘Open specified (txtURL) page
WebBrowser1.Navigate (txtURL.Text)
g) Case Is = "Disconnect"
‘Disconnect from internet
WebBrowser1.Offline = True
h) Case Is = "Exit"
‘Exit from My Web Browser
Unload Me
End Select
- When the user clicks the GoBack button on the toolbar, the GoBack
method of the WebBrowser control sends the user back to the last page they
visited during the current web browsing session.
- The GoForward method of the WebBrowser control allows
the user to move forward through pages that they have already visited, if they’ve
used the GoBack button previously.
- The GoHome method of the WebBrowser control will go to
the user’s homepage (if they have Internet Explorer on their computer, and
they’ve previously designated a home page within its option settings). The WebBrowser
finds this information by examining the System Registry on their computer.
- When the user selects the Refresh button, it reloads the
currently open page (after making sure that the WebBrowser is connected).
- If the user clicks the Stop button, any web page that is
currently being downloaded stops downloading (and any functioning ActiveX or Java controls
on the page stop working).
- The Connect button establishes a connection and tries to
access the page specified by the user in the txtURL textbox.
- The Disconnect button disconnects the user from the Internet.
- The Exit button terminates the Web Browser application.
Add this line of code to the Form_Load event procedure:
WebBrowser1.GoHome
When the user launches your Web Browser program, the first place on
the web it goes is their homepage. Note: If the user has Microsoft
Internet Explorer on their computer, and
they’ve previously designated a home page within its option settings, this will work.
I’m not sure if it will work if they regularly use Netscape Navigator, and
don’t have Microsoft Internet
Explorer installed.
Adding a ProgressBar control and another Textbox control to the
form.
If you are an Internet user, you are well aware of how long it can
take for a web page to download. As a matter of fact, long download times are one of the
biggest complaints about accessing the internet (And to think that people are all excited
about learning Java and ActiveX programming so that they can create cool custom controls
for their web pages, which in the end will just make them take even longer to download!).
A progress bar is traditionally used to display the progress of a web page being
downloaded to your computer—actually, it just gives the user something to look at so
they don’t go nuts!
Click once on your WebBrowser control to select it. Grab the sizer handle dot at the bottom
center of the control and drag it up about and inch, to make room for the Textbox and
ProgressBar controls you’re going to place at the bottom of the form:
Place a Textbox control where shown (lower left corner of form). Set it’s Name property to txtProgress.
Set it’s Visible property to False.
Place a ProgressBar where shown (the ProgressBar control was added to your Control
Toolbox when you added the Microsoft Windows Common Controls 6.0 component back
in step 2). Leave its default Name property at ProgressBar1 and its Max property at 100. Set it’s Visible property to False.
Your goal is to display the percentage that the downloading of a web
page is complete as a number in the txtProgress textbox, and graphically in the ProgressBar. You’ll need to use the following event procedures of the WebBrowser control to do
it:
WebBrowser1_DownloadBegin
The above event procedure is executed once when a new web page is
first accessed and downloading of the web page begins.
WebBrowser1_ProgressChange
The above event procedure is executed over and over as every new
byte of the web page being downloaded arrives.
WebBrowser1_DownloadComplete
The above event procedure is executed once when the downloading of a
new web page is complete.
Enter the following code into the WebBrowser DownloadBegin and DownloadComplete event
procedures:
Private Sub WebBrowser1_DownloadBegin()
ProgressBar1.Value
= 0
txtProgress.Text
= "0.00%"
ProgressBar1.Visible
= True
txtProgress.Visible
= True
End Sub
The above code initializes the values of the Value and Text
properties of ProgressBar1 and txtProgress controls. Then it makes them both visible.
Private Sub WebBrowser1_DownloadComplete()
ProgressBar1.Visible
= False
txtProgress.Visible
= False
End Sub
The above code hides the ProgressBar1 and txtProgress controls after they’ve done their job.
Enter the following code into the WebBrowser1_ProgressChange event procedure (don’t type the preceding letters—some lines
are lettered and explained below):
Private Sub WebBrowser1_ProgressChange(ByVal Progress As Long, _
ByVal ProgressMax As Variant)
Dim dPBarValue As Double
a) If ProgressMax > 0 Then 'Avoid a
divide-by-zero error
b) dPBarValue = (Progress * 100) / ProgressMax
c)
If dPBarValue > 0 And dPBarValue <=
ProgressBar1.Max Then
α ProgressBar1.Value = dPBarValue
α txtProgress.Text = Format(dPBarValue, "0.00") & "%"
End If
End If
End Sub
Note: The
2 arrowed lines above set the Value and Text properties of the ProgressBar1 and txtProgress controls. Notice that the number being assigned to the Text property
of txtProgress is converted to a number with 2 decimal points via the Format
command. The lettered lines are explained below:
- This code tests the value of the ProgressMax variable to make
sure it is greater than zero, so we can avoid a potential divide-by-zero error. ProgressMax
is a Variant that is passed to this event procedure by the operating system.
It is WebBrowser1’s best-guess of how much longer this download
will take.
- This line of code uses another variable passed to this event
procedure by the operating system: Progress. Progress is WebBrowser1’s
estimate of how far the download has progressed so far. By multiplying Progress
by 100 and dividing it by ProgressMax, you get a percentage that the download is
complete. This value is stored in a local double named dPBarValue.
- This line of code makes sure that dPBarValue is greater than zero
and less than or equal to ProgressBar1.Max (trying to assign a number to the Value
property of a ProgressBar control that is less than it’s Min or
greater than it’s Max properties upsets it J ).
A final touch. Add the following code to the Form_Resize event procedure. This is the code that resizes the WebBrowser1, txtProgress,
and ProgressBar1 controls when the user resizes the form at run-time.
(Don’t type the preceding letters—some lines are lettered and explained below):
Private Sub Form_Resize()
a)
If frmBrowser.WindowState <>
vbMinimized Then
b)
If
frmBrowser.Width < 7000 Then
frmBrowser.Width = 7000
End If
c)
WebBrowser1.Width
= frmBrowser.ScaleWidth
d)
If
ProgressBar1.Visible = True Then
e)
WebBrowser1.Height = frmBrowser.ScaleHeight - _
1000 - ProgressBar1.Height
f)
ProgressBar1.Top = frmBrowser.ScaleHeight - _
ProgressBar1.Height
g)
ProgressBar1.Left = txtProgress.Width
h)
ProgressBar1.Width = frmBrowser.ScaleWidth - _
txtProgress.Width
i)
txtProgress.Top = frmBrowser.ScaleHeight - _
txtProgress.Height
Else
j)
WebBrowser1.Height = frmBrowser.ScaleHeight - _
1000
End If
End If
End Sub
- This line of code makes sure you don’t do anything if the
program window was just minimized.
- This test prevents the user from resizing the form to narrower than 7000
twips. It just snaps back to 7000 wide if they try.
- This code sets the Width of the WebBrowser1 control to
the ScaleWidth value of the form. The ScaleWidth and ScaleHeight
properties refer to the Internal size of the Form, and have slightly smaller values
than the Width and Height properties.
- Makes sure the following code is only executed if ProgressBar1 is
visible.
- To make room for the txtProgress and ProgressBar1 controls,
this code adjusts the Height of the WebBrowser1 control (the extra minus 1000
takes into account the height of the tbBrowser toolbar and txtURL textbox
controls).
- This sets the Top property of ProgressBar1 to just
below bottom edge of the WebBrowser1 control.
- Sets the Left property of ProgressBar1 to just to the
right of the right edge of the txtProgress textbox.
- Sets the Width property of ProgressBar1 is to the ScaleWidth
of the form minus the Width of the txtProgress textbox.
- Like line f) above, the Top property of the txtProgress
textbox is set to just below the bottom edge of the WebBrowser1 control.
- If ProgressBar1 and txtProgress are not visible, this
line of code adjusts the Height of the WebBrowser1 control to fill in the
gap at the bottom of the screen where they would normally appear.
Make this final change to the WebBrowser DownloadBegin and DownloadComplete event
procedures (add only the arrowed lines to the previously entered code):
Private Sub WebBrowser1_DownloadBegin()
ProgressBar1.Value
= 0
txtProgress.Text
= "0.00%"
ProgressBar1.Visible
= True
txtProgress.Visible
= True
α 'Adjust the browser window to make room for the Progress bar
α
Form_Resize
End Sub
Private Sub WebBrowser1_DownloadComplete()
ProgressBar1.Visible
= False
txtProgress.Visible
= False
'Resize the browser window,
since the Progress bar is now hidden
Form_Resize
End Sub
These calls to the Form’s Resize event procedure make room for ProgressBar1 and
txtProgress when they appear, and fills the gap they leave behind when they disappear.
Testing your WebBrowser project. When you run this project,
if your computer uses a modem to connect to the Internet, your auto-dialer should launch
and connect you to your internet service provider (ISP) automatically. Give it a try and
see what happens. In some cases you may need to establish a connect to your ISP manually
before running this project. To establish a connection to your ISP manually, follow these
steps:
- Minimize Visual Basic (you don’t need to close it).
- Double-click on the My Computer icon to open it.
- Double-click on the Dial-Up Networking icon.
- Double-click on the icon of the Dial-Up Networking configuration
that you usually use to connect to the internet. At this point the auto-dialer should
start and connect you.
Once a connection has been established you can restore Visual Basic
and run this project to test it.
