Removing your old project and creating a new one
Run Visual Basis .NET and open your Solution (<your name>.sln).
Right-click on the Project13-Loose Ends project in the Solution Explorer window and select Remove from the context menu. Do not save this project if prompted to do so. Your solution should now be empty.
Drop down the File menu and select New Project under the Add Project menu item. When the Add New Project dialog appears, be sure that the Visual Basic Projects folder is open in the Project Types pane, and that the Windows Application template is selected in the Templates pane. Type DerivedClassOverrides in the Name textbox. Then click the OK button. This creates a new folder inside the \Visual Studio Projects\<Your Name> folder named DerivedClassOverrides:
...My Documents\Visual Studio Projects\<Your Name>\DerivedClassOverrides.
Note: When class is over, be sure to follow the instructions at the end of this project that tell you how to copy your project to your floppy diskette so you can take it home with you.
Rename the Form file and change it's Name and Text properties
With the form file (Form1.vb) selected in the Solution Explorer window, so that it's File properties are displayed in the Properties window, change the File Name property to frmProject14.vb (don't forget to include the .vb extension).
Now click on the form in the Designer window to display it's properties:
- Change the Name property to frmProject14
- Change the Text property to Project 14-Derived Class Overrides
- Change the Size property to 450, 350
Setting the Startup Object
Right-click on the DerivedClassOverrides project in your Solution Explorer window, click on the Properties item at the bottom of the context-menu. In the DerivedClassOverrides Property Pages dialog drop down the Startup object list and choose frmProject14 and click the OK button.
Dynamically Creating all the Controls we will need
Let's begin by adding a Listbox control and two Labels controls to the form. But instead of doing it the normal way--by pulling them from the control toolbox and dropping them on the form--let's create them with code. In order to dynamically create a control with code at run-time requires you to do these steps, in this order, for each control you create:
- Dynamically construct each of the controls. If you want access to the
control's event procedures at design-time, be sure to construct them with
the WithEvents keyword in the
Declaration's section, like this:
'Construct ListBox1 with the WithEvents keyword so that we
' have easy access to it's event procedures at design-time.
Public WithEvents ListBox1 As New ListBox
'We won't be using the Event procedures of the Labels
' so we are constructing them normally .
Public Label1 As New Label - Add the newly constructed controls to the Form's
Control collection--normally in the
Load
event procedure of the form--like this:
'Add our dynamically created controls to the
' form's controls collection.
Me.Controls.Add(Label1)
Me.Controls.Add(Label2)
Me.Controls.Add(ListBox1) - Configure each of the controls and make them visible, like this:
'Configure Label1 and make it visible
Label1.Text = "ListBox1"
Label1.BackColor = Color.Aqua
Label1.Left = 5
Label1.Top = 5
Label1.Visible = True
'Configure Label2 and make it visible
Label2.Text = "ScrollListBox1"
Label2.BackColor = Color.Coral
Label2.Left = 210
Label2.Top = 5
Label2.Visible = True
Configure ListBox1 and make it visible
ListBox1.Left = 5
ListBox1.Top = 30
ListBox1.Width = 200
ListBox1.Height = 150
ListBox1.Visible = True
'Fill ListBox1 with enough entries to generate a vertical scrollbar
Dim i As Integer
For i = 0 To 50
ListBox1.Items.Add("Entry Number #" & i)
Next i
Public Label2 As New Label
Add the first three lines of code above, that construct the controls, to the Declaration's section. Add the remaining code above to the Load event procedure of the form (frmProject14_Load). Save and run your project. When the program is running the form should look like this :
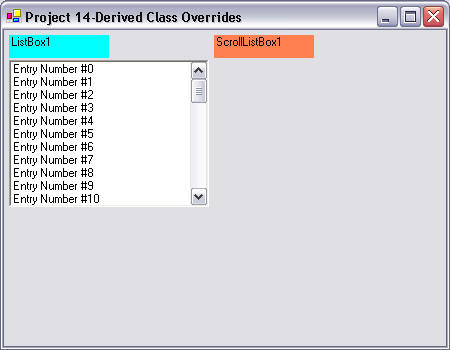
The goal in this project will be to synchronize the scrolling of two listboxes. We will add another listbox called ScrollListBox1. When ScrollListBox1 is scrolled up and down, ListBox1 should also scroll up and down and stay synchronized with it. This should be an easy task to perform. If we added a second listbox (and named it ScrollListbox1), we could set the TopIndex property of listbox1 equal to the TopIndex property of ScrollListbox1 in the Scroll event procedure of ScrollListbox1, with a single line of code, like this:
ListBox1.TopIndex
=
ScrollListbox1.TopIndex
Unfortunately, listboxes do not have a
Scroll event procedure! So we have no
way of determining when ScrollListbox1 has been scrolled.
Making a more powerful ListBox control
We will now create a new listbox control and add a Scroll event procedure to it. Begin by adding a new Class module to the project. Right-click on the DerivedClassOverrides project in the Solution Explorer window (as shown below) and select Add New Item under the Add menu item on the context menu:

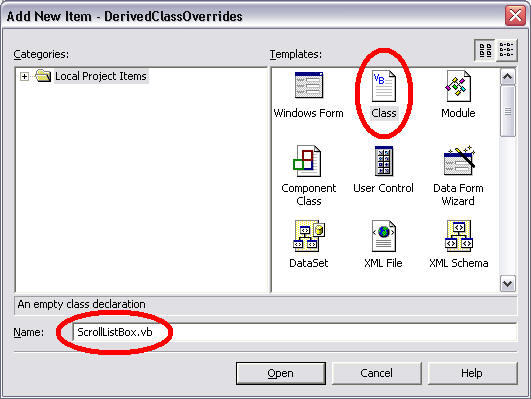
On the Add New Item dialog, be sure the Class template is selected in the Templates pane (see illustration below). Type ScrollListBox.vb in the Name textbox and click the Open button:
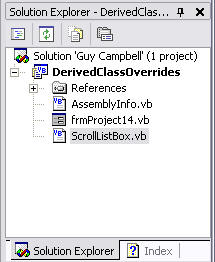
This adds a new base class module to the project. Your solution explorer window should look like this. Notice how the icon looks in front of ScrollListBox.vb:
The new ScrollListBox class is a base class because it is not derived from any existing class. To turn ScrollListBox into a derived class from the existing ListBox class, display the code view of the ScrollListBox and add the following Inherits statement directly below the Public Class ScrollListBox line at the very top of the class module code window:
Inherits System.Windows.Forms.ListBox
Your code view window for ScrollListBox should look like this:

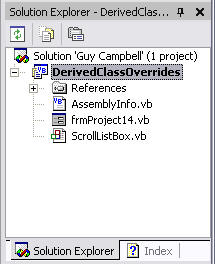
After adding the above line of code and pressing enter, notice how the icon in front of ScrollListBox.vb has changed. This designates that ScrollListBox is now a derived class, not a base class:
You should also notice that the declarations for two Overrides procedures are automatically added to the code window of the ScrollListBox class after you added the Inherits statement:
Protected Overrides Sub
RefreshItem(ByVal index As
Integer)
End Sub
Protected Overrides Sub
SetItemsCore(ByVal
items As System.Collections.IList)
End Sub
Depending upon which class you are deriving, automatically generated overrides procedures may be added for you--I suppose these would be considered procedures you would most likely override, though we don't need them in this case. When creating a derived class, these automatically added overrides procedures may vary from several to none. We won't need to add any code to these procedures, so just delete them. When you are finished, the code window for your new ScrollListBox derived class should look like this:

Adding a new Event Procedure to a Derived class
When creating a new event procedure, you must always consider the e EventArgs parameter. Remember, there are usually two parameters that are passed to an event procedure, like this--using the Load event procedure of a form as an example:
Private Sub
frmProject14_Load(ByVal
sender As Object,
_
ByVal
e As System.EventArgs)
Handles MyBase.Load
The sender parameter is the object that raised the event, and the e parameter holds the event arguments. What the e parameter contains varies from one event procedure to the next. The e parameter of a MouseMove event includes X and Y data members that represent the location of the mousepointer. The e parameter of a Click event, contains no values at all. So e can contain several values or nothing depending upon which event it is. When we add our own custom event procedures to a derived class, it is a good idea to follow the format of pre-existing event procedures by including the sender and e parameters. It is up to us to decide what event arguments are to be included in the e parameter.
So, along with creating each new event procedure comes the responsibility of creating a new derived EventArgs class for it's e parameter.
Creating a Derived EventArgs class to go with our new Scroll event procedure
For the purposes of this program--where synchronizing the scrolling of two listboxes is our main goal--the only value we really care about when the new Scroll event procedure of our ScrollListBox is raised is the value of the TopIndex property. So that we can do this:
ListBox1.TopIndex
=
ScrollListbox1.TopIndex
We have direct access to this property, so we don't really
need to pass it through a new derived EventArgs class. But for the sake
of this exercise we will pass it so you can see how it is done. To
create a derived EventArgs class named
ScrollListBoxEventArgs, add the following code below the
End Class line at the bottom of the code
window of
ScrollListBox. This will create two separate classes within
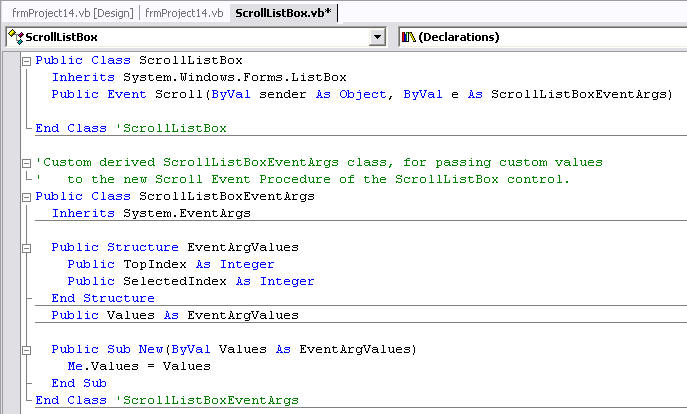
the same class module:
'Derived ScrollListBoxEventArgs class, for passing custom values
' to the new Scroll
Event Procedure of the ScrollListBox control.
Public Class
ScrollListBoxEventArgs
Inherits
System.EventArgs
'Use a structure to combine several parameters values
' into
a single variable, which will be the e.
Public Structure
EventArgValues
'Besides TopIndex, let's include the SelectedIndex
' value of the listbox just for the fun of it.
Public
TopIndex
As Integer
Public
SelectedIndex
As Integer
End Structure
Public
Values
As
EventArgValues
'We need to include a New procedure to initialize the data
'
members
in the Values (EventArgValues) variable
' when this object is created.
Public Sub
New(ByVal
Values As EventArgValues)
Me.Values
=
Values
End Sub
End Class
'ScrollListBoxEventArgs
Using a New constructor to initialize an object
Whenever an instance of a class is created, VB.NET attempts to execute a procedure named New, if it exists in that object. When a programmer creates an instance of our ScrollListBoxEventArgs class they need a way to assign values to the TopIndex and SelectedIndex data members of the Values (EventArgValues structure) variable inside it. So we are including a New procedure. Our New procedure includes a Values As EventArgValues argument that must be provided by the programmer when constructing a ScrollListBoxEventArgs object. Following is an example of the code required to construct an instance of a ScrollListBoxEventArgs object (do not type this code):
'Create an
EventArgValues variable to assign values to the
' TopIndex and
SelectedIndex data members during the
' construction of a
ScrollListBoxEventArgs object.
Dim
eArg
As
ScrollListBoxEventArgs.EventArgValues
eArg.TopIndex
= Number
eArg.SelectedIndex
= Number
Dim
e
As
ScrollListBoxEventArgs
= _
New
ScrollListBoxEventArgs(eArg)
It is common to use a structure (EventArgValues) in a derived
EventArgs class so that you can combine multiple values (through the
data members of the structure) to be passed through a single
e parameter.
Now that we have a derived EventArgs class (ScrollListBoxEventArgs) we can declare our new Scroll event procedure within the ScrollListBox derived class. Add the following line of code below the Inherits line in the declarations section of the ScrollListBox code window:
Public Event
Scroll(ByVal
sender As Object, _
ByVal e
As
ScrollListBoxEventArgs)
We needed to create the ScrollListBoxEventArgs
derived EventArgs class before we could declare the new
Scroll event procedure. As you can
see in the code above, ScrollListBoxEventArgs
was required for the e parameter
declaration. Your code window of the
ScrollListBox derived class should look like this:
As you see from the code above, creating a proper Scroll event procedure requires consideration of the e EventArgs parameter it must be passed. In the case of our Scroll event, we are only concerned with the TopIndex and--just for fun--SelectedIndex values. But we don't have to stop there, and we are not restricted to just passing the values of properties. We could also pass locally dimensioned variables whose values depend upon calculations or even reference other objects, the possibilities are endless.
Overriding the WndProc procedure to determine when a ListBox is scrolled
So far so good, but when do we raise the new Scroll event? Since Listboxes don't have a Scroll event procedure normally, how do we determine when our derived ScrollListBox has been scrolled?
WndProc, the Mother of all Event Procedures
Within each object is the a Mother of all Event Procedures called WndProc. The WndProc procedure is raised whenever anything happens to the object--from a mousepointer passing over it, to keyboard presses when it has the focus. It has just a single m parameter passed to it by the operating system that is declared like this (don't type this code):
ByRef m As System.Windows.Forms.Message
The WndProc procedure is already being used by the ListBox class that our derived ScrollListBox class is inheriting. In order to get access to the WndProc procedure from within a derived class we must declare an Overrides procedure for it, like this:
Protected
Overrides
Sub
_
WndProc(ByRef
m
As System.Windows.Forms.Message)
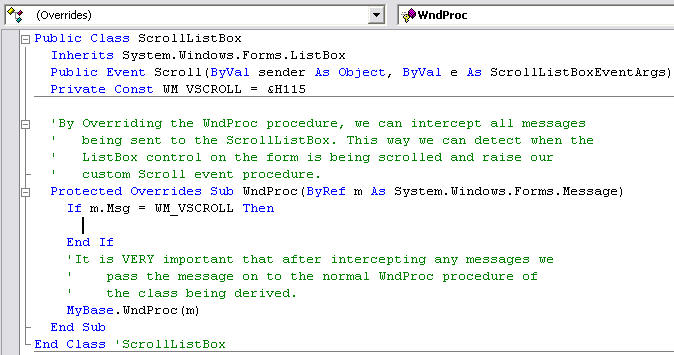
By overriding the
WndProc procedure, we can intercept every event
message that our ScrollListBox receives.
Including those event messages that the ListBox class--from which our
ScrollListBox is derived--is ignoring.
Just because a Listbox doesn't have a Scroll
event procedure doesn't mean it is not receiving scroll event messages through
its WndProc procedure. In fact it
is, but it is ignoring them.
Type the code above, to create an overrides WndProc procedure, into the code window of the ScrollListBox class and press enter. An End Sub line should have been added automatically to complete the overrides WndProc procedure declaration.
Important! Before we forget, it is essential when overriding the WndProc procedure to include a pass through call to the WndProc procedure of the class being derived. Otherwise, we will intercept every event message before it is passed to the ListBox class we are deriving. We would--by the single Overrides Sub WndProc declaration above--completely break the Listbox class. Add the following line of code on the blank line above End Sub within the WndProc overrides procedure:
'It is VERY
important after intercepting any messages that we
' pass the message on to the normal
WndProc procedure of
' the class being derived.
MyBase.WndProc(m)
The code for your overrides WndProc
procedure should now look like this:

The m message argument contains a Msg data member that we can use to determine what type of event message occurred.
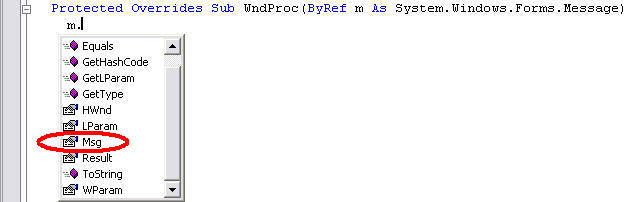
Every event message is represented by a different number value in Msg. The number value of a Vertical Scroll event message is decimal 277. Add the following code to the declaration section of the ScrollListBox class (below the Public Event Scroll line) to create a constant that represents the number value of a Vertical Scroll event message:
Private
Const
WM_VSCROLL
=
&H115
We are using the hexadecimal number for decimal 277 (&H115)
in the code above, which follows the accepted convention for declaring event
message constants. The name we are using for the constant (WM_VSCROLL) also follows
the naming convention of such constants.
WM
stands for Windows Message, and
VSCROLL
stands for Vertical Scroll. Now add the following
code inside the WndProc procedure (above
the MyBase.WndProc(m) line):
If m.Msg
=
WM_VSCROLL
Then
End If
The declarations and overrides WndProc procedure parts of the code in your ScrollListBox derived class should now look like this:
Determining what type of Scrolling occurred
The m message argument also contains a WParam data member that we can use to determine exactly what type of Vertical Scrolling happened. We could add a Select Case statement inside the If-Then test above, that would look like this (don't type this code):
'Examine the
WParam to determine what kind of Vertical
' Scroll event occurred.
Select
Case
m.WParam.ToInt32
Case
WM_UPLINE
'Hex 0
'Do something
Case
WM_UPPAGE
'Hex 2
'Do something
Case
WM_DOWNLINE
'Hex 1
'Do something
Case
WM_DOWNPAGE
'Hex 3
'Do something
Case
WM_STOPSCROLL
'Hex 8
'Do something
End Select
We can test for scroll-up-one-line, scroll-up-one-page, scroll-down-one-line,
and scroll-down-one-page event messages. We can even determine
when scrolling has stopped by testing for a Stop Scroll event message. But we don't need to know how much the user scrolled the listbox, just that
they did scroll it. So in this particular situation we don't need
to include the Select Case code
above.
We are now ready to raise our new scroll event procedure. Add the following RaiseEvent code (italicized line) to your code:
If m.Msg
=
WM_VSCROLL
Then
RaiseEvent
Scroll(Me,
e)
End If
The e parameter will have a squiggly-underline because it is not declared yet. Before we can raise our custom Scroll event procedure, we need to construct the e ScrollListBoxEventArgs parameter and assign appropriate values to its TopIndex and SelectedIndex data members. Add the following line of code to the declarations section on the line below the WM_VSCROLL constant declaration:
Private eArg As ScrollListBoxEventArgs.EventArgValues
We begin by dimensioning eArg, above, as an EventArgValues type--which, as you recall, is the structure in our derived ScrollListBoxEventArgs class that holds the individual event arguments (TopIndex and SelectedIndex). Now add the following two lines of code above the RaiseEvent Scroll(Me, e) line inside the If-Then statement in the WndProc procedure:
eArg.TopIndex
= Me.TopIndex
eArg.SelectedIndex
= Me.SelectedIndex
Now that its data members are initialized, we can pass
eArg as the argument to the construction
of our e ScrollListBoxEventArgs
object. Add the following line of code below the two lines above:
Dim
e
As
ScrollListBoxEventArgs
= _
New
ScrollListBoxEventArgs(eArg)
The code in your overrides
WndProc procedure should now look like
this:
If m.Msg
=
WM_VSCROLL
Then
eArg.TopIndex
= Me.TopIndex
eArg.SelectedIndex
= Me.SelectedIndex
Dim
e
As
ScrollListBoxEventArgs
= _
New
ScrollListBoxEventArgs(eArg)
RaiseEvent
Scroll(Me,
e)
End If
Testing the new ScrollListBox control
We are now ready to take the new ScrollListBox control for a test drive. Save the project. Open the code view of frmProject14. Add the following line of code to the declarations section to construct a new ScrollListBox:
Public
WithEvents
ScrollListBox1
As
New
ScrollListBox
Add the following code to the end of the
frmProject14_Load event procedure above the For i = 0 To
50 line of code:
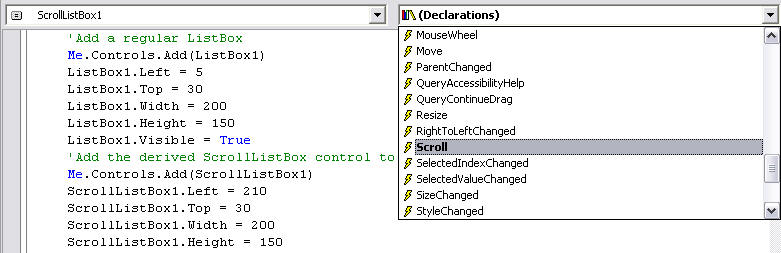
'Add the derived ScrollListBox control to the form and configure it
Me.Controls.Add(ScrollListBox1)
ScrollListBox1.Left
= 210
ScrollListBox1.Top
= 30
ScrollListBox1.Width
= 200
ScrollListBox1.Height
= 150
ScrollListBox1.Visible
= True
Add the following line of code inside the For i = 0 To 50 loop to fill ScrollListBox1 with the same initial values we are adding to ListBox1:
ScrollListBox1.Items.Add("Entry
Number #" & i)
Now drop down the Class
list and select your new ScrollListBox1
item, then drop down the Methods list, and
scroll down to find your new Scroll
event procedure among all the normal ListBox event procedures that were
inherited, and select it, as shown in the following illustration:
Inside the ScrollListBox1_Scroll event procedure add the following line of code to set the TopIndex property of ListBox1 equal to the TopIndex property of ScrollListBox1:
ListBox1.TopIndex
= e.Values.TopIndex
Save the project and run it. What happens when you scroll
ScrollListBox1 with its vertical scrollbar? Does Listbox1
stay synchronized with it?
Getting the Mouse Wheel scroll event to raise the Scroll event of ScrollListBox
While test running your program try scrolling ScrollListBox1 with the Mouse Wheel on the mouse (click inside ScrollListBox1 to give it the focus and scroll the Mouse Wheel up and down). ScrollListBox1 should scroll up and down, but ListBox1 does not stay synchronized with it. That is because there is a unique event message number for a Mouse Wheel scroll event which we are not intercepting, and so our Scroll event procedure is not being raised.
Go back to the code view of ScrollListBox. We need to begin by declaring another event message constant for the Mouse Wheel scroll event. Add this code to the declarations section of ScrollListBox, on the line below the declaration of the WM_VSCROLL constant:
Private
Const
WM_MOUSEWHEEL
=
&H20A
Now add the italicized lines of code
below (starting with the ElseIf line) to the overrides WndProc procedure
to intercept the event message for a Mouse Wheel scroll event:
If m.Msg
= WM_VSCROLL
Then
eArg.TopIndex
= Me.TopIndex
eArg.SelectedIndex
= Me.SelectedIndex
Dim
e
As
ScrollListBoxEventArgs
= _
New
ScrollListBoxEventArgs(eArg)
RaiseEvent
Scroll(Me,
e)
ElseIf m.Msg
= WM_MOUSEWHEEL
Then
'Let the ListBox class process the m event message
' argument
first, and then raise our Scroll event.
MyBase.WndProc(m)
eArg.TopIndex
= Me.TopIndex
eArg.SelectedIndex
= Me.SelectedIndex
Dim
e
As
ScrollListBoxEventArgs
= _
New
ScrollListBoxEventArgs(eArg)
RaiseEvent
Scroll(Me,
e)
'Exit the Sub to prevent the m event message argument
' from being passed
through to the Listbox class again.
Exit Sub
End If
Letting the class being derived process the WndProc event message first
Sometimes we may need to allow the class being derived (a Listbox this case) to process the m event message first. Then only after it is finished with it do we do our thing--raise our custom Scroll event in this case. Notice that we have inserted a pass through call to MyBase.WndProc(m) as the first line of code in the newly added ElseIf code above. We need to let the Listbox class process the Mouse Wheel scroll event message before we raise our scroll event. If we intercept the m event message and raise our new Scroll event procedure before the Listbox class has a chance to process it, it may not scroll properly or may not even scroll at all. Why doesn't it work that way when we are intercepting a Vertical Scroll event message? Because when we use the vertical scroll bar of a listbox to scroll it up and down, the Vertical Scroll event message doesn't get passed to WndProc until after the scroll events for the scroll bars are processed by the Listbox class.
Also notice the Exit Sub line at the end of the new code we've added above. This Exit Sub line will redirect execute out of the overrides WndProc procedure before m can be passed through to the Listbox class a second time.
After adding the code above, save and test run your program. Click in the ScrollListBox1 control to give it the focus and use the Mouse Wheel to scroll it. Do the listboxes stay synchronized?
To copy a Project folder from your Solution on the Hard Drive to a floppy diskette, follow these steps:
- Exit Visual Basic .NET and insert the floppy diskette, that you want to copy the Project folder to, into drive A:
- Select the My Documents item on the Start Menu to open the My Documents folder.
- In the My Documents folder, double-click the Visual Studio Projects folder to open it.
- Double-click on your Solution folder to open it (it should have your name).
- Open the Project folder that you want to copy, by double-clicking on it.
Deleting the Obj and Bin folders from inside the Project folder before copying it.
- Inside the Project folder, delete the Obj and Bin folders--these folders are created automatically when you open a project. You do not need to copy them, or their contents, to your floppy diskette.
- Hit the Backspace key once--or click the Back button on the toolbar. This moves you from inside the Project folder to back inside your Solution folder.
- Right-click on the Project folder and selected: 3 1/2" Floppy A: on the Send To fly-out menu. This copies the Project folder to your floppy diskette.