In this project we will use the Microsoft Web Browser COM component to create a simple Web Browser.
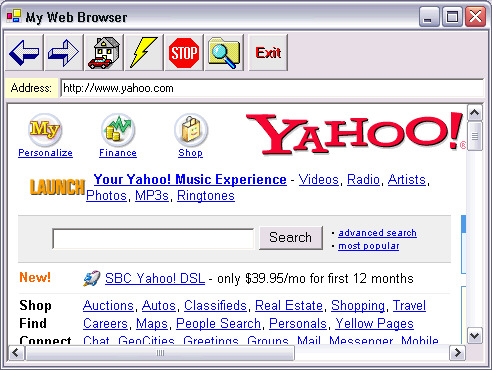
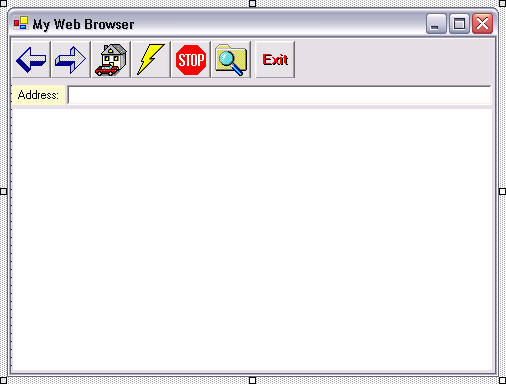
In the above example of the finished Web Browser project, buttons on a Toolbar are used to access different functions that the Web Browser can perform. These buttons include (from left to right):
- Go Back
- Go Forward
- Go Home
- Refresh
- Stop
- Search
- Exit the Browser
The textbox labeled Address (below the Toolbar) lets the user type the Web Address of an internet site they would like to visit. As you can see in the above illustration, the Microsoft Web Browser control displays web pages just like Microsoft Internet Explorer or Netscape Navigator.
Removing your old project and creating a new one
Run Visual Basis .NET and open your Solution (<your name>.sln).
Right-click on the MyPictureViewer project in the Solution Explorer window and select Remove from the context menu. Do not save this project if prompted to do so. Your solution should now be empty.
Drop down the File menu and select New Project under the Add Project menu item. When the Add New Project dialog appears, be sure that the Visual Basic Projects folder is open in the Project Types pane, and that the Windows Application template is selected in the Templates pane. Type MyWebBrowser in the Name textbox. Then click the OK button. This creates a new folder inside the \Visual Studio Projects\<Your Name> folder named MyWebBrowser:
...My Documents\Visual Studio Projects\<Your Name>\MyWebBrowser.
Note: When class is over, be sure to follow the instructions at the end of this project that tell you how to copy your project to your floppy diskette so you can take it home with you.
Rename the Form file and change it's Name and Text properties
With the form file (Form1.vb) selected in the Solution Explorer window, so that it's File properties are displayed in the Properties window, change the File Name property to frmMyWebBrowser.vb (don't forget to include the .vb extension).
Now click on the form in the Designer window to display it's properties:
- Change the Name property to frmMyWebBrowser
- Change the Text property to My Web Browser
Setting the Startup Object
Right-click on the MyWebBrowser project in your Solution Explorer window, click on the Properties item at the bottom of the context-menu. In the MyWebBrowser Property Pages dialog drop down the Startup object list and choose frmMyWebBrowser and click the OK button.
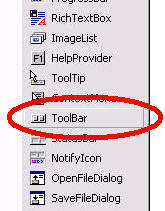
Adding a Toolbar control to the form
Find the Toolbar control in the control toolbox and double-click it once to add a Toolbar to the form:
The new Toolbar has no buttons and appears as a blank bar across the top of the form. This is because the default value of it's Anchor property is Top, Left. This is the normal location of toolbars so we will leave this unchanged. It's default name is Toolbar1, we don't need to change that either. Toolbar buttons usually contain pictures. The pictures on the buttons of a toolbar must be stored inside an ImageList control. Every toolbar is usually associated with it's own ImageList control. So before we can start adding buttons to our Toolbar, we need to add an ImageList control to the form.
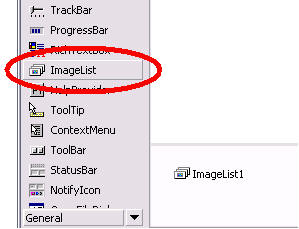
Adding an ImageList control to the form
An ImageList control is ideal for storing multiple images within a project. Once the images are stored inside an ImageList control, you have easy access to them at run-time. Accessing the images in an ImageList is fast and easy, as compared to reading the images from image files--bitmaps, jpegs, etc.-- which is much slower. You can populate an ImageList dynamically at run-time by filling it with images from image files, or you can populate it at design time; which is what we will do.
Double-click on the ImageList icon on the control toolbox (as shown below) to add an ImageList control to the Component Tray:
It's default name is ImageList1, set the properties of this new ImageList control as follows:
|
ImageList |
|
| Property | Value |
| Name | imgListToolbar |
| ImageSize.Width | 32 |
| ImageSize.Height | 32 |
Adding Images to the imgListToolbar control
With imgListToolbar selected in the Component Tray so that it's properties are displayed in the Properties window, click on the ellipses button of it's Images property. This opens the Image Collection Editor dialog. Use the table below and add the following bitmap files to imgListToolbar, at the positions shown. Use the Add button to add each image. Look inside the \Shared\Bitmaps folder on drive C: for the bitmap files (Note: In some labs, the \Shared\Bitmaps folder may be on drive D:. You may download a Zip file containing this files by clicking on this link):
|
Add these Images to imgListToolbar |
|
| Position | File Name |
| 0 | BackArrow.bmp |
| 1 | ForwardArrow.bmp |
| 2 | Home.bmp |
| 3 | Refresh.bmp |
| 4 | Stop.bmp |
| 5 | Search.bmp |
| 6 | Exit.bmp |
If you place a bitmap in the wrong position, just select it in the list and use the up/down arrow buttons to move it up and down in the list. When you are finished, your Image Collection Editor dialog should look just like this:

Once these bitmaps are added to imgListToolbar, the individual files are no longer required, since the bitmaps are actually embedded inside the imgListToolbar control.
Adding Buttons to Toolbar1
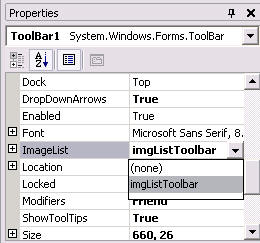
With ToolBar1 selected at the top of the form so that it's properties are displayed in the Properties window, set it's ImageList property to imgListToolbar, as shown below. Note: Any ImageList controls your project contains are listed in the drop down list:
Now click on the ellipses button of the Buttons property of Toolbar1, in the properties window, as shown below:

This opens the ToolBarButton Collection Editor dialog. The buttons we are adding will be listed in the Member pane on the left side of the dialog. The properties of a selected button in the Members pane will be displayed in Properties pane on the right side.
Let's add the first button together. Follow these four steps:
- Click on the Add button. A new button (ToolBarButton1) appears in the Members pane, as shown below:

- Change it's Name property to tbBack.
- Use the drop down arrow of the button's ImageList property and select image number 0, as shown below:
Recall that we set the ImageList property of Toolbar1 to the imgListToolbar imagelist control, so it's images are listed here for us to choose from.

- Now set the Tag property to Back.
Using the four steps above as a guide, add seven more buttons to Toolbar1, and set their properties like this. Note: You need to set the Style property of the tbSeparator button to Separator. Leave the Style property of the other buttons at the default value of PushButton:
| Add 7 more buttons to Toolbox1 | |
| ToolBarButton2 | |
| Property | Value |
| Name | tbForward |
| ImageIndex | 1 |
| Tag | Forward |
| ToolBarButton3 | |
| Property | Value |
| Name | tbHome |
| ImageIndex | 2 |
| Tag | Home |
| ToolBarButton4 | |
| Property | Value |
| Name | tbRefresh |
| ImageIndex | 3 |
| Tag | Refresh |
| ToolBarButton5 | |
| Property | Value |
| Name | tbStop |
| ImageIndex | 4 |
| Tag | Stop |
| ToolBarButton6 | |
| Property | Value |
| Name | tbSearch |
| ImageIndex | 5 |
| Tag | Search |
| ToolBarButton7 | |
| Property | Value |
| Name | tbSeparator |
| Style | Separator |
| ImageIndex | (None) |
| ToolBarButton8 | |
| Property | Value |
| Name | tbExit |
| ImageIndex | 6 |
| Tag | Exit |
When you are finished click the OK button to close the Toolbar Collection Editor dialog. Your Toolbar should look like this:

Adding an URL Address Bar to the form
Now we will add a Label and Textbox below Toolbar, that will display the URL (Universal Resource Locator) of the website the user is visiting--See the first illustration at the beginning of the project. They will also be able to type a website URL into the Textbox and press enter to go to that website:

Use the illustration above and add one Label and one Textbox
as shown. Use the following table to set their properties:
| Label | |
| Property | Value |
| Text | Address: |
| TextAlign | MiddleRight |
| TextBox | |
| Property | Value |
| Name | txtURL |
| Text | (blank) |
Adding the Microsoft Web Browser control to the control Toolbox
Make sure the Windows Forms tab is selected in the control Toolbox. To add the Microsoft Web Browser control, right-click on the toolbox and select the Add/Remove Items... option from the context menu. The Customize Toolbox dialog should appear, as shown:

With the COM Components tab selected, scroll down to the Microsoft Web Browser component and put a checkmark in front of it, as shown above. Then click the OK button to close the dialog. A new Microsoft Web Browser component icon should appear at the bottom of the Toolbox, like this:

Adding the Microsoft Web Browser control to the form
Scroll to the bottom of the component list to find the Microsoft Web Browser control icon (Explorer). Select it and draw a Microsoft Web Browser control on the form, as shown (the big white box):
The default name of the Microsoft Web Browser control will be AxWebBrowser1. Leave this default name and all the other properties of the control unchanged.
Configuring the Web Browser to display the default Homepage at start up
The Microsoft Web Browser control has several useful methods for navigating webpages. The GoHome method takes us to the user's default homepage. The default homepage information is stored in the registry when the user specifies a homepage in their normal web browser. The GoHome method reads this registry entry and navigates there. Note: If the user's computer is not already connected to the internet, executing the GoHome method will automatically initiate an internet connection.
To have our browser navigate to the user's homepage at launch, add the following line of code to the frmMyWebBrowser_Load event procedure:
'Navigate to the user's homepage at startup
AxWebBrowser1.GoHome()
Navigating to any webpage with the Microsoft Web Browser control raises several event procedures that are built into it. For example the BeforeNavigate2 and DownloadBegin event procedures are both triggered when a change of webpage is initiated. The BeforeNavigate2 event procedure is raised first, even before the page being searched for is found. Note: If the webpage is not found, the NavigateError event is raised. If you didn't already know it, any webpage you visit with your browser requires you to download the webpage--which includes all of the graphic files it contains--before it appears in your browser window. The DownloadBegin event procedure is not raised until the website is actually found, and the download process starts.
There are also two event procedures that are raised when the navigation process completes. These include NavigateComplete2 and DownloadComplete. We will use the DownloadComplete event procedure to update our txtURL textbox so that it displays the webpage URL of the page currently being viewed. Add the following code to the AxWebBrowser1_DownloadComplete event procedure:
'Display the URL of the current webpage
txtURL.Text = AxWebBrowser1.LocationURL
The LocationURL property of the Microsoft Web Browser control is a string containing the URL of the currently displayed webpage.
Implementing the Address textbox
To allow the user to type a URL into the Address textbox, and then navigate to that webpage, add the following code to the txtURL_KeyPress event procedure:
'When the user presses enter, Navigate to the URL
' specified in the txtURL textbox.
If e.KeyChar = Chr(Keys.Return) Then
AxWebBrowser1.Navigate(txtURL.Text)
End If
The Navigate method of the Microsoft Web Browser control takes a URL string as an argument.
Testing the program so far
Save the project now. Run the program. You should see the default homepage displayed in the browser control. Try typing a new URL address into the txtURL textbox (for example http://www.msn.com), and press the enter key. Is that website displayed?
Adding a download ProgressBar control to the form
If you are an Internet user--who isn't--you are well aware of how long it can take for some webpages to download. A progress bar is traditionally used to display the progress of a web page being downloaded to your computer--actually, it just gives the user something to look at so they don’t go nuts!
Click once on your AxWebBrowser1 control to select it. Grab the sizer handle dot at the bottom center of the control and drag it up about and inch, to make room for the Label and ProgressBar controls you’re going to place at the bottom of the form:

Use the illustration above and place one Label control (lower left corner) and ProgressBar control (lower right middle) where shown on the form. Use the following table to set their properties:
| Label | |
| Property | Value |
| Name | lblProgress |
| Text | (blank) |
| TextAlign | MiddleRight |
| Visible | False |
| ProgressBar | |
| Property | Value |
| Name | ProgressBar1 |
| Maximum | 100 |
| Visible | False |
Our goal is to display the percentage downloaded of a webpage while it is downloading as a number in the lblProgress label, and graphically in the ProgressBar1 control. You’ll need to use the following event procedures of the Microsoft Web Browser control to do it:
- DownloadBegin -- Raised once when a new web page is first accessed as downloading of the webpage begins. This is were we need to initialize the values in lblProgress and ProgressBar1. Then display them both.
- ProgressChange -- Raised repeatedly as every new byte of the webpage being downloaded arrives. This is where we we will calculate and update the percentage number displayed in lblProgress, and increase the length of the bar in ProgressBar1.
- DownloadComplete -- Raised once when the downloading of a new webpage is complete. This is where we hide lblProgress and ProgressBar1.
Enter the following code into the AxWebBrowser1_DownloadBegin event procedure:
'Set initial values for ProgressBar1 and lblProgress
ProgressBar1.Value = 0
lblProgress.Text = "0.00%"
'Make ProgressBar1 and lblProgress visible
ProgressBar1.Visible = True
lblProgress.Visible = True
The above code sets the initial values of the Value and Text properties of the ProgressBar1 and lblProgress controls. Then it makes them both visible. Now add the following code to the AxWebBrowser1_DownloadComplete event procedure:
'Hide ProgressBar1 and lblProgress
ProgressBar1.Visible = False
lblProgress.Visible = False
The above code hides the ProgressBar1 and lblProgress controls after they’ve done their job.
The code that goes into the AxWebBrowser1_ProgressChange event procedure is a little more interesting. This is the event procedure that is raised over and over again as a webpage is being downloaded. Type the following code into the AxWebBrowser1_ProgressChange event procedure:
Dim dPBarValue As Double
'Avoid a divide-by-zero error
If e.progressMax > 0 Then
'Calculate the percentage downloaded
dPBarValue = (e.progress * 100) / e.progressMax
'Be sure that dPBarValue is greater than zero and less than the Maximum
' property value of ProgressBar1.
If dPBarValue > 0 And dPBarValue <= ProgressBar1.Maximum Then
'Set the Value property of ProgressBar1 to dPBarValue
ProgressBar1.Value = dPBarValue
'Display the percentage downloaded in lblProgress
lblProgress.Text = Format(dPBarValue, "0.00") & "%"
End If
End If
The progressMax property of the e object is the size in bytes of the current item being download from the webpage. The progress property of e is the number of progressMax bytes that have been downloaded. We need to make sure that progressMax is greater than zero before using it as a divisor to calculate the percentage downloaded value (dPBarValue). Note: The actual value in progressMax is not really a byte size. It is a augmented value related to the size-in-bytes of the item being download. This number is significantly increased in size so that progress bars can more accurately display a percentage downloaded.
Getting the ToolBar buttons working
Let's begin implementing the Toolbar buttons. Within the Toolbar1_ButtonClick event procedure, add the following line of code and press enter:
'Use the Tag property to determine the selected button.
Select Case e.Button.Tag
Recall that we set the Tag property of the toolbar buttons to a descriptive string, i.e. Back for the tbBack button, Exit for the tbExit button, etc. We will use that Tag value to determine which button was pressed. Add the following code inside the Select Case statement in the Toolbar1_ButtonClick event procedure:
Case "Back"
Case "Forward"
Case "Home"
Case "Refresh"
Case "Stop"
Case "Search"Case "Exit"
The code in the Toolbar1_ButtonClick event procedure should now look like this:
Select Case e.Button.Tag
Case "Back"
Case "Forward"
Case "Home"
Case "Refresh"
Case "Stop"
Case "Search"Case "Exit"
End Select
Now we just need to add the code to each Case section to implement the corresponding button. Let's start at the top and work our way down. The Microsoft Web Browser control comes with a set of Go methods that include GoBack, GoForward, GoHome, and others. We can use these Go methods to implement the first three buttons on the toolbar. Add the following italicized lines of code to the Select Case structure in the Toolbar1_ButtonClick event procedure:
Select Case e.Button.Tag
Case "Back"
'Return to the previously viewed webpage
AxWebBrowser1.GoBack()
Case "Forward"
'Return to the formally viewed webpage
AxWebBrowser1.GoForward()
Case "Home"
'Return to the users default Homepage
AxWebBrowser1.GoHome()
Case "Refresh"
Case "Stop"
Case "Search"
Case "Exit"End Select
There is also a GoSearch method, but I haven't figured out what it is supposed to do. Testing it just returns to the default homepage. So we will implement a custom search option that defaults to the Google search engine. Add the following code to the Case "Search" section:
AxWebBrowser1.Navigate("http://www.google.com")
The Refresh option needs to reload the current webpage, so add the following code to the Case "Refresh" section:
AxWebBrowser1.Navigate(txtURL.Text)
The Stop button must immediately cease downloading the current webpage. The Microsoft Web Browser control comes with a Stop method just for that purpose. Add the following code to the Case "Stop" section:
AxWebBrowser1.Stop()
And finally, the Exit button needs to close the application. Add the following code to the Case "Exit" section:
Me.Close()
The completed code for the Toolbar1_ButtonClick event procedure should look like this:
Select Case e.Button.Tag
Case "Back"
'Return to the previously viewed webpage
AxWebBrowser1.GoBack()
Case "Forward"
'Return to the formally viewed webpage
AxWebBrowser1.GoForward()
Case "Home"
'Return to the users default Homepage
AxWebBrowser1.GoHome()
Case "Refresh"
'Reload the current webpage
AxWebBrowser1.Navigate(txtURL.Text)
Case "Stop"
'Stop downloading the current webpage
AxWebBrowser1.Stop()
Case "Search"
'Make the Google website the default search engine
AxWebBrowser1.Navigate("http://www.google.com")
Case "Exit"
'Exit the program
Me.Close()
End Select
Adjusting the size of the Browser Window and Address Bar when the form is resized
Before testing the program again, we need to add one final feature. When the user resizes the form, we need to adjust the sizes of the txtURL, AxWebBrowser1, and ProgressBar1 controls to fit the form. This will require the addition of code to the form's Resize event procedure. Begin by adding the following line of code to the frmMyWebBrowser_Resize event procedure:
'Do not process the resize event code if the form is minimized.
If Me.WindowState <> _
FormWindowState.Minimized Then
The above If-Then test uses the form's WindowState property to determine if the form is minimized. The code we are about to add to the Resize event procedure should not be executed if the form is minimized. So all of the following code goes inside the above If-Then structure. The first thing we need to do is set a minimum width and height for the form. I've chosen 300 pixels for the minimum Width and Height. Add the following code to the frmMyWebBrowser_Resize event procedure so that the user cannot shrink the form smaller than this minimum:
'Minimum Width is 300 pixels
If Me.Width < 300 Then
Me.Width = 300
End If
'Minimum Height is 300 pixels
If Me.Height < 300 Then
Me.Height = 300
End If
The Top properties of txtURL and AxWebBrowswer1 remain constant when the form is resized. But the Top properties of lblProgress and ProgressBar1 need to be adjusted whenever the form is stretched taller, so they they remain at the bottom of the form. Add this code, below the code above:
'Adjust the Top properties of lblProgress and ProgressBar1
' so that they remain at the bottom of the form.
lblProgress.Top = Me.Height - _
lblProgress.Height - 35
ProgressBar1.Top = Me.Height - _
ProgressBar1.Height - 35
We need to subtract an extra 35 pixels to account for the caption bar at the top of the form.
Now we must adjust the Width of txtURL, AxWebBrowser1 and ProgressBar1. Add this code, below the code above:
'Adjust the Width of txtURL
txtURL.Width = Me.Width - txtURL.Left - 10
'Adjust the Width of AxWebBrowser1
AxWebBrowser1.Width = Me.Width - _
AxWebBrowser1.Left - 10
'Adjust the Width of ProgressBar1
ProgressBar1.Width = Me.Width - _
ProgressBar1.Left - 10
Set the Width property of all three controls equal to the Width of the form minus their Left property values. Then subtract an extra 10 pixels to account for the form border.
Setting the Height property of AxWebBrowser1 will be a little trickier. We need to account for the heights of the lblProgress and ProgressBar1 controls at the bottom of the form. When the lblProgress and ProgressBar1 controls are displayed--while a page is being downloaded--we need to adjust the Height of AxWebBrowser1 to so that they are not displayed on top of it. Then once those controls are hidden, we need to adjust the Height of AxWebBrowser1 again to fill the gap they will leave at the bottom of the form. So how we set the Height property of AxWebBrowser1 will depend upon whether the lblProgress and ProgressBar1 controls are visible or not. Add the following code, below the code above:
'Include the Height of ProgressBar1 when calculating
' the new Height of AxWebBrowser1, if it is visible.
If ProgressBar1.Visible = True Then
AxWebBrowser1.Height = _
Me.Height - AxWebBrowser1.Top - _
ProgressBar1.Height - 10
Else
AxWebBrowser1.Height = _
Me.Height - AxWebBrowser1.Top - 10
End If
The complete code for the frmMyWebBrowser_Resize event procedure should look like this:
'Do not process the resize event code if the form is minimized.
If Me.WindowState <> FormWindowState.Minimized Then
'Minimum Width is 300 pixels
If Me.Width < 300 Then
Me.Width = 300
End If
'Minimum Height is 300 pixels
If Me.Height < 300 Then
Me.Height = 300
End If
'Adjust the Top properties of lblProgress and ProgressBar1
' so that they remain at the bottom of the form.
lblProgress.Top = Me.Height - _
lblProgress.Height - 35
ProgressBar1.Top = Me.Height - _
ProgressBar1.Height - 35
'Adjust the Width of txtURL
txtURL.Width = Me.Width - txtURL.Left - 10
'Adjust the Width of AxWebBrowser1
AxWebBrowser1.Width = Me.Width - _
AxWebBrowser1.Left - 10
'Adjust the Width of ProgressBar1
ProgressBar1.Width = Me.Width - _
ProgressBar1.Left - 10
'Include the Height of ProgressBar1 when calculating
' the new Height of AxWebBrowser1, if it is visible.
If ProgressBar1.Visible = True Then
AxWebBrowser1.Height = _
Me.Height - AxWebBrowser1.Top - _
ProgressBar1.Height - 10
Else
AxWebBrowser1.Height = _
Me.Height - AxWebBrowser1.Top - 10
End If
End If
Calling the Form's Resize event manually whenever the ProgressBar is displayed or hidden
The frmMyWebBrowser_Resize event procedure contains the code to adjust the height of the AxWebBrowser1 control to accommodate the lblProgress and ProgressBar1 controls when they are visible or hidden. We need to execute the frmMyWebBrowser_Resize event procedure whenever the Visible properties of lblProgress and ProgressBar1 are changed.
We display and hide the lblProgress and ProgressBar1 controls in the AxWebBrowser1_DownloadBegin and AxWebBrowser1_DownloadComplete event procedures respectively. Add the following line of code at the bottom of both these event procedures to make sure the AxWebBrowser1 control is resized properly when their Visible properties are changed:
'Call the form's Resize event procedure to adjust
' the height of AxWebBrowser1.
frmMyWebBrowser_Resize(sender, e)
Testing the program
Save the project now. Run the program. And give it a thorough test.
Required Enhancements
The reason we waited so long before testing the program, is because of two major bugs. I wanted to wait until the main code was completed before dealing with them. These two bugs are:
- Using the Forward button before you use the Back button causes a critical error.
- Using the Back button, when there is no place to go back to, causes a critical error.
You need to fix these two bugs.
Hints: Disable and enable the Forward and Back buttons so that they can only be selected when it is legal to do so. The following line of code disables the Back button:
ToolBar1.Buttons(0).Enabled = False
- To determine if it is legal to use the Back button, you need to keep track of the number of times the user navigates to a new webpage.
- To determine if it is legal to use the Forward button, you need to keep track of each time the user presses the Back button.