Once you've finished an Application, how do you distribute it?
After completing an application, you can distribute it by adding a Windows Installer project to the solution. While not as intuitive as the very user-friendly Package and Deployment Wizard of VB6, creating a Setup and Deployment project in VB.NET makes distributing your finished applications quick and easy.
Removing your old project and adding an existing project to your solution
Run Visual Basis .NET and open your Solution (<your name>.sln).
Right-click on the MyCalculator project in the Solution Explorer window and select Remove from the context menu. Click the OK button when warned that MyCalculator will be removed from the Solution. If there are any other projects open in your solution close them now. Drop down the File menu and select Existing Project under the Add Project menu item. When the Add Existing Project dialog appears, navigate to your DatabaseSnooper project folder and open it. Select the DatabaseSnooper project file (DatabaseSnooper.vbproj) and click the OK button to add the DatabaseSnooper project to the solution.
Compiling a Release version of DatabaseSnooper
Drop down the Solution Configurations listbox and change the default Debug setting to Release to exclude debugging information from the final version of the compiled DatabaseSnooper.exe file:
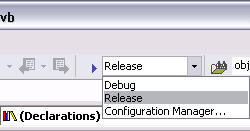
Note: The inclusion of debugging information in the compiled version of your project allows you to step though the program so you can debug it during the program development process. To significantly speed up, and reduce in size, the final version of your program, change the Solution Configurations option from Debug to Release when compiling your applications prior to release.
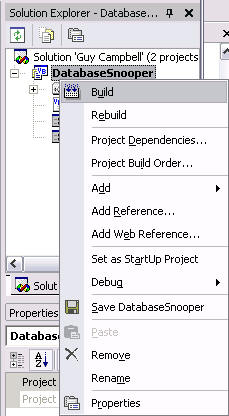
Right-click on the DatabaseSnooper project in the solution explorer window and select the Build menu item, as shown:
This recreates the DatabaseSnooper.exe file in a final, distributable form.
Adding a Setup and Deployment project to the solution
Drop down the File menu and under the Add Project menu item select New Project--Do not remove your DatabaseSnooper project! When the Add New Project dialog appears, open the Setup and Deployment Projects folder, the Setup Project item in the Templates pane should be selected by default, as shown below:
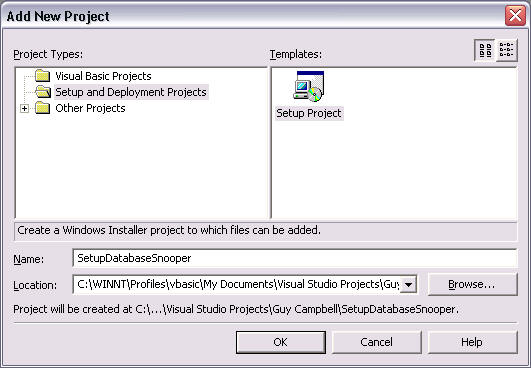
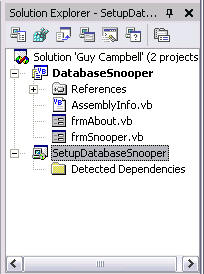
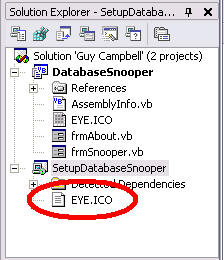
Type SetupDatabaseSnooper in the Name textbox and click the OK button. You should now see a SetupDatabaseSnooper project in the solution explorer window, below your DatabaseSnooper project (as shown below):
Setting DatabaseSnooper's Icon property
As you know, every program has an icon associated with it. We have yet to assign an icon to any of the projects we've done so far. But when you prepare a program for distribution, you don't want to forget to spend at least 2 or 3 hours trying to find or create an icon for it. In fact, for some particularly small applications, you may spend more time finding an icon for it than writing the program itself. Well, I've saved you some time here by providing you with an icon file for DatabaseSnooper. Right-click on the DatabaseSnooper project in the solution explorer window, and select Properties from the context menu:
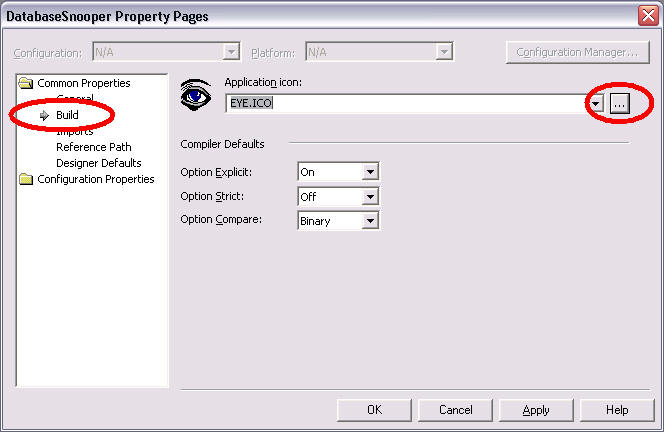
When the DatabaseSnooper Property Pages dialog appears, select the Build item inside the Common Properties folder on the left (as shown above). Use the ellipses button next to the Application Icon combobox (on the right side of the dialog as shown above) to open a file browser window. Navigate to the c:\shared\bitmaps folder and select the eye.ico file. You may download an archive containing this file by clicking this link. Click the Open button. Your dialog should now match the above illustration. Click the OK button.
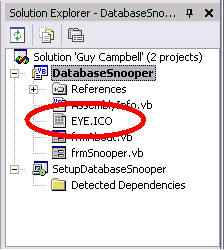
You should now see a new eye.ico file entry inside the DatabaseSnooper project in the solution explorer window (as shown above). This adds the eye.ico file to the project, but we still need to apply it to the forms of the project.
Applying the Icon to the Form files
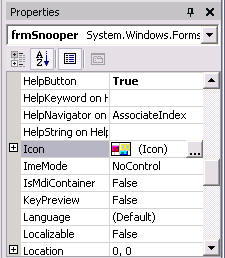
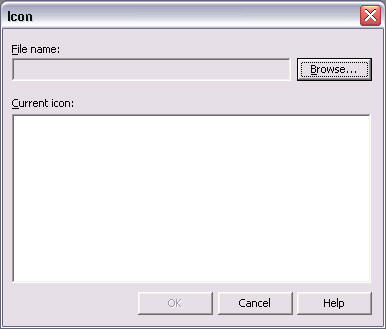
Open the design view of the frmSnooper.vb form file. Make sure the frmSnooper form is selected in the design view window so you can see it's properties in the properties window. Click on the ellipses button of the Icon property (as shown below), to open a browser window:
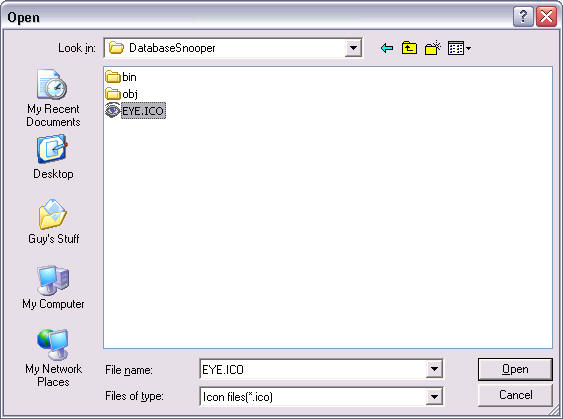
Navigate to the DatabaseSnooper folder, which should be located here:
...My Documents\Visual Studio Projects\<Your Name>\DatabaseSnooper
Select the eye.ico file--which was copied to the DatabaseSnooper folder when you added it to your project above--and click the Open button (as shown below):
Now take a look at the upper left corner of the caption bar of the frmSnooper form, and you can see the default project icon has been replace with the new eye.ico icon:
Open the design view of the frmAbout.vb form file. Make sure the frmAbout form is selected in the design view window so you can see it's properties in the properties window. Now follow the steps above and set it's Icon property to the eye.ico file as well.
Setting the AddRemoveProgramsIcon property of the SetupDataDatabase project
The AddRemoveProgramsIcon property of the SetupDatabaseSnooper project lets you specify the icon that will be displayed with the program you are distributing in the Add Remove Programs list after your program is installed on a user's computer. It's good to make this icon the same one your application uses so that a user won't have a problem quickly spotting your application in the Add Remove Programs list when then go to remove it from their computer (usually after running it the first time--I'm joking, really I am).
Click once on the SetupDatabaseSnooper project in the solution explorer window to see it's properties in the properties window. Click on the drop-down arrow of the AddRemoveProgramsIcon property and choose the Browse item to open the Icon selection dialog (as shown below):
Click on the Browse button to see the Select Item in Project dialog (as shown below):

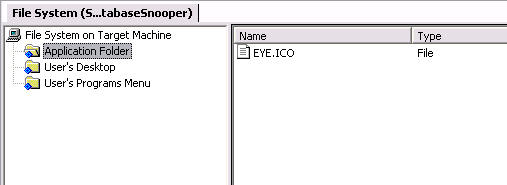
The three folders in the Select Item in Project dialog Look in pane represent locations on the user's computer where your application is going to be installed, they are:
- Application Folder -- This is the actual folder where your application is installed on the user's computer. For the DatabaseSnooper application, this would normally default to c:\Program Files\[company name]\DatabaseSnooper, but the user has the opportunity to change this location during the installation process.
- User's Desktop -- The desktop of the user's computer. You can use this folder to add a shortcut to your application to the user's desktop during installation.
- User's Programs Menu -- This is inside to Programs folder on the user's Start menu. Here you will create a DatabaseSnooper folder and add shortcut's to it for your application, application help files, support website links, and any support documents included with your application.
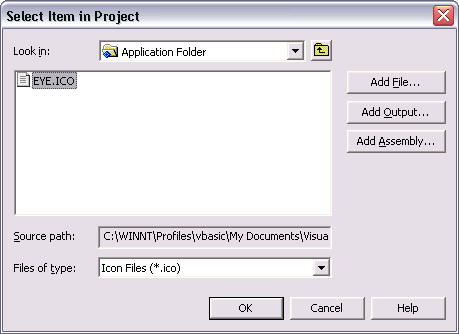
We will add the eye.ico file to the Application Folder. Select the Application Folder item (as shown above) and click the OK button:
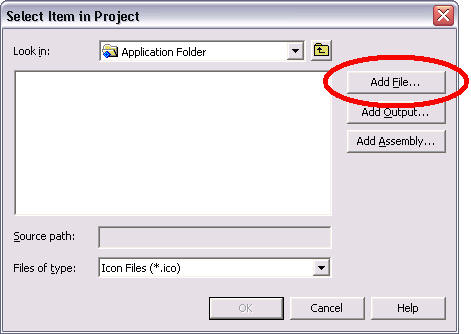
Now click on the Add File button to open a browser window and select the eye.ico file inside your DatabaseSnooper project folder. Your Select Item in Project dialog should then match the following illustration:

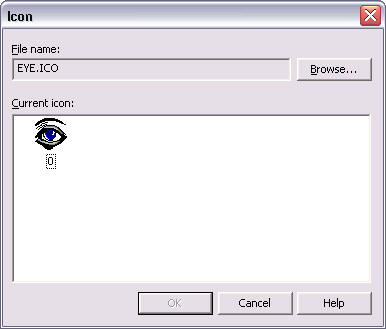
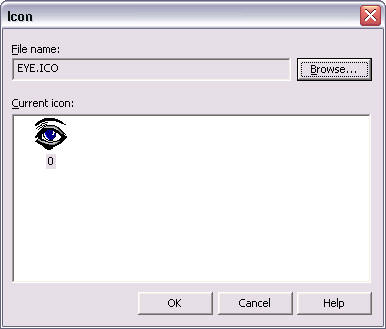
Click the OK button. Your Icon selection dialog should now match the following illustration, with the single eye.ico in the Current Icon pane. Click once on the icon to select it, this enables the OK button. Now click the OK button to close the dialog:
You should now see a new eye.ico file entry inside the SetupDatabaseSnooper project in the solution explorer window (as shown below):
Setting the other Properties of the SetupDataDatabase project
Click once on the SetupDatabaseSnooper project in the solution explorer window to see it's properties in the properties window. The illustration below shows the complete list of a Setup and Deployment Project's properties:
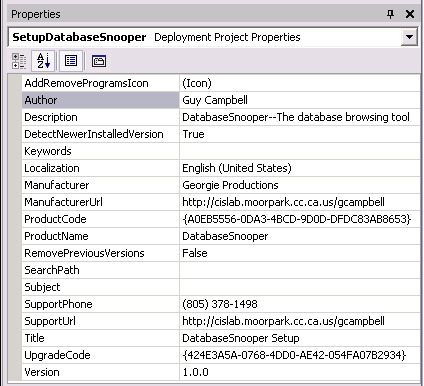
Use the list above to guide you and add your own values for the following properties--Use some of my values in the illustration above if you need to, but make sure you enter values for all of the properties below:
- Author
- Description
- Manufacturer
- ManufacturerUrl
- Product Name
- SupportPhone
- SupportUrl
- Title - This is the title that will appear on the installation dialog during the setup process
- Version
Do not modify the ProductCode or UpgradeCode registry key values, these are generated for you, and will be different for every application you distribute. There are times when these values need to be modified, but not for this exercise.
Using the File System Editor to configure your deployment package
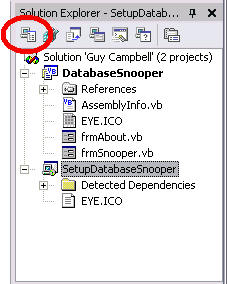
With the SetupDatabaseSnooper project in the solution explorer window, click on the File System Editor button on the top left of the solution explorer window (as shown below):
This displays the File System panes of the SetupDatabaseSnooper deployment project (as shown below):
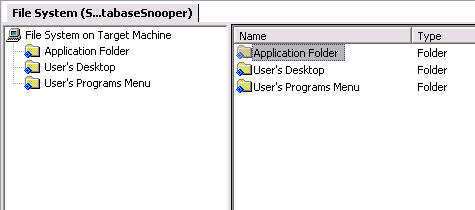
I've described these folders before when we added the eye.ico file to the Application Folder for the AddRemoveProgramsIcon property. Now we will look at them one-by-one and in more detail as we add items to them.
Choosing Files for the Application Folder
Recall that the Application Folder is the folder where your application is installed on the user's computer. We need to include the DatabaseSnooper program and help files, and any readme.txt or support.txt files if they exist.
Open the Application Folder by clicking on it in the File System on Target Machine pane on the left side. You should notice that this folder already contains the eye.ico file we added early (as shown below):
Adding the DatabaseSnooper.exe file to the Application Folder
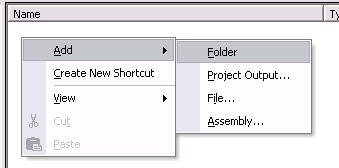
Point inside the Files pane on the right side and right-click to display a context menu. Select the Project Output item under the Add menu as shown below:

This displays the Add Project Output Group dialog as shown below:
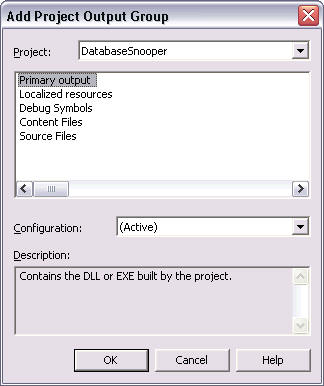
Because the Setup and Deployment project was added to a solution with only the DatabaseSnooper project in it, DatabaseSnooper is selected by default in the Project drop down list. The only item in the Outputs window that we need to selected is Primary output. The Description pane at the bottom of the dialog tells us that this will include the DatabaseSnooper.exe file. With the Primary output item selected, click on the OK button.
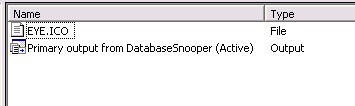
You should now see a new entry in the Files pane of the Application Folder that looks like this:
Adding the DatabaseSnooper Help file to the Application Folder
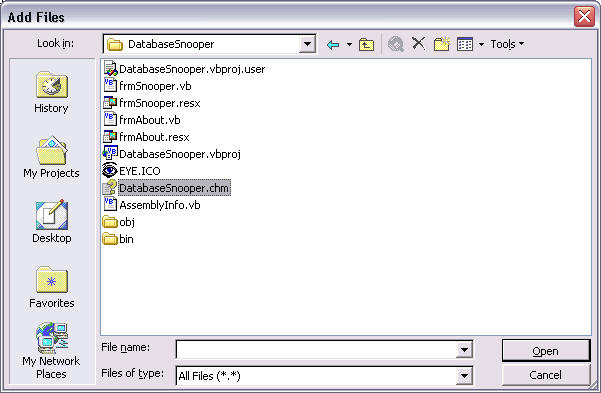
Right-click in the File pane again and select the File item under the Add menu as shown below:
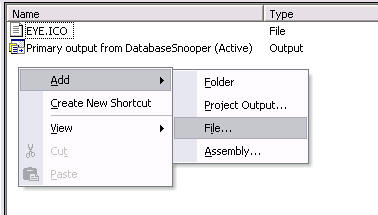
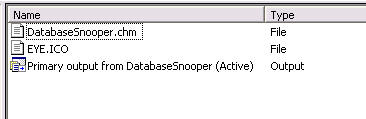
This displays an Add Files browser window. Navigate to your DatabaseSnooper project folder and select the DatabaseSnooper.chm help file that we created in project 4 (as shown below), and click the Open button:
Now the File pane of the Application Folder should look like this:
Creating and adding a readme.txt file to the Application Folder
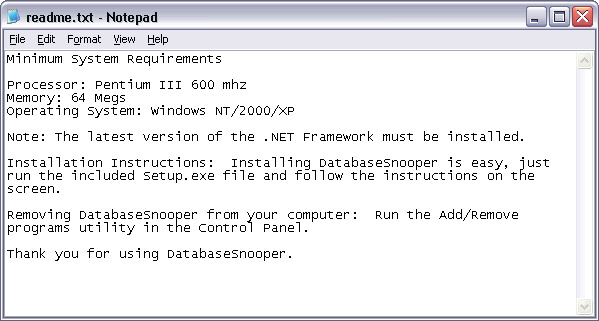
As a common practice, a readme.txt or support.txt file is included in the program folder of most applications. They contain program installation and removal instructions and support information for the user. We will now create a very basic readme.txt file that will be included in our installation package for DatabaseSnooper.
Open the Note Pad application (usually found inside the Accessories folder on the Start menu). Use the illustration below as a guide and type this text which briefly describes the minimum system requirements for DatabaseSnooper, how to install the program, and how to uninstall it:
When you are finished, select Save on note pad's File menu. Be sure to save the file as readme.txt inside your DatabaseSnooper project folder, which you can find here:
...My Documents\Visual Studio Projects\<Your Name>\DatabaseSnooper
Then exit from note pad.
Now right-click in the Application Folder's File pane again and select the File item under the Add menu one more time. Navigate to your DatabaseSnooper project folder and select the readme.txt that you just created and click the Open button to add it to the File pane. Now the File pane of the Application Folder should look like this:
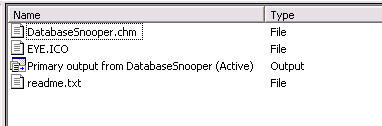
This means that the application folder for DatabaseSnooper--once it is installed on the user's computer--will contain the DatabaseSnooper program file, help file, readme.txt file, and the eye.ico file. When creating a Setup and Deployment Project, you are free to add other files if you wish--for example, a database file that your program uses. But for this project, these are all the files we will include.
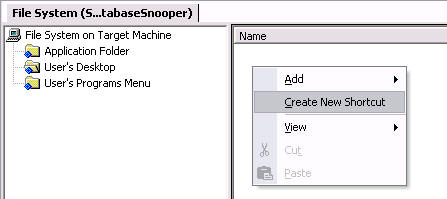
Adding a Shortcut to the User's Desktop folder
Open the User's Desktop folder by clicking on it in the File System on Target Machine pane on the left side. To add a shortcut to the DatabaseSnooper program to the user's desktop, point inside the Files pane on the right side and right-click to display a context menu. Select the Create New Shortcut as shown below:
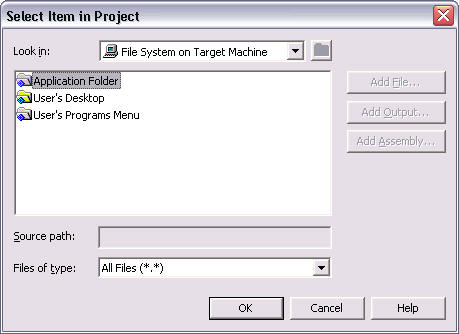
This displays the Select Item in Project dialog. Note: We are only allowed to create shortcuts on the user's desktop to files that are part of our installation package. With the Application Folder selected in the Look in window, click on the OK button (as shown below):
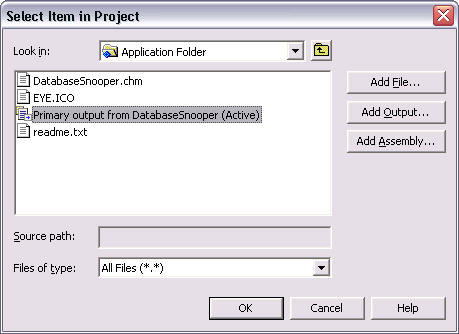
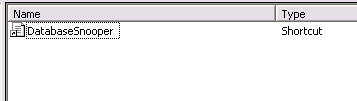
You should now see a list of the items we added to the Application Folder previously. Select the Primary output from DatabaseSnooper item and click the OK button (as shown below):
Renaming and setting an Icon for the Shortcut in the User's Desktop folder
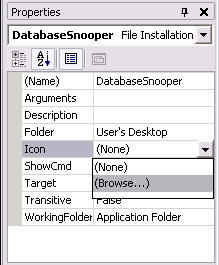
Right-click on the new shortcut in the Files pane of the User's Desktop folder and select Rename from the context menu:

Change the name of the shortcut to DatabaseSnooper. With the shortcut selected in the Files pane of the User's Desktop folder, so that you can see it's properties in the properties windows, click on the drop-down arrow of the Icon property and choose the Browse item (as shown below):
This opens the Icon selection dialog. Click on the Browse button to display the Select Item in Project dialog. With the Application Folder item selected click the OK button to open it so that we can see the eye.ico file inside:
Select the eye.ico file and click the OK button. Your Icon selection dialog should now look like this:
Click the OK button to close the Icon dialog. The eye.ico icon will now be applied to the shortcut in the Files pane--so you won't see it's icon change--but it will be applied to the desktop shortcut that is installed on the user's computer.
This is what the Files pane of the User's Desktop folder should look like now:
Adding our Program Folder and Shortcuts to the User's Programs Menu folder
The User's Programs Menu represents the location on the user's computer inside the Programs folder on the Start menu. This is where we will create a DatabaseSnooper folder and filled it with shortcuts to our program files.
Open the User's Programs Menu folder by clicking on it in the File System on Target Machine pane on the left side. Now right-click in the Files pane and select Folder under the Add menu item of the context menu, like this:
Change the name of the new folder from New Folder #1 to DatabaseSnooper, as shown in the following illustration:

The DatabaseSnooper folder needs shortcuts to the DatabaseSnooper program, help, and readme.txt files.
Open the DatabaseSnooper folder you just added to the User's Programs Menu folder by clicking on it in the File System on Target Machine pane on the left side. Right-click in the Files pane and select the Create New Shortcut item on the context menu. Follow the steps we just took above to add a shortcut to the DatabaseSnooper application file to the desktop, and add shortcuts to these files from inside the Applications Folder:
- Primary output from DatabaseSnooper
- DatabaseSnooper.chm
- readme.txt
The Files pane of the DatabaseSnooper folder should now look like this:
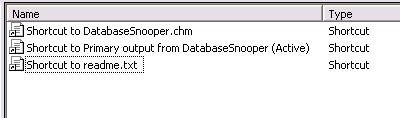
Rename the above shortcuts and set their Icon properties as follows:
| Old Name | New Name | Icon Property |
| Shortcut to DatabaseSnooper.chm | DatabaseSnooper Help | (default) |
| Shortcut to Primary output from DatabaseSnooper | DatabaseSnooper | eye.ico |
| Shortcut to readme.txt | Read Me | (default) |
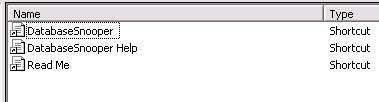
When you are finished the shortcuts in the Files pane of the DatabaseSnooper folder--which is inside the User's Programs Menu folder--should now look like this. Note: These files are sorted alphabetically and do not correspond to the order of the files in the first illustration above with their old names:
The Final step - Selecting the Type of Package to create
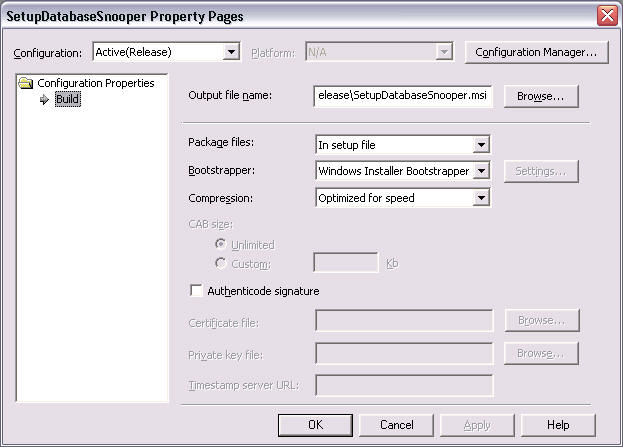
Right-click on the SetupDatabaseSnooper setup and deployment project in the solution explorer window and select the Properties menu item to display the SetupDatabaseSnooper Property Pages dialog, as shown:
Let's take a look at the options on this dialog:
- Configuration - Normally always set to Active(Release), which means it will include the Active project in the solution (DatabaseSnooper in this case), compiled in a Release format which will not include the Debug information that helps us trouble-shoot the project as we are creating it.
- Output file name - This is the name and location of the Microsoft Setup Information file (msi). Leave this set to the default location and filename of Release\SetupDatabaseSnooper.msi. This is the Release folder inside the SetupDatabaseSnooper project. This is also where the deployable package files will be created.
- Package Files - Lets you choose how the files will be packaged within
the Windows Installer file. The following options are available--we will use
the In Setup File option:
Option Description As loose uncompressed files The separate installation package files will be placed in the same directory as the .msi file and will not be compressed into archive files.
In setup file The installation package files will be compressed inside self-extracting archive files, for easy distribution. Note: This is the option you would select if you want to distribute your application over a network or via the internet.
In cabinet file(s) The installation package files will be compressed in one or more .cab files in the same directory as the .msi file. Note: This is the option you would select if you want to distribute your application on floppy diskettes.
- Bootstrapper - This option lets you specify whether the files needed to install Microsoft Windows Installer 1.5 on the target computer--which are required to do the installation--should be included in the installation package. Note: Windows Installer 1.5 comes with Windows XP. But when installing your package on systems running earlier versions of Windows, the bootstrapper files will be necessary--so always include them.
- Compression - We usually set this to Optimized for Speed. The Optimized for Size option will compile the application in such a what that the executable file will be smaller, but the program may run slower. With the size of hard drives these days, running out of space is the least of your worries.
Without changing any of the default settings, click the OK button.
Building the Setup Package
Now we are ready to build our Setup Package for DatabaseSnooper. Save the project before going on. To build the Setup Package, right-click on the SetupDatabaseSnooper project in the solution explorer window, as shown:
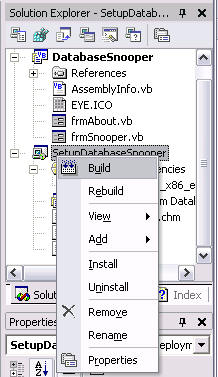
Select the Build item on the context menu to start the build and watch the messages in the Output window at the bottom of the screen while the package is constructed. When the build is complete, your Output window should look something like this:
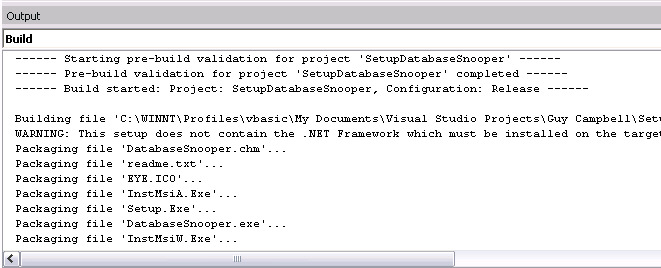
Notice the warning message: About the package not containing the .NET framework, which our program needs to work properly on the target computer. Including the .NET Framework within our installation package would make it much larger. If the user regularly applies service packs and security updates to their computer, they would have installed the .NET framework package a long time ago. Recall that we also mentioned in our readme.txt file under System Requirements that the latest version of the .NET framework was required.
Installing your finished DatabaseSnooper Application
Important: Be sure to exit from Visual Basic .NET for this next step. Now open the My Documents folder and navigate to the Release folder inside your SetupDatabaseSnooper project folder. It's contents should look like this:
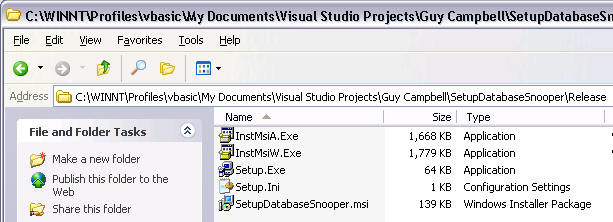
These are the installation files for DatabaseSnooper. You can zip these five files together and send them to a friend and they can install your DatabaseSnooper program. They only need to extract the files onto their computer, and run the Setup.exe program. The InstMsiA.Exe and InstMsiW.Exe files are self-extracting archive files that contain the DatabaseSnooper.exe file and all the support files that it requires. These includes the object libraries and code libraries in the form of DLL files, as well as the other files you included in the project previously.
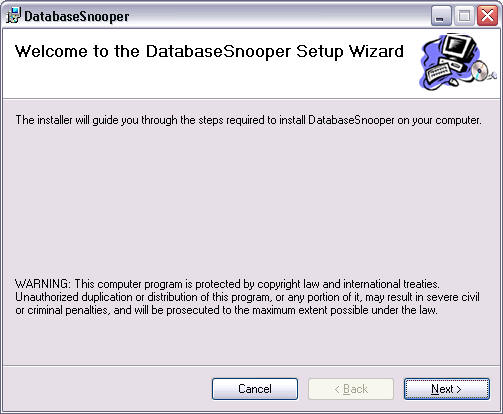
Double-Click the Setup.exe file now. After a moment, you should see the following DatabaseSnooper Setup Wizard dialog:
Click on the Next button to see the Select Installation Folder dialog:
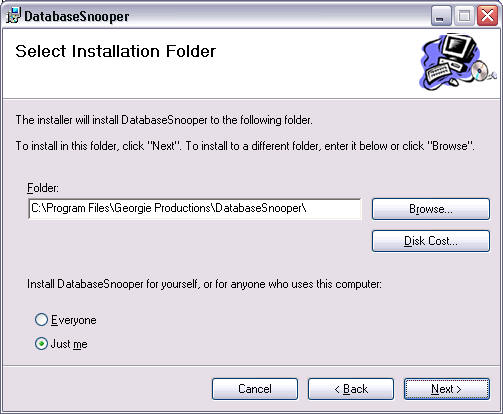
This dialog allows the user to choose the installation folder. Notice how the default location includes the value of the Manufacturer property of the SetupDatabaseSnooper project in the path, which in my example is Georgie Productions. Your installation path should include the value you specified for the Manufacturer property. The user can also select whether this installation should be available to All Users or only the current user who is installing it. Leave the default values unchanged and click the Next button.
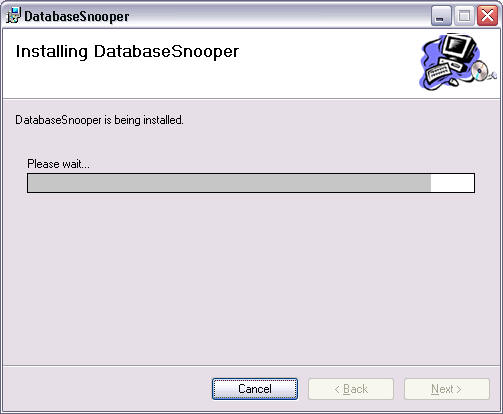
A Confirm Installation dialog appears next. Click on the Next button to start the installation process. The Installing DatabaseSnooper dialog should display for a while during actual installation process (see the following illustration):
When the installation completes successfully you should see the Installation Complete dialog, which looks like this:

Click the Close button to close the Installation Complete dialog.
Checking what the Installation did
Once the DatabaseSnooper installation is complete, take a look at your Desktop. Is there a shortcut to DatabaseSnooper there?
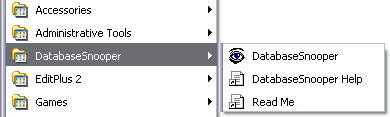
Now click on the Start button and open the Programs menu. Do you see a new DatabaseSnooper folder? Does it contain shortcuts to the DatabaseSnooper program, help and readme.txt files, as shown below:
Now take a look inside the c:\Program Files\ folder. You should find a folder with the name of your Manufacture property (Georgie Productions in my case), and inside it is the DatabaseSnooper folder with your program files, as show below:

Viewing the Support Information, and uninstalling DatabaseSnooper
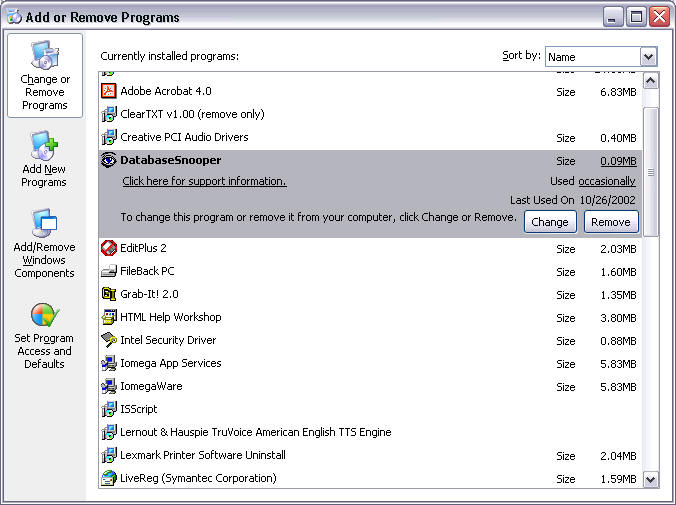
After you've finished testing your DatabaseSnooper installation, let's uninstall it. Make sure DatabaseSnooper is not running and open the control panel and run the Add/Remove Programs applet. The list of programs that are installed on your computer will be different, but you should see the DatabaseSnooper program somewhere in the list, like this:
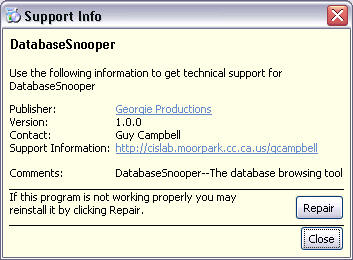
Click on the Click here for support information link (as shown above) so see the Support Info dialog. The information on this dialog is taken from several of the property settings we applied to the SetupDatabaseSnooper project:
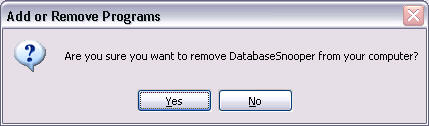
Close the Support Info dialog. Now click the Remove button of the DatabaseSnooper application in the Currently Installed Programs list. You should see the following confirmation dialog. Note: Before clicking the Yes button, make sure the confirmation dialog is telling you that you are about to remove DatabaseSnooper from your computer. Do not accidentally remove the wrong program!
After clicking the Yes button, the uninstall process should take just a few seconds. After it's finished, make sure that all the files your DatabaseSnooper installation pack added to the computer were removed.
Creating a Setup and Deployment Package - A Summary
- With a blank solution, add the finished application project that you wish to distribute.
- Add a new Setup and Deployment project to the solution.
- Add an Icon to the finished application project and set the Icon properties of the forms, if you had not already done this previously.
- Set the AddRemoveProgramsIcon property of the Setup and Deployment project to the same Icon your finished application project uses. You will need to include the actual icon file in the Application Folder, so that is will be included with your installation package. Note: One common practice is to create a special ╪ (not) crossed-out version of the icon for this purpose.
- Set the properties of the Setup and Deployment project which
include:
- Author
- Description
- Manufacturer
- ManufacturerUrl
- Product Name
- SupportPhone
- SupportUrl
- Title
- Version
- Choose the files to be installed in the Application Folder of the user's computer.
- Create shortcuts to your installation files to be installed on the Desktop of the user's computer. Be sure to set the Icon property of shortcuts to your application to the same Icon file that the application uses. Note: Including a shortcut to your application on the desktop is optional.
- Add an application folder that contains short cuts to your installation files to the user's Programs folder on their Start menu. Note: Be sure to set the Icon property of shortcuts to your application to the same Icon file that the application uses.
- Select the type of Setup Package to be created via the property pages dialog of the Setup and Deployment project.
- Build the Setup Package.
- Deploy the the Setup Package files.