| Mass: 16000 kg Length: 15.33 m Max Yaw: 110 dps Max Pitch 60 dps Max Roll: 100 dps Max Velocity: 500 kps |
 |
Last modification: 21th October, 1998.
Collected by Tozo (Main source: http://www.3dgaming.net/features/secretops/)
Attention! (English)
My goal was to provide a single file, that contains all the needed information to complete Origin's WingCommander: Secretops. I didn't write it myself, so all the credits must be given to the guys at 3DGaming.net. I only made this file, because I needed a single word file to print out. Then I converted and modified it to Html, so that's what you are reading. Please, if you want the most accurate information, go to 3DGaming.net, and get it from there. I would like to thank the guys their work making this collection. This file doesn't contain the pictures provided in the original issue, so if you need them, sail there!
Figyelem! (Hungarian)
C�lom egy olyan f�jl l�trehoz�sa volt, amely tartalmazza az Origin c�g WingCommander: Secretops j�t�k�nak v�gigj�tsz�s�hoz sz�ks�ges �sszes inform�ci�t. A f�ljl tartalm�t nem magam �rtam, annak dics�s�ge a 3DGaming.net-en dolgoz� sr�cok�. El�sz�r egy Word f�jlra volt sz�ks�gem, hogy kinyomtathassam. Ezut�n ezt tettem �t Html-be, �s m�dos�tottam n�mik�pp, �s ezt olvasod most. Term�szetesen, ha az abszol�t legfrissebb inf�kra van sz�ks�ged, k�nytelen vagy a 3DGaming.net-hez fordulni, �s onnan leszedni. Ez�ton is szeretn�m megk�sz�nni az ottani sr�coknak a munk�jukat. Ez a f�jl nem tartalmazza az eredeti anyag k�peit, sz�val azokat is onnan kell leszedned!
From now on, all the characters (despite some of the links) are 3DGaming.net made!!!
Update!!!:
98.09.20.
I made some addititions to this file, so from Episode3, it is my own work! The preceeding sections (Episode1 and 2) and the Weapons and Enemy guide mainly remained intact (I only completed them with the mission and episode names). Tozo
98.10.11.
I made some additions again. I think that it is now ALMOST complete!!! The informations are partly from 3DGaming.net, and partly from me. Maybe if I have some time I will update the final missions with more informations. I had no time to do so. J Tozo
Please do not forget to visit Vondoom's site, including the WCSO section. He has some goooood fictions from the Wing Commander universe, and a low number on the counter. J
98.10.11.
Update again. ALMOST complete!!! :) Added Devastator infos and a pic. Thanks to Attila!
When Origin announced that they would be releasing a totally free game to the Internet, everyone came up with their own theories on why they were doing this. Some thought that Origin would fill the download page with advertisements or even use advertisements in the game to make money. Others thought that it was to repair Origin's bad reputation after Ultima Online. My best guess was that they wanted to get people hyped up for the Wing Commander movie that is coming up soon. None of that really matters though, because we have a FREE full-version game to download! If you aren't familiar with the Wing Commander series, Secret Ops is a space combat sim like X-Wing vs. TIE Fighter or Descent Freespace. This is such a huge event for every gamer out there that we would be stupid not to do a big feature to celebrate it.
Every Thursday a new episode is released, and we will do our best to get a strategy guide for that episode posted by Saturday or Sunday. Click on "Episode" to see the latest strategies. In the downloads section we give you links to download the game, weekly episodes (updated on Thursdays), an instruction manual and even some trainers (cheats!). In the Enemies section we tell you what you will be fighting against and give you some info on what each enemy's weak spot is. The Ships section tells you what you get to fly, and each ship's abilities. The Weapons section will tell you everything you need to know about each firearm, e.g. some of missiles have cool abilities like auto-tracking (no lock needed), and we'll tell you what guns are good for certain situations. All of the sections will be updated when a new episode brings us new weapons/enemies/ships. Feel free to send us any hints or tips, and we'll be sure to give you credit if we use them. Check back here often, this feature won't be completed for almost 2 months! Or 7 episodes, whichever comes first.
Beginning Episode1 Episode2 Episode3 Episode4 Episode5 Episode6 Episode7 Enemies Weapons
Episode 1: Deep Black (Courage system)
Mission 1 Mission 2 Mission 3 Mission 4
Mission #1: The Capricous Carrier
Primary Objectives: Escort the Cerberus into hyperspace;
Secondary Objectives: None;
Guns: Cloudburst; Chain Ion;
Missiles: Artemis = 6; PilumIV = 6;
Enemies: Moray, Stingray, Manta;
Your Ship: Panther
Make sure you are familiar with all of the keys like Afterburners (TAB) Flares (E), and Autopilot (A) before playing your first mission.
NAV #1
You will encounter a wave of four Morays at first. The Morays are
slow and can be taken out easily with good aim and Cloudburst
guns. When the last Moray is on it's final breath, a second wave
of five enemy ships will appear. They are a mix of Morays and
Stingrays. The Cloudbursts work well on the Morays, but the
Stingrays might be too fast for you. A combination of Artemis
missiles and Chain Ion cannons will clean the 'rays up pretty
quick.
NAV #2
Seven ships will meet you at this NAV. Two Morays will try to
escape, if they succeed you will fail the mission. Hit your
afterburners and let a few Artemis missiles talk them out of
their escape. While you're chasing the two chickens a group of
Mantas will stick on your tail. Drop some flares to distract
their missiles, and if your shields start getting low hit C then
5 to tell your wingmen to help out. When you have killed the two
runaways use your remaining missiles on the Mantas. When they are
dead it's time for you to get back to the Cerberus.
Primary Objectives: Defend the Cerberus;
Secondary Objectives: None;
Guns: Dust Cannon; Cloudburst;
Missiles: Artemis = 4; Swarm = 8;
Enemies: Skate; Skate Class B; Lamprey; Baracuda; Manta; Moray;
Your Ship: Wasp;
Scramble!
This is a tough mission! If you lose a
wingman, don't even bother trying to finish. Just restart.
The mission starts with an uncountable number of enemies inbound. Then Hit "B" right away to activate your rocket boosters (only available on the Wasp) to get to the baddies before they get to your wingmen. Your role in this mission is to take out the fighters that are attacking the good guys. If you go after the big Barracudas in your little ship, you and your wingmen will die. Your Primary targets are the Skates and Lampreys. If you finish them off set your sites on the nearest Manta. Don't worry about the Skate Class B ships, they aren't a threat until they split up.
When you are going head-on against an enemy, never fire a missile, because it will get destroyed by their gunfire. If you are using swarms you need not worry about that rule, there are too many of them for the enemy to stop. If you are successful in destroying the fighters your wingmen will have no problem with the barracudas. A good rule for attacking is to fire at an enemy until your guns dry up, then shoot a missile at him. Now he's dead. Your guns will recharge by the time you find another enemy.
The golden rule for this mission is to keep your eye on the radar and go after any enemy close to a friendly.
Primary Objectives: Escort the Cerberus to Jump;
Secondary Objectives: None;
Guns: Cloudburst; Chain Ion;
Missiles: Artemis = 6; PilumIV = 6;
Enemies: Moray; Skate; Manta;
Your Ship: Panther;
If you completed the 2nd mission, there should only be 3 NAV points to finish this level. If there are more than 3 NAVs you screwed the 2nd mission up big time, and I can't help you out.
NAV #1
You'll face around eight enemies right
off the bat. They are just Skates and Morays, so pick off the
slow guys first with your Cloudbursts, and use the Artemis
missiles on any Skates that your wingmen don't pick up.
NAV #2
12-14 enemies are waiting for you at this point, and they are a
mix of Mantas, Morays, and Skates. Your wingmen do a good job at
killing the skates, but the Mantas are constantly tailing your
buds. Go after the evil Mantas with missiles and guns blazing
before anything else. Clean up the Morays next, and then use
missiles on any Skates left. Check your wingmen's health
("C" then "4") and you're ready to go to the
next NAV.
NAV #3
An easy mix of 12 Morays and Mantas. Use up your remaining
missiles, look at the stars, play with your camera angles, take a
nap... whatever. This final NAV is simple.
Mission #4: Visit to Aunt Ella
Primary Objectives: Defend the Cerberus;
Secondary Objectives: None;
Guns: Tachyon Cannon; PLS Particle;
Missiles: Tracker = 4; Artemis = 8; PilumIV = 8;
Enemies: Devil Ray; Skate Class B; Skate; Moray;
Your Ship: Vampire;
Scramble!
Don't be afraid to use your missiles on
this one; they really load you up! There are two major waves of
enemies on this mission, and you should greet each wave with a
big Tracker missile! The tracker flies straight for awhile, then
splits up into 4 pieces to chase after the closest enemies. After
firing the Tracker into the crowd, immediately go after the
Skates with Artemis missiles and the Particle gun. Like always,
leave the Skate Class B ships alone until they split. Morays
aren't worth a missile, so just blast them with your Particle
guns, which are my favorite guns for this mission. The Particle
guns fire fast and seem to do a fair amount of damage. The Devil
Rays are your biggest problem for this mission. If they are
giving you a hard time press and hold "P" to bring up
your ship power levels then move your joystick closer to the
shield to give you more protection. Then give that Devil Ray a
troublesome load of PilumIV missiles. When you clear the baddies
out return to the Cerberus to complete Episode #1!
Password for episode #2 (with all missions completed): Acheron
Episode 2: Thickening (Ella system)
Mission 1 Mission 2 Mission 3 Mission 4 Mission 5 Mission 6
Primary Objectives: Escort and defend the Cerberus;
Secondary Objectives: None;
Guns: Cloudburst; Chain Ion;
Missiles: Artemis = 6; PilumIV = 6;
Enemies: Moray; Manta; Red Manta; Stingray; Devil Ray;
Your Ship: Panther;
The following strategies will only work if you received the password "Acheron" for the first episode.
Start
This mission starts you off with a few easy Morays to warm you
up. Pick those guys off with full guns then get on your way.
Always use full guns when you're in the Panther. Tap the trigger
to fire short bursts of the Cloudburst and Chain Ion combo until
the enemies shield is worn off, then hold the trigger down to let
the Ions do their work on the hull. This is extremely effective
for every fighter you face.
NAV #1
Ten Morays and one Manta are at this NAV. Set your sites on the
Manta and take him out before the Morays, or else he might give
your wingmen a hard time. Press "L" to keep your sites
constantly on him. When the Manta is dead take lock off
("L" again) and finish off the Morays. Deaaad Bug!
NAV #2
Morays, Red Mantas, and Stingrays are
the big welcome wagon for NAV #2. Set your sites on the Red
Manta, and give him an Artemis or two in the rear. The Stingrays
aren't a threat, because there are only two, one short of being
able to join together.
NAV #3
Two Mantas, one Red Manta, five Stingrays, and a handful of
Morays are your playtoys for NAV #3. Get that Red Manta first,
then switch to killing the Stingrays and normal Mantas. As
always, the Morays are just there to look pretty.
NAV #4
Mantas (both flavors) and Morays will meet you at this NAV, but
that lone Devil Ray will mix things up a bit. I would say kill
the Devil Ray first, but the Red Mantas would eat the Cerberus
alive. Get the Red Mantas first, and tell you wing to kill the
Devil Ray. This is the last NAV, so be sure and use up your
missiles!
Alternative strategy for mission #1 from Alex!
Hi, here is something I've discovered that helped me to finish the first mission of the Acheron-Password second episode. At each waypoint when the enemies appear, tell all your wingman to return to formation and sit right next to the Cerberus till its turrets (not the big cannon) start shooting at the incoming bogies. Once that happens, turn your wing loose, and kick butt, the AA fire from the Cerberus is very helpful, and they don't seem to attack the Cerberus enough to damage it much if at all.
Also the massive cannon on the Cerberus is VERY annoying sometimes especially when you are close on someone's tail, and the Cerberus decides to take some shots at the same target, vaporizing you in the process.
Primary Objectives: Patrol all NAV points;
Secondary Objectives: None;
Guns: Cloudburst; Chain Ion;
Missiles: Artemis = 6; PilumIV = 6;
Enemies: Moray; Manta; Stingray; Devil Ray;
Your Ship: Panther;
NAV #1
A handful of Morays and Regular Mantas. Go after the Mantas
first. Keep an eye on your wingmen's tails and this NAV shouldn't
be a problem.
NAV #2
Morays and Stingrays here. Head for the Stingrays first, and if
you see them join, GET OUT OF THEIR WAY! Always attack connected
Stingrays from the tail. If you see them about to connect, don't
hesitate to fire a missile to break them up. You will probably
save a wingman by doing so.
NAV #3
Excalibur ships should help you destroy the Morays, Stingrays,
and Mantas at this NAV. Kill the Mantas first unless the
Stingrays are giving you hell, then kill the Stingrays until
there are only two left. Pick off the Morays, and check on your
wingmen's health (c-4).
NAV #4
The Devil Ray at this NAV has his sights set on your wing. If you
have any doubt about your wingmen's or your missile dodging
skills, go after him first. There are also four Stingrays here
that start off pretty far apart. Make sure they don't get close.
Random Tip from Tigershark!
A tip on nose to nose confrontations - if you can take the hits to the shields, go for it. If not, steer away left or right several degrees putting the attacker out of view. Then veer back on the original course to find the bogie has turned towards your fake. Now you are on his tail, so whack him!
Primary Objectives: Eliminate Destroyer; Eliminate Bombers;
Secondary Objectives Eliminate Alien Transports;
Guns Dust Cannons; PLS Particle;
Your Ship Shrike;
Missiles Artemis = 4; Pilum IV = 4; Lancer LT = 6; Pike T = 2;
Mosquito = 36; Dragonfly = 36;
Enemies Moray; Manta; Red Manta; Barracuda; Triton; Orca;
NAV #1
Just Mantas and Morays here. This NAV
is to help you get used to your new cumbersome ship, the Shrike.
I find myself using Afterburners much more due to its slow speed.
Get the Mantas off of the screen first, then head for the Morays.
NAV #2
At this NAV there are 3 Red Mantas (the Bombers) trying to escape
so they can head for the Cerberus, which is far away. You must
stop them before they get out of reach. Start attacking ASAP! Do
anything you can to stop them, use up your Artemis and Pilum IV
missiles, tell your entire wing to attack them, run your
afterburners dry� anything! If they get away you fail a primary
objective and the mission. When the Red are dead, go and play
around with the Morays.
NAV #3
Mantas, Morays, Barracudas, Tritons, and an Orca� Oh my! Good
thing you have Excalibur and Thunderbolt ships backing you up
here. If you screwed up the last NAV you won't see the capital
ship Orca anywhere. Cruise around, take out the Mantas first, and
then the Morays if they are giving your wing trouble. This clears
the air (space doesn't sound right) and helps you and your wing
take out the cap ships safely. If you finish off the fighters
quickly there should be one or two Barracudas left. Fly around
behind them and take 'em out with Dust Cannons right in their
engines. Your Auto Pilot sign may show up at this time, but don't
press it! Wait to finish off all of the ships first. Your next
target should be the big Orca. Target it and start cycling
through its subsystems ("R"). The Shield Generator
should be your first target and is easily killed with cannons and
an Artemis missile, but most likely one of your wingmen has
destroyed this subsystem by now. Your next target should be the
engine, and it stands no chance against a Pike Heavy Torpedo.
Don't fire the torpedo until you are very close to the engines,
that way the turrets on the Orca wont pick your torpedo off (or
you can fly around and kill all of the turrets, whatever is
easier). Next go after the bridge with your last Pike, and the
Orca will be dead! Primary objectives will be complete at this
point, but I recommend that you stick around and destroy the
Tritons to pick up the secondary objectives. Use your Lancer
Light Torpedoes on their engines and bridges, but watch out for
turret fire. Good luck, this is the hardest mission in this
episode!
Random Tip from Tigershark!
Afterburners (turbos to us old timers) are great for closing the
distance between foes, but in a dogfight, release them when
turning. Use the afterburner to gain ground with little turning.
You will turn much faster with the afterburners off. I constantly
play the afterburners like flooring the accelerator pedal when
racing between turns. Sometimes you cannot gain on a bogie even
with afterburners. Let him go, burners off and watch him return
nose to nose.
Primary Objectives: Rendezvous with Confed convoy; Escort & defend
friendly ships;
Secondary Objectives: None;
Guns: Cloudburst; Chain Ion;
Missiles: Artemis = 6; Pilum IV = 6;
Enemies: Moray; Manta; Red Manta; Skate; Stingray; Devil Ray;
Your Ship: Panther;
NAV #1
Three Mantas and four Morays welcome
you to this NAV. Yup, you guessed it! Kill the Mantas first. Fire
an Artemis at anything chasing your wingmen. When the Mantas are
dead, go get the Morays.
NAV #2
A load of Morays and five Skates will attack you here. In the
Panther I always have my guns set to full, but full guns work so
well against Skates that I recommend everyone use them. It will
only take two good shots with full guns to kill them, and when
they are dead head after the Morays.
NAV #3
A few seconds after meeting up with the convoy, a load of Devil
Rays, Red Mantas, and Stingrays attack. Go after the Red Mantas
first, but if a Devil Ray crosses your path don't be afraid to
send a couple missiles his way. Switch guns to full, and fire a
few bursts until the enemy's shield is gone, then hold down the
trigger and the Chain Ion will do its work on the hull. You need
to perfect this method of firing to effectively protect the
friendly ships. If you see three Stingrays far away that are
joined together, don't bother trying to catch up to them to
attack with cannons. By the time you catch up a wingmen could be
dead or a subsystem on your cap ship destroyed. A missile will
stop them from doing any severe damage.
Alternative Strategy for
Mission #4 from Alex!
Hi, I'd just like to relate to you something I've noticed about
mission #4 episode #2. What you do is when you start the mission,
do not go on patrol, go straight to the last waypoint and meet
the capital ships and kill the ships attacking them. Once you
have done that go to the other nav points, the covering fire from
the capital ships can be quite helpful there if you keep the
dogfights close in to them. Once you have been to all the
waypoints go back to the Cerberus and you are done.
Primary Objectives: Escort and defend the Cerberus;
Secondary Objectives: None;
Guns: Cloudburst; Chain Ion;
Missiles: Artemis = 6; Pilum IV = 6;
Enemies: Moray; Red Manta; Stingray;
Your Ship: Panther;
NAV #1
Three Red Mantas and Three Morays are at this NAV for your
enjoyment. Switch guns to full and kill the Red Mantas first.
Pick their shields off slowly, and then hold the trigger down to
eat away their hulls. Kill the Morays, and enjoy this easy NAV.
NAV #2
All of the Stingrays at this NAV are headed for the Cerberus, and
they will connect together and blast the cap ship until it is
dead. Make sure they don't succeed by giving any joined Stingrays
a nice little Pilum IV missile. Chase down the Morays, and you're
ready for the next NAV.
NAV #3
This is an exact copy of NAV #2, except this time a Red Manta is
present and has its sites set on the Cerberus. Kill it before the
Stingrays.
NAV #4
Yawn... This is just like NAV #2, but this time there are two Red
Mantas. Kill them first, then Stingrays, and then Morays. I think
I see a pattern forming...
Random Tip from Tigershark!
If defending an objective - Cerberus, for example - don't stray
too far from it. Keep watching the radar or listen to the
warnings from the objective. Usually this means the target is
under attack. Close quickly, and hit the nearest bogie to the
objective. Sometimes you don't even need to target the bogie -
just look for who is shooting at your objective.
Primary Objectives: Escort the Cerberus to jump point. Eliminate enemy
fighters;
Secondary Objectives: None;
Guns: Cloudburst; Chain Ion;
Missiles: Artemis = 6; Pilum IV = 6;
Enemies: Moray; Manta; Red Manta; Stingray; Devil Ray;
Your Ship: Panther;
Start
Your final mission for this episode
starts off with an easy mix of Mantas and Morays. Kill them with
full guns as fast as you can (Mantas first). A minute or two into
the battle a group of Morays and Red Mantas will block the
Cerberus's path to the jump. I believe this is unavoidable, so
now you have to go through an alternate path to the jump. The Red
Mantas that just appeared should now be your first priority, and
if you witness a torpedo being launched at the Cerberus do your
best to shoot it out of the sky (space still doesn't sound
right). Kill the Morays last and you should be ready for NAV #2.
NAV #1
(Blocked, impossible to get to)
NAV #2
Morays, Stingrays, and a Devil Ray all
show up frighteningly close to you at this NAV. You will be shot
at right from the start. If the Cerberus is in bad shape go after
the Stingrays first. Otherwise take out that evil Devil Ray ASAP,
because he has his sights set on your wingmen. Use missiles
liberally here, it's your last chance to blow up bugs until
Thursday!
Password for episode #2 (with all primary/secondary objectives completed): TMA-1
Episode 3: Hide and Seek (Talos system)
Mission 1 Mission 2 Mission 3 Mission 4 Mission 5
Primary Objectives: Rescue Shy Meadows;
Secondary Objectives: None;
Bonus: Rescue Kyoto Rose; Rescue Cheryls Song;
Guns: Dust Cannon; Cloudburst;
Your Ship: Wasp;
Missiles: Artemis ELRIR = 4; Swarmer AB = 8;
Enemies: Moray; Manta; Devil Ray; Stingray; Red
Manta;
The following strategies will only work if you
received the password "TMA-1" for the second episode.
Rescue!
Right when the mission starts hit "B" to activate your
boosters so you can reach the bugs before they do a lot of
damage. Set your sites on a Red Manta and head straight for him.
While you are getting there, press and hold "P" and
focus your power on shields and guns. You will be using
afterburners so much in this mission you don't have to worry
about your regular speed. Before you reach the Red Manta,
Stingrays will try to attack you. Ignore them, but adjust your
shields to the rear. When your boosters die out the nearest Red
Manta will still be very far away. Don't look for anything
closer, just hit your afterburners and keep going after him. By
the time you kill off the last Red Manta, your wingmen should be
finished killing the Devil Rays. If not, kill them next and then
the Stingrays. If you can kill the Red Mantas fast enough the
bonus objectives shouldn't be a problem.
Alternative strategy for
mission #1 from Starwolf!
Here's what I suggest:
This one seems to be the toughest mission in this episode - you
should be extremely fast to complete all objectives. Step on
afterburners right as you get control on your ship. There are a
couple of Devil Rays going head to head on you - try to get them
as quick as possible (rush head-on to the closest, and put a full
load from all your guns when in range, then finish the second
with missiles and/or guns), or they will sneak on you from behind
and will shoot you down in no time. Go at full speed and take
down two or three Red Mantas with your Artemis in "launch -
lock next" manner, but watch Stingrays closely, and don't
let them combine into the x3 - this is lethal to your capships.
If you manage to down three Stingrays asap, the remaining will
not be able to combine since they will be busy to evading your
wingmen. Another thing to think of is that if you take out the
first wave really quickly, the second one may not appear at all
(lucky for you) In any case, pay most attention for Red Mantas
because they're the ones launching torpedoes at your capships,
and don't let Stingrays combine - this means you shouldn't lock
on one target for a long time - if you can't take it down in five
seconds or so, let it go and catch another one, keep 'em busy
evading you. If you see a torpedo rushing close to you at your
capship, try to shoot it down - shooting the head of its trail
may casually blow it up - this way you will save yourself time
for dealing with enemies - every capship can stand only two
torpedo hits or just a few Stingray x3 shots.
Primary Objectives: Escort and Defend the Cerberus;
Secondary Objectives: Escort and Defend Civilian Transports;
Bonus: Eliminate 50% of Alien Fighters;
Guns: Chain Ion; Cloudburst;
Your Ship: Panther;
Missiles: Artemis ELRIR = 6; PilumIV FF = 6;
Enemies: Moray; Manta; Red Manta;
NAV #1
If you completed the bonus objectives on the last mission two
extra ships will be along side you in this mission. The Red
Mantas at this NAV will have their sites set on the Cheryl's Song
transport. Make sure they don't destroy it.
NAV #2
This is almost a duplicate of the last NAV,
but now there are only two Red Mantas going after Cheryl's Song.
(Or another civilian transport if Cheryl's was destroyed)
NAV #3
This is getting easy to write! This NAV has
the same strategy as above, but now only one Red Manta.
NAV #4
Three Red Mantas on this NAV. Two are
headed for a civilian transport (or the Cerberus if there aren't
any left), and one is headed for the Talos Station. Hit CTRL + N
to find the Manta going after Talos, and kill him first, and then
go after the other two.
Random Tip from
Tigershark!
Regarding Panthers, I disagree with the
tactic of rotating to use the higher turn rate to replace the
lower pitch rate. Generally it matters little. Just anticipate
the bogie's evasive maneuver, and combine a turn with a pitch.
Primary Objectives: Patrol all NAV points;
Secondary Objectives: None;
Bonus: None;
Guns: Chain Ion; Cloudburst;
Your Ship: Panther;
Missiles: Artemis ELRIR = 6; PilumIV FF = 6;
Enemies: Moray; Manta; Skate; Devil Ray; Triton;
Stingray;
NAV #1
You have enough allies on this mission to
destroy a dozen Cap ships, so the Morays and Mantas at this NAV
are pretty much a joke.
NAV #2
Exactly the same as the first NAV, but this
time there are Stingrays involved. Fortunately there are only two
of them, so they don't really pose a threat. Take out anything
close to a teammate.
NAV #3
Just when you thought this mission would be
easy� two Tritons, a good number of Skates, Mantas, Morays, and
a Devil Ray show up. If you can kill the Devil Ray fast, do it.
The Mantas and Skates will eat your wingmen alive if you don't
stop them quickly. Make sure you concentrate most of your power
on guns for this NAV. (press and hold P, then move the joystick)
NAV #4
You needed a break after that last NAV, and
you will get it here. Only Stingrays and Morays will attack you.
Get the Stingrays first, and make sure they don't join.
Bonus Mission Strategy
from Ronald!
Completing the bonus objective for this
mission is so simple that I am embarrassed to admit that I
couldn't figure it out at first.
I went directly to NAV 3, took out the gun turrets on the two
transports, then went after the Devil Ray and the red mantas. It
never occurred to me that the Excaliburs have the armament to
kill the transports, and that it would help if I got them all to
NAV 3 at 100 percent fighting capacity (I was getting them there
before, but they were badly beaten up). A few torpedoes from the
Excaliburs, and one of the transports was history: You only need
to knock off one transport to complete the bonus objective. It
was then easy to go back to NAVs 1 and 2, mop up, then proceed to
NAV 4 to kick some more butt.
Mission #4: The Great Forbidden
Primary Objectives: Escort and Defend Civilian Transport;
Secondary Objectives: None;
Bonus: None;
Guns: Chain Ion; Cloudburst;
Your Ship: Panther;
Missiles: Artemis ELRIR = 6; PilumIV FF = 6;
Enemies: Moray; Red Manta; Barracuda;
NAV #1
Lalalala... all clear...
NAV #2
Four Red Mantas and a bunch of Morays will
lead the attack at NAV 2. All of the Red Mantas are headed for
the Kyoto Rose. Kill them as fast as you can. When the last one
is dead, a second wave of bugs will appear. Three Barracudas and
two Red Mantas will go after the Kyoto Rose. Hit the Mantas
first, then kill the Barracudas by slowly flying behind them and
destroying their engines with missiles. When you're all done
manually fly to exact point of the 2nd NAV and your auto-pilot
light will come on.
Random Tip from
Tigershark!
I always use full guns even though they
drain gun power quickly. But I always use restraint in firing,
making sure that I am well within range for several good hits.
Primary Objectives: Escort Cerberus to Jump-Point; Eliminate
Destroyer;
Secondary Objectives: Eliminate Alien Fighters; Eliminate
Alien Transports;
Bonus: None;
Guns: Dust Cannon; Pls Particle;
Your Ship: Shrike;
Missiles: Mosquito RP = 36; PilumIV FF = 4;
Dragonfly RP = 36; Artemis ELRIR = 4; Lancer LT = 6; Pike T = 2;
Enemies: Moray; Triton; Barracuda; Manta; Orca;
NAV #1
10 Morays to play around with here. Wake me
when it's over.
NAV #2
Two Barracudas, two Tritons, and an Orca
will give you hell at this NAV, but you should clear the area of
every Manta before attacking the big guys. Don't worry about the
Morays unless your inner shields are worn. When you're ready to
attack the large ships, go after the Barracudas first with
cannons and Mosquito missiles. The Tritons shouldn't give you a
hard time if you destroy their engines with Lancers, and then
pick off their turrets. Take out the bridge with a Lancer or two,
and that Triton will be dust. The Orca should be dead by the time
you are done with the Tritons. If it's not, your Pike Torpedoes
should do the job on its bridge & engine.
NAV #3
All clear... it's time for episode #4!
Password for episode #3 (with all primary/secondary objectives completed): Laumer
Episode 4: Cygnus Triangle (Cygnus system)
Mission 1 Mission 2 Mission 3 Mission 4 Mission 5
Primary Objectives: Patrol all NAV Points;
Secondary Objectives: None;
Bonus: Eliminate 75% of Alien Fighters;
Guns: Chain Ion; Cloudburst;
Your Ship: Panther;
Missiles: Artemis ELRIR = 6; PilumIV FF = 6;
Enemies: Moray; Devil Ray; Manta;
The following strategies will only work if you
received the password "LAUMER" for the third episode.
NAV #1
4 Morays at this NAV, that's all.
NAV #2
The Mantas start off with their sites set
on Zero. Kill them fast to save your buddy, then pick off all the
Morays.
NAV #3
The Mantas and Devil Ray here are going
after you. The Morays are going after your wingmen. You may want
to kill a moray or two first, but don't ignore the Devil Ray on
your tail. After about 30 seconds the big fighters will go after
your wingmen.
Random Tip from
Tigershark (aka: The WC god)!
Launching multiple rockets at targets. You
can only fire a single IR missile at a target until it connects,
but the Panther has IR and FF missiles. Launch the IR after lock
on then switch to the FF missile and just fire. You can score two
quick hits on a difficult target (Devil Rays) this way.
Primary Objectives: Escort Rescue Shuttle to the
Albergetti; Patrol secondary NAV route;
Secondary Objectives: None;
Bonus: Eliminate 75% of Alien Fighters;
Guns: Chain Ion; Cloudburst;
Your Ship: Panther;
Missiles: Artemis ELRIR = 6; PilumIV FF = 6;
Enemies: Moray; Stingray; Manta;
NAV #1
Nothing.
NAV #2
The three Stingrays have to be stopped
before they do any more damage to the Albergetti.
NAV #3
This is the first NAV I have seen without a
Moray in awhile! Just six Stingrays here. Make sure they don't
connect, and if they do don't attack them head-on.
NAV #4
The four Mantas here will do a great deal
of damage to your wingmen if they are not killed quickly.
NAV #5
A generic mix of Mantas and Morays here.
Get the Mantas first.
Mission #3: The Twilight Purchase
Primary Objectives: Patrol all NAV points; Rendezvous with
Twilight Purchase; Defend Twilight Purchase; Escort Twilight
Purchase;
Secondary Objectives: None;
Bonus: Eliminate 75 % of Alien Fighters;
Eliminate 75 % of Alien Bombers;
Guns: Chain Ion; Cloudburst;
Your Ship: Panther;
Missiles: Artemis ELRIR = 6; PilumIV FF = 6;
Enemies: Ray; Moray; Stingray; Remora; Red
Manta; Skate Class-T; Skate;
NAV #1
This one starts off with a few easy Morays
and a Ray, but then seven Remoras join in the fight. Get the Ray
first, then the Remoras. Remoras can be taken out with one
full-gunned shot.
NAV #2
Every enemy here is attacking the Twilight.
Try to kill the Red Mantas first, but if you see a 3x Stingray
don't think twice about firing an Artemis missile at it.
NAV #3
Four Skate Class T's are attack the
twilight, so you should stop them before worrying about the
Mantas. When the Skate Class T breaks, don't go after the smaller
skates, just head for the next Class-T.
Random Tip from
Tigershark!
If you have the front shields, don't be
afraid to ram a bogie. They generally stop for a second
afterwards, allowing you to pepper them with gunfire.
Primary Objectives: Patrol all NAV Points IN ORDER;
Secondary Objectives: None;
Bonus: Eliminate 75 % of Alien Fighters;
Guns: Chain Ion; Cloudburst;
Your Ship: Panther;
Missiles: Artemis ELRIR = 6; PilumIV FF = 6;
Enemies: Manta; Moray; Devil Ray; Skate;
NAV #1
Four Mantas. Kill 'em.
NAV #2
Get the Devil Ray first, then the Mantas.
Don't worry too much about protecting your bombers. No capships
ever show up.
NAV #3
Kill the Devil Ray first using an Artemis
along with full guns for each bug. Get the Mantas next. Press
"L" so you don't lose sight of an enemy.
Random Tip from Kaisar!
When flying a mission and taking heavy
hits, the eject indicator shows up. I ignore this and take
evasive maneuvers. Then I return and kick some ass before the
bugs get me.
Primary Objectives: Ensure Cruiser Elimination; Defend
Bravo Wing;
Secondary Objectives: Eliminate 75 % of Alien Fighters;
Eliminate 75 % of Alien Cruiser Gun Turrets; Eliminate 75 % of
Alien Cruiser Missile Turrets; Eliminate Alien Cruiser Shield
Emitters;
Bonus: None;
Guns: Chain Ion; Cloudburst;
Your Ship: Panther;
Missiles: Artemis ELRIR = 6; PilumIV FF = 6;
Enemies: Manta; Stingray; Moray; Devil Ray;
NAV #1
Pretty much everything but the Morays are
attacking the Bravo wing here. You must keep that wing alive.
Stop the Devil Rays first, then the Mantas.
NAV #2
Whoooole lotta Stingrays here! Keep killing
them even after the third or fourth wave. Your bombers will take
care of the rest.
Password for episode #4 (with all primary/secondary objectives completed): Kasparov
Episode 5: Viral Legacy (Luyten system)
Mission 1 Mission 2 Mission 3 Mission 4 Mission 5 Mission 6
Primary Objectives: Defend the Cerberus;
Secondary Objectives: None;
Bonus: ?;
Guns: Cloudburst; Dust Cannon;
Your Ship: Wasp;
Missiles: Artemis ELRIR = 6; Swarm AB = 8;
PilumIV FF = 6;
Enemies: Red Manta; Skate
Class T; Skate; Manta;
The following strategies will only work if you
received the password "KASPAROV" for the fourth
episode.
HOLY SHIT!
Ok, it may look intimidating, but all you
really need to worry about are 3 Red Mantas and 3 Skate Class T
ships. Every other red blip on your screen is Mantas and Morays.
Hit "B" right at the beginning and set your sites on a
Skate Class-T ship.
The problem here is that the big fighters are spread out in three
groups. This would make it hard to attack Red Mantas first, then
Skates etc� The best way of approaching this mission is to go
after one Red Manta or Skate Class-T, and then kill all of the
smaller ships around it before moving on to the next Red Manta or
Class-T. Be sure your power is focused on guns & shields. You
don't need to worry about speed power since it doesn't affect
afterburner speed.
Random Tip from
Tigershark!
Regarding Wasps, my favorite interceptor,
save missiles for anything bigger than Skates. Wasting Swarmers
on a Skate is good for a head slap.
Primary Objectives: Patrol all NAV
points;
Secondary Objectives: None;
Bonus: ?;
Guns: Tachyon Cannon;
PLS Particle;
Your Ship: Vampire;
Missiles: Tracker = 4;
Artemis = 8; Pilum IV = 8;
Enemies: Moray; Barracuda;
Stingray; Skate; Manta;
NAV #1
Three Mantas, several Skates, and Morays.
Stop the Mantas first, then the Skates. This NAV shouldn't be a
problem.
NAV #2
Nobody home!
NAV #3
I would tell you to get the Stingrays
first, but there are only two. Kill those pesky Skates first
instead. If you put your guns on full they should go down with
one shot. If a wingman ejects just restart the mission.
NAV #4
Hope you have some wingmen left for this
one� Those Devil Rays are a bitch, so kill them first. Conserve
your afterburners when attacking Skates. Let them fly ahead of
you, and watch them turn back around so you can give them a few
good shots.
Random tip from Pascal!
Just a small addition that would be
interesting about those two:
The Dust Cannon has more punch but eats your gun's energy pool
very fast.
The PLS Particle inflicts only moderate damage but is less
energy-expensive.
Mission #3: Luyten Station Support
Primary Objectives: Escort &
defend the Cerberus; Defend Lyten station;
Secondary Objectives: Patrol all NAV
points;
Bonus: None;
Guns: Tachyon Cannon;
PLS Particle;
Your Ship: Vampire;
Missiles: Tracker = 4;
Artemis = 8; Pilum IV = 8;
Enemies: Moray; Barracuda;
Stingray; Skate; Manta;
NAV #1
Five Stingrays and a couple Mantas are the
"big" threat here. Kill three of the stingrays then go
after the Mantas.
NAV #2
Right when you start this mission, two capship missiles will
appear to your right, and they are headed for the Lyten station.
Use your NAV map (ctrl + n) to find the missiles, and make sure
lock target "L" is on too. Switch to particle guns and
shoot them out of the sky (space... whatever). Go after the Devil
Rays next with some missiles, and you're done! (the other NAV's
are optional and very easy)
Random tip from Viper!
This only works some of the time, but it is
useful when it does.
I've found that when I'm attacking the Stingray x3, after sending
out a few taunts to get it to come straight at me, it will mimic
my movements to a degree. Now with one of them buggers hounding
me, and not the big C or my wingmen, I'll go at it full
afterburn, and just before firing range for it's big cannon, I
start to basically do a circle rotation on the HUD. The bug is
too busy trying to match my maneuver, and firing in an almost
swirl pattern. So I stop the roll and fire everything I got at it
before it can come to bear on me, sometimes with a Pilum IV for
good measure. When it works I usually have taken out 1 or 2, the
remaining sustain moderate damage. If the vectoring is right, and
I can autoslide, the last one is a snap to bag.
Primary Objectives: Eliminate alien
transports;
Secondary Objectives: None;
Bonus: ?;
Guns: Dust Cannon; PLS
Particle;
Your Ship: Shrike;
Missiles: Artemis = 4;
Lancer LT = 6; Pike T = 2; Mosquito = 36; Dragonfly = 36; Pilum
IV = 4;
Enemies: Moray; Triton; Skate;
NAV #1
Clear.
NAV #2
Morays and Skates here. Go after the Morays
first, since you are in a slow ship. Don't even try to catch up
to the Skates. Use Mosquito missiles on the Skates when they are
headed away from you.
NAV #3
The Devil Rays are you biggest problem. Use
Dragonfly and leftover Mosquito missiles on them. You pretty much
want to keep your fellow bombers alive on this one so they can
destroy the Tritons. When attacking a Triton, shoot off the
turret by the engine, then destroy the engine with a Lancer
torpedo, and then fly to the front of the ship and destroy the
bridge with another Lancer.
NAV #4
Skates and Morays here. Just like the 2nd
NAV.
Primary Objectives: Eliminate
cruiser; Defend Bravo wing; Defend Lyten Station;
Secondary Objectives: None;
Bonus: ?;
Guns: Cloudburst; Chain ion;
Your Ship: Panther;
Missiles: Artemis = 6;
Pilum IV = 6;
Enemies: Moray; Stingray; Hydra; Manta;
NAV #1
Easy NAV. Hit the Mantas first, then
Stingrays.
NAV #2
This is the toughest point in the game so
far. After about 30 seconds into play, the Hydra will start
launching missiles at the Lyten station. Stop every capship
missile that appears. I recommend using an Artemis missile on
each of them. Stingrays are also a huge problem. If left alone,
they will destroy the Lyten. Hit CTRL + N every 5 seconds (and
make sure you have target lock "L" on), and look for a
cap missile. If there is no cap missile present go after a
Stingray. Keep doing this until your bombers destroy the Hydra.
It's tedious, but it's the only way I found. It took me 5 tries
to finish this mission with the Lyten intact.
Primary Objectives: Escort the
Cerberus; Eliminate cruiser; Eliminate carrier;
Secondary Objectives: Destroy alien
transport;
Bonus: ?;
Guns: Dust cannon; PLS Particle;
Your Ship: Shrike;
Missiles: Artemis = 4;
Lancer LT = 6; Pike T = 2; Mosquito = 36; Dragonfly = 36; Pilum
IV = 4;
Enemies: Moray; Manta;
Hydra; Triton; Barracuda; Red Manta;
NAV #1
Do what you can to take out
the Mantas first. Your Mosquito missiles will come in handy. Next
the Barracudas, then the Triton.
NAV #2
Kill the Mantas first, but
don't bother with the Morays. Just get the capships.
NAV #3
Two Red Mantas are you only
problem here. Kill them first.
Password for episode #5 (with all primary/secondary objectives completed): Veitch
Episode 6: Duel (Krieger system)
Mission 1 Mission 2 Mission 3 Mission 4 Mission 5 Mission 6 Mission 7 Mission 8
Primary Objectives: Defend Krieger Space station; Defend
Cerberus;
Secondary Objectives: Eliminate Bombers; Eliminate Alien
Fighters;
Bonus: Eliminate 50% of Alien Fighters;
Eliminate 66% of Alien Bombers;
Guns: Dust Cannon; Cloudburst;
Your Ship: Wasp;
Missiles: Artemis ELRIR= 4;
Swarm AB= 8;
Enemies: ?;
NAV ?
Mission #2: Tactical Reposition
Primary Objectives: Escort and Defend the Cerberus;
Secondary Objectives: Defend Friendly Bombers;
Bonus: Eliminate Enemy Corvettes; Eliminate
Alien ACE Pilots;
Guns: Tachyon; PLS Particle;
Your Ship: Vampire;
Missiles: Tracker = 4;
Artemis = 8; PilumIV = 8;
Enemies: ?;
NAV ?
Mission #3: Carrier Assault One
Primary Objectives: Eliminate all Alien Carrier Gun
Turrets; Eliminate all Alien Carrier Missile Turrets;
Secondary Objectives: None;
Bonus: Eliminate 75% of Alien Fighters;
Guns: Tachyon; PLS Particle;
Your Ship: Vampire;
Missiles: Tracker = 4;
Artemis = 8; PilumIV = 8;
Enemies: ?;
NAV ?
Primary Objectives: Eliminate Carrier;
Secondary Objectives: Engage and destroy fighters; Eliminate
Alien Transports; Eliminate Alien Corvettes; Destroy any other
Cap-Ships;
Bonus: Eliminate 50% of Alien Fighters;
Guns: Tachyon; PLS Particle;
Your Ship: Vampire;
Missiles: Tracker = 4;
Artemis = 8; PilumIV = 8;
Enemies: ?;
NAV ?
Mission #5: Reposition Battery
Primary Objectives: Escort and Defend Cerberus;
Secondary Objectives: Eliminate Bombers; Eliminate Alien
Fighters; Destroy Alien Comm Relay Station; Eliminate Alien
Transports;
Bonus: Eliminate 75% of Alien Bombers;
Eliminate 50% of Alien Fighters;
Guns: Tachyon; PLS Particle;
Your Ship: Vampire;
Missiles: Tracker = 4;
Artemis = 8; PilumIV = 8;
Enemies: ?;
NAV ?
Primary Objectives: Eliminate all Alien Carrier Gun
Turrets; Eliminate all Alien Carrier Missile Turrets;
Secondary Objectives: None;
Bonus: Eliminate 50% of Alien Fighters;
Guns: Tachyon; PLS Particle;
Your Ship: Vampire;
Missiles: Tracker = 4;
Artemis = 8; PilumIV = 8;
Enemies: ?;
NAV ?
Primary Objectives: Eliminate Carrier; Destroy any other
Alien Cap-Ships;
Secondary Objectives: Eliminate Fighters defending Carrier;;
Bonus: Eliminate 50% of Alien Fighters;
Guns: Tachyon; PLS Particle;
Your Ship: Vampire;
Missiles: Tracker = 4;
Artemis = 8; PilumIV = 8;
Enemies: ?;
NAV ?
Primary Objectives: Escort and Defend the Cerberus; Ensure
Cruiser Elimination; Ensure Destroyer Elimination; Ensure Carrier
Elimination;
Secondary Objectives: Engage and destroy fighters;
Bonus: Eliminate 50% of Alien Fighters;
Guns: Tachyon; PLS Particle;
Your Ship: Vampire;
Missiles: Tracker = 4;
Artemis = 8; PilumIV = 8;
Enemies: ?;
NAV ?
Password for episode #7 (with all primary/secondary objectives completed): Moore
Episode 7: Finishing Stroke (Proxima system)
Mission 1 Mission 2 Mission 3 Mission 4
Mission #1: Evasive Recon Patrol
Primary Objectives: Eliminate Alien Transports; Patrol all
NAV points;
Secondary Objectives: Eliminate Alien Corvettes;
Bonus: Eliminate 75% of Alien Fighters;
Guns: Plasma; Tachyon;
Your Ship: Devastator;
Missiles: Artemis ELRIR= 6;
Pilum IV = 6; Lancer LT = 8; Pike T = 4; Mosquito = 90; Dragonfly
= 90;
Enemies: ?;
NAV ?
Primary Objectives: Escort and Defend the Cerberus;
Secondary Objectives: None;
Bonus: Eliminate 75% of Alien Fighters;
Eliminate 75% of Alien Bombers;
Guns: Tachyon; PLS Particle;
Your Ship: Vampire;
Missiles: Tracker = 4;
Artemis = 8; PilumIV = 8;
Enemies: ?;
NAV ?
Mission #3: Alien Science Crew
Primary Objectives: Ensure Carrier Elimination; Eliminate
75% of Alien Carrier Gun Turrets;
Secondary Objectives: Eliminate 75% of Alien Carrier Missile
Turrets; Eliminate Carrier Shield Emitters;
Bonus: Eliminate 75% of Alien Fighters; Destroy
Alien Transport;
Guns: Dust Cannon(1); PLS Particle(3);
Turret(1);
Your Ship: Strike;
Missiles: Artemis ELRIR= 4;
Pilum IV = 4; Lancer LT = 6; Pike T = 2; Mosquito = 36; Dragonfly
= 36; Chaff Pods(36);
Enemies: ?;
NAV ?
Primary Objectives: Eliminate Alien Command ship; STAY ALIVE AND SHOOT THEM!!! J
Secondary Objectives: None;
Bonus: Destroy Alien Transport; Eliminate 75%
of Alien Fighters;
Guns: Plasma; Tachyon;
Your Ship: Devastator; J
Missiles: Artemis ELRIR= 6;
Pilum IV = 6; Lancer LT = 8; Pike T = 4; Mosquito = 90; Dragonfly
= 90;
Enemies: ?;
NAV ?
Now you are READY!!! L
Moray
This guy is a medium sized, slow, stupid ship. You should have no trouble hitting this guy even with the slowest guns. His shields are fairly weak, and his hull isn't any better.
Skate
A very fast fighter. When fighting the Skate you will most likely need to keep your afterburners on. If you can get a few good shots on the little guy he will die rather quickly, his shields are a joke.
Skate Class B
An anti-bomber fighter. This ship isn't much of a threat to your fighters, but it will reek havoc on your capitol ship. It has a large torpedo, or perhaps a plasma weapon that it will use to hurt the Cerberus. If the Cerberus is in bad condition, make sure you stop these guys. They are pretty easy to plunk off with any good shield-penetrating weapon due to their slow speed. Watch out when it is destroyed, the Skate Class B will split into three Skates! - Thanks to Skyfire and Eqo.Z for the update!
Stingray
The Stingray is about the same strength as the Moray, but it's much more agile, fast, and deadly. It's a definite threat but shouldn't be at the top of your To Kill list. Take it out with a good shield-penetrating gun. - Thanks to Greg for the update!
Stingray x 3
If three Stingrays are left alone for a short time, they will find each other and connect to form one helluva ship. If you have ever watched the Cerberus fire that huge cannon at an enemy, you know the damage it can do. The Stingray x 3 appears to have a similar cannon, but this one fires almost twice as fast. You will usually see the Stingray x 3 attacking capital ships and occasionally giving your wingmen a hard time. You can split these guys up easily with a Pilum missile and possibly kill one of them in the process. I would never try attacking one of these guys head-on unless my shields were all the way forward (hold down "S" move joystick up) Even after they split up, they are always able to regroup. - Thanks to Armydillo for the screenshot!
Lamprey
The Lamprey is fast as hell, even faster than the Skate. It is a strange looking ship so it is very easy to identify. It fires bright blue rings that do a fair amount of damage. I haven't seen one of these ships fire a missile though. You and your wingmen should be cautious when a Lamprey is in the area, but their tiny shields make for a quick kill. Take the guys out with cannons, preferably the fast firing flavor.
Barracuda
The Barracuda is a corvette, the smallest capital ship around. It doesn't have fighter launching facilities, but it has jump engines and can be annoying for some of your bombers and capital ships. This large ship crawls through space firing at anything that gets close. If you have to go near it, make sure you go fast. Stay still around this big boy for 1 second and he'll devour your shields. If you stay directly behind him, his guns can't touch you. Shoot his big yellow engine with Duster Cannons and he's toast. - Thanks to Daniel for the update
Manta
A good enemy. Not quite as fast as the Lamprey and the Skate, but due to its above average speed and its strong shields, destroying it with Cloudbursts is a tedious task. If you need to protect any type of slow ship make sure the Manta stays away.
Red Manta
This manta is red and is tougher then the normal manta. One of the worse things about this manta is that is loaded with torpedoes and can kill the Cerberus or any other Confed Cap ship with ease if left alone. The other problem is that you cannot tell the Red Manta from the normal one other than by visual contact or by looking at the NAV map. - Thanks to Skyfire for the update!
Devil Ray
The Devil Ray is a Space Superiority fighter, a bomber, and a defensive craft. It can perform any mission short of a full-blown torpedo attack. It boasts extremely heavy guns and at least a 650 kps top speed. The Devil Ray won't think twice about launching a missile at your capitol ship, then turning around and launching one at you. Just keep this guy away from anything you have to protect. To take this bad boy down, I suggest using a strong missile like the Artemis or Swarm followed by a flood of guns. - Thanks to Greg and Robert for the update!
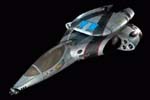
Panther:
| Mass: 16000 kg Length: 15.33 m Max Yaw: 110 dps Max Pitch 60 dps Max Roll: 100 dps Max Velocity: 500 kps |
|
Missiles: Artemis ELRIR = 6; PilumIV FF = 6; Guns: Cloudburst; Chain ION;
This ship has seen a lot of combat in the first episode, and it does its job well. Shields are a little above average, and they recharge extremely fast. I don't really like the gun selection, but like the shields they recharge quickly. You will usually see this ship in escort missions because of its awesome dog-fighting capabilities. The yaw rate on this puppy is almost two times that of the pitch, so when an enemy goes above or below you - DON'T FOLLOW THEM! Instead roll to one side and turn to keep on his tail. I promise that you will get more kills this way.
Wasp:
| Mass: 18000 kg Length: 11.6 m Max Yaw: 70 dps Max Pitch 80 dps Max Roll: 120 dps Max Velocity: 550 kps |
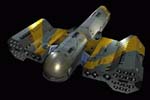 |
Missiles: Artemis ELRIR= 4; Swarm AB= 8; Guns: Dust Cannon; Cloudburst;
This is my favorite ship so far because it is very agile, has cool weapons, and holds the incredibly fast rocket boosters! These enable you to speed ahead of all the other fighters and attack the enemy first. The Wasp will usually be found on defense missions.
Shrike (TB-81b):
| Mass: 18000 kg Length: 28 m Max Yaw: 55 dps Max Pitch 70 dps Max Roll: 80 dps Max Velocity: 400 kps |
 |
Missiles: Artemis ELRIR= 4; Pilum IV = 4; Lancer LT = 6; Pike T = 2; Mosquito = 36; Dragonfly = 36; Chaff Pods(36); Guns: Dust Cannon(1); PLS Particle(3); Turret(1);
Usually stationed on escort carriers, the
Shrike is a lightened answer to the much larger Devastator. While
it is not as powerful an anti-ship platform, it is noticeably
faster and more maneuverable than the TB-80 (Devastator) and
therefore somewhat less vulnerable in the event of a fighter
encounter. It enjoys the same computer targeting system as the
Devastator but not it's massive plasma cannon. Rather, the Shrike
caries a more conventional armament. Due to its limited torpedo
load, the Shrike is most effective against naval targets of light
cruiser-size and downward, but in larger groups it can be
employed effectively against larger targets. The Shrike has top,
bottom, and tail turrets, but lacks the Devastator's side mounts,
depending instead on overlap from the top and bottom positions to
cover its flanks.
Huge thanks to Eqo.Z for the info!
Vampire:
| Mass: 17000 kg Length: 18.33 m Max Yaw: 70 dps Max Pitch 135 dps Max Roll: 180 dps Max Velocity: 600 kps |
 |
Missile: Tracker = 4; Artemis = 8; PilumIV = 8; Guns: Tachyon; PLS Particle;
This is a heavily armed fighter that is used for long range and short range combat. It is always effective against large groups of enemies in any situation.
Devastator (TB-80a):
| Manufacturer:
Douglas Aerospace Mass: 23000 kg Length: 36.00 m Max Yaw: 65 dps Max Pitch: 55 dps Max Roll: 90 dps Max Velocity: 416 kps Afterburner: 780 kps Armor F/B/L/R: 400/400/360/360 Shields F/B: 450/450 |
 |
Missiles: Artemis ELRIR= 6; Pilum IV = 6; Lancer LT = 8; Pike T = 4; Mosquito = 90; Dragonfly = 90; Guns: Plasma; Tachyon;
The only ship which is able to kill a capital ship without any torpedoes using its huge plasma cannon. Smaller cap ships like transports' engines or bridges can be killed with a single shot, while big ships die from about 4 hits to engines and 4 to bridges.
Cloudburst
This gun fires VERY slow, but it does a good deal of damage. If you link the two cannons together (CTRL + G) you can cut through an enemy's shields like butter! To maximize shield penetration, wait a second between each firing. This works much better than blasting the enemy non-stop. Try it.
Chain ION
A very fast firing gun, unfortunately it does minimal damage to shields. I will sometimes use it on low shielded, fast enemies like the Skate. It can do a fair amount of hull damage if you ever get past the shields.
Dust Cannon
One of my favorite guns. This baby fires very fast and does a good deal of damage on both shields and hull. It's perfect for attacking any sort of fighter.
Tachyon
Slow firing yellowish-red bolts. It even fires slower than the Cloudburst. Damage on shields seems to be fair, but hull damage is incredible. I can take down a Skate with 2-3 shots using this gun. I would suggest this gun for full time use, but it drains your energy like mad. It's very good for weak shielded enemies, but those enemies go so fast that it makes it hard to actually hit them. I rarely use this gun. Thanks to Greg for the update!
PLS Particle
This gun resembles the Dust Cannon. Like the cannon it fires very fast, but I don't think it does quite as much damage. Though it is still a very effective weapon against any fast moving target.
Artemis
The Artemis ELRIR (Enhanced Long Range Image Recognition) all-aspect missile remains Confed's top single-warhead guided missile. It has a fairly low lock time, and once the missile has acquired a lock it will doggedly pursue its target. The Artemis ELRIR is difficult for alien fighters to spoof, and its powerful impact makes it a favorite amongst Confed's elite pilots.
PilumIV
Confed's PilumIV FF (Friend or Foe) missile doesn't have the punching power of the Artemis ELRIR, but it has one distinct advantage: it doesn't require a target lock. The PilumIV FF can be fired at any time and will automatically hunt down the closest enemy ship. This all-aspect missile is ideal for getting that pesky alien off your back or surprising the fighter just outside of your front view.
Swarmer
The Swarmer AB pod launches multiple missiles at a target. The initial lock time for the Swarmer AB is comparable to that of the Artemis ELRIR, but you must maintain a visual lock on the target until impact. The line-of-sight nature of this weapon makes it more difficult to use than other missiles, but Swarmer missiles are unaffected by decoys, and their combined punching power makes them a favorite against more powerful targets like the Devil Ray.
Tracker
The Tracker MIRV is a multi-warhead, long-range missile. This no-lock missile streaks toward the target, then releases four Friend or Foe missiles once the booster has expired. These Friend or Foe missiles will attack any nearby ships, making this the ideal weapon for thinning out an incoming alien swarm or taking out fast moving targets trying to flee the area.
Dragonfly Rocket Pods
Quick little buggers, and they have a high rate of fire as well. They're very weak by themselves, but in a pod setting, they can be pretty dangerous. Due to their weakness, they're best when used against a slow-moving target, like a cruiser or a transport.
Mosquito Rocket Pods
New in SO are the Mosquito RP's. Take a Dragonfly and add a small tracking device. Think of it as a Pilum lite. Use the same tactics as the Dragonflys.
Pike Heavy Torpedo
It's effective against major warships but requires a very long lock time. Make sure you're clear before trying to toss this one away. It's very slow, so you may want to also make sure most turrets are gone before firing it off, so as to prevent it from being shot out of space.
Lancer Light Torpedo
Weaker than the Pike, it's effective against smaller starships. If you're making an in-and-out run against a big ship and not all of the defences are gone, this is the torpedo to use. Granted you may have to make a few more passes, but the much shorter lock time is worth it.