


XStitch Sovereign
The complete manual...
Sovereign User Manual
Copyright © APDL and iSV Products 2006
All rights reserved. This program is licensed for use on a single computer by a single user.
This version is supplied for the use of RISC World subscribers only.
Published by -
APDL
39 Knighton Park Road
Sydenham
London SE26 5RN
Phone : 020 8778 2659
Fax : 020 8488 0487
E-mail : info@apdl.co.uk
Contents
- Introduction
- Loading Sovereign
- Your first canvas
- The Sovereign window
- Loading a sprite
- The sprite preview
- Canvas size/hpi
- Canvas options window
- Making a canvas from a sprite
- Making a Blank Canvas
- Canvas Drawing Window
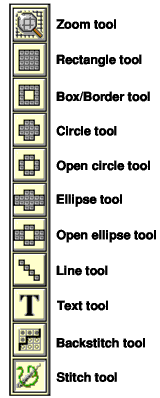
- Drawing toolbox
- The button bar
- Printing the canvas
- The colour window
- The colour button bar
- Picking Colours
- Copy/flip buttons
- The Motif tool
- The preview tool
- Undo tools
- Button bar colours pickers
- Sovereign Preferences
- Supported file types
- Problem Solving
- Glossary of terms
- Copyright message
Introduction
Sovereign is a cross stitch design generator for RISC OS. It allows cross stitch designs (canvases) to be produced from sprites and other types of bitmap files such as JPEGs. Sovereign also allows canvases to be generated entirely using the computer. You can start with a blank canvas and then use drawing tools to produce your design.
The canvas designs are all produced on a grid with bold lines every 10 stitches (if you want them). Sovereign works by converting colours to symbols. These symbols represent colours from either the Anchor or DMC stranded cotton ranges.
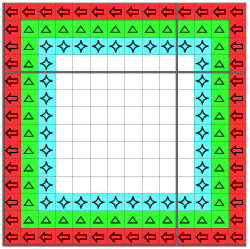
An example design with a grid and symbol for each colour. Each symbol represents a different colour. No symbol means the canvas colour.
Sovereign requires RISC OS 3.1 or later & 2Mb of RAM in order to work correctly. Sovereign uses !ChangeFSI for some sprite processing effects. Please ensure that !ChangeFSI is "seen" by the filer before running Sovereign.
Sovereign uses a special font and this also needs to be "seen" by the computer before the application can be used. This font is stored inside a special !Fonts folder which is alongside Sovereign. When you first open the directory window that contains Sovereign double click on this !Fonts folder to install the special font.
Loading Sovereign
To load Sovereign simply double click on its icon in the directory window. A loading banner will appear and then Sovereign will load.
If Sovereign has a problem loading then a message will be displayed on screen. The most likely cause of this is because the special font required is not available.
The Font iSVXStitch could not be found. Please install the font and run !Sovereign again.
If this message appears then the !Fonts folder next to Sovereign has not been "seen" by the filer. Open the window containing this !Fonts folder and then re-run Sovereign.
Once the font has been installed Sovereign will load and will appear on the right hand side of the icon bar.
You are now ready to make your first canvas.
Your first canvas
Making a canvas design in a matter of seconds.
- Load Sovereign onto the icon bar of your computer
- Click SELECT on the Sovereign icon.
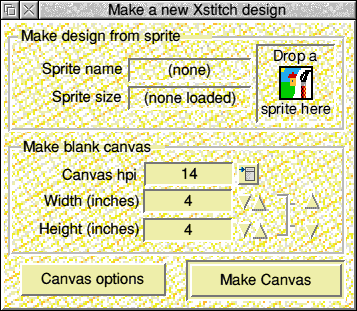
- A window will open on screen. Only 2 parts of this window are important at the moment. The first is an icon which says Drop a sprite here. The second is a button called Make Canvas
- Open the examples directory next to Sovereign.
- Drag the Sprite file called QuickStart into the Sovereign window and drop it onto the Drop a sprite here icon.
- Click on the Make Canvas button in the Sovereign window. An hourglass will appear.
- A window will open with your canvas design.
That is all there is to producing a simple canvas. Other features will be covered in the rest of the manual. If you would like to "play" with the canvas you have just produced then Sovereign can provide on-line help on its tool bar. Just move the mouse around and read the messages. Sovereign also supports Interactive Help.
The Sovereign window
This is the window that you first see when you click on the Sovereign icon on the icon bar.
This window is used to make a canvas. From here you can produce a canvas either from a sprite, or from scratch. The next few pages will cover all of the features available from this window.
Loading a sprite
In order to produce a canvas from a sprite the sprite must first be loaded in Sovereign. Drag the sprite file onto the Drop a sprite here icon of the main window. Sovereign will then show the name of the sprite and its size in pixels. The lower half of the window will also be updated to show the size of the canvas generated from this sprite.
Note that Sovereign can also import Drawfiles, these will be automatically converted to sprites when loaded.
The sprite preview
When a sprite is loaded a small sprite preview window will also open.

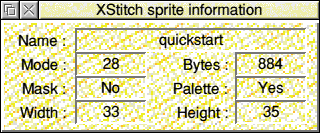
This window shows the sprite that you have just loaded. You can use the zoom tool to get a closer look at the sprite. To get more information about the sprite click on the information tool when the window below will open.
If you need to edit the sprite then click on the OLE tool. The sprite will then be loaded automatically into !Paint. Once you have finished editing the sprite simply click on SAVE from the !Paint MAIN menu and the sprite will update.
Canvas size/hpi
When a sprite is loaded the size of the canvas generated is shown in the main window. You can change this size easily if the resulting canvas is too big. To change to size click on one of the up/down arrows next to the width or height (these will double/halve) the canvas size. You can also click SELECT in one of the icons showing the width or height and type in a new size.
Next to the canvas hpi icon is a menu button. You can click on this to open a menu of hpi sizes. Select a size from this menu and the canvas hpi size will change. If the size you want is not available then you can type it in to the icon which shows the current size.
Sometimes when a sprite is loaded into Sovereign a short message will flash on screen. Sovereign can only handle sprites of certain types. For example only sprites with square pixels can be loaded (Modes 27,28 etc). If you drop in a sprite created in mode 12 (rectangular pixels) then it will be converted to square pixels automatically by Sovereign.
Sovereign also works on a special 64 colour sprite format. If you drop in a 256 colour or deep (32,000 colour) sprite then this will automatically be converted to 64 colours. These conversions will only take a few seconds at most. The information windows shown above are also used by XStitch to tell you what it is doing if the hourglass is on.
Canvas options window
This window is opened by clicking on the "Canvas options" button in the main XStitch window.
This window allows you to change aspects of the canvas before you make it.
Grid and Colour options
The grid options section of the window allows you to alter some aspects of the Sovereign grid. You can turn the background grid on or off. Add bold lines every 10 units, and set the grid colour to 16 possible colours.
Colour options
This allows you to alter the way that colours are handled.
You can choose to make a canvas using either Anchor or DMC thread colours. You can also see the current background colour here. This is the colour in that will be ignored when a canvas is created. For example if a sprite has a white background then a symbol is not required for white. To change the background colour open the sprite preview and double click on the colour that will be ignored.
You can also set the backstitch colour, this alters the colour that will be used to draw the backstitch on the canvas.
Symbol options
This section of the window allows you to set up the way the canvas will be generated.
You can chose to produce a canvas with just symbols and no colours, or one with coloured blocks but no symbols, or even both. You cannot have a canvas with no symbols and no colours as this would just be a grid! If you do want to make this then please see the Blank Canvas section.
You can also save these options from this window. So if for example you always use DMC threads you could select DMC as the thread type and then click on the "Save as Default" button and from then on Sovereign would always use DMC colours.
To set the options in this window click on the "Set options" button. The options will be set and the window will close.
Making a canvas from a sprite
Once you have set all the options up the way that you would like then you can now make the canvas. Click on the Make Canvas button in the main window. If you have resized the canvas from the main window you will see a message appear on screen telling you that XStitch is re-sizing the sprite to the new size you have chosen.
A message will then appear saying Generating Canvas. The hourglass will turn on and a percentage indicator will appear showing you how far XStitch has got.
Once Sovereign has completed the canvas the canvas design window will open. You can now edit this canvas, or just print it out.
Making a Blank Canvas
Sovereign does not need to have a sprite loaded in order to make a canvas. You can create a blank canvas and then produce your design from scratch using the drawing tools provided.
Making a blank canvas is done in exactly the same way as making a canvas for a sprite, except that you perform all the operation without a sprite being loaded into Sovereign.
If you already have a sprite loaded into Sovereign but would still like to make a blank canvas then simply close the sprite preview window. A message will appear on screen asking if you are sure you want to discard the sprite. Click on the Continue button.
Once you have no sprite loaded set the options up for the canvas, then set the size that the canvas will be in the main window and click on the Make Canvas button.
If you have the Produce design with colours button set then XStitch will generate a blank sprite of the correct size before producing the canvas for you.
Canvas Drawing Window
This is the canvas drawing window. This window will open once you have clicked on the make canvas button. From here you can edit your canvas or print it out.
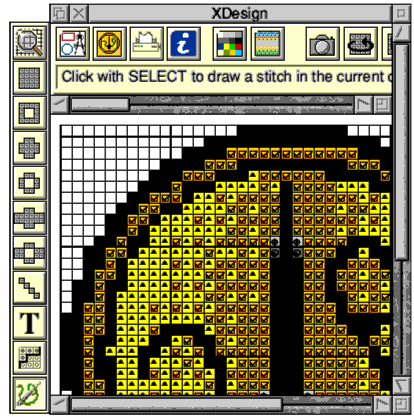
Drawing toolbox
Along the left side of the canvas window is the drawing toolbox. This contains a series of tools that can be used to alter or edit the canvas. Only one tool can be selected at any time. To select a tool simply click on it with SELECT . The currently selected tool will turn off.
For example if you click SELECT on the Stitch tool and then move the mouse pointer onto the canvas a click with SELECT will draw a stitch of the current colour. If you want to clear a stitch on the canvas then you can click with ADJUST.
The circle, box and line tools all work by dragging with SELECT (to draw in the current colour) or ADJUST (to clear the canvas).
Clicking SELECT on the zoom tool will zoom in, ADJUST zooms out.
A Click on Text opens the text dialogue.
Single stitch tools
Sovereign has two single stitch tools, the normal stitch tool will draw one stitch in the current colour when you click with SELECT over the canvas. You can delete a stitch by clicking with ADJUST . You can also select a colour by moving the mouse pointer over a stitch of the colour you want and clicking on MENU.
The backstitch tool
This tool allows you to add backstitch along the edge of any stitches. To add backstitch simply click (or drag) with SELECT over the relevant edge of the stitch that you wish to have backstitch on. The backstitch (which is usually drawn in black) will appear on the canvas. To delete a bit of backstitch drag using ADJUST over the stitch you want to remove.
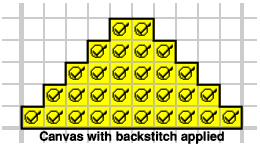
When adding backstitch it is very helpful to check the WYSIWYG preview window every few minutes to see what your backstitch will look like on your finished design.
The text dialogue
Clicking on the text button on the toolbar will open the text dialogue box.
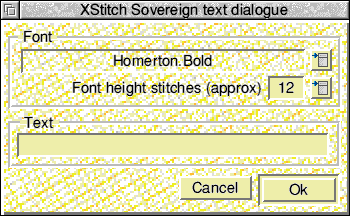
From here you can add text to your canvas. You can use any outline font installed on your system, fonts can be chosen using the menu button next to the font name. You can also set the height of the text in stitches (please note that this is an approximate figure due to variations in font designs). Once you have typed in the text you want to add to your canvas click on the OK button. A text caret will appear over the canvas, when you have positioned this correctly click SELECT to add the text. If you do not want to add the text click ADJUST .
The button bar
The button bar along the top of the drawing window also has some tools on it.

Save buttons
Clicking on either of the first two buttons will open a save dialogue box. The first button allows you to save the current canvas as a Drawfile (for importing into other packages). The seconds button allows you to save the canvas file for later editing/use.
Canvas information
The canvas information window can be opened by clicking on the Canvas information button on the button bar.
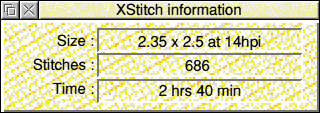
This window will provide information on the canvas that you are currently working on. You can work on the canvas with this window open if you like. If you use the drawing tools to edit the canvas then you will see the number of stitches shown in this window increase or decrease as you work.
The stitching time shown in this window is only an estimate and is based upon the time it takes an experienced stitcher to produce a canvas of the size you are working on.
Printing the canvas
The canvas print dialogue box can be opened by clicking on the Print button. The print dialogue box will then open.
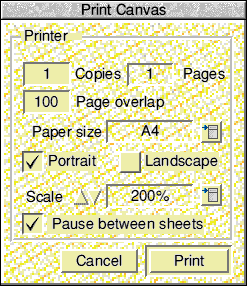
From here you can set the scale of the printed canvas (200% is twice real size). You can also set the paper size you want to use (only choose A3 if your printer has A3 paper). You can also set the paper to be either Portrait or Landscape.
If your canvas is taller than it is wide choose Portrait, if it is wider than it is tall choose Landscape.
If you are using a printer that can only take 1 page at a time then turn on the Pause between sheets option. Sovereign will then print out 1 sheet at a time.
Printing overlap
If your design is bigger than one sheet of paper XStitch will automatically tile the design so that it fits across several sheets of paper. The overlap option allows you to set the amount of the design that is repeated on the next sheet. An overlap of 100 is roughly 1/20th of the width of the page and should be fine for most printers.
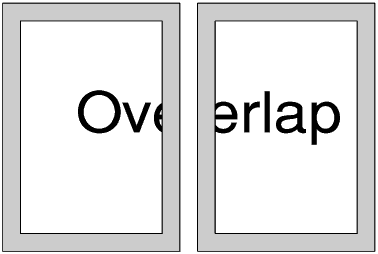
Changing the overlap may also change the number of sheets of paper required to print the design. Often changing from Portrait to Landscape printing can reduce the number of sheets of paper needed.
The colour window
The colour window is opened by clicking on the colour button on the button bar.
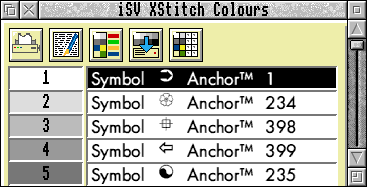
This window allows you to pick a colour and then draw with that colour in your canvas. In the example above colour 1 is selected (as you can see it is highlighted). To select a colour simply click SELECT on the particular symbol as shown in the window. Clicking on the boxes showing the examples of the colours will not select a colour.
Depending on the number of colours in your sprite this window may show either 2,4,16 or 64 colours. If you have created a blank canvas then this window will always show a full range of 64 colours in either DMC or Anchor threads.
The colour button bar
Along the top of the colour window is a button bar

Printing button
Clicking on this button will open a print dialogue box from where you can print out a colour reference chart showing all the symbols and their associated colours.
Save text file
Clicking on this button will open a save dialogue box that will allow you to save the current colours. This text file can then be imported into another package.
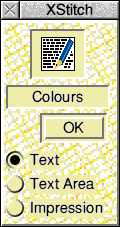
- Text - saves a normal text file
- Text Area - saves a Draw text area
- Impression - saves an Impression script
Picking Colours
If you want to choose a colour that is not currently used in your canvas you will need to open the colour window and then click on the colour of your choice.
If however you want to pick a colour that is already used in the canvas you can click MENU over a stitch of that colour and it will then be selected as the current colour.
What ever way you pick a new colour the old colour (the one that you were using) will de de-selected from the colour window and the new one will be highlighted.
Picking the canvas colour
Quite often it is useful to be able to choose a colour that is the same as the canvas colour that you are working on. This would result in a blank symbol( ie. no symbol) being placed on the canvas. As you may have seen the colour window does not have a blank symbol option. To draw in the same colour as the canvas (ie. clear symbols) simply draw using the ADJUST button rather than the SELECT button.
Remove unused colours
This button will remove all the colours from the colour window that are not actually used in your design. If you click on this button a confirmation window will open asking if you are sure that you want to continue.
For example if you have produced a design from scratch you may have used only 10 of the available 64 colours. Clicking on this button will remove the unused 54 colours from the colour list. You can then print out a reference chart with only the colours actually used in your design.
We recommend that you only use this button once a canvas has been completed and before printing out the colour chart. Once this button has been clicked on you will not be able to use any other colours apart from those that already exist in your canvas.
Remove colours from symbols
If you have produced a design with both colours and symbols then the canvas will show each square with a block of colour and a symbol on top.
This is fine when editing the canvas but when it comes to printing the design out on a monochrome printer there will be grey blocks behind each symbol. To prevent this happening simply click on the "Remove colours from behind symbols" button on the colour button bar.
This will remove all the colours from behind the symbols and leave you with a black and white chart with grid lines, symbols but no colours.
This can also be useful when you are producing a canvas that will be incorporated into another document such as an Impression file or an Ovation PRO file.
Save colours as default
Clicking on this button will save the current colours as the default set for a blank canvas using the particular type of thread.
When you click on this button a confirmation window will open asking if you are sure you want to save the default colours.
This can be useful if you want to produce designs from scratch but do not want all the 64 colours available.
If at a later stage you decide that you do want all the colours available when you make a blank canvas then make a canvas from any 256 colour sprite and then click on this button again.
Skein count
Sovereign can count the number of skeins required to stitch a design. If you click on the skein count button the number of skeins of each colour required will be shown in the colour picker window.
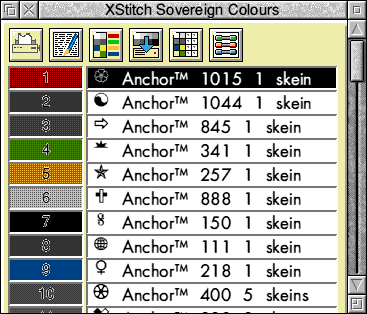
This will only count the number of skeins currently needed. If you change the design on the canvas you may need to click on the skein count again to remake the list.
Copy/flip buttons
The copy block button will allow you to select a piece of the canvas and then copy it to another location.
Click on the tool and then drag a rectangle on the canvas using SELECT . This will be the area that will be copied. Once you have released the mouse button you can then click on SELECT to position the bottom left corner of the copy. This will then be pasted into your canvas. This tool can be used to produce repeating patterns easily.
Flip tools
Both of these tools operate in a similar way to the copy button. You drag over an area of the canvas with SELECT and then let go of the mouse button. The selected area will then be flipped over. These tools are also useful when you need to produce repeating patterns.
The Motif tool
This allows pre-designed motifs to be be pasted into you canvas easily and quickly. Sovereign comes with some motifs built in and you can add you own as well.
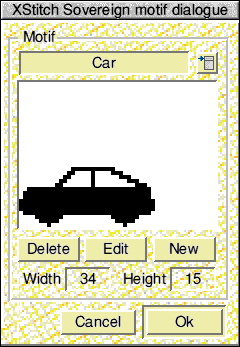
When you click on the motif button the motif window will open. You can choose one of the pre-defined motifs from the menu button at the top of the window. When you have chosen the motif you want click on "OK". The window will close and a rectangle the size of your motif will appear over the canvas. Position this in the right place with the mouse,click SELECT to paste the motif using the currently selected colour. If you click with ADJUST the motif will not be pasted.
New Motifs
You can create your own motifs by clicking on the New button. This will open the new motif window.

You need to give your new motif a name and also tell Sovereign how wide and how high it will be.
Once the name and sizes have been entered click on the Make new motif button. A new blank motif will now appear in the !Paint application. Motifs are stored as 2 colour Mode 25 sprites. Design the new motif using !Paint and then save it. Sovereign will detect that the motif has been saved by Paint and will now automatically load it. You can now select it in the same way that you would select any other motif. Sovereign can store over 70 motifs at one time.
Motif Edit/Delete
As we have seen previously when you make a new motif it is automatically sent to !Paint for editing. The Edit button works in the same way. Select the motif that you want to edit and then click on the Edit tool. The motif will appear in a !Paint window, you can then edit it and once you have completed the editing simply save it back.
Delete motif
Sometimes it may be useful to delete a motif that is no longer needed. To do this select the motif that you don't want and then click on the Delete button. Sovereign will confirm that you are sure as once a motif is deleted it is gone for ever, if you are sure click on Continue.
The preview tool
This tool allows you to see what your design will look like when it has been stitched. Click on this button and a preview window will be generated. You will need to be in a 256+ colour mode to see the preview properly.
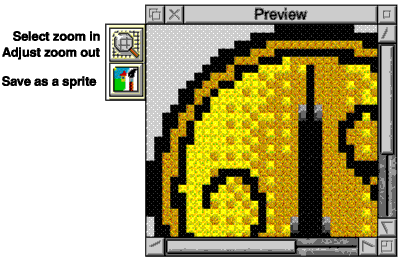
The preview window offers a similar WYSIWYG display to that provided by FairIsle, our knitting pattern designer. You can zoom in and out of the preview as well as saving it as a 256 colour sprite.
Undo tools
These tools allow you to undo operations on the canvas. For example suppose you had placed a motif on the canvas and had not selected the correct colour before pasting. You could click on the main Undo tool (with the larger red arrow) on the button bar and the motif would be removed.
The main undo tool (large arrow) will undo all operations in one go that have occurred since you last selected a tool from the toolbar.
The other undo tool (small arrow) will undo operations one stitch at a time. You can hold down SELECT on this tool and watch as Sovereign performs the undo. Releasing SELECT will stop the undo process.
The undo tool may not always be able to undo some operations even though the undo buffer can store over 3800 stitches. For example if you had drawn a big rectangle over the entire canvas Undo might not be able to recover the old design underneath. We therefore recommend that you save your canvas periodically while working on it.
Button bar colours pickers
On the top of the button bar are three colour pickers, these allow you to alter the colours used by Sovereign when drawing the canvas.
As you can see the grid colour, the backstitch colour and the symbol colour can be changed. Altering any of these will no effect on your design. They will however alter the colours used by Sovereign to draw your design on screen, or on paper.
For example, suppose you had imported a very dark sprite, normally it would be very difficult to see the symbols because they are drawn in black. You could change the symbol colour to white and the design would be much much clearer.
You can change these colours at any time, however please note that if you are using a TurboDriver from computer concepts you will need to turn on the "halftone text" button in the TurboDriver when printing otherwise symbols and backstitch will always be black when printed.
Sovereign Preferences
If you click MENU over the Sovereign icon on the icon bar the icon bar menu will appear. Clicking on the Prefs... option will open the preferences window.
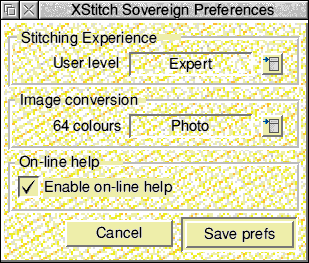
This allows you to set up the experience of the user. This alters both the stitching time calculated by Sovereign and the skein count. Sovereign allows more time to stitch and assumes a greater wastage of thread for a Beginner.
Image conversion
This option relates to the importing of bitmap images. Sovereign needs to convert 256+ colour images into its own 64 colour format before making a canvas. This option controls the brightness of the converted image
As you can see there are four options. You need to set the one that is appropriate to the image you are going to import before importing it. The examples below show the differences. This option can affect both the screen display and the Anchor/DMC colours chosen by Sovereign.
On-line help
Sovereign can provide you with on-line help as you move the mouse around its windows. The constantly changing text messages on the button bar can become annoying for experienced users and so you can turn them off with this option.
Note that turning off on-line help has no effect on the Interactive/Bubble help support provided by Sovereign.
Saving options
Once you have set your options you can save them using the Save prefs button. If you change your mind the old settings can be restored by clicking on the Cancel button.
Supported file types
Sovereign can generate patterns from a wide variety of bitmap file types. These include:
- Sprites - Both old format and RiscPC deep sprites
- JPEG - Joint Photographic Experts Group files
- GIF - As designed by Compuserve
- TIFF - Tagged Image File Format
- BMP - Microsoft Windows bitmaps
You can import these file types simply by dropping them onto Sovereign. Sovereign uses !ChangeFSI to import these images so please ensure that a copy of !ChangeFSI has been "seen" by the filer before trying to load any of these filetypes.
In addition Sovereign can also import Drawfiles. These are automatically converted to 64 colour sprites when they are dropped onto Sovereign. Drop the drawfile onto Sovereign in the same way you would a sprite, it will be converted and a sprite will appear in the preview window.
Problem Solving
Slow screen redraw
If the main Sovereign window (containing the canvas) is redrawing slowly then you need to increase the size of your font cache, we recommend that you allocate at least 100K for the font cache. Click on the Acorn icon on the right of the icon bar. Scroll down the window that opens until you find the font cache setting, now drag the red bar out to at least 100K.
Sovereign complains when you drag in Drawfiles or JPEGS directly from an application
Sovereign needs to convert the drawfile to a sprite, first drag the file from the application to an open filer window. Now drag the file from this filer window and drop it onto the main Sovereign window, the file will now load.
Glossary of terms
Here is a quick explanation of some of the terms used in this manual.
Aida - The canvas material used to stitch a designAnchor - The name of a thread manufacturer
Canvas -The name of the file type that designs are saved as
DMC - The name of a thread manufacturer
hpi - Holes Per Inch, the number of stitches that can fit into 1 inch of canvas (Aida) material.
Skein - Cotton thread used for stitching designs. Thread is normally sold in skeins (8 to 10 metres).
Text area - A text file that can be dropped directly in Draw and that has font information included in it.
Copyright message
Sovereign is © iSV Products 1994 - 2006
Anchor is a trademark of Coats Patons Crafts
All other trademarks are acknowledged
Acknowledgements
iSV Products would like the thank Coats Patons Crafts, DMC Paris, Barry Hawkyard and Christoper Jarman for their help in developing XStitch2. Supplied example files are © Christopher Jarman.
RISCWorld