


Configuring RISC OS Adjust
David Bradforth continues his exploration of the RISC OS Adjust configuration system.
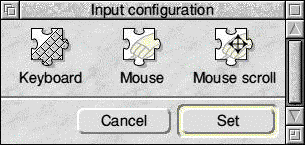
Input
The Input section gives you control over the two main input devices to your computer, the keyboard and the mouse. Click the Input icon to open this window.
Let's start with the Keyboard section. The Keyboard section allows you to modify the way in which the keyboard works. Click the Keyboard icon to open this window.
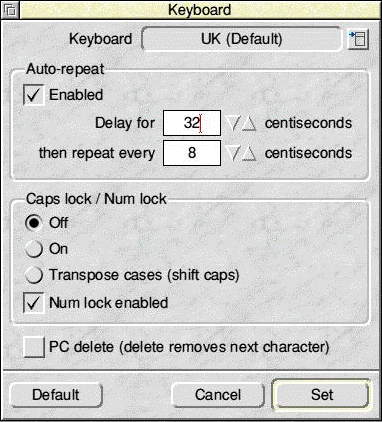
At the top you can set the country. This can be important because some countries arrange the keys differently or have different keys. For example only a UK keyboard would have a '£' key.
Auto repeat is the time you have to hold down a key before it begins to repeat and then how fast it repeats. If you set the delay too short then you may find you ttyyypppeee llllliiiikkkeeee tttthhhiiiissss.
When Enabled is not ticketed, the keyboard will not auto-repeat.
The Caps Lock section has three options - labelled On, Off and Transpose Cases. If the Caps Lock key on the keyboard is pressed the indicator light in the top right hand corner will come on and when you press the alphabet keys they will appear in upper case. This option sets the Caps Lock key on by default.
Transpose Cases is similar, but some keyboard actions are slightly different. In either case to produce a lower case letter you need to use the Shift key, that is, the action is the opposite of normal for an alphabet key.
The Num Lock enabled option activates the number lock on the numeric keypad. This ensures that you can use it just as you would a calculator. Without the Num Lock key enabled the numeric keypad acts as a series of arrow keys. On a RISC OS keyboard these are not shown as arrows but for those using a non-RISC OS alternative it's possible that arrows are printed alongside the numbers.
Finally, the PC delete option alters the action of the Delete key. Normally both the Delete and Backspace keys will delete the character before the cursor. With PC delete ticked the Delete key will delete the character under the cursor, that is, it deletes forwards as is the usual method for the PC.
Now let's move onto the Mouse section.

The top item in this window is Mouse speed. This is the relationship between the distance you move the mouse and the distance the pointer moves on screen. The more you drag the slider to the right the more the pointer will move relative to the mouse.
The next item lets you set the type of mouse. For most users this will be Standard mouse. The other options, which can be selected from the menu, are PS2 mouse and two different types of Serial Mouse.
Do not select PS2 mouse if you are using a PS2 mouse with an adaptor, these alter the output from a PS2 mouse to make it look like a Standard mouse. This option is for models like the RiscStation, A7000, Omega and Mico which use a PS2 mouse directly. If you are using a PS2 mouse through an STD interface, make sure you select the option from the menu - this will ensure that your mouse runs correctly.
The next two items set the amount of time you have to hold down the mouse button and the distance you have to drag an object before it is interpreted as a drag rather than just being selected.
Double-click delay is the time you have to make the second click when double-clicking on an object. More experienced users may wish to shorten this time from the default of one second to avoid two rapid single clicks being interpreted as a double-click. Double-click cancel distance is the distance you have to move the pointer between clicks for the second click to be interpreted as a new click and not a double click.
Some software, such as drawing or DTP programs, will allow you to drag an object within a window and if you pause at the edge the window scrolls so you can reach the part of the window you wish to drag to. Autoscroll delay is the length of the pause before the window scrolls.
Open submenus automatically makes submenus of a menu open when you move the pointer over that item and close again when you move off it, like the way sub-menus open in Windows. This is not normal RISC OS practice, but you may prefer it. The two items below it only become active if Open submenus automatically is ticked and let you set the delay before the submenu opens when you move onto the menu item and closes again when you move off it.
Bring icon bar forward automatically is extremely useful. If this is ticked then, if the icon bar is covered by a window, when you move the mouse pointer to the bottom of the screen the icon bar will automatically move on top of the window so that you can get access to it without moving the window.
Finally, let's move to the Mouse Scroll section. Click the Mouse Scroll icon and this window opens:
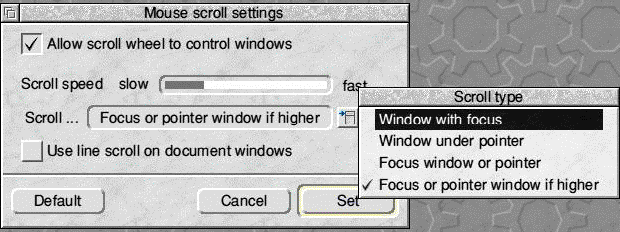
This window allows you to set RISC OS to respond when a wheel-enabled mouse is plugged into the computer. Wheel mice are increasingly becoming the standard for Windows XP machines; and the new Mighty Mouse from Apple provides the same functionality on the Mac OS X platform.
With the Allow scroll wheel to control windows option ticked, RISC OS will respond when you use the scroll button on a mouse.
The Scroll Speed tells the computer how fast windows should scroll in comparison to everything else on the system. We'd recommend leaving this at the default, unless you have any major issue with the speed of response.
Underneath the Scroll menu there are four options.
- Window with Focus applies your scroll action to the currently selected window.
- The Window under Pointer option will apply the scroll action to the window immediately underneath the pointer.
The latter options operate on a similar basis.
Lock
The Lock window opens as shown.
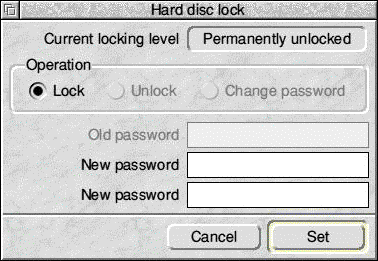
The main use for this was when Acorn computers were widely used in schools. If the hard drive is locked then you cannot access most parts of it or modify or delete data on it except in two places. The first is within the !Scrap directory, used by programs for temporary storage of transient data and is hidden within !Boot. The second is the content of the Public directory. This should be in the root directory of your hard drive, but it may not be present if your machine is not new. This prevented pupils from deleting or modifying any programs or settings as these parts of the drive are locked, but they could access all their own work and files in the Public folder.
If you do want to lock your hard drive then to set the password you will need to enter it twice to check that you don't mistype it. Then click on Set. This will not take effect until you next start the computer. To unlock the drive again select Unlock and enter the password.
If you forget your password the only way to get access to the hard drive again is to completely reset the computer by switching on with the Delete or R key held down.
Time constraints with this piece prohibit us from going further at the moment, but next time we'll run through the System Logging tool plus more of the RISC OS Adjust configuration system.
David Bradforth