Before looking at each of the program features in detail, it is important to have an overall understanding of the way NightSky operates. It is recommended that you work through this chapter before you explore any of the menu options.
Loading the Program
Run NightSky by double clicking on the !NightSky icon in the directory display. After a few seconds NightSky's icon appears on icon-bar, with the number 2000 beneath. Click SELECT on the icon to display the program's initial menu, Draw a Map.
Plotting a Map
Choose the first item Here : Now from this menu. NightSky will plot a star map using the default settings of its configuration file, and the default location which is where the computer is assumed to be. Initially this is Northwich, Cheshire. You will probably want to amend this to reflect your own location and this will be described later.
The map represents the whole visible sky for the place and time chosen. The stars at the bottom part of the map correspond to those in front of you (by default you are facing South), the central part is the area more or less overhead (the zenith region), and the top represents the part of the sky behind you. The brighter stars are named in green, although their labels are so small that you cannot easily read them. This is because these initial settings are designed to produce a neatly labelled printout when you send the map to your printer. You can easily alter the size or colour of such labels. If it is day-time, the position of the sun is marked by a small yellow circle; in such a case of course the sun (and moon) are all you can really see ! NightSky still shows everything that is there however, the only difference being that the Milky Way is only plotted in the hours of darkness.
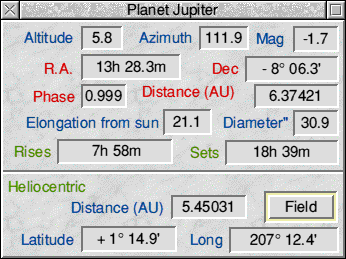
If you move the pointer around the map and click SELECT over an object, a window of information about it will appear instantly. The picture below shows the information window that appears after you click SELECT on a planet: however all the information windows are quite similar.
Altitude gives the elevation in degrees above the horizon: 0 means just rising or setting, 90 would be overhead. Azimuth is the direction of the object measured in degrees from North (0) through East (90), South (180) and West (270) back to North again (360).
R.A. and dec stand for Right Ascension and declination, effectively celestial longitude and latitude respectively (see section 6.2).
Magnitude means brightness, and a smaller number means brighter. The twenty-five brightest stars, loosely described as of the first magnitude range from -1.5 to 1.5. In favourable conditions (moonless night, no light pollution, a transparent atmosphere) an acute eye can see stars somewhat fainter than the sixth magnitude at 6.3. Such stars are 100 times fainter than stars of magnitude 1.0, and in general each magnitude step means an increase or decrease in brightness by a factor of approximately 214. Here, the -2.4 means that Jupiter is very bright: in fact Jupiter is never surpassed in brightness except by the sun, moon, Venus and, rarely and briefly. Mars.
Phase is the fraction illuminated, as planets shine by reflected sunlight only and so show phases like the moon's. 1 is full (we look at the illuminated hemisphere, as at full moon) and zero is new (we are looking at the dark side, only possible with Venus and Mercury).
Distances of the planets are conventionally measured in Astronomical Units (AU). 1 AU is the mean distance of the earth from the sun (149 597 870 km).
Elongation is the angular separation of the planet from the sun in the sky. This is an important guide to the visibility of the object, as if this is close to zero (or 360°), the planet is near the sun in the sky and so is above the horizon mostly in the daytime, and invisible. 180° on the other hand means diametrically opposite the sun and visible all night. This is called Opposition and is possible only for the outer planets that he further from the sun than we are, i.e. not Venus or Mercury.
If you click on the Field icon in this window, you will get an enlarged view of the part of the sky close to the planet: 10° across if the map on-screen is a small scale one. This is useful for studying the motions of the planets relative to the fixed stars, and also for finding (with binoculars) the faint outer planets Uranus and Neptune. If you click on Field when the view is already 10° or less, then the magnification will be increased by a factor of 4, subject to a minimum field of view of one-eighth of a degree. Hence you can view the current phase of a planet, the four bright satellites of Jupiter or the rings of Saturn. Clicking with ADJUST will zoom the other way.
For stars, information is given in a similar window. The title bar holds the star's catalogue number: they are in order of brightness (rounded to nearest tenth of a magnitude). Many stars arc tagged, shown by the icon in the bottom right of the information panel being selected. This means that additional information on the star is stored within NightSky. If you click on the Tag icon, you can read this in another window.
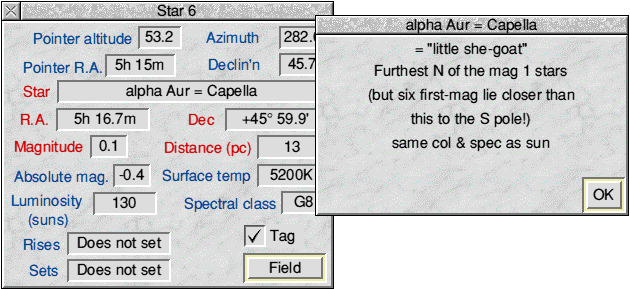
The notes provided mainly flag double or variable stars likely to be of interest to an amateur astronomer. If the star you have clicked is at present untagged, clicking on the Tag icon will open the tag window? empty; you can now type in up to 7 lines of text (you have to press Return at the end of each line). Click on OK , and, if you have write permission, NightSky will store your comments. Similarly, with a star that is already tagged, you can delete or change the tag text before pressing OK and the file will be updated. Before this operation takes place however, you will have to prove that you have the necessary write access (you have to supply a password). Note also that no "garbage collection" is performed on the file of comments, so you cannot"untag" a star. We therefore suggest that you perform your initial experiments in tagging on a backup copy of NightSky, and then make a new working copy when you are ready to do so, destroying the first as you are licensed only for one working copy of the application. It is definitely wise to preserve your original NightSky discs unaltered.
SELECT-drag
If you press and hold down SELECT whilst making a slight movement with the mouse you start a drag operation. A rectangle appears on the screen, which will define (approximately) the area of an enlarged view. You can move this around within the map area simply by moving the mouse. Pressing SELECT will make the chosen area smaller (:.m>iii in) , whilst Ad just will make it larger (zmim out). Press MENU to draw the new view, or Escape to cancel the zoom operation and leave the map unchanged. You can zoom in by stages to a field as small as 1/8°.
ADJUST
Clicking ADJUST within the map area will cause the map to be redrawn facing in the direction of the point where you clicked. If the map is an enlargement rather than the whole sky, that point will be at the centre of the new view. However when the point clicked on is very close to the horizon, NightSky adjusts the centre of the field so that the horizon is close to the bottom of the screen.
Home
Any time after experimenting with enlarged views and different directions you can press the Home key. The whole sky map facing 180° (South) will then be redrawn. Note also that at any time Shift-F4 will give you back your last enlarged view and Ctrl-F4 a whole sky view preserving the current orientation.
MENU
Pressing MENU within the map area will display NightSky's Map menu, which gives access to several options. Most of these are fairly straightforward, such as Save and Print. Choosing Moon will display a window with information on the moon, including a large image showing how it appears in the sky in both phase and orientation.
RealTime is an important menu item here. This menu item may be ticked. If so the map will be updated, normally once a minute. The present orientation and scale are preserved for this. Clicking on RealTime toggles the real-time status. The keyboard shortcut F9 achieves the same result - toggling the real-time status - much more quickly, and you will usually want to start or suspend the RealTime option using this key. Note that starting a new map with either of the Now options resets the real-time parameters to updating the screen every one minute.
The remaining menu-items lead to sub-menus which are explained in detail in Section 3.3, The Map Menu.
F5 to F8 and Shift-F5 to Shift-FS
These hot keys allow you to change the place and time of your map. They duplicate the first four options of the opening menu. In all cases the effect of the Shift key is to force NightSky to read the scale and orientation of the map from the file of stored places held in memory. When Shift is not used, the present values of these parameters are preserved. F5 gives the Here : Now view, which uses the default place and current time, with RealTime updating selected. The other three keys all lead to the map plotting dialogue box. You would use F6 to plot the default location but not at the present time. For example to preview tonight's sky in the day time. RealTime update is not selected.
F7 and F8 work similarly, for other locations.
Press F7 for example. To see the available places you can select from, click and hold down SELECT in the icon to the right of "place #". As you cycle through them the time displayed changes to what it is there and now ". Using ADJUST will work back through the file in the same way. To search for a place delete the contents of the Name of place dialogue and type in a few letters of the desired location name (case immaterial) followed by Return .: the first matching place in the file will be displayed. For example LON is likely to give you London , CZ will certainly yield somewhere in the Czech Republic, but a common combination such as NEW might yield almost anywhere - Newcastle, New York or New Zealand. The place displayed in the window will be the first such match for what you typed, working from the start of the file. For a more specific search type more letters. Click on GO to draw the map when you have found the required place.
In the directory Demos are a number of saved NightSky positions which when run give a good idea of the capabilities of NightSky. To run one of these animations just drag the relevant file onto the NightSky icon bar icon. All the animations use NightSky's RealTime menu option. You are recommended to try all of them in turn. In what follows it is assumed that you have not deleted places from NightSky's default places file, or edited any of the Choices files in the application directory; if you have and a missing location is specified, the default place is used instead, with possibly uninteresting result.
The Demos directory is divided into a number of sub-directories according to to topic.
Is to help familiarise yourself with the star patterns (constellations) and the changes in them over a year (or longer).
Northern1
Shows the march of those stars that never set as seen from U.K., the circiimpolar stars, round the north celestial pole. Successive views are a month apart, a change equivalent to waiting two hours on a single evening. The main stars depicted arc those of Ursa Major (the Great Bear, including the Plough), Cassiopeia, Perseus, Draco and Copheus plus the bright stars Capella, Vega and Deneb, all moving anticlockwise round the almost stationary Polaris, the Pole Star. These arc the first star groups that a beginner in these latitudes will learn, as they are always visible.
Northern2
Shows the corresponding view facing south. Here are found the equatorial and some southern hemisphere groups, and the stars on view are different at different seasons. Planets appear sometimes which they never do in the previous set, as do all the zodiacal groups plus such important and prominent objects as the Square of Pegasus, Orion and the bright stars Sirius, Procvon and Arcturus, Altair and Fomalhaut. They move clockwise across the southern sky, and the beginner will need up to a year to learn them all, unless observation in the unsocial hours before dawn is also undertaken, in which case six months or so will suffice !
Southern1 and Southern2
Are corresponding views from a location in the temperate southern hemisphere, in this case in New Zealand. Note that the circumpolar stars (the Southern Cross, Canopus and Achernar and alpha and beta Centauri, the Pointers to the Cross) move clockwise around the (empty) southern pole, whilst the same groups as seen in Northern2 move anticlockwise (and "upside down") across the northern sky.
EquatN and EquatS
Give similar north- and south- facing views using a site in the tropics and close to the equator.
Allows you to run animations of selected total solar eclipses, a good way to get an idea of the accuracy (and limitations) of NightSkv. The animations run at an acceptable speed on all machines, but benefit strongly from the presence of one of the faster chips supplied with the more recent Acorn RISC OS computers (and available as an upgrade for the older family members). Occasional stars intrude - these are in fact sky maps for the given place and time and the whole catalogue is examined. There is no special separate eclipse routine within Nightskv.
Falmouth99, Manchr99 and Wien99
Are views of the total eclipse of 1999 August 11. This will be the first such event visible from anywhere on the British mainland since 1927. From southwest Cornwall the eclipse is total, but from typical British sites such as London, Manchester or all of Scotland, only a large partial eclipse is seen, while Vienna is on the (northern) limit of totality. NightSky faithfully reproduces events from each site, though exact times are only reliable within a minute or two. Other relevant locations for exploration of this eclipse might be Paris (south of the zone), Munich, Prague, Budapest, Istanbul, Tehran and New Delhi. To change site, when any animation is in progress hit h'9 , F8 and Ctrl-U: now enter (part ol) the new place name followed by RETURN and finally click on Ok . Mexico91 and Borneo88 arc two other total eclipse sequences and well illustrate the variation in the track of the moon across the sun and in the duration of totality seen in different eclipses.
Shows views of the other variety of central eclipse: sometimes the moon is too far from the earth to block out the whole of the sun's disc. A thin ring (niiniilii.':, Latin) of sunlight remains round the outside of the moon, and the event is called an annular eclipse (figure 8). Welling91 shows an annular eclipse that occurred in the middle of the day, but Calif92 is one where annuarity was achieved just as the sun was setting while Reykjav03 previews the annular eclipse of May 31, 2003 in Iceland which happens at sunrise. Such events, where the geometry is very oblique, are a sensitive test of computational accuracy requiring for example allowance for the figure of the earth (not a sphere) in addition to the calculations on the sun and the moon. NightSky docs not need to flag eclipses and then make a special effort to calculate for them - the same algorithms are used for every plot of the sun, moon 'tars and planets.
Deals with eclipses of the moon. June93 and Nov93 show the sequence of events for the total lunar eclipses 1993, visible from Australasia and the U.K. respectively. The disc of the full moon is shown crossing the earth's shadow. The inner dark circle represents the earth's shadow? or umbra at the distance of the moon. Parts of the moon within this circle receive no direct sunlight. The outer circle is the penumbra; within this as seen from the moon, the earth partially blocks the sun's light. Penumbral stages of a lunar eclipse are all but unobservable in practice, as no change in the moon is noticed bv the eye until part of its disc enters the umbra. However the changes in brightness for both the penumbral and umbral stages of a lunar eclipse could be monitored automatically with the dataloggers readily available in schools these days and there is the possibility of interesting projects here. Consult the Bibliography under Eclipses for suggestions.
Has views of a partial solar eclipse (November 1993) from various locations in New Zealand and Antarctica, including the South Pole. Auckland is on the eclipse limiting line in this case, with 0.3% of the sun obscured at 0838 NZST.
Shows how the appearance of the sky changes dramatically over long periods due to the phenomenon of precession of the equinoxes, discovered by Claudius Ptolomey in the first century. The axis of rotation of the earth, the line joining the north and south poles, does not point in a fixed direction in space, but like that of a spinning top "wobbles", tracing a small circle in the sky with a period of 26000 years. Since the poles of the sky are not fixed, the co-ordinates of the stars change in time and a frequent astronomical calculation is to correct them from a standard epoch used in catalogues, atlases and computer files to the actual date of observation. NightSky uses the standard epoch of 2000.0 and for maps drawn for dates in the current (and next) decade the correction is very small and need not be made except for calculations or demonstrations of occultations of stars by the moon, when it is essential. Over longer periods the effect of precession is drastic: for example the Tropics of Cancer and Capricorn are named from the zodiacal groups in which the sun stood at the time of greatest north and south displacement from the equator two or three thousand years ago when the constellations were named. Now when the sun is "on" the tropic of Cancer it is in fact located on the borders of Taurus and Gemini, and when "on" Capricorn lies in the constellation of Sagittarius. The demonstration shows this by depicting the winter night sky seen from the U.K. at intervals of 1000 years.
UrsaMa
Shows views of this famous constellation at 10000 year intervals. At epochs very remote (more than one precessional cycle) from the present, precession itself is ignored, as the intention is to show the effect of the actual motion of the stars themselves. A typical star like the sun makes an orbit around the centre of our galaxy (milky way system) in a million years or so. Over very long periods the present constellations become unrecognisable, mostly due to relatively "rapid" motion of nearby bright stars like Sirius, Aldebaran, Arcturus, Fomalhaut and (of course) alpha Centauri.
When using the Precession demonstrations, you will notice that the precession year of the catalogue is displayed on the icon bar underneath NightSky's icon. For everyday use there is no need to process the catalogue: the standard epoch (currently 2000) is sufficiently accurate for ordinary star maps. Lunar occultations of stars are another matter.
Occn/Trans
Has demonstrations of recent or forthcoming occultations of stars by the moon and transits of Venus and Mercury across the sun. Such an event occurs when an interior planet (Venus or Mercury) passes almost exactly between the sun and the earth. Because each planet orbits the sun in its own plane, such events are rare, especially for Venus. At the largest scales used by NightSky, both Mercury and Venus are shown to scale on the disc of the sun (or indeed elsewhere).
Contains the animations Jupiter and Saturn which give views of the changing appearances of Jupiter's four main moons and of Saturn's rings. The step sizes in these two files are 4 hours and 4 months respectively. The other files in this subdirectory are examples of those exceedingly rare events when one planet passes in our view directly in front of another (mutual occultations). There is no such event at all in the present century. On "1170 September 12, one Gervase, monk of Canterbury Cathedral, noted that as Mars and Jupiter rose late in the evening that it was impossible to separate them by eye - their light had merged into one source. Calculation shows that a few hours earlier Mars had in fact passed right across the face of Jupiter as seen from earth. Gervase appears to have been the only observer on our planet who left a record of an event that were it to occur today would cause immense excitement among astronomers and the general public and would form the subject of thousands of photographs, videos, newspaper articles in all languages, TV programmes and so forth. Astrologers too would pontificate at great length on such an event!
Coincidentally(?) it is interesting to note that three months later Canterbury was the scene of the notorious Murder in the Cathedral.
Several such events before the year 1570 are given in this subdirectory.
This concludes the preliminary tour of NightSky. The following chapters form a comprehensive reference section on the options and actions available at all points within NightSky, organised by considering the menu options on offer.