


WebFX3D
RISCWorld presents the WebFX3D Manual.
| Rendering |
Click Render... from the 3D view menu to open the render dialog, shown below.
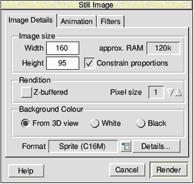
There are 3 tabs: Image details , Animation and Filters . The Image details tab lets you set options required for all renditions. The other tabs contain extra options which are not required to render a standard single image. When you are ready, click Render and the image will be rendered. Then you can then drag the new file to a filer window or another application.
See also:
Image Details
Animations
Filters
| Image Details |
Image size
The width and height controls allow you to set the dimensions of the image in pixels. If Constrain proportions is ticked, the width and height values will be kept in the same proportions as the width and height of the frame in the 3D view. Approx. Ram reports the approximate memory requirement for the rendition, taking into account the Z-buffer, and pixel size (note that this is not the file size of the image to be created).
Rendition
Tick Z-buffered to use a Z-buffer for the rendition. This will use twice the memory, and is not normally required. However some objects with large faces can be drawn incorrectly if this is option is not ticked, and will therefore need to be re-rendered with he Z-buffer on. The pixel size parameter controls anti-aliasing. A value of 1 uses no anti-aliasing, 2 = normal, 3 = best. Note that the higher the value, the more memory is required. Keep an eye on the approx. RAM indicator. Note that these options do not significantly affect the speed of a rendition, only the memory requirement.
Background Colour
There are 3 options for the background colour. Select From 3D view to use the colour shown in the 3D view. The other 2 options allow you to set white or black background. These are the most useful backgrounds and are provided to ensure that these colours are pure (ie. to make sure you have a white page not a slightly grey one).
Format
There are several image formats provided : Sprite (16M = 16 million colour / 256C = 256 colour), JPEG, Targa and PBM (24bpp binary). Select the format you require from the list, and click details... to set options specific to that format. Some of these options are explained below:
Sprite (16M) transparency channel - This option uses the unused byte of a 16M colour sprite as a transparency channel. This is a higher level of sprite masking. Although all programs should be able to load the sprite, only a couple can take advantage of the transparency channel.
Sprite (256C) palette - The 256 colours in a sprite can be set to different colours than the Acorn 256 colour palette. A grey scale sprite sets each of the 256 colours to shades of grey. An optimised palette sprite uses a palette of the best 256 colours for displaying the sprite (i.e. an image of red text will have a palette of generally red colours).
See also:
Rendering
Animations
Filters
| Animation |
Animations will be created by WebFX3D if you tick the Animate option on the Animation tab. Animations are saved as a sprite file containing several images - one for each frame of the animation. Creating an animation is easy - all you do is select the type of animation you require, and WebFX3D does the rest. The sprite file can then be loaded into other programs (such as InterGif to create animated Gifs for the internet).
The Frames field sets the number of images which form the animation. The more frames in the animation, the longer it will take to render. Additionally you should keep the file size in mind. If your animations are for the internet, use the minimum number of frames that look presentable.
There are a selection of different types of animations to choose from. Click the Details... button to set options specific to each type of animation. Each of these is described below:
Object Revolution
This simply rotates the object about one axis (X, Y or Z). Tick Half a revolution to only rotate half way (180��o). By combining this with Rotate 90��o first the animation appears to rotate all the way, but any text will always be facing the front and is therefore always readable. Tick Reverse direction to rotate in the opposite direction.
Orbital Lights
This option rotates the lights about one axis (X, Y or Z). The lights effectively orbit about the object. Best results are achieved when the lights are close to one axis and therefore do not move very much - but enough to move highlights on an object in an interesting way. Animating Gifs created from this type of animation should compress well as most of the image does not change.
Fade to Background
The object is made progressively transparent against the background, and appears to fade away - then fade back. You can set how transparent the object is when most faded, by dragging the Fade how much? bar. Low values do not fade the object much, large values fade the object completely.
Scale Object
This option scales the object smaller, then scales it back to full size. You can set the amount by which the object gets scaled as a proportion of original size. Low values scale the object really small, large values do not scale the object by much.
See also:
Rendering
Image Details
Filters
| Filters |
A filter is a process which is applied to an image after it has been rendered. There is currently one filter: Drop Shadow. Filters require a little more memory than a standard rendition, but not much. More filters are a possibility for future releases.
Drop Shadow
The drop shadow creates a shadow of the object on the background, and can also create a glow around the object. To create a drop shadow, tick On in the Drop Shadow group. The Colour of the shadow is shown, and can be changed by clicking Set...
Blur sets how soft the shadow is. Low values do not blur the shadow much and create a jagged effect, larger values blur the shadow more. Transparency controls how transparent the shadow is against the background, measured as a percentage. Low values create a solid shadow, higher values fade it away.
The X-offset and Y-offset, set the displacement of the shadow in pixels. Positive X-offset values move it right, negative = left. Positive Y-offset values move it up, negative = down. Values of 0 do not move the shadow from behind the object. Enlarge by increases the size of the shadow in pixels.
Image Map
This filter allows you to use an image as a surface material, in addition to the colour of any objects. !ChangeFSI is required (must be installed on your computer).
The image is not mapped onto your object in a traditional 3D sense. To understand how it is mapped, consider the following: The texture is scaled to fit the size of the rendition, and is mapped directly onto your object. Thus if your texture has only 2 pixels:red and white, your object will have 2 halves, one will be red, the other will be white. To use this filer, tick On.
Overlay; At 100%, the texture will be used to colour the object. At 0% the original colour of the object will be used. At 50% half the original colour, and half the texture colour will be used.
X,Y tile; The texture can be tiled.
Image; The path of the image map is shown here. Drag a texture here to use it as the image map.
See also:
Rendering
Image Details
Animations
| 3D co-ordinate system |
WebFX3D works with objects in 3 dimensional space. It is advisable that you understand the basics of the 3D environment created by WebFX3D, if you intend working with animations and lighting.
Introduction to 3D
When you use an application such as !Draw, you are working in 2 dimensions. If you create some text, it has width and height. Additionally, the position of the text is defined by X and Y co-ordinates. X measures the distance from the origin horizontally (X-axis), and Y measures the distance from the origin vertically (Y-axis).
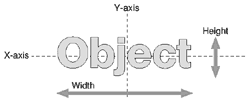
In WebFX3D, this concept is extended by adding depth to objects (give the text thickness). The diagram below shows the object in 3D space. There is now a new axis: the Z-axis which measures how thick objects are and how far they are from the viewer (Depth).
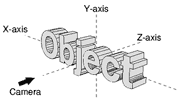
The X and Y axes are still the same, but there is now an new axis to measure depth. Most plug-ins use these axes as parameters (ie. the scale plug-in, scales the object by a set amount in each axis), additionally the lighting and animation parts of WebFX3D requires knowledge of this 3D system.
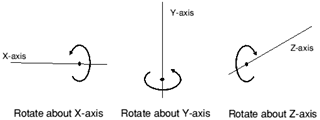
Rotating about Axes
The Object Rotation plug-in is one example where you are required to set which axis to rotate something about. Rotating about an axis is shown by the following diagram.
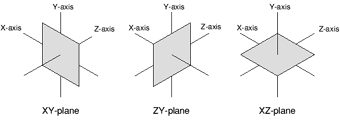
Planes
A plane is like a sheet of paper in 3D. It defines a 2 dimensional area. There are 3 important planes in 3D, which are described by the axes they follow. The XY-plane describes a plane as a wall in front of the viewer along the X and Y axes (ie. The page you are reading is an XY plane). The XZ-plane describes a plane on the 'ground' (ie. horizontal). The ZY-plane describes a plane as a wall in the Z-axis(ie. vertical).
RISCWorld