



WebFX3D
RISCWorld presents the WebFX3D Manual.
| Working with a 3D scene |
Now that you have created a 3D object, you have the opportunity to work with it before rendering an image/animation. The main 3D view is shown below.
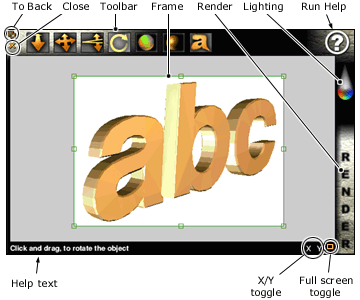
Surrounding the 3D view are all the controls you require to work with the scene. Click menu over the 3D view to open a menu with some additional options which are described later.
The icons at the top left corner of the window allow you to close, or put the window to the back . To bring the window to the front, click select on the top bar. To open this view at any time, click adjust on the WebFX3D iconbar icon.
Click on the Render, Lighting and Help controls to open those windows. This can also be done from the menu.
X / Y toggle
These toggles control in which axes/direction other controls work in. Click the X or Y to toggle each on or off. The other controls which work according to the X/Y toggle are Camera move and Object rotate.
Full screen toggle
Click this to increase the window size to full-screen. Click again to return the window size to normal.
Frame
The frame which surrounds the object is used for rendering only. It defines the region which is rendered. You can alter the size of the frame by dragging one of the boxes around the frame. Be careful to create a border for anti-aliasing or a shadow.
The menu
Click menu over the 3D view to open the 3D view menu. See the relevant sections of this manual for information about what each menu entry does when it is clicked on.
See
The toolbar
Field of View
Shininess Details
Plug-ins
3D view options
Atmosphere
The Scene Gallery
Exporting
| The toolbar |
Along the top of the 3D view, is a toolbar. The first four tools allow you to adjust your objects positioning, and how the camera views it:
 Move Camera forwards/backwards; Drag the mouse left / right to move forwards / backwards (Click adjust on this icon, to adjust numerically).
 Move Camera left, right, up and down; Dragging the mouse, moves the camera in the direction you move (Click adjust on this icon, to adjust numerically).
 Field of View; Drag the mouse left/right to decrease/increase the Field of View. (Click adjust on this icon, to adjust numerically).
 Rotate; Drag the mouse left/right, up/down to rotate the object. Click adjust on this icon, to undo the last rotate.
The next two tools control you objects surface appearance. Note that these changes will apply to every object in your scene. If you want to set different colours to different objects, import a drawfile.
 Colour; Sets the colour of the object.
 Shininess; Sets how shiny the object is (see below). Shininess details.
The last tool (on the right) allows you to run plugins:
 Plug-ins; Opens a list of available Plug-ins.
| Field of View |
The field of view controls how much of what is in front of the camera is actually seen by the camera. It can be thought of as a zoom tool. Imagine a cone extending from the camera (see diagram below), everything inside the cone is seen (the shaded region).
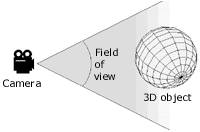
Therefore by increasing the field of view, more of the object will be shown, and decreasing the field of view reduces what is seen by 'zooming in'. You can control perspective by altering the field of view.
| Shininess Details |

Shininess is controlled through two settings. The first shininess defines whether the highlight is small (high values) or large (small values). The second value shininess strength defines how strong the highlight is. High values show a bright highlight, lower values reduce the brightness until it is undetectable. The diagram below shows the effects of various settings

| Plug-ins |
Plug-ins are separate programs to WebFX3D, which reside within the !WebFX3D application. Each plug-in performs an operation on the 3D object to change it in some way. Although plug-ins are separate to WebFX3D, they integrate seamlessly with WebFX3D and as far as the user is concerned, a separate program is not even running.
See Also
Bend Plug-in
Colourise Plug-in
Scale Plug-in
Twist Plug-in
Wave Plug-in
| 3D view options |
The options dialog is opened from the 3D view menu by clicking Options... You can then set the appearance of the 3D view, which affects how a rendition will look. The options dialog is shown below.
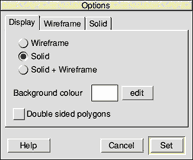
There are 3 tabs: Display, Wireframe and Solid. The Display tab contains general settings, the 2 other tabs contain specific settings which are effective depending on the settings of the Display tab. Each tab is described below.
Display
The option defines the type of display. There are 3 settings: Wireframe, Solid and Solid + Wireframe. The colour of the wireframe is set on the Wireframe tab, the type of solid fill is set on the Solid tab. The background colour sets the colour of the background, click edit... to change this.
Tick Double sided polygons to use these opposed to single sided polygons. Each object is formed by a series of faces. At any time, many of these are facing away from the camera (i.e. are on the other side of the object), and don't need to be drawn. A speed increase of 50% is achieved when these are not drawn. However on a few occasions, when an object is drawn without some faces, Double sided polygons will need to be ticked.
Wireframe
The second tab contains settings for drawing the object wire frame. Firstly you can set how the wireframe colour is decided - either the colour of the object (Use object colours) or a different colour which is defined lower in the window. Click edit... to change this colour, which is also used as the wireframe colour in exported draw files.
Solid
Tick Shaded to display the object with each face rendered, alternatively the object will be filled with its solid colour. If Shaded is ticked, the options in the Shading options group affect the way the object is rendered. These options are explained below.
Phong; When ticked, objects are rendered with phong highlights. If not ticked, there will be no highlights.
Directional lights; If unticked, light emits from each light source in all directions. If ticked, light shines in the direction from the light to the origin of 3D space. So the actual position of each light is not as important as it only defined the direction the light shines. Renditions are quicker if directional lights are used (ticked).
Attenuation; Tick this option to show attenuation, other wise no attenuation will be used. For more information on attenuation, see the lighting section.
Atmosphere; Tick this option to render objects in an atmosphere. For more information on the atmosphere, see the section on Atmosphere.
| Atmosphere |
Atmosphere settings control the colour and density of the atmosphere surrounding your object. If coloured white you can create fog, or black to add a distance cue. Select Atmosphere... from the 3D view menu to set atmosphere settings. The atmosphere can only be turned on/off through the 3D view options dialog.
The atmosphere settings dialog is shown below:

Thickness
The Thickness settings define how dense the atmosphere is. The Near value sets how thick the fog is at the nearest part of the object from the camera. The Far value sets the thickness of fog at the furthest part of the object from the camera. Each is measured as a percentage.
Typically, the near value is set to 0 so there is no fog close to the camera, and the far value is set to a higher setting. Therefore the thickness of the fog increases the further the object gets from the camera.
Colour
The filled box at the lower left of the dialog window (above) sets the colour of the fog. Click edit... to change this. If you require a fog effect, is it a good idea to set the background colour to the fog colour to give a fog background, i.e. the object fades into the background.
| The Scene gallery |
The Scene Gallery is a facility for storing components of a scene so they can be applied to other objects in the future. The surface material, lighting, background and fog settings are given a name and stored in the gallery. You can then browse through the stored scenes to quickly find the effect you're looking for. Additionally you can apply one component from a gallery scene to your scene (such as lighting, or the surface material).
The scene gallery is opened from the 3D view menu:
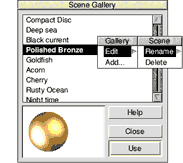
A list of stored scenes is shown as a scrollable list. Click on one and a preview of it is rendered on a sphere at the lower left corner of the window. To show if fog is applied to the object, the text near and far is shown to the right of the object in the colour it would appear at the near and far parts of the object. The sphere itself does not show the effect of fog.
To use a gallery scene, select it and click Use. A dialog window will pop up where you can set what parts of the scene to apply to your scene. Click use in that dialog and your scene will be updated. When selected, you can also rename or delete a scene from the gallery by clicking the menu mouse button over the list.
Additionally, you can add a scene to the gallery. Simply set up the scene (object colour, lighting positions etc.), open the gallery, click the menu button over the list and select the Add... menu entry. A dialog will open where you can type the name of your scene. This is handy if you will need to render several different objects, and each must have the same theme.
| Exporting |
WebFX3D allows you to export an object as a draw file or VRML file in addition to rendering bit-mapped images. To export an object, open the Export menu which is a sub-menu of the 3D view menu:
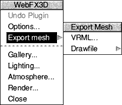
Exporting a Draw file
To save as a drawfile use the standard process of dragging the draw file icon to a filer window or another program. The draw file will look exactly as the 3D view, however it will not be shaded. A draw file either has a wire frame, solid fill or both depending on the 3D view options. The wire frame colour is set to the colour of the Wire frame on the second tab of the options dialog.
Exporting a VRML file
VRML (Virtual Reality Modelling Language) is a format used to describe 3D scenes on the internet. When you click on the VRML menu entry the Export VRML dialog pops up (below).

VRML files are text files, and can have information about the author (you) inside them as an Information Node. Anything you type into the white text area will be put into the file. At the moment, the VRML version 1 format is supported.
Drag the file icon to a filer or other application to save the VRML file. VRML files can be viewed on all computer platforms by most popular web browsers and 3D graphics programs. On the Acorn platform, Aspex Software develop the most useful VRML viewer which we recommend you use.
| Bend Plug-in |
This plugin bends the object around a circular path. It only works in the XY plane (i.e. parallel to the screen). It is best suited to a line of text.
Angle
The angle in which the object will fit. 355� bends the object around a complete circle, 180� a half circle and so on.
Radius
The radius of the circle to create, as a percentage of the overall width of the object. A larger radius should be used in conjunction with a small angle, however you will need to experiment a lot.
Center of object
Whether the center of the original object will be at the top or bottom of a circle.
| Colourise Plug-in |
This plugin allows you to set the colour of the join between the front and back faces of your object. It is suited to object created by WebFX3D, not add-ons.
Join colour
The colour is defined by RGB values. Move the sliders to set the amount of Red, Green and Blue in the colour of the join.
Type of Join
Select the type of join you used when creating the object. If this is not set correctly, the object will not be coloured correctly.
| Scale Plug-in |
This plug-in provides a simple way to scale the object in any axis. There are 3 scale factors, one for each axis. To enlarge or reduce the size of the object, set all scale factors the same.
To extend in the z-axis only, leave the X and Y factors as 1.0, and increase the Z value.
| Twist Plug-in |
The twist plugin twists the object about an axis. One end of the object is held still, while the other end is rotated.
Axis
Which axis to twist the object about.
Revolutions
How many times to rotate the end. 1.00 to rotate 360 degrees, 0 for no rotation. 3.00 will rotate 3 times, 0.5 will rotate only 180 degrees etc.
Radius
While twisting, the object can also be expanded about the axis. This allows a helix to be created from the object. No radius, will just twist the object. Set the radius, and if the result is not as you require, Undo the plugin, and try again with a different radius.
| Wave Plug-in |
The wave plug-in puts a wave through the object.
Plane
Which plane to put the wave through. The default is XY, so the wave is put horizontally through the object from left to right.
Amplitude
The height of the wave, as a percentage of the height of the object.
Waves
The number of waves to put through the object.
RISCWorld