


WebFX3D
RISCWorld presents the WebFX3D Manual.
| Creating Objects |
To create objects using WebFX3D, open the Create window (click on the WebFX3D icon on the iconbar), which is shown below:
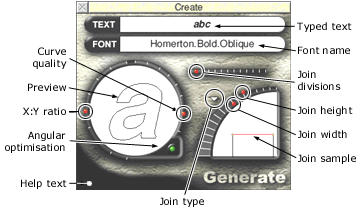
Text and font settings
The Preview
Join settings
When everything is set, click Generate to create the 3D object.
See also:
Using Drawfiles
The Create Menu
| Text and Font Settings |
Typed text
This displays the text which will be used to create a 3D object, in the selected font. Click on the bar to edit this. Where a drawfile will be used instead of text, the path and filename of the drawfile is shown here.
Font name
The selected font is shown here. Click on the bar to change the font. Only fonts which have outlines are used to create 3D objects. The system font is excluded from the list as it has no outline.
| The Preview |
The first letter of the typed text is shown in the circle. This preview shows how the 3D object will appear. You can adjust the Y:X ratio, curve quality and toggle angular optimisation.
Y:X ratio
This adjusts the height of the object, in relation to the width. Initially it is set to 1 : 1. However some fonts may look better with different ratios. To make text taller, increase the ratio, tho make smaller, decrease. To adjust, simply drag the red ball around the circular track. At the top the ratio is highest, at the bottom it's lowest. When you release the ball, the preview is updated to show your adjustment.
Curve Quality
When the text is converted to 3D, curves which are infinitely smooth as text must be converted to straight line segments. By dragging this ball around the circular track, the quality of curves is adjusted. At the bottom very few line segments are created per curve, at the top many segments are used to create smoother curves. However, more segments create larger 3D objects, which take longer to render etc.
Angular optimisation
Click this button to toggle angular optimisation on/off. When its green, angular optimisation is on, red is off. Angular optimisation reduces the size of large 3D objects by limiting the number of points generated. The technique is best explained by an example: If a curve is nearly straight, a single straight line is created instead of several segments. If some text is not converted to 3D properly, toggling this option can make it work.
| Join |
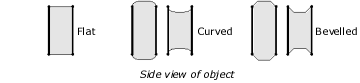
The join is the section which joins the front face of text, and the back face. This join can be flat, curved or bevelled with a variable number of divisions. The following options affect the join:
Join type
There are 3 join types. They are described by the illustrations below.
Join sample
This display shows the type of join selected, and how the width/height settings will affect it. Note that it does not show how the number of divisions will appear.
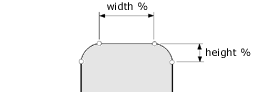
Join Width and Height
These settings affect the proportions of the join. For flat joins they have no effect. The diagram below shows how each is measured as a proportion of the total width of the join. The height setting can also take negative values, which allow the join to curve inwards.
Join divisions
The join can be divided up into a number of divisions. The default setting is 1 to conserve memory. For flat and bevelled joins, it is the flat horizontal bit which is divided up into a number of segments. With curved joins, the curved areas are divided up instead of the straight areas.
| Using a Drawfile |
A drawfile can be used instead of text to generate a 3D object. Simply drag the file to the enter text window, or onto the WebFX3D icon on the iconbar. The drawfile name and path is shown where the text is normally displayed. A drawfile icon is shown over the font as an additional indication that a drawfile is loaded.
All the settings work the same as with text. To cancel the drawfile and type text, click on the text or font bar.
When converted to 3D, only path elements in the drawfile are used. Open paths will cause an error, as 3D objects must be closed completely. Layered objects, can have an undefined result when rendered or displayed, as these elements are all the same distance from the camera, and it is difficult to work out which is in front of the other.
Make sure that any text in the drawfile is converted to path in !draw first or it will not be converted to 3D.
| Create Menu |
A menu is opened when you click menu in the Create Window. There are three menu entries:
Font
Allows the font to be changed (See Text and Font Settings ).
Reset
Resets all options in this window to their default values.
Re-scale scene
This is an option. When ticked, the 3D view will be re-scaled to fit the new object you create. If not ticked, the scale will not be adjusted. The purpose of this option, is to allow you to create several objects, one after the other, and to be able to leave the scaling the same for all of them. Without this option, it would be difficult to create several titles, of exactly the same size.
RISCWorld