


ProArtisan2
The complete ProArtisan2 manual
8. Input/Output Menu
Input/Output mode
This menu deals with all the input and output concerned with ProArtisan 2. This includes disc saving and printing.
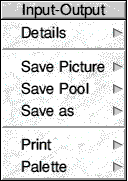
Details
This menu analyses the data in a picture. First of all the internal sprite name of the image is shown. To the right of the name is the Width of the image and below that is the Height.
Under the name the number of colours used is displayed and the large box below shows the colours used. If you click with ADJUST on the colours a histogram is displayed showing how often colours are used in the image.
Save Picture
This menu leads to a standard save dialogue. You can enter the name and drag the file to a directory viewer or you can enter a full pathname and click on OK. If the Squashed box is ticked in the Save box then the file is saved in a compressed format called Squash. Squash is supplied with all RISC OS 3 machines and is supplied with ProArtisan 2 for RISC OS 2 machines.
Squash files can be reloaded into ProArtisan 2 by dropping them on to the canvas. If the file is not a sprite or Draw file then ProArtisan 2 ignores it.
Squash is an efficient compression tool for any file but it does not allow you to specify a file type. This means that you must have a little discipline when saving compressed files. It is advised that you store all ProArtisan 2 pictures in a directory called ProPics or similar. ProArtisan 2 will not crash if incompatible squashed files are dropped on to the canvas, it will just ignore them.
Save Pool
This option is as for Save Picture except that it saves the contents of the Sprite pool. The pool can be squashed or not. These files can be restored to the sprite pool by dragging them from a filer to the Sprite Pool window. Due to technical restrictions compressed sprite files replace all existing sprites in the pool whereas uncompressed sprite files merge with those already present. So if you want to merge your sprite files you must decompress them first.
Squashed files can be unsquashed by running the !Squash application and dragging the files onto the !Squash icon. You then select the Unsquash option to convert the file - provided there is enough space on your disc for the unsquashed file. Alternatively you can double click on the squashed file once !Squash has been run to convert the squashed file into a standard sprite file.
Save as
This item leads to a sub menu with two entries.
| Save | This item leads to a further save box which is used to save in the same way as described above except that the Mode item below allows you to specify which mode the image is saved in. |
| Mode | This item leads to a writable icon into which you can enter a mode number. Click on OK to confirm the choice. An error is generated if the mode is not known to the system. When you save an image using Save as -> Save the image is converted to the specified mode and saved in that mode. Note that if your image is not screen sized, eg A4. the resulting image has the same dimensions but it takes on the resolution and colour characteristics of the new mode. Warning: This facility is provided for those wishing to produce an image for a particular mode and should only be used on the final image. If you edit the image later you may find that you have lost colours, resolution or both. |
This item leads to the Print dialogue box which presents a novel approach to printing.
The area to the left represents the possible printing area and the white area within it represents the paper. The slightly lighter grey around the white area is the printer margin. These values are derived from the printer driver. If no printer driver is present then an A4 page with 10mm margins is assumed.
You can drag the canvas image around on the paper to position it where required.
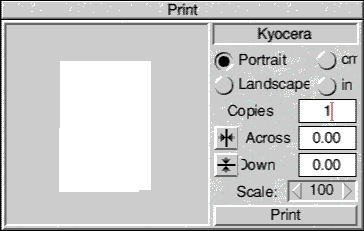
The right side of the dialogue box has several controls. First the panel at the top tells you which printer driver is loaded. You can also toggle between Portrait (upright) or Landscape (sideways). The selection is reflected in the white area. Next you can select to have the measurements below in centimetres or inches.
The box below this enables you to enter how many copies of an image you want printed.
The writable icons below this are the X (across) and Y (down) position of your picture relative to the bottom left corner of the paper. This means that if you placed your picture so that its bottom left comer was in the bottom left comer of the paper then your picture would be at position 0.0.
You can click on the icon with the two horizontal arrows to centre the picture horizontally on the page.
You can click on the icon with the two vertical arrows to centre the picture vertically on the page.
You can also scale the image using the Scale option to set a percentage scale.
Finally there is the Print button. Click on this to print your picture, assuming that you have a printer connected and on line.
Palette
The Palette item enables you to edit the 256 colours used. You normally create the colours before starling work in much the same way as an artist selects which colours he intends to use and places them on his palette. Clicking on OK makes the selection of colours the current palette and any image that you have loaded will be changed.
Colour editing
The palette enables you to edit a colour if you have a colour card fitted provided that the S for Screen icon is selected. Click on the colour that you want to edit and it is shown in the box at the top of the dialogue window. The sliders to the left of the box show how the colour is formed from its red. green and blue components. To alter a colour drag these sliders until the required colour is achieved. To confirm a colour and palette click on OK. The sliders range from 0 to 255 and if all sliders are set to zero then the colour is black. If they are all set to 255 the colour is white.
Palette editing
With a colour card you can define your own palette of 256 colours provided that the S for Screen icon is selected. You can either edit each colour individually as described above or you can alter them in sets. The largest set that you can create is one of 256 colours. For example you can create a set from Black to White by clicking on the white in the top right corner of the palette and dragging down to the black at the bottom left. This identifies the two colours that you want to create the palette between and how many colours you want in between. 254 in this case. If you now click on the Blend arrows in the top right corner of the palette you will get a grey scale consisting of 256 greys. If you do a fill with this it is very impressive as even at 800% magnification you cannot see the pixels.
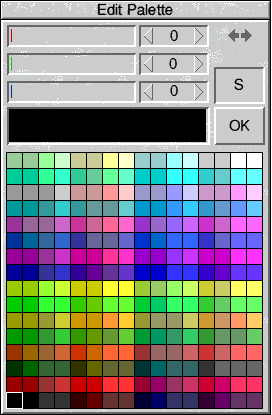
If you do not want to blend all the colours you can just drag over a range, say from yellow to blue, and when you click on the Blend arrows the program will create a blend between these two colours. In this way you can define sections of the palette as blends very easily. This range also then becomes available in the fill option because the fill will use as many colours in a blend as it can find to fit the blend definition.
Another thing that you might want to do is have a large blend of red, for example. You can do this by defining a start colour as red using the sliders and then also an end colour in the same way. You control how many steps there will be between the colours by the number of colour cells between the start and end colour in the palette. When you click on OK the palette is changed to reflect your new requirements. If you had put the reds at each end of the palette instead of black and white you can have 256 shades of red.
It is possible to obtain all of these shades because you are picking the colours from 16.7 million colours, although you can currently only have 256 of them at any one time.
It is possible to load images created with an arbitrary 256 colour palette into a machine without a colour card fitted and ProArtisan 2 will make the best approximation that it can, given the standard palette.
Note: In all cases, whether a colour card is fitted or not. the palette is taken from the last image loaded. If other images have a different palette that you want to restore then you must reload the image or load in a previously saved 256 colour palette file such as the ones used by FlipTop which is supplied with the Wild Vision/CC colour card. Alternatively you can load a sprite into Paint and save a palette file from there.
Importing files
ProArtisan 2 can accept files from several sources but the two most common are Sprite and Draw files. Most applications will allow you to save an image in one of these formats.
Sprites
Sprites are loaded onto the canvas by dragging them onto the ProArtisan 2 icon on the Icon Bar or by dropping them into an already visible canvas. In the latter case the new image replaces whatever was on the canvas. Sprites can be in normal unsquashed format or squashed using the Acorn Squash utility.
Sprites, either single or multiple images in one file, can also be loaded into the Sprite Pool by dropping their icon onto the Sprite Pool window. Again, sprites can be in normal unsquashed format or squashed using the Acorn Squash utility. If the sprites loaded into the Sprite Pool are squashed then they replace any sprites already in the Sprite Pool. If the sprites are not squashed then the new sprites are merged with the existing Sprite Pool.
Draw
Draw files can be loaded into ProArtisan by dragging the Draw file to the bottom left corner of the canvas. The Draw file is converted into a sprite and positioned with the bottom left edge of the bounding box that surrounds the Draw file at the pointer position. If you .want to position the Draw file accurately you are best to take it into a blank canvas first and cut it out as a sprite. You can then place it on your working canvas and manipulate it in the same way as any sprite using transparency, rotation, scaling etc.
APDL