


ProArtisan2
The complete ProArtisan2 manual
5. The Paint menu
Painting mode
Click on the paintbrush icon on the Tool pane icon to enter Paint mode and then press MENU with the pointer on the canvas. This brings up the Painting menu.
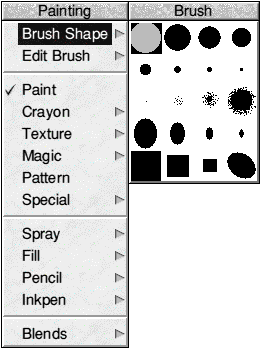
Brush Shape
Follow the arrow on this item to open the Brush selection box. To select a brush click on it with SELECT. Holding SHIFT down at the same time also selects a pointer in the shape of the brush, except for small brushes when a cross hair is used instead. The selected brush is highlighted, as with the first brush in the window below. To paint with a brush move the pointer on the canvas with SELECT held down. The brush uses the current colour and opacity, which can be changed using the Palette option.
Frisket - if you are creating a frisket the brush is used to paint into the frisket.
Edit Brush
This item leads to a box where you can create your own brush shape.
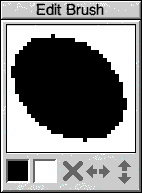
The two boxes at the bottom allow you to choose from Set pixel (black) or Unset pixel (white). Any white areas on the design are transparent. You can clear the brush design area by clicking on the X icon. This clears to either white (totally transparent) or black (a large square black brush) depending upon which is chosen at the time.
The other two icons allow you to flip the brush in the horizontal and vertical axis respectively.
When a brush is designed it appears as the last brush in the Brush Shape menu described earlier. You can then select it as your brush template and paint in the current colour. The brush template is also used wherever a normal brush template is used. Imagine the effects you can create by designing a polo shape brush and using this when using Magic Brush - the possibilities are endless.
Frisket - The created brush can be used when creating a frisket.
Paint
Click on this item to paint on the canvas in the current colour. Note that selecting a brush shape does not automatically select Paint mode as brush shapes can also be selected for items such as Magic Brush, Crayon, Texture etc.
Crayon
This option looks very similar to Texture below. However, when you draw on the canvas the pattern is applied in the current colour except for any black in the crayon pattern which is made transparent.
Frisket - when creating a frisket Crayon draws the pattern into the frisket leaving black as transparent and not part of the frisket.
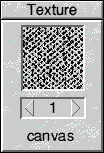
Texture
This is a very powerful item. It allows you to choose from a selection of textures such as canvas, pebble, rattan etc. To choose a texture click on the arrows. When you brush over the canvas with a texture the texture is applied to the canvas but without disturbing the colours on the canvas - it is a true texture. The current brush size is used as the template when applying texture.
Frisket - when creating a frisket Texture draws the pattern into the frisket leaving black as transparent and not part of the frisket.
Magic
This is the Magic Brush option first introduced in ProArtisan. It allows you to selectively change one or more colours (up to 16) for any other colour. The first and third columns are the original colour and the second and fourth columns are the new colour that you want them to become.
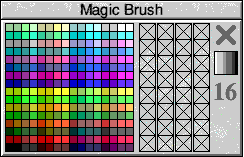
You can select the colours to be changed in three ways. Firstly you can pick up the colours from the Magic Brush palette and drag them into the left hand column. Secondly, you can click SELECT on the Picker icon (shown as 16) to transfer the colours from the Picker in the Palette menu. Finally, clicking SELECT on the Blend icon will transfer the current Blend set into columns 1 and 3.
There are also three ways to put the new colours in columns 2 and 4. Firstly, drag the colour into the relevant box. If you want to change all the colours to one colour drag the new colour into the destination box whilst holding down SHIFT.
Individual replacement colours can be turned off by clicking with SELECT and turned back on again with ADJUST. Secondly, you can click on the Picker icon with ADJUST to put the colours from the Picker into columns 2 and 4. Thirdly, you can click with ADJUST on the Blend icon to transfer the current Blend Set into columns 2 and 4.
To sum up. SELECT on the Picker or Blend icons puts the relevant colours in columns 1 and 3. ADJUST on the icons puts the colours into columns 2 and 4. To alter the colours wipe over the canvas. The current brush size and shape is used when wiping the canvas. A global Magic brush is provided in the Process menu.
Frisket - When creating a frisket the colours in columns 1 and 3 are set or cleared depending on whether you select Set Frisket or Clear Frisket in the Palette.
Pattern
This item is a little difficult to imagine. In essence the current sprite is tiled onto the back screen, its size and the number of times it is plotted relate to the original sprite. When you wipe over the screen with your Pattern brush the tiled sprite is revealed. The brush size and shape is governed by the selection in the Brush menu.
Sprites, patterns and ECFs can be dropped into the Sprite Pool and then used as patterns. This replaces the ECFs in the original ProArtisan.
Frisket - This item does not work when creating a frisket.
Special
This menu provides some special effects. The features in this menu can be used when the item Special is ticked. None of these items work when creating a Frisket.
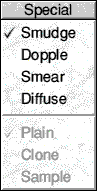
| Smudge | Smudge softens an image by smudging the colours in a similar way to smudging wet paint. The Clone and Sample options have no effect. The Smudge brush size is taken from the currently selected brush. A small brush size is recommended. The effect is different when Minimise is selected. |
| Dopple | Dopple creates a Pointillist effect by painting in a manner that looks as if the tip of a brush has been dabbed onto the canvas. The Clone option constantly reads the area under the brush and writes it back in a different pattern of dots. The Sample option uses the current Picker colours. The current brush size is ignored. Frisket - this item works in a similar way when creating a frisket. |
| Smear | Smear allows you to drag out a colour. The program graduates the colours as you drag the colour out. The best analogy is like using a wet brush to smear watercolour paints. If you are working on grey scales it is like using your thumb to rub over a charcoal drawing. Try creating a block of black next to a block of white and smear from black to white and then white to black. Clone and Sample have no effect. A small brush size is recommended. |
| Diffuse | Diffuse breaks up the area that you brush over. In Plain mode it's like painting with a small brush. In Clone mode the area under the brush is constantly read and then written back to the brush in a different pattern thus breaking up areas. In Sample mode the diffuse pattern uses the current Picker colours. The current brush size is ignored. |
Spray
This item leads to the Spray menu.
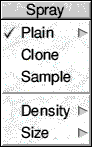
| Plain | The Plain item has a further sub menu allowing you to select either Weighted or Unweighted options. This means that the spray is weighted towards the centre of the spray or not. The Plain spray uses the current colour and opacity. Frisket - If creating a Frisket this tool sprays into the Frisket |
| Clone | Frisket - If creating a frisket this tool sprays into the frisket. This item enables you to copy one part of the screen to another. To select the source for the cloned area click on the canvas with ADJUST. When you spray, the image, starting at your selected point, is used as the spray pattern. To start from a new point use Adjust again and then carry on spraying. Frisket - This item does not work when creating a frisket. |
| Sample | This item uses the colours shown in the Picker. These are then used randomly when spraying. Frisket - This item does not work when creating a frisket. |
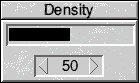
| Density | This item leads to a box which enables you to set the density of the spray, either by dragging the slider or by altering the numeric parameter using the bump arrows. |
| Size | This item lets you set the size of the spray numerically, using the bump arrows or by dragging out the circle. |
Fill
This leads to the Fill menu
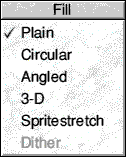
| Plain | With this item selected the fill is a simple fill that replaces all connected pixels, that are the same colour as the pixel that you click on, with the current colour. Click with SELECT on the canvas to start the fill. Frisket - This item also works when creating a frisket. |
| Circular | This item provides a circular fill. If the bottom item in the menu, Dither , is unticked then you get a stepped fill but if it is ticked you get a dithered graduated fill. In both cases the fill uses the current Blend set as defined in the Blends menu described later. A circular fill can be done into any shape, it just means that the fill is calculated in a circular pattern which radiates from the central point. To initiate a fill hold down SELECT at the point that you want to be the centre and drag out the line before releasing SELECT. The further you drag the line, the wider the bands of each colour will be. A small line means small bands with the final colour filling any area left to fill. Once you try it you will see how easy it is. Note that the arrow head does not have to stay within the region to be filled. Frisket - This item does not work when creating a frisket. |
| Angled | The Angled fill is similar to the Circular fill except that the bands are diagonal instead of circular. This fill accommodates all angles including horizontal and vertical fills. Frisket - This item does not work when creating a frisket. |
| 3-D | The 3-D fill uses the current Blend set. The area to be filled is taken from the point on which you clicked and the fill works out from the centre of each horizontal line segment within the area. It uses all colours in the blend set on each side of the centre point. The Dither option can be applied to this fill if required. Frisket - This item does not work when creating a frisket. |
| Spritestretch | This fill takes the current sprite and fills an area with the sprite, stretching or compressing the sprite as required. Click on a point to start the fill. Dither has no effect on this item. Frisket - This item does not work when creating a frisket. |
| Dither | This option lets you choose whether a fill is dithered (the illusion of more colours to make a fill look smoother) or stepped. A stepped fill has distinct bands of each colour. Frisket - This item does not work when creating a frisket. |
Pencil
The Pencil is similar to the brush option except that with pencil you never get any gaps, the drawing will always catch up to the pointer. You can alter the size of the pencil by dragging out the circle or using the arrows. Pencil uses the current colour but not the opacity.
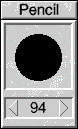
Frisket - this item works in a similar way when creating a frisket.
Inkpen
The Inkpen can be used as a calligraphic tool. When painting with it the pen starts off small and while you drag a line out it gets larger over a short period of time. Try it ! The size is adjusted as for the pencil above and the current colour is used. Great for Chinese writing !
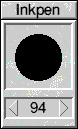
Frisket - this item works in a similar way when creating a frisket.
Blends
This item is again very powerful.
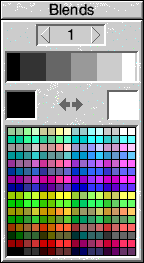
The small box at the top with arrows either side can be used to toggle through the default Blends provided. You can also create your own blends by dragging a colour from the palette into the boxes on the left and right of the arrows icon. Drag one colour into the left box and one into the right box and you automatically get the maximum number of colours available for a blend between the two colours. On a machine with a fixed 256 colour palette the resulting blend depends upon how many colours are available between the two defined colours and the number of colours is fixed.
On machines capable of having any 256 colours in the palette eg those fitted with colour cards, you could have 256 shades or colours in the blend set. For these machines the Palette option in the Input/Output menu allows you to redefine the colours and create your own blends with up to 256 shades.
You can also alter the direction of the blend by clicking on the arrows icon between the two boxes. For example if you had a blend that was black to white you can click on the arrow to change it into white to black.
APDL