


Using the program
Before you can convert an Ovation Pro file you need an appropriate Mappings file. A 'basic' file named 'DefaultMap' is provided and there is also one called 'Manual' which was designed to work with the format used to write this manual. As this DDL file is provided with the program you can use it with this mapping file to make an HTML version of the manual to demonstrate how the program works.
Load Ovn-HTML by double-clicking on the application icon and it will install itself on the icon bar. If you click MENU on this icon a menu will appear with the usual 'Info' and 'Quit' items at top and bottom and three others, 'Process', 'Mappings' and 'Save Choices'. More about the others later, but for the moment select 'Process' and the window below will open. You can also open this window by clicking SELECT on the iconbar icon.
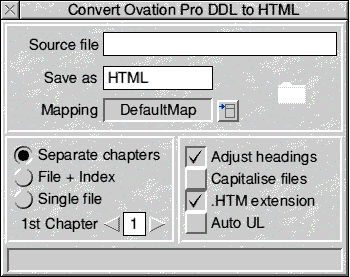
At this stage there is a 'greyed out' directory icon on the right hand side. Drag the DDL file to the icon at the top of the window labelled 'Source file'. Its name will appear there, the directory icon will become 'active' and the instruction 'Enter name and drag dir. icon to convert file' will appear at the bottom.
Output file options
The 'box' at the bottom left of the window defines the form the HTML file(s) will take. There are three options;
- Separate chapters will divide the HTML into chapters at predetermined points with a separate index file.
- File + Index will create two files, one called BODY which contains the main document and a separate INDEX file.
- Single file makes a single long HTML file with an index at the start of the file
The first two methods create a directory in which the files are placed. The name shown in the 'Save as' icon is the name of this directory. If there are any graphics files to be included these can then be placed in this directory or a sub-directory.
The third method, 'Single file', creates a single HTML file so there's no need for a directory. In this case the name in the Save as icon will be the name of the HTML file and the icon will change from a directory to an HTML file icon.
Chapter numbers
When you split your file up into separate chapters they are given names with a numeric suffix. These would normally be in the form CHAP01, CHAP02, CHAP03 etc. If the original file also has chapter numbers and you want to arrange for the file names to correspond with them they might be out of step if there is something such as a Preface or Introduction before 'Chapter 1'.
This option enables you to adjust the numbers given to the HTML 'chapter' files. By clicking on the 'bump' icons you can make the numbers begin with '00' or even negative numbers, so that if your document does have a Preface that would be CHAP00 so that Chapter 1 of the document would correspond with CHAP01.
Adjust headings
When you use a Style to set a heading or sub-heading in Ovation Pro the code to set the style is normally placed at the start of the line but the code to end it will usually be placed at the start of the following line. When this is converted to HTML it will (usually) look OK in a browser but it produces messy code.
If this option is ticked then the program will try to adjust this by moving the code to cancel the style to the end of the preceding line. This produces 'cleaner' HTML which makes it much easier if you wish to edit or adjust it manually later.
Capitalise files
If this is ticked then filenames will be in upper case, CHAP01, CHAP02, etc. If it isn't ticked the filenames will be in lower case, chap01, chap02, etc.
In either case all HTML links in the index file will be in the same case.
This is largely cosmetic as RISC OS and Windows filing systems aren't case sensitive However, Linux and Unix are, so if, for example, you were to transfer files to a case sensitive system (and remember that most web servers are Unix based) via a DOS format disc then it would be best to make sure that all the links are upper case.
.HTM extension
If this is ticked then all files will be given a .HTM file extension (or .htm if 'Capitalise files' is not selected). This would be normal unless you are sure that your files will only be used on a RISC OS system.
Auto UL
If this is ticked then the program will try to create <UL> constructs.
If it finds a line starting with a 'bullet' character (ascii 143) it will begin a <UL> construct and each bullet with be translated into a <LI>. It will close the construct by inserting a </UL> when it finds a line that doesn't begin with a bullet. If there is a Tab character following the bullet, as is often done, this will be ignored.
This system is not infallible, but it does normally work quite well. The most common problem is if you have one of the 'bullet sections' divided into two paragraphs. This will result in the HTML being terminated and re-started. However, you will normally be able to see this in the finished product and correct it manually.
Choosing a Mapping file
If you click on the menu icon to the right of the icon labelled 'Mapping' a menu will open listing all the Mapping files available. With the basic program there will be only two, the 'DefaultMap' and 'Manual', which is provided to enable you to experiment with the text of this manual. To choose a Mapping file just select it from the menu and it will be loaded and its name will appear in the icon.
A demonstration
Open the 'Process' window and drag the DDL file supplied with this program, which is the text of this manual, to the icon at the top of the window. Select the 'Manual' Mapping file and set 'Adjust headings' and 'Auto UL' so they are ticked. Select 'Separate chapters' and '1st chapter' to '1'.
Now drag the directory icon to a suitable filer window.
The icon at the bottom of the window will inform you as the program creates each chapter, and will say 'Finished' when it is done. At this point the directory icon will once again be 'greyed out'.
Unless you have changed the name in the Save as icon a directory called HTML will have been created and in it will be several HTML files. Their exact names will depend on the sate of the 'Capitalise files' and 'HTM extension' icons, but there will be an Index file and a file for each chapter.
If you load the Index file into a browser you should find that it contains a series of HTML links. The 'major' ones will be to each individual chapter. The start of each 'chapter' has nothing to do with Chapters in Ovation Pro. They are defined (in this case) by the chapter headings, such as the 'Using the program' heading at the start of this section. The 'minor' links are to the sub headings, such as 'A demonstration' above.
If you click on any of these links the browser will load the appropriate file and, in the case of the minor links, scroll to the sub-heading.
You could experiment with the other options. If you select 'Single file' you will find that the program creates a single, long, HTML file with the index at the beginning.
Saving Choices
If you select 'Save choices' from the iconbar menu then the settings in the lower part of the window will be saved in a Choices file. The next time you run Imp-HTML they will then be set they way you have chosen.
!OV-HTML is Copyright © David Holden 2002.