


Using Powerbase - Part 4
by Derek Haslam
As promised in the last article, the main topics this month are:
- Associating string operations and user functions with Computed fields
- Using subsidiary indexes
- Attaching external files to database records
Before proceeding, however, there is an updated version of Powerbase, PB834, on the CD. The changes from v.8.32 are minor but it's always best to use the latest version.
Using string operations in Composite fields
When a database contains the names of people we often want the names in different formats for different purposes. If the names supply the primary key of the database the surname usually comes first. Something like the first 4 letters of the surname plus the initial letter of the first name yields a suitable key for quickly retrieving records. e.g. John Smith might have 'Smith' in a Surname field and 'John' in a First name field, the primary key being SMITJ, which serves to distinguish John from (most) other Smiths. In an alphabetical list of names he would normally appear as Smith John but if we're addressing a letter to him we would prefer a mode of address such as 'Mr. J. Smith', or perhaps 'Dr. J. Smith', 'Rev. J. Smith' or whatever is most appropriate.
To illustrate this we need a new database. You can use the empty database !Names from the CD, if you wish, but you might care to get some more pratice using Powerbase by constructing it yourself. Five data fields, the first four of which are Editable, will be needed:
         Class        Type           Descriptor      Tag   Data length

         Editable     Unrestricted   Surname         SNAM     20
         Editable     Unrestricted   First name      FNAM     20
         Editable     Unrestricted   Other names     MNAM     20
         Editable     Unrestricted   Title           TITL     5
         Computed     Composite      Address as      ADDR     25
That last field is very important; it will allow us to re-jig the name into a format suitable for addressing a letter by making use of the data in the other fields. Just to make sure we get it right Fig.1 shows what the relevant part of the Field design window should look like when defining the field:
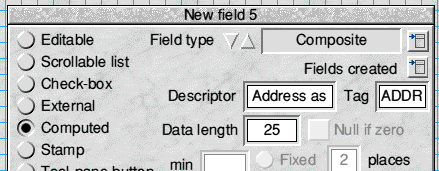
Fig.1 Designing the Computed field
Make sure you have Composite selected as the field type, not Calculated.
The number of different entries in the Title field will be quite small so you might add a Menu button to facilitate entry. Can you remember how to do that? The field type will be found in the Extra button class, it's Menu (field), not Menu (General) and you give it the same tag (TITL) as the associated data field. No descriptor is necessary.
Choose Default database from the main menu to create the empty database and put you into data-entry mode. Depending on how you've laid out the fields, your record window should look something like this:
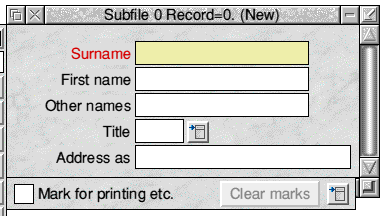
Fig.2
If you did add the Menu button the next thing to do is construct the menu itself. Click SELECT on the button and it will tell you what to do. Be sure to change the menu title to something other than 'UserMenu' or you'll always get a text window to edit when you click the button instead of an actual menu. Below the title enter 'Mr.', 'Mrs.', 'Miss', 'Dr.', 'Rev.' etc., one to a line, then save the file with the supplied name.
Now for the Composite field. When the pointer is over this field it changes to a large cross indicating that this is not an Editable field. (Remember the 'pocket calcualator' pointer over the Calculated field added to the !Marks database last time?) What we want in the Composite field is the Title, followed by a space, then the initial letter of the First name, followed by a full-stop plus a space, and finally the Surname. Click MENU over the Composite field and choose Formula from the Field submenu. The writable icon will show 'ADDR=' and the right-hand side of the formula should be completed exactly as in Fig.3:
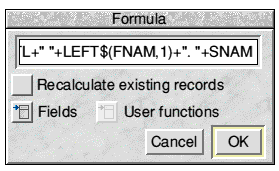
Fig.3 Entering the formula
The formula is quite a long one and isn't fully visible in the writable icon. The 'L' at far left is the final letter of TITL which comes immediately after the '='. The method used to strip the initial from FNAM will be familiar to anyone who has programmed in BASIC; the '1' after the comma means take the leftmost single letter of the field. The Fields menu button on the Formula window may be used to enter the field tags when the caret is at the appropriate place in the formula.
When you're sure the formula is correct click OK and you're ready to try it out. Notice how the contents of Address as change when you type Return after adding each piece of data. (If you type Return after entering the Title a new record will be displayed because Title is the last Editable field. To see the immediate effect of entering the Title type the up or down arrow instead of Return.)
If you change your mind about how you want to address people you can edit the formula. Access the Formula window again, delete everything up to the '=' and enter a new right-hand side as in Fig.4:
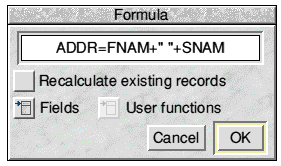
Fig.4 Altering the formula
When you enter new records the contents of Address as will be the First name followed by Surname with a single space between. But suppose we want to change all the existing records to this format? Nothing simpler! Go back to the Formula window, select the Recalculate existing records button and click OK. All the previously-entered records will be changed to the new format.
User functions in Composite fields
Using such a format raises another point: some people use a middle name as a regular form of address rather than their first given name. How can we accommodate this? It can be done by means of a User function. User functions are short program segments, written in BASIC and placed in a subdirectory UserFuncs inside the database. The actual writing of User functions is beyond the scope of this series but a number of useful ones, including the one required here, will be found on the CD in the zip file USERFUNCS. Proceed as follows:
- Close the !Names database.
- Shift-double-click on the !Names directory then open the UserFuncs subdirectory.
- Open the USERFUNCS zip file.
- Copy the BASIC file 'Name' into the database's UserFuncs subdirectory.
- Re-open the !Names database.
Open the formula window and again delete up to the '='. If you now click the User functions menu button you will see the name of the single installed user function displayed as in Fig.5:
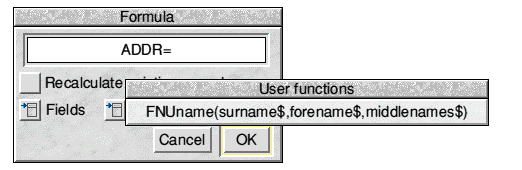
Fig.5 The User functions menu
This tells a BASIC programmer that the function FNUname takes three string variables as parmaeters. These are supplied by the Surname, First name and Other names fields respectively so what we actually need to put into the formula are the tags of these fields. When you choose the user function from the menu it is entered into the formula simply as 'FNUname()' and the caret is positioned between the parentheses. Enter SNAM,FNAM,MNAM (don't forget the commas!), select Recalculate existing records and click OK. Make sure the window looks as it does in Fig.6 before doing so:
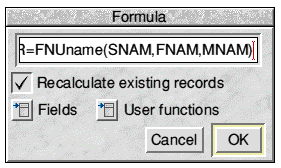
Fig.6 A formula using a User function
If you now browse through the records you will notice no difference in Address as from what was there already! Bring up a record in which at least one name has been entered in Other names. (If there is more than one they must be separated by a space.) To make Address as use a name from this field place an asterisk immediately after the required name. e.g. If John Smith's full name is John Philip Aloysius Smith and he prefers to be called Philip, introduce an asterisk immediately after Philip in the Other names field. When you type Return Address as will change to 'Philip Smith'. If you'd placed the asterisk after 'Aloysius' it would have become 'Aloysius Smith'. (Users with some knowledge of programming in BASIC might like to examine how this simple user function works by loading the file 'Name' into their editor.)
Using subsidiary indexes
The only index we've encountered up to now is the primary key index; the one that every database must have in order to function at all. Powerbase allows you to create subsidiary indexes to present the records in a different order. You can have up to 10 subsidiary indexes, which ought to be plenty for most users, but the number may be increased if you wish by editing the file !Powerbase=>Resources=>Config. This is a text file which sets up many choices which need altering only rarely. The relevant item is the second one, with the token 'Keys' followed by a space and the number 10. Substitute a larger number if necessary and re-save the file.
To create a subsidiary index click MENU over the field you want to index and choose Create index from the Field submenu. In order to be indexable a field must be some sort of text field but needn't be an Editable one. You can, for example, index the Address as field in the !Names database. The window which appears is the same as the one used to define the primary key (Fig.7):
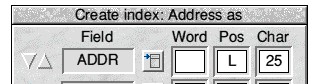
Fig.7 Indexing the Address as field
Note that the tag of the field over which you clicked MENU is already entered and the caret positioned in the Word icon. Pos contains 'L' (indicating that characters from the left-hand end of the chosen word will be used), and Chars contains the maximum length of the field which is probably far more than you want.
Assuming you have the name in the form given-name-plus-surname you might decide to take the first three letters of each to construct the key. To do so set up the window as in Fig.8:
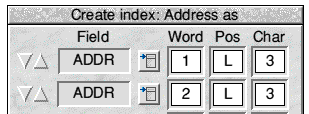
Fig.8 The new key structure entered
(Although you accessed this window by indicating that you wanted to index the Address as field there is nothing to stop you defining a composite key using up to four fields, just as you can for the primary key.) Click Create and, when the process concludes, you will see that the Address as descriptor is now blue instead of black. This indicates that there is a key based on this field but it isn't the currently-selected key. To change to the new key click the tool-pane button bearing the representation of a key. Address as changes to red, indicating that it is now the selected key, and Surname becomes blue. If you have two or more subsidiary keys defined the 'key' button will cycle through them and the primary key. ADJUST cycles through the keys in the opposite order to SELECT. Since there are only two keys here, using either mouse button simply alternates them.
With the new key selected you will find that browsing and reporting accesses the records in an order determined by this key instead of the primary key. To retrieve an individual record after clicking the ? button you must now enter the appropriate subsidiary key in the Search window (Fig.9):
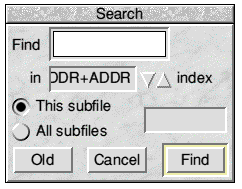
Fig.9 Searching on the new key
The name of the index containing these keys is 'ADDR+ADDR' because it is made up from two parts of the field whose tag is ADDR. Note, however, that bump icons are provided to allow you to search for a record using a key other than the selected one without actually changing the selected key.
The Index entry on the main menu leads to a submenu from which you can inspect the key-structure of the curent index, delete a subsidiary index (but not, of course, the primary key index!) and view the directory Indexes in which subsidiary indexes are stored. If you do delete an index it is removed from memory but not actually deleted from the disc. Instead the filename is prefixed with 'Del_' (and might also be truncated if your system can't use long filenames). You can revive a 'deleted' index by removing the prefix but you should only do so if no records have been added or deleted and no field on which the subsidary index is based has been altered.
Subsidiary indexes can, in some circumstances, speed up report-creation. This can be particularly noticeable in very large databases. The !Elements database in EXAMP will serve to demonstrate the principle, although it isn't nearly big enough to show the benefits.
- Create a subsidiary index on the Groupfield. It consists of only one 'word' so there's no need to enter anything under Word. Don't make the index case-specific.
- Don't make the new key the selected key: leave the primary key selected.
- Select Name (plus any other fields you care to include) for reporting.
- Make sure the Case specific button on the Match window is selected.
- Create a report using GP=T as a search formula. If you do this by clicking the Print button on the Match window with ADJUST the window will remain open and indicate how long the report took.
Note the displayed time in the Match window. Next,click Old to retrieve the same search formula, deselect the Case specific button on the Match window, and again click the Print button with ADJUST. The displayed time should be less. On my 233 MHz RiscPC, with the first six fields selected the times are, respectively, 0.59 and 0.38 seconds. You may have spotted two other differences:
- The report header in the first case says (as you'd expect) 'Ordered by: Primary key'. In the second case it says 'Ordered by: GP index', even though that wasn't the currently-selected index.
- The small square icon next to the writable icon in the Match window changed briefly to display the number '1' (the number of the GP index) when creating the second report.
What's going on here, and why did deselecting Case specific make a difference? When Powerbase is given a straightforward search formula of the type tag=target, i.e there is no 'OR' element involved; an 'all or nothing' match of field with target is demanded, it looks to see whether the field is indexed. If it is, all the keys which match the target will be together, one after the other, in the subsidiary index and Powerbase can go straight to the beginning of this group of keys, ignoring all others which come before or after. Relieved of the necessity of scanning the entire subfile for matching records, Powerbase will complete the report more quickly but can only use this method if the case of the keys in the index agrees with the one to be matched.
By default, keys in an index are non-case-specific. Whatever the case of the letters in the fields from which the key is constructed, they will be forced to uppercase in the key itself. This frees the user from the need to think about case when searching for a record by key: whatever you type in the Search window is also forced to uppercase before comparing with the keys in the index. You can make keys case-specific (at the time the index is created; not afterwards) but you would then need to type a key exactly matching the case of letters when retrieving a record. When generating reports, however, case is usually more important so the Case specific on the Match window is normally selected. To force Powerbase to use a subsidiary index when creating a report you must set the Case specific switch on the Match window to be the same as on the Key structure window; either both must be selected or both deselected. It would have been possible to write Powerbase so that the button on the Match window was automatically set to agree with a subsidiary index when Powerbase was about to use the latter, but I considered the disadvantages to outwiegh the advantages. I'm willing to reconsider the matter, though, in the light of feedback from users.
Even in the example just demonstrated, where the targeted records amount to 30 out of 103, there is a time difference. If you wanted a report targetting 30 records out of 10,000 there would be a very dramatic difference.
Before leaving the subject of subsidiary indexes there are a couple more points worth making:
- The primary key may not be null: at least one of the fields used in its construction must contain data. Subsidiary keys can, however, be null and it is often desirable to construct a subsidiary index on a field which is blank in a large number of records. Under these circumstances it may be be advisable to select the Omit null keys button before creating the index. Only those records which have data in at least one of the key fields will then be included in the index.
- It is often useful to create a subsidiary index for just one purpose then delete it afterwards. In the !Marks database which we constructed near the end of the previous article you could create subsidiary indexes on each of the three mark fields so that lists of students could be printed in rank-order for each subject. It would actually be superfluous in this instance because a report in primary key order could be sorted on each mark column in turn, printing it out each time, but you'll get the idea.
Attaching external files to database records
Textual and numeric data in 'ordinary' database fields is stored in a file called Database inside the database's application directory. (It's a plain text file so you may load it into your favourite editor and examine it.) There are other types of field which are linked to graphics or text files, by which we mean a separate graphics or text file for each record. Because they aren't part of the Database file such fields are called External. There are, however, two levels of 'externalness'! Fields of the following types have their individual graphics or text files stored in a special system of subdirectories inside the database directory: they're 'external' to the Database file, but they do reside within the 'package' which makes up the database:
- Text (Appears as a button on the record window with a small !Edit sprite)
- Sprite (Also appears as a button, but with a small !Paint sprite)
- Draw (Again, a button, but with a small !Draw sprite)
- Text block (The text, or part of it, is actually displayed in a large text icon)
- Picture (As above but the object is a sprite, actually displayed on the desktop)
Unzip the example database !Externals to see how this works. If you drop a text file onto the Text button the sprite on the button changes from an Edit to a text-file sprite. A similar thing happens when you drop a sprite file onto the Sprite button or a drawfile onto the Draw button. You will also find that these buttons will only accept the appropriate type of file: dropping sprite file onto a Text button has no effect. Once a file is linked to a button you can click the button to display the file in the appropriate editor (assuming the filer has 'seen' such an editor).
Dropping a text file onto the Text block icon displays the text, or as much of it as will fit. The limitations imposed by RISC OS on multi-line text icons mean that the lines are always centred and the text is not directly editable. Double-clicking over the icon will load the text into an editor and re-saving the text causes the Text block to update; there's no need to drop the updated file on the icon again. Picture fields behave in a similar way when sprites are dropped onto them but it is the user's responsibility to ensure that the icon is big enough to contain the sprite, otherwise it will overflow onto the rest of the window.
Where are these 'external' files actually stored? Shift-double-click on the !Externals directory and look inside. You will see a number of subdirectories with names like TBLKtext and TEXTtext. The first part of the name is the tag of the associated record field, the latter part tells us what type of file is stored. (NOTE: These directories won't be present until you have actually dropped an object on the button or rectangle concerned.) Look inside one of these directories and you will find a subdirectory called '0', inside which is another subdirectory called '0'! Inside the latter will be one or more Text, Sprite or Draw files called 'Rec0', 'Rec1' etc. indicating the record number with which the file is associated. This rather baffling directory structure arises from the 72-object directory limit on all versions of RISC OS prior to 4.02. When the bottom level directory gets full a new one called '1' is created in the level above. When that level becomes full of subdirectories one called '1' will be created immediately inside !Externals.TBLKtext or whatever.
Databases using External fields of the above types can become very large indeed - in actual disc size, not just in number of records. They do have the advantage that you know where everything is: their chief disadvantage is that, every time you drop a new file onto a field, you are making a copy of the original file. It would be nice if we could use a database to classify files (especially graphics files) without copying or moving them. We can do this with the final type of External field - Remote. Our last exercise this month will be to build a database which catalogues all the GIF files used as figures in this article.
We need only two fields: an Unrestricted field called something like 'Name' to act as the primary key field and hold an identifier for the picture, and a Remote field to which we will give the tag 'GIF'. Add a descriptor if you wish but it isn't really necessary. The record window of the empty database will look something like this:
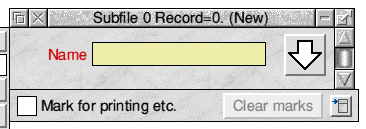
Fig.10 A blank record
Enter a brief description - 'Fig.1' will do - then drag the file 'fig1/gif' from the HTML.POWERBASE.IMAGES directory and drop it on the large button. The down-pointing arrow will change to a GIF sprite:
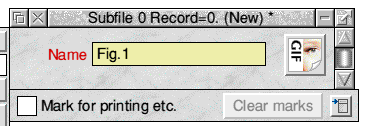
Fig.9 A completed record
Create new records for the other GIFs in the same way. Clicking on the button will display the linked file if the filer has seen an appplication capable of displaying GIFs. Everyone should have ChangeFSI which can do so. David Pilling's excellent ImgMaster will also display GIFs. Moreover, if you click the Remote button with Ctrl-ADJUST and then browse through the records you will find that each image is displayed automatically as you go from record to record. Another Ctrl-ADJUST click turns off the auto-display feature.
The files have not been moved or copied from their original location: all Powerbase is doing is storing the pathname of the file so that it can be found wherever it is on the disc. You can use this method to catalogue files in directories scattered all over your hard-disc, or over several hard-discs, and the files need not be of the same type. The button displays the appropriate sprite for the file type, e.g. a JPEG sprite for a JPEG file. Shift-ADJUST over the button displays the pathname of the linked file, but it might look rather odd because it is a relative pathname showing where the file is in relation to the database. You can select the button with ADJUST to include the pathnames in a report
Well, that's all for this time. The main subjects of the next article will be mail-merging with Impression and Ovation Pro, and how to use Powerbase's script language to automate common tasks.