


Pro CAD+
Robert Richards investigates one of the RISC OS CAD packages
ProCAD+ has had a long evolution, going all the way back to the 1970s. The CADet package, marketed by Minerva Software, was based on a cut down version of what became Pro CAD and was designed for schools. Since then its author David Snell has produced ProCAD, and then ProCAD Lite and ProCAD+. Recently, a Windows version has been completed, wProCAD+, with identical functionality to the RISC OS version. ProCAD Lite was a cut down version of ProCAD+ aimed at students and those who didn't require all of the more expensive packages features, its now been withdrawn. This review concerns ProCAD+, but I will briefly describe the differences between the packages during the course of the review.
Part of my problem with writing this review is the sheer size and scope of ProCAD+. Simply listing all of it's features would run into thousands of words - a description and appraisal of each one would result in a monstrous article. What I intend to do is highlight the best and worst aspects of ProCAD+ whilst conveying an impression of the massive potential it offers.
What you get
We'll start at the beginning and have a look at what you get for your money. ProCAD+ arrives in a large padded envelope, inside is a sturdy hard-backed plastic bound A5 ring binder and "Quick Start" booklet. The binder contains the main manual and an envelope containing the application disc - the licence agreement is printed on the outside of the envelope in a manner that many large software companies use. The Quick Start guide consists of a 20 page booklet printed in black and white bound with a glossy colour cover. The main manual runs to 186 pages contained in the ring binder - these are in full colour and printed on a high quality smooth paper. It's difficult to tell whether the pages have been produced on a colour laser machine or professionally printed. The application itself is contained on a single floppy disc with a nicely printed label. ProCAD+ deserves top marks for the physical quality of the documentation and presentation. It's particularly pleasing to see high quality documentation that rivals that of the biggest software houses on any platform, especially given the modern trend of not providing printed manuals. The ring binder can be opened to lie completely flat, and is hence infinitely more useful than an on-screen manual.
Getting Started
I decided to dive right in and follow the Quick Start manual for my first test drive of ProCAD+. The installation and loading instructions are as simple as they get - just drag from the disc to somewhere appropriate and double-click to load. This produces a view similar to figure 1.

Unlike many other draughting packages, this screen contains every single tool you will ever need. There is no need to load extra toolbars in order to get at certain features. This ensures that the maximum possible screen area is available for drawing The Message Bar is where ProCAD+ will prompt you to carry out certain actions. For example, when drawing a circle, it will prompt you to locate the centre-point etc. This is useful as there are lots of ways of drawing a circle in ProCAD+! A nice touch is that the Message Bar turns yellow when it is active, drawing your attention to the prompt without being too distracting. The Snap Bar, as the name suggests, controls everything to do with snaps. Snaps are selected by clicking on the appropriate icon which then becomes depressed. Multiple snaps can be set by adjust-clicking on further icons. I'll describe the operation of snaps in detail later. The Status Bar displays and controls access to layer settings, pen colours and widths, line styles and classes. The Tool Bar holds all of the drawing tools - they are accessed by clicking on them, and options set by adjust-clicking on the appropriate tool icon. Rulers are pretty self-explanatory! Overall, the display is very neat and well structured, a we shall see it's possible to get at everything quickly without having an undue amount of clutter on the screen when it's not needed. The remainder of the Quick Start booklet consists of some simple exercises. These take only a few minutes each, and each addresses a particular function of ProCAD+, zooming, snaps, symbols etc. It is an effective way of demonstrating the power of ProCAD+ as well as it's general operation. Overall, the Quick Start guide makes it very easy to begin using ProCAD+ within minutes. One very minor point is that the guide states that there should be two floppy discs when in fact there is only one.
Let's Draw!
OK, let's have a go at drawing something for real. I've chosen the gearbox cover shown below, which I've adapted from an AutoCAD tutorial book! It looks pretty nasty at first sight - how are we going to get the straight lines to join smoothly with the arcs? How do we determine the start and end points of the arcs and lines?
Well actually it's fairly easy to draw, and there are a number of ways of achieving the result. I'll only describe one method, but I'll point out the various options as we go along.
First things first - let's choose a paper size that's going to be big enough for our drawing. A2 seems good enough. Paper size is set using the Misc.Paper Size menu. I've left it at landscape orientation. I've switched the rulers off because I don't really need them for this exercise. I'm going to switch the grid snap on by clicking on it's icon in the Snap Bar, and make the grid visible using the Grid.Show menu or by pressing F1. OK, we're ready to start drawing.
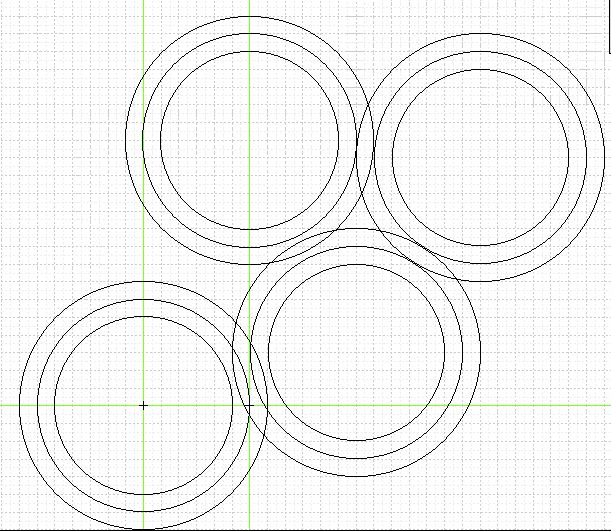
I'm going to start at the lower-left corner of the top-down view. If you've got experience of CAD, you'll know that complex shapes are achieved by drawing simpler shapes, then joining, cutting and deleting parts of them as appropriate. So the first thing to do is draw the circle that will eventually for the outer arc of the corner. There are five ways to draw a circle with ProCAD+, I'm going to specify a centre point and radius. I can either type the value into the dialogue box. or use the adjust button, control and shift keys to achieve the required value. Adjust increases by 1, shift-adjust decreases the value by one, ctrl-adjust doubles the value and shift-ctrl-adjust halves the value. This sounds cumbersome but is in fact a quick and easy way to enter the value. Dialogue boxes that can work in this way indicate themselves by adding a small red mark to the mouse pointer. See the pin icon in the bottom right of the dialogue box? If you click on it, the dialogue box becomes "pinned", and won't disappear when 'OK' is clicked. Useful if you have a series of circles to draw of different sizes. All of the dialogue boxes work in this manner. And one final point - the 'OK' button turns yellow when a change is made to remind you that the changes won't take effect until it's clicked - it's very easy to forget if you've got the box pinned! Phew! All that to describe one dialogue box - see I told you ProCAD+ was massive!
Anyway, I'll turn the grid snap on and draw the circle. With the snap on, a snap noise is made and the pointer snaps to a grid intersection when it gets near. The circle appears in blue, allowing positioning, until the mouse button is clicked and it is placed on the drawing. The circle tool remains selected and we can go on and draw more. Well first I'm going to reduce the diameter to 60mm, then 50 and finally 40. The final circle needs to be dotted, so I simply select it and click adjust on the line type selector in the status bar until I reach the desired line type. I could also have selected the line type before drawing the circle, or drawn all the circles, selected those that needed changing, nd then changing the line type. Now I'm going to select the point tool and using the centre snap place a point in the middle of the circle. If I now switch on vertical and horizontal construction lines (diagonal is also available), two green lines of infinite length appear, crossing at the centre of the circle. These lines do not get printed or plotted - they are merely aids for positioning other items. I've also used the quadrant snap to place construction lines at appropriate places on the circumference of the circle. I've drawn all the other circles in the same manner, so now we have something similar to figure 3.
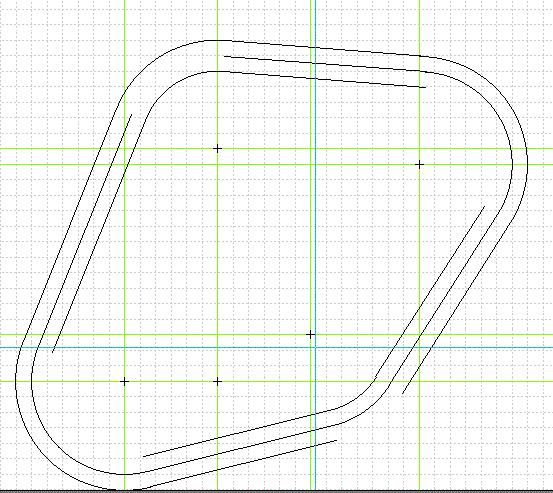
Now I need to draw the lines between the circle circumferences. How am I going to make sure that they join smoothly on the tangents? Well I could draw more construction lines manually and use the intersect snap to draw simple lines between them. A far quicker, easier and more accurate method is to use the Geometric tool and select Co-tangent.

I'm prompted to select the first arc, so I click on one of the circles in the general area where I think the line should end. Then I'm prompted to click on the second arc, again I click in the general area and a straight line is drawn that is a perfect tangent with both arcs. All the other straight lines are drawn in precisely the same manner. This part of the drawing has taken less than 30 seconds. Overall I've spent not a lot more than 5 minutes on this drawing so far. Now it's a matter of selecting all the straight lines, Pressing CTLR K to break the circles, selecting the redundant parts and pressing CTRL X to remove them.
Damn, I've accidentally removed some of the arcs that I wanted to keep. No matter, I'll draw them again. There are six ways of drawing and arc in ProCAD+ - the best for this job is to specify the centre and the start and end points (the radius being calculated automatically). Using the centre and end-point snaps the arcs are drawn very quickly. To ensure the right "side" of the arc is drawn, one must remember the CAD convention that angles are measured anti-clockwise. Use the demo version to see what happens if you specify the points in a clockwise direction. I can see which snap is active by looking at the snap toolbar when I hear the snap sound - the active snap icon is depressed.
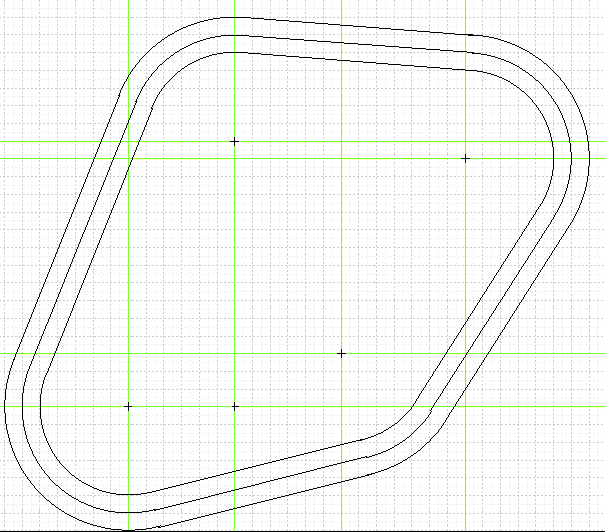
That's the top view finished! I can use my construction lines to quickly produce the side and end views. Overall, the completed drawing shown below took around 15 minutes - including dimensioning. Of course I could have done this in any number of ways - with ProCAD+ the only constraint is your own skill and imagination.
I'll look a bit more closely at some specific areas of ProCAD+ now to illustrate some more features. Rather than go through more examples, I'll let you experiment using the demo version provided. I think this will be far more useful than trying to convey the feel and useability of the package by describing more examples.
Snaps
Without a doubt one of the most important features of any CAD package is the ability to ensure that lines, arcs and boxes can be accurately placed relative one another. With ProCAD+, snaps are neatly dealt with using the snap toolbar - providing a consistent way to access and view the snap settings. Click on a snap icon to switch it on (a description appears in the status bar when the mouse pointer is over the icon). Note the indicator next to the pen colour indicator changes to show the selected snap. Multiple snaps can be selected by clicking adjust on further snap buttons. The indicator then shows ">1". When the cursor is snapped, the indicator changes to show which snap is active. If the indicator is clicked on, all the snaps are switched off, and it shows "Off". A further click will switch on your previous snap settings, another quick and easy feature to remember that saves time in use. The only issue I have with the snap system is that it can be distracting to have to look up at the snap indicator when drawing complex detail with multiple snaps on. Other packages will display an indicator near to the cross-hairs in these circumstances, and it would be nice if this was an option in ProCAD+.
Drawing tools
Equally important as an easy way to access snaps is an easy way to select drawing tools, and to change their options. All of the drawing tools are available on the left hand tool bar. Select clicking a tool activates it, Adjust click brings up its dialogue box. Only the point and select tools do not have dialogue boxes. There are many ways to draw everything with ProCAD+, and I haven't yet come across a situation in which I've felt limited by the package.
The number of options may appear at first sight to be confusing and unwieldy, but in fact most are self-explanatory and quickly learnt. There are no further dialogue boxes to confuse the issue. For example, all the ellipse options are controlled through the same dialogue box with control being greyed as appropriate. This also has the benefit that once the options are set, they are set (and quickly changed if the box is "pinned"). With many other packages you choose say, the circle tool, prompted for the centre, and prompted for the radius. Other tools may require you to enter many parameters at the command line, breaking up the flow of work Generally, thinking "I want to do that" means that there is a way to do that which is easily and quickly accessible. With other drawing packages the option is either not there, requiring a workaround or is tucked away in some obscure dialogue box. ProCAD+ doesn't fall into the trap of making what it thinks you will find useful easily accessible and making you hunt for anything else - everything is easily accessible through a common and simple interface.
File Management
ProCAD+ has it's own built-in file management window. Files can be saved by dragging the icon from any save dialogue box to the file manager, and they can be loaded by double-clicking on them in the usual manner. There is nothing to stop you using the ordinary filer system for these activities, but the file management window provides some specialist functions. If you select a filename in the first panel, it's details (drawing number, revision number etc) are displayed in the middle pane, and a small preview is displayed in the right hand pane. This is very useful where there is a large collection of drawings all with similar names, or for when you can't quite remember which is which! In addition, it provides a neat way to keep track of the history of a drawing. Clicking on the green directory icon displays the contents of your designated "drawings" directory. This can contain subdirectories as shown, and it is easy to navigate up and down directory trees. The white directory icon displays the contents of the "blanks" directory. Blanks are blank drawing sheets that have had formatting options set and symbol libraries embedded. For example, you could have a blank for schematics, and another for drawing process diagrams. Blanks can be roughly equated to the concept of a document template in DTP and word processing packages. Thus, this simple file management window provides a neat way to keep all of your drawings organised and easily previewed and retrieved.
The file management window also doubles as a symbol manager. By clicking on the "Symbols" check box the panes change function slightly. Now the first window displays a list of symbol sets, the second individual symbols in each set, and the third a preview of the selected symbol. Click on the question mark and you can search for a specific symbol. The green icon opens a "standard" symbol set (typically those provided with the application), whilst the white icon can be set to open a "custom" set. A large symbol library is provided with ProCAD+, which contains symbols that are most commonly used. It may not be visible on the screenshots, but most symbols have Points, which are picked up with the point snap. This is useful for positioning symbols to create for example, a nut and bolt assembly. Where appropriate, symbols will stretch - the shank symbols being a good example.
Layers
All good CAD applications have layer controls. A layer is simply a way of grouping entities - you can think of a layer as a sheet of clear plastic laid over the drawing. ProCAD+ allows one to define an unlimited number of layers, they can be defined as "visible", meaning that the entities they contain are visible, and selectable - they can also be selected. If you're familiar with other CAD packages, these define these states as frozen/unfrozen and off/on. The entities in a specific layer can be set to a specific colour making it easy to interpret a drawing when multiple layers are switched on. Again, ProCAD+ provides access to all of these options through a single dialogue box that is easily accessed at all times - simply menu click on the displayed layer name on the status bar.
I think that's probably enough description of general features. I really could write thousands of words and not cover anything like everything. I suggest you run the demo version contained on this months CD, and follow the tutorials included. This is the contents of the Quick Start guide, and is also available on David Snells' website. You'll get a much better impression of the flexibility and ease of use of ProCAD+ from that than you will from reams and reams of description.
Extra stuff
Also included on the application disc is "Plotter+" which can be used to drive a large number of plotters. It's operation is fully described in the ProCAD+ manual. I don't have a plotter so I've never used this and wouldn't be qualified to comment on its operation. But from a cursory glance it appears to be fairly comprehensive and. like ProCAD+ itself, simple to get to grips with.
If you're interested in generating programs for CNC machine tools, you may be interested in "ProCAM+", which is developed by HighPath Engineering. This is a commercial product, but a demo version is available from it's website. Limited NC data can be saved out directly from ProCAD+ itself.
Customization
This is another definite strength of ProCAD+ - it is extremely customizable, almost to the ridiculous. There is a large preferences window accessible from the icon bar icon. Here you can set the default directory, autosave options, dimensioning options, display options, printing options, don't like they yellow "OK" buttons - switch it off...
The list goes on. Furthermore, an entire chapter of the manual is dedicated to describing ways of customizing ProCAD+. You can change and set your own keyboard shortcuts. A "user menu" on the main application menu allows you to specify your own menu, which can contain up to 32 entries. The manual describes clearly and concisely how to set up and format the user menu to your liking. Colours, fonts, mouse behaviour, snap behaviour etc can all be customized. Don't like the way you have to delete the numbers from the co-ordinate icon in the status bar before manual entry?. Change the behaviour! With packages of any type, there are always aspect of the interface that don't quite work for some people. Usually they don't affect the operation, but can be irritating - and usually you're stuck with the way it is. With ProCAD+, chances are there's a way to make the thing behave just how you think it should.
Support and the Future
If you return your registration card, you are entitled to 90 days telephone, email and post support from David Snell. After that you may have to pay. However given that the package is so easy to use, you are unlikely to need to pay! There is a free users mailing list, in which David Snell participates and offers advice - the paid for support is really only if you require a lot of one to one help. As for the future. The good news is that ProCAD+ is still being developed, and there are fairly frequent updates, which are usually free of charge. Just after the new year someone asked on the mailing list if it would be possible to have a DWG (AutoCAD) file importer. There were umms and ahhs and mutterings of "...monster job...very complicated" but around a week - yes, one week - later a beta version was available for those willing to test it and provide feedback. Free upgrades are not promised with ProCAD+. However, given the current state of the package and the amount of work upgrades represent this seems reasonable.
Supported Filetypes
Below is a list of the main filetypes supported by ProCAD+:
- Native format Draw
- NTF (Ordnance Survey map format)
- DTM (Ordnance Survey contour format)
- GML (Ordnance Survey MasterMap format)
- DXF (Data eXchange Format)
- CSV (Comma Separated Value)
- IGES
- Sprite
- JPEG
- BMP bitmap
- Text
- DWG (Beta at present time. Import only).
Of course, files are transparently interchangeable between the RISC OS and Windows version of the package.
Conclusion.
ProCAD+ is a huge package that manages to present itself in a simple and intuitive manner. It allows what can be a difficult job to be done as quickly and easily as possible. ProCAD+ has features that other, more heavyweight and industry standard packages just don't possess. For example, the "copy along a line" feature with it's option of copy upright or at a specified angle cannot be found on any other package. ProCAD+ is not a 3-D modelling package - it's a draughting package, isometric views are possible, but there is no solid modelling aspect to the package. It's a draughting package. And it's a damn fine draughting package. ProCAD+ is definitely well worth the outlay, the professionals choice for CAD on RISC OS and more than able to stand up for itself with the best of the rest.
Pros
Easy to use Quick to learn Massive scope Lots of useful and unusual features Very good documentation Supporting applications available Good technical support.
Cons
Very minor issues with some aspects of the interface.
Product details
| Product: | PRO CAD+ |
| Supplier: | David Snell |
| Price: | £229.13 (Single User - inc VAT) |
| Address: | 35 Wrefords Close, Cowley Park, Exeter, Devon, EX4 5AY UK |
| WWW: | http://www.zynet.co.uk/dsnell |
Robert Richards